Videos mit der Transcoder API transcodieren

Auf dieser Seite erfahren Sie, wie Sie einen einfachen Job zur Videotranscodierung mit den Standardeinstellungen der Transcoder API und curl, Windows PowerShell oder den Clientbibliotheken erstellen.

Sie können diese Kurzanleitung auch direkt in der Google Cloud Konsole in einer der folgenden Programmiersprachen ausführen:

Hinweise

  1. Sign in to your Google Cloud account. If you're new to Google Cloud, create an account to evaluate how our products perform in real-world scenarios. New customers also get $300 in free credits to run, test, and deploy workloads.
  2. Install the Google Cloud CLI.

  3. Wenn Sie einen externen Identitätsanbieter (IdP) verwenden, müssen Sie sich zuerst mit Ihrer föderierten Identität in der gcloud CLI anmelden.

  4. Führen Sie folgenden Befehl aus, um die gcloud CLI zu initialisieren:

    gcloud init
  5. Create or select a Google Cloud project.

    • Create a Google Cloud project:

      gcloud projects create PROJECT_ID

      Replace PROJECT_ID with a name for the Google Cloud project you are creating.

    • Select the Google Cloud project that you created:

      gcloud config set project PROJECT_ID

      Replace PROJECT_ID with your Google Cloud project name.

  6. Verify that billing is enabled for your Google Cloud project.

  7. Enable the Transcoder API:

    gcloud services enable transcoder.googleapis.com
  8. Create local authentication credentials for your user account:

    gcloud auth application-default login

    If an authentication error is returned, and you are using an external identity provider (IdP), confirm that you have signed in to the gcloud CLI with your federated identity.

  9. Grant roles to your user account. Run the following command once for each of the following IAM roles: roles/transcoder.admin, roles/storage.admin

    gcloud projects add-iam-policy-binding PROJECT_ID --member="user:USER_IDENTIFIER" --role=ROLE

    Replace the following:

    • PROJECT_ID: your project ID.
    • USER_IDENTIFIER: the identifier for your user account—for example, myemail@example.com.
    • ROLE: the IAM role that you grant to your user account.
  10. Install the Google Cloud CLI.

  11. Wenn Sie einen externen Identitätsanbieter (IdP) verwenden, müssen Sie sich zuerst mit Ihrer föderierten Identität in der gcloud CLI anmelden.

  12. Führen Sie folgenden Befehl aus, um die gcloud CLI zu initialisieren:

    gcloud init
  13. Create or select a Google Cloud project.

    • Create a Google Cloud project:

      gcloud projects create PROJECT_ID

      Replace PROJECT_ID with a name for the Google Cloud project you are creating.

    • Select the Google Cloud project that you created:

      gcloud config set project PROJECT_ID

      Replace PROJECT_ID with your Google Cloud project name.

  14. Verify that billing is enabled for your Google Cloud project.

  15. Enable the Transcoder API:

    gcloud services enable transcoder.googleapis.com
  16. Create local authentication credentials for your user account:

    gcloud auth application-default login

    If an authentication error is returned, and you are using an external identity provider (IdP), confirm that you have signed in to the gcloud CLI with your federated identity.

  17. Grant roles to your user account. Run the following command once for each of the following IAM roles: roles/transcoder.admin, roles/storage.admin

    gcloud projects add-iam-policy-binding PROJECT_ID --member="user:USER_IDENTIFIER" --role=ROLE

    Replace the following:

    • PROJECT_ID: your project ID.
    • USER_IDENTIFIER: the identifier for your user account—for example, myemail@example.com.
    • ROLE: the IAM role that you grant to your user account.
  18. Cloud Storage-Bucket erstellen

    1. Create a Cloud Storage bucket and configure it as follows:
      • Set the storage class to S (Standard).
      • Legen Sie als Speicherort Folgendes fest: US (USA).
      • Ersetzen Sie BUCKET_NAME durch einen eindeutigen Bucket-Namen. Der Bucket-Name darf keine vertraulichen Informationen enthalten, da der Bucket-Namespace global und öffentlich sichtbar ist.
      • gcloud storage buckets create gs://BUCKET_NAME --default-storage-class STANDARD --location US
      • Klicken Sie auf Ordner erstellen und geben Sie einen Namen ein, um einen Ordner zu erstellen, in dem Sie die codierten Videoausgaben speichern möchten.

    Videos mit der Transcoder API transcodieren

    Für die folgenden Schritte benötigen Sie ein Video von einer Dauer von mindestens 5 Sekunden, das von Ihrem lokalen Rechner stammt (Beispielvideo). Siehe dazu die Liste der unterstützten Eingabe- und Ausgabeformate.

    Video in den Cloud Storage-Bucket hochladen

    1. Wechseln Sie in der Google Cloud Console zur Seite „Cloud Storage-Browser“.
      Zum Cloud Storage-Browser
    2. Klicken Sie auf den Namen Ihres Buckets, um ihn zu öffnen.
    3. Klicken Sie auf Dateien hochladen.
    4. Wähle eine Videodatei zum Hochladen von deinem lokalen Computer aus.

    Das Video ist jetzt im Cloud Storage-Bucket gespeichert.

    Transcodierungsjob erstellen

    Standardmäßig transcodiert die Transcoder API Videos mit der H.264-Codierung sowie der MP4-, HLS- und MPEG-DASH-Paketerstellung. Für jedes Eingabevideo werden Ausgabewiedergaben in hoher Auflösung (1.280 x 720 Pixel) und Standardauflösung (640 x 360 Pixel) bereitgestellt.

    Verwenden Sie zum Erstellen eines Jobs die Methode projects.locations.jobs.create. In den folgenden Codebeispielen wird ein einfacher Transcodierungsjob mit einer Voreinstellung erstellt.

    REST

    Ersetzen Sie diese Werte in den folgenden Anfragedaten:

    • PROJECT_ID: Ihre Google Cloud -Projekt-ID, die unter IAM-Einstellungen aufgeführt ist.
    • LOCATION: Der Standort, an dem der Job ausgeführt werden soll. Verwenden Sie eine der unterstützten Regionen.
      Standorte anzeigen
      • us-central1
      • us-west1
      • us-west2
      • us-east1
      • us-east4
      • southamerica-east1
      • northamerica-northeast1
      • asia-east1
      • asia-northeast1
      • asia-northeast3
      • asia-south1
      • asia-southeast1
      • australia-southeast1
      • europe-west1
      • europe-west2
      • europe-west4
      • me-west1
      • me-central1
      • me-central2
    • STORAGE_BUCKET_NAME: Der Name des Cloud Storage-Buckets, den Sie erstellt haben.
    • STORAGE_INPUT_VIDEO: Der Name des Videos in Ihrem Cloud Storage-Bucket, den Sie transcodieren, z. B. my-vid.mp4. In diesem Feld sollten alle Ordner berücksichtigt werden, die Sie im Bucket erstellt haben (z. B. input/my-vid.mp4).
    • STORAGE_OUTPUT_FOLDER: Der Name des Cloud Storage-Ordners, in dem die codierten Videoausgaben gespeichert werden sollen.

    Wenn Sie die Anfrage senden möchten, maximieren Sie eine der folgenden Optionen:

    In diesem speziellen REST-Beispiel wird mit dem optionalen Abfrageparameter fields nur der erstellte Ressourcenname in der Antwort angezeigt.

    {
      "name": "projects/PROJECT_NUMBER/locations/LOCATION/jobs/JOB_ID"
    }
    

    gcloud

    1. Ersetzen Sie im Befehl gcloud Folgendes:
      • STORAGE_BUCKET_NAME: Der Name des Cloud Storage-Bucket, den Sie erstellt haben.
      • STORAGE_INPUT_VIDEO: Der Name des Videos in Ihrem Cloud Storage-Bucket, das Sie transcodieren, z. B. my-vid.mp4. In diesem Feld sollten alle Ordner berücksichtigt werden, die Sie im Bucket erstellt haben (z. B. input/my-vid.mp4).
      • LOCATION: Der Standort, an dem der Job ausgeführt wird. Verwenden Sie eine der unterstützten Regionen.
        Standorte anzeigen
        • us-central1
        • us-west1
        • us-west2
        • us-east1
        • us-east4
        • southamerica-east1
        • northamerica-northeast1
        • asia-east1
        • asia-northeast1
        • asia-northeast3
        • asia-south1
        • asia-southeast1
        • australia-southeast1
        • europe-west1
        • europe-west2
        • europe-west4
        • me-west1
        • me-central1
        • me-central2
      • STORAGE_OUTPUT_FOLDER: Der Name des Cloud Storage-Ordners, in dem die codierten Videoausgaben gespeichert werden sollen.
    2. Führen Sie dazu diesen Befehl aus:
      gcloud transcoder jobs create \
        --input-uri="gs://STORAGE_BUCKET_NAME/STORAGE_INPUT_VIDEO" \
        --location=LOCATION \
        --output-uri="gs://STORAGE_BUCKET_NAME/STORAGE_OUTPUT_FOLDER/"
      Die Antwort sieht ungefähr so aus:
      {
        "config": {
         ...
        },
        "createTime": CREATE_TIME,
        "name": "projects/PROJECT_NUMBER/locations/LOCATION/jobs/JOB_ID",
        "state": "PENDING",
        "ttlAfterCompletionDays": 30
      }
      

    C#

    Folgen Sie der Einrichtungsanleitung für C# in der Transcoder API-Kurzanleitung: Clientbibliotheken verwenden, bevor Sie dieses Beispiel anwenden. Weitere Informationen finden Sie in der Referenzdokumentation zur Transcoder API für C#.

    Richten Sie die Standardanmeldedaten für Anwendungen ein, um sich bei der Transcoder API zu authentifizieren. Weitere Informationen finden Sie unter Authentifizierung für eine lokale Entwicklungsumgebung einrichten.

    
    using Google.Api.Gax.ResourceNames;
    using Google.Cloud.Video.Transcoder.V1;
    
    public class CreateJobFromPresetSample
    {
        public Job CreateJobFromPreset(
            string projectId, string location, string inputUri, string outputUri, string preset)
        {
            // Create the client.
            TranscoderServiceClient client = TranscoderServiceClient.Create();
    
            // Build the parent location name.
            LocationName parent = new LocationName(projectId, location);
    
            // Build the job.
            Job newJob = new Job
            {
                InputUri = inputUri,
                OutputUri = outputUri,
                TemplateId = preset
            };
    
            // Call the API.
            Job job = client.CreateJob(parent, newJob);
    
            // Return the result.
            return job;
        }
    }

    Go

    Folgen Sie der Einrichtungsanleitung für Go in der Transcoder API-Kurzanleitung: Clientbibliotheken verwenden, bevor Sie dieses Beispiel anwenden. Weitere Informationen finden Sie in der Referenzdokumentation zur Transcoder API für Go.

    Richten Sie die Standardanmeldedaten für Anwendungen ein, um sich bei der Transcoder API zu authentifizieren. Weitere Informationen finden Sie unter Authentifizierung für eine lokale Entwicklungsumgebung einrichten.

    import (
    	"context"
    	"fmt"
    	"io"
    
    	transcoder "cloud.google.com/go/video/transcoder/apiv1"
    	"cloud.google.com/go/video/transcoder/apiv1/transcoderpb"
    )
    
    // createJobFromPreset creates a job based on a given preset template. See
    // https://cloud.google.com/transcoder/docs/how-to/jobs#create_jobs_presets
    // for more information.
    func createJobFromPreset(w io.Writer, projectID string, location string, inputURI string, outputURI string) error {
    	// projectID := "my-project-id"
    	// location := "us-central1"
    	// inputURI := "gs://my-bucket/my-video-file"
    	// outputURI := "gs://my-bucket/my-output-folder/"
    	preset := "preset/web-hd"
    	ctx := context.Background()
    	client, err := transcoder.NewClient(ctx)
    	if err != nil {
    		return fmt.Errorf("NewClient: %w", err)
    	}
    	defer client.Close()
    
    	req := &transcoderpb.CreateJobRequest{
    		Parent: fmt.Sprintf("projects/%s/locations/%s", projectID, location),
    		Job: &transcoderpb.Job{
    			InputUri:  inputURI,
    			OutputUri: outputURI,
    			JobConfig: &transcoderpb.Job_TemplateId{
    				TemplateId: preset,
    			},
    		},
    	}
    	// Creates the job, Jobs take a variable amount of time to run.
    	// You can query for the job state.
    	response, err := client.CreateJob(ctx, req)
    	if err != nil {
    		return fmt.Errorf("createJobFromPreset: %w", err)
    	}
    
    	fmt.Fprintf(w, "Job: %v", response.GetName())
    	return nil
    }
    

    Java

    Folgen Sie der Einrichtungsanleitung für Java in der Transcoder API-Kurzanleitung: Clientbibliotheken verwenden, bevor Sie dieses Beispiel anwenden. Weitere Informationen finden Sie in der Referenzdokumentation zur Transcoder API für Java.

    Richten Sie die Standardanmeldedaten für Anwendungen ein, um sich bei der Transcoder API zu authentifizieren. Weitere Informationen finden Sie unter Authentifizierung für eine lokale Entwicklungsumgebung einrichten.

    
    import com.google.cloud.video.transcoder.v1.CreateJobRequest;
    import com.google.cloud.video.transcoder.v1.Job;
    import com.google.cloud.video.transcoder.v1.LocationName;
    import com.google.cloud.video.transcoder.v1.TranscoderServiceClient;
    import java.io.IOException;
    
    public class CreateJobFromPreset {
    
      public static void main(String[] args) throws Exception {
        // TODO(developer): Replace these variables before running the sample.
        String projectId = "my-project-id";
        String location = "us-central1";
        String inputUri = "gs://my-bucket/my-video-file";
        String outputUri = "gs://my-bucket/my-output-folder/";
        // See https://cloud.google.com/transcoder/docs/concepts/overview#job_template
        // for information on this preset.
        String preset = "preset/web-hd";
    
        createJobFromPreset(projectId, location, inputUri, outputUri, preset);
      }
    
      // Creates a job from a preset.
      public static void createJobFromPreset(
          String projectId, String location, String inputUri, String outputUri, String preset)
          throws IOException {
        // Initialize client that will be used to send requests. This client only needs to be created
        // once, and can be reused for multiple requests.
        try (TranscoderServiceClient transcoderServiceClient = TranscoderServiceClient.create()) {
    
          CreateJobRequest createJobRequest =
              CreateJobRequest.newBuilder()
                  .setJob(
                      Job.newBuilder()
                          .setInputUri(inputUri)
                          .setOutputUri(outputUri)
                          .setTemplateId(preset)
                          .build())
                  .setParent(LocationName.of(projectId, location).toString())
                  .build();
    
          // Send the job creation request and process the response.
          Job job = transcoderServiceClient.createJob(createJobRequest);
          System.out.println("Job: " + job.getName());
        }
      }
    }

    Node.js

    Folgen Sie der Einrichtungsanleitung für Node.js in der Transcoder API-Kurzanleitung: Clientbibliotheken verwenden, bevor Sie dieses Beispiel anwenden. Weitere Informationen finden Sie in der Referenzdokumentation zur Transcoder API für Node.js.

    Richten Sie die Standardanmeldedaten für Anwendungen ein, um sich bei der Transcoder API zu authentifizieren. Weitere Informationen finden Sie unter Authentifizierung für eine lokale Entwicklungsumgebung einrichten.

    /**
     * TODO(developer): Uncomment these variables before running the sample.
     */
    // projectId = 'my-project-id';
    // location = 'us-central1';
    // inputUri = 'gs://my-bucket/my-video-file';
    // outputUri = 'gs://my-bucket/my-output-folder/';
    // preset = 'preset/web-hd';
    
    // Imports the Transcoder library
    const {TranscoderServiceClient} =
      require('@google-cloud/video-transcoder').v1;
    
    // Instantiates a client
    const transcoderServiceClient = new TranscoderServiceClient();
    
    async function createJobFromPreset() {
      // Construct request
      const request = {
        parent: transcoderServiceClient.locationPath(projectId, location),
        job: {
          inputUri: inputUri,
          outputUri: outputUri,
          templateId: preset,
        },
      };
    
      // Run request
      const [response] = await transcoderServiceClient.createJob(request);
      console.log(`Job: ${response.name}`);
    }
    
    createJobFromPreset();

    PHP

    Folgen Sie der Einrichtungsanleitung für PHP in der Transcoder API-Kurzanleitung: Clientbibliotheken verwenden, bevor Sie dieses Beispiel anwenden. Weitere Informationen finden Sie in der Referenzdokumentation zur Transcoder API für PHP.

    Richten Sie die Standardanmeldedaten für Anwendungen ein, um sich bei der Transcoder API zu authentifizieren. Weitere Informationen finden Sie unter Authentifizierung für eine lokale Entwicklungsumgebung einrichten.

    use Google\Cloud\Video\Transcoder\V1\Client\TranscoderServiceClient;
    use Google\Cloud\Video\Transcoder\V1\CreateJobRequest;
    use Google\Cloud\Video\Transcoder\V1\Job;
    
    /**
     * Creates a job based on a job preset.
     *
     * @param string $projectId The ID of your Google Cloud Platform project.
     * @param string $location The location of the job.
     * @param string $inputUri Uri of the video in the Cloud Storage bucket.
     * @param string $outputUri Uri of the video output folder in the Cloud Storage bucket.
     * @param string $preset The preset template (for example, "preset/web-hd").
     */
    function create_job_from_preset($projectId, $location, $inputUri, $outputUri, $preset)
    {
        // Instantiate a client.
        $transcoderServiceClient = new TranscoderServiceClient();
    
        $formattedParent = $transcoderServiceClient->locationName($projectId, $location);
        $job = new Job();
        $job->setInputUri($inputUri);
        $job->setOutputUri($outputUri);
        $job->setTemplateId($preset);
        $request = (new CreateJobRequest())
            ->setParent($formattedParent)
            ->setJob($job);
    
        $response = $transcoderServiceClient->createJob($request);
    
        // Print job name.
        printf('Job: %s' . PHP_EOL, $response->getName());
    }

    Python

    Folgen Sie der Einrichtungsanleitung für Python in der Transcoder API-Kurzanleitung: Clientbibliotheken verwenden, bevor Sie dieses Beispiel anwenden. Weitere Informationen finden Sie in der Referenzdokumentation zur Transcoder API für Python.

    Richten Sie die Standardanmeldedaten für Anwendungen ein, um sich bei der Transcoder API zu authentifizieren. Weitere Informationen finden Sie unter Authentifizierung für eine lokale Entwicklungsumgebung einrichten.

    
    import argparse
    
    from google.cloud.video import transcoder_v1
    from google.cloud.video.transcoder_v1.services.transcoder_service import (
        TranscoderServiceClient,
    )
    
    
    def create_job_from_preset(
        project_id: str,
        location: str,
        input_uri: str,
        output_uri: str,
        preset: str,
    ) -> transcoder_v1.types.resources.Job:
        """Creates a job based on a job preset.
    
        Args:
            project_id: The GCP project ID.
            location: The location to start the job in.
            input_uri: Uri of the video in the Cloud Storage bucket.
            output_uri: Uri of the video output folder in the Cloud Storage bucket.
            preset: The preset template (for example, 'preset/web-hd').
    
        Returns:
            The job resource.
        """
    
        client = TranscoderServiceClient()
    
        parent = f"projects/{project_id}/locations/{location}"
        job = transcoder_v1.types.Job()
        job.input_uri = input_uri
        job.output_uri = output_uri
        job.template_id = preset
    
        response = client.create_job(parent=parent, job=job)
        print(f"Job: {response.name}")
        return response


    Ruby

    Folgen Sie der Einrichtungsanleitung für Ruby in der Transcoder API-Kurzanleitung: Clientbibliotheken verwenden, bevor Sie dieses Beispiel anwenden. Weitere Informationen finden Sie in der Referenzdokumentation zur Transcoder API für Ruby.

    Richten Sie die Standardanmeldedaten für Anwendungen ein, um sich bei der Transcoder API zu authentifizieren. Weitere Informationen finden Sie unter Authentifizierung für eine lokale Entwicklungsumgebung einrichten.

    # project_id  = "YOUR-GOOGLE-CLOUD-PROJECT"  # (e.g. "my-project")
    # location    = "YOUR-JOB-LOCATION"  # (e.g. "us-central1")
    # input_uri   = "YOUR-GCS-INPUT-VIDEO"  # (e.g. "gs://my-bucket/my-video-file")
    # output_uri  = "YOUR-GCS-OUTPUT-FOLDER/"  # (e.g. "gs://my-bucket/my-output-folder/")
    # preset      = "YOUR-JOB-PRESET"  # (e.g. "preset/web-hd")
    
    # Require the Transcoder client library.
    require "google/cloud/video/transcoder"
    
    # Create a Transcoder client.
    client = Google::Cloud::Video::Transcoder.transcoder_service
    
    # Build the resource name of the parent.
    parent = client.location_path project: project_id, location: location
    
    # Set the job fields.
    new_job = {
      input_uri: input_uri,
      output_uri: output_uri,
      template_id: preset
    }
    
    job = client.create_job parent: parent, job: new_job
    
    # Print the job name.
    puts "Job: #{job.name}"

    Kopieren Sie den zurückgegebenen JOB_ID. Sie benötigen ihn, um den Status des Jobs abzurufen.

    Status Ihres Transcodierungsjobs überprüfen

    Verwenden Sie die Methode projects.locations.jobs.get, um den Status eines Jobs zu prüfen. Die folgenden Codebeispiele rufen die Jobdetails ab und zeigen dann den Jobstatus an.

    REST

    Ersetzen Sie diese Werte in den folgenden Anfragedaten:

  19. JOB_ID: Die ID des von Ihnen erstellten Jobs.
  20. PROJECT_ID: Ihre Google Cloud -Projekt-ID
  21. LOCATION: Der Standort Ihres Jobs. Verwenden Sie eine der unterstützten Regionen.
    Standorte anzeigen
    • us-central1
    • us-west1
    • us-west2
    • us-east1
    • us-east4
    • southamerica-east1
    • northamerica-northeast1
    • asia-east1
    • asia-northeast1
    • asia-northeast3
    • asia-south1
    • asia-southeast1
    • australia-southeast1
    • europe-west1
    • europe-west2
    • europe-west4
    • me-west1
    • me-central1
    • me-central2
  22. Wenn Sie die Anfrage senden möchten, maximieren Sie eine der folgenden Optionen:

    Sie sollten eine JSON-Antwort ähnlich wie diese erhalten:

    {
      "name": "projects/PROJECT_NUMBER/locations/LOCATION/jobs/JOB_ID",
      "config": {
        "inputs": [
          {
            "key": "input0",
            "uri": "gs://STORAGE_BUCKET_NAME/STORAGE_INPUT_VIDEO"
          }
        ],
        "editList": [
          {
            "key": "atom0",
            "inputs": [
              "input0"
            ],
            "startTimeOffset": "0s"
          }
        ],
        "elementaryStreams": [
          {
            "videoStream": {
              "h264": {
                "widthPixels": 640,
                "heightPixels": 360,
                "frameRate": 30,
                "bitrateBps": 550000,
                "pixelFormat": "yuv420p",
                "rateControlMode": "vbr",
                "crfLevel": 21,
                "gopDuration": "3s",
                "vbvSizeBits": 550000,
                "vbvFullnessBits": 495000,
                "entropyCoder": "cabac",
                "bFrameCount": 3,
                "aqStrength": 1,
                "profile": "high",
                "preset": "veryfast"
              }
            },
            "key": "video-stream0"
          },
          {
            "videoStream": {
              "h264": {
                "widthPixels": 1280,
                "heightPixels": 720,
                "frameRate": 30,
                "bitrateBps": 2500000,
                "pixelFormat": "yuv420p",
                "rateControlMode": "vbr",
                "crfLevel": 21,
                "gopDuration": "3s",
                "vbvSizeBits": 2500000,
                "vbvFullnessBits": 2250000,
                "entropyCoder": "cabac",
                "bFrameCount": 3,
                "aqStrength": 1,
                "profile": "high",
                "preset": "veryfast"
              }
            },
            "key": "video-stream1"
          },
          {
            "audioStream": {
              "codec": "aac",
              "bitrateBps": 64000,
              "channelCount": 2,
              "channelLayout": [
                "fl",
                "fr"
              ],
              "sampleRateHertz": 48000
            },
            "key": "audio-stream0"
          }
        ],
        "muxStreams": [
          {
            "key": "sd",
            "fileName": "sd.mp4",
            "container": "mp4",
            "elementaryStreams": [
              "video-stream0",
              "audio-stream0"
            ]
          },
          {
            "key": "hd",
            "fileName": "hd.mp4",
            "container": "mp4",
            "elementaryStreams": [
              "video-stream1",
              "audio-stream0"
            ]
          },
          {
            "key": "media-sd",
            "fileName": "media-sd.ts",
            "container": "ts",
            "elementaryStreams": [
              "video-stream0",
              "audio-stream0"
            ]
          },
          {
            "key": "media-hd",
            "fileName": "media-hd.ts",
            "container": "ts",
            "elementaryStreams": [
              "video-stream1",
              "audio-stream0"
            ]
          },
          {
            "key": "video-only-sd",
            "fileName": "video-only-sd.m4s",
            "container": "fmp4",
            "elementaryStreams": [
              "video-stream0"
            ]
          },
          {
            "key": "video-only-hd",
            "fileName": "video-only-hd.m4s",
            "container": "fmp4",
            "elementaryStreams": [
              "video-stream1"
            ]
          },
          {
            "key": "audio-only",
            "fileName": "audio-only.m4s",
            "container": "fmp4",
            "elementaryStreams": [
              "audio-stream0"
            ]
          }
        ],
        "manifests": [
          {
            "fileName": "manifest.m3u8",
            "type": "HLS",
            "muxStreams": [
              "media-sd",
              "media-hd"
            ]
          },
          {
            "fileName": "manifest.mpd",
            "type": "DASH",
            "muxStreams": [
              "video-only-sd",
              "video-only-hd",
              "audio-only"
            ]
          }
        ],
        "output": {
          "uri": "gs://STORAGE_BUCKET_NAME/STORAGE_OUTPUT_FOLDER/"
        }
      },
      "state": "PENDING",
      "createTime": CREATE_TIME,
      "ttlAfterCompletionDays": 30
    }
    

    gcloud

    1. Ersetzen Sie im Befehl gcloud Folgendes:
      • JOB_ID: Die ID des von Ihnen erstellten Jobs.
      • LOCATION: Der Standort Ihres Jobs. Verwenden Sie eine der unterstützten Regionen.
        Standorte anzeigen
        • us-central1
        • us-west1
        • us-west2
        • us-east1
        • us-east4
        • southamerica-east1
        • northamerica-northeast1
        • asia-east1
        • asia-northeast1
        • asia-northeast3
        • asia-south1
        • asia-southeast1
        • australia-southeast1
        • europe-west1
        • europe-west2
        • europe-west4
        • me-west1
        • me-central1
        • me-central2
    2. Führen Sie dazu diesen Befehl aus:
      gcloud transcoder jobs describe JOB_ID --location=LOCATION
      Die Antwort sieht ungefähr so aus:
      {
        "name": "projects/PROJECT_NUMBER/locations/LOCATION/jobs/JOB_ID",
        "config": {
          "inputs": [
            {
              "key": "input0",
              "uri": "gs://STORAGE_BUCKET_NAME/STORAGE_INPUT_VIDEO"
            }
          ],
          "editList": [
            {
              "key": "atom0",
              "inputs": [
                "input0"
              ],
              "startTimeOffset": "0s"
            }
          ],
          "elementaryStreams": [
            {
              "videoStream": {
                "h264": {
                  "widthPixels": 640,
                  "heightPixels": 360,
                  "frameRate": 30,
                  "bitrateBps": 550000,
                  "pixelFormat": "yuv420p",
                  "rateControlMode": "vbr",
                  "crfLevel": 21,
                  "gopDuration": "3s",
                  "vbvSizeBits": 550000,
                  "vbvFullnessBits": 495000,
                  "entropyCoder": "cabac",
                  "bFrameCount": 3,
                  "aqStrength": 1,
                  "profile": "high",
                  "preset": "veryfast"
                }
              },
              "key": "video-stream0"
            },
            {
              "videoStream": {
                "h264": {
                  "widthPixels": 1280,
                  "heightPixels": 720,
                  "frameRate": 30,
                  "bitrateBps": 2500000,
                  "pixelFormat": "yuv420p",
                  "rateControlMode": "vbr",
                  "crfLevel": 21,
                  "gopDuration": "3s",
                  "vbvSizeBits": 2500000,
                  "vbvFullnessBits": 2250000,
                  "entropyCoder": "cabac",
                  "bFrameCount": 3,
                  "aqStrength": 1,
                  "profile": "high",
                  "preset": "veryfast"
                }
              },
              "key": "video-stream1"
            },
            {
              "audioStream": {
                "codec": "aac",
                "bitrateBps": 64000,
                "channelCount": 2,
                "channelLayout": [
                  "fl",
                  "fr"
                ],
                "sampleRateHertz": 48000
              },
              "key": "audio-stream0"
            }
          ],
          "muxStreams": [
            {
              "key": "sd",
              "fileName": "sd.mp4",
              "container": "mp4",
              "elementaryStreams": [
                "video-stream0",
                "audio-stream0"
              ]
            },
            {
              "key": "hd",
              "fileName": "hd.mp4",
              "container": "mp4",
              "elementaryStreams": [
                "video-stream1",
                "audio-stream0"
              ]
            },
            {
              "key": "media-sd",
              "fileName": "media-sd.ts",
              "container": "ts",
              "elementaryStreams": [
                "video-stream0",
                "audio-stream0"
              ]
            },
            {
              "key": "media-hd",
              "fileName": "media-hd.ts",
              "container": "ts",
              "elementaryStreams": [
                "video-stream1",
                "audio-stream0"
              ]
            },
            {
              "key": "video-only-sd",
              "fileName": "video-only-sd.m4s",
              "container": "fmp4",
              "elementaryStreams": [
                "video-stream0"
              ]
            },
            {
              "key": "video-only-hd",
              "fileName": "video-only-hd.m4s",
              "container": "fmp4",
              "elementaryStreams": [
                "video-stream1"
              ]
            },
            {
              "key": "audio-only",
              "fileName": "audio-only.m4s",
              "container": "fmp4",
              "elementaryStreams": [
                "audio-stream0"
              ]
            }
          ],
          "manifests": [
            {
              "fileName": "manifest.m3u8",
              "type": "HLS",
              "muxStreams": [
                "media-sd",
                "media-hd"
              ]
            },
            {
              "fileName": "manifest.mpd",
              "type": "DASH",
              "muxStreams": [
                "video-only-sd",
                "video-only-hd",
                "audio-only"
              ]
            }
          ],
          "output": {
            "uri": "gs://STORAGE_BUCKET_NAME/STORAGE_OUTPUT_FOLDER/"
          }
        },
        "state": "PENDING",
        "createTime": CREATE_TIME,
        "ttlAfterCompletionDays": 30
      }
      

    C#

    Folgen Sie der Einrichtungsanleitung für C# in der Transcoder API-Kurzanleitung: Clientbibliotheken verwenden, bevor Sie dieses Beispiel anwenden. Weitere Informationen finden Sie in der Referenzdokumentation zur Transcoder API für C#.

    Richten Sie die Standardanmeldedaten für Anwendungen ein, um sich bei der Transcoder API zu authentifizieren. Weitere Informationen finden Sie unter Authentifizierung für eine lokale Entwicklungsumgebung einrichten.

    
    using Google.Cloud.Video.Transcoder.V1;
    
    public class GetJobStateSample
    {
        public Job.Types.ProcessingState GetJobState(string projectId, string location, string jobId)
        {
            // Create the client.
            TranscoderServiceClient client = TranscoderServiceClient.Create();
    
            // Build the job name.
            JobName jobName = JobName.FromProjectLocationJob(projectId, location, jobId);
    
            // Call the API.
            Job job = client.GetJob(jobName);
    
            // Return the result.
            return job.State;
        }
    }

    Go

    Folgen Sie der Einrichtungsanleitung für Go in der Transcoder API-Kurzanleitung: Clientbibliotheken verwenden, bevor Sie dieses Beispiel anwenden. Weitere Informationen finden Sie in der Referenzdokumentation zur Transcoder API für Go.

    Richten Sie die Standardanmeldedaten für Anwendungen ein, um sich bei der Transcoder API zu authentifizieren. Weitere Informationen finden Sie unter Authentifizierung für eine lokale Entwicklungsumgebung einrichten.

    import (
    	"context"
    	"fmt"
    	"io"
    
    	transcoder "cloud.google.com/go/video/transcoder/apiv1"
    	"cloud.google.com/go/video/transcoder/apiv1/transcoderpb"
    )
    
    // getJobState gets the state for a previously-created job. See
    // https://cloud.google.com/transcoder/docs/how-to/jobs#check_job_status for
    // more information.
    func getJobState(w io.Writer, projectID string, location string, jobID string) error {
    	// projectID := "my-project-id"
    	// location := "us-central1"
    	// jobID := "my-job-id"
    	ctx := context.Background()
    	client, err := transcoder.NewClient(ctx)
    	if err != nil {
    		return fmt.Errorf("NewClient: %w", err)
    	}
    	defer client.Close()
    
    	req := &transcoderpb.GetJobRequest{
    		Name: fmt.Sprintf("projects/%s/locations/%s/jobs/%s", projectID, location, jobID),
    	}
    
    	response, err := client.GetJob(ctx, req)
    	if err != nil {
    		return fmt.Errorf("GetJob: %w", err)
    	}
    	fmt.Fprintf(w, "Job state: %v\n----\nJob failure reason:%v\n", response.State, response.Error)
    	return nil
    }
    

    Java

    Folgen Sie der Einrichtungsanleitung für Java in der Transcoder API-Kurzanleitung: Clientbibliotheken verwenden, bevor Sie dieses Beispiel anwenden. Weitere Informationen finden Sie in der Referenzdokumentation zur Transcoder API für Java.

    Richten Sie die Standardanmeldedaten für Anwendungen ein, um sich bei der Transcoder API zu authentifizieren. Weitere Informationen finden Sie unter Authentifizierung für eine lokale Entwicklungsumgebung einrichten.

    
    import com.google.cloud.video.transcoder.v1.GetJobRequest;
    import com.google.cloud.video.transcoder.v1.Job;
    import com.google.cloud.video.transcoder.v1.JobName;
    import com.google.cloud.video.transcoder.v1.TranscoderServiceClient;
    import java.io.IOException;
    
    public class GetJobState {
    
      public static void main(String[] args) throws Exception {
        // TODO(developer): Replace these variables before running the sample.
        String projectId = "my-project-id";
        String location = "us-central1";
        String jobId = "my-job-id";
    
        getJobState(projectId, location, jobId);
      }
    
      // Gets the state of a job.
      public static void getJobState(String projectId, String location, String jobId)
          throws IOException {
        // Initialize client that will be used to send requests. This client only needs to be created
        // once, and can be reused for multiple requests.
        try (TranscoderServiceClient transcoderServiceClient = TranscoderServiceClient.create()) {
          JobName jobName =
              JobName.newBuilder().setProject(projectId).setLocation(location).setJob(jobId).build();
          GetJobRequest getJobRequest = GetJobRequest.newBuilder().setName(jobName.toString()).build();
    
          // Send the get job request and process the response.
          Job job = transcoderServiceClient.getJob(getJobRequest);
          System.out.println("Job state: " + job.getState());
        }
      }
    }

    Node.js

    Folgen Sie der Einrichtungsanleitung für Node.js in der Transcoder API-Kurzanleitung: Clientbibliotheken verwenden, bevor Sie dieses Beispiel anwenden. Weitere Informationen finden Sie in der Referenzdokumentation zur Transcoder API für Node.js.

    Richten Sie die Standardanmeldedaten für Anwendungen ein, um sich bei der Transcoder API zu authentifizieren. Weitere Informationen finden Sie unter Authentifizierung für eine lokale Entwicklungsumgebung einrichten.

    /**
     * TODO(developer): Uncomment these variables before running the sample.
     */
    // projectId = 'my-project-id';
    // location = 'us-central1';
    // jobId = 'my-job-id';
    
    // Imports the Transcoder library
    const {TranscoderServiceClient} =
      require('@google-cloud/video-transcoder').v1;
    
    // Instantiates a client
    const transcoderServiceClient = new TranscoderServiceClient();
    
    async function getJob() {
      // Construct request
      const request = {
        name: transcoderServiceClient.jobPath(projectId, location, jobId),
      };
      const [response] = await transcoderServiceClient.getJob(request);
      console.log(`Job state: ${response.state}`);
    }
    
    getJob();

    PHP

    Folgen Sie der Einrichtungsanleitung für PHP in der Transcoder API-Kurzanleitung: Clientbibliotheken verwenden, bevor Sie dieses Beispiel anwenden. Weitere Informationen finden Sie in der Referenzdokumentation zur Transcoder API für PHP.

    Richten Sie die Standardanmeldedaten für Anwendungen ein, um sich bei der Transcoder API zu authentifizieren. Weitere Informationen finden Sie unter Authentifizierung für eine lokale Entwicklungsumgebung einrichten.

    use Google\Cloud\Video\Transcoder\V1\Client\TranscoderServiceClient;
    use Google\Cloud\Video\Transcoder\V1\GetJobRequest;
    use Google\Cloud\Video\Transcoder\V1\Job;
    
    /**
     * Gets a Transcoder job's state.
     *
     * @param string $projectId The ID of your Google Cloud Platform project.
     * @param string $location The location of the job.
     * @param string $jobId The job ID.
     */
    function get_job_state($projectId, $location, $jobId)
    {
        // Instantiate a client.
        $transcoderServiceClient = new TranscoderServiceClient();
    
        $formattedName = $transcoderServiceClient->jobName($projectId, $location, $jobId);
        $request = (new GetJobRequest())
            ->setName($formattedName);
        $job = $transcoderServiceClient->getJob($request);
    
        // Print job state.
        printf('Job state: %s' . PHP_EOL, Job\ProcessingState::name($job->getState()));
    }

    Python

    Folgen Sie der Einrichtungsanleitung für Python in der Transcoder API-Kurzanleitung: Clientbibliotheken verwenden, bevor Sie dieses Beispiel anwenden. Weitere Informationen finden Sie in der Referenzdokumentation zur Transcoder API für Python.

    Richten Sie die Standardanmeldedaten für Anwendungen ein, um sich bei der Transcoder API zu authentifizieren. Weitere Informationen finden Sie unter Authentifizierung für eine lokale Entwicklungsumgebung einrichten.

    
    import argparse
    
    from google.cloud.video import transcoder_v1
    from google.cloud.video.transcoder_v1.services.transcoder_service import (
        TranscoderServiceClient,
    )
    
    
    def get_job_state(
        project_id: str,
        location: str,
        job_id: str,
    ) -> transcoder_v1.types.resources.Job:
        """Gets a job's state.
    
        Args:
            project_id: The GCP project ID.
            location: The location this job is in.
            job_id: The job ID.
    
        Returns:
            The job resource.
        """
    
        client = TranscoderServiceClient()
    
        name = f"projects/{project_id}/locations/{location}/jobs/{job_id}"
        response = client.get_job(name=name)
    
        print(f"Job state: {str(response.state.name)}")
        return response


    Ruby

    Folgen Sie der Einrichtungsanleitung für Ruby in der Transcoder API-Kurzanleitung: Clientbibliotheken verwenden, bevor Sie dieses Beispiel anwenden. Weitere Informationen finden Sie in der Referenzdokumentation zur Transcoder API für Ruby.

    Richten Sie die Standardanmeldedaten für Anwendungen ein, um sich bei der Transcoder API zu authentifizieren. Weitere Informationen finden Sie unter Authentifizierung für eine lokale Entwicklungsumgebung einrichten.

    # project_id = "YOUR-GOOGLE-CLOUD-PROJECT"  # (e.g. "my-project")
    # location   = "YOUR-JOB-LOCATION"  # (e.g. "us-central1")
    # job_id     = "YOUR-JOB-ID"  # (e.g. "c82c295b-3f5a-47df-8562-938a89d40fd0")
    
    # Require the Transcoder client library.
    require "google/cloud/video/transcoder"
    
    # Create a Transcoder client.
    client = Google::Cloud::Video::Transcoder.transcoder_service
    
    # Build the resource name of the job.
    name = client.job_path project: project_id, location: location, job: job_id
    
    # Get the job.
    job = client.get_job name: name
    
    # Print the job state.
    puts "Job state: #{job.state}"

    Wenn state den Wert SUCCEEDED hat, ist der Job abgeschlossen und die Videoausgaben sind jetzt in der Liste der codierten Dateien Ihres Cloud Storage-Buckets verfügbar.

    Spielen Sie Ihr Video ab.

    Führen Sie die folgenden Schritte aus, um die generierte Mediadatei in Shaka Player abzuspielen:

    1. Machen Sie den von Ihnen erstellten Cloud Storage-Bucket öffentlich.
    2. So aktivieren Sie Cross-Origin Resource Sharing (CORS) für einen Cloud Storage-Bucket:
      1. Erstellen Sie eine JSON-Datei, die Folgendes enthält:
        [
          {
            "origin": ["https://shaka-player-demo.appspot.com/"],
            "responseHeader": ["Content-Type", "Range"],
            "method": ["GET", "HEAD"],
            "maxAgeSeconds": 3600
          }
        ]
      2. Führen Sie den folgenden Befehl aus, nachdem Sie JSON_FILE_NAME durch den Namen der im vorherigen Schritt erstellten JSON-Datei ersetzt haben:
        gcloud storage buckets update gs://STORAGE_BUCKET_NAME --cors-file=JSON_FILE_NAME.json
    3. Wählen Sie eine der MP4- oder Manifestdateien aus, die vom Transcodierungsjob im Cloud Storage-Bucket generiert wurden. Klicken Sie in der Spalte Öffentlicher Zugriff der Datei auf URL kopieren.
    4. Rufen Sie Shaka Player, ein Online-Livestream-Player, auf.
    5. Klicken Sie in der Navigationsleiste oben auf Benutzerdefinierte Inhalte.
    6. Klicken Sie auf die Schaltfläche +.
    7. Fügen Sie die öffentliche URL der Datei in das Feld URL manifestieren ein.

      Geben Sie die URL der Datei in Shaka Player ein.

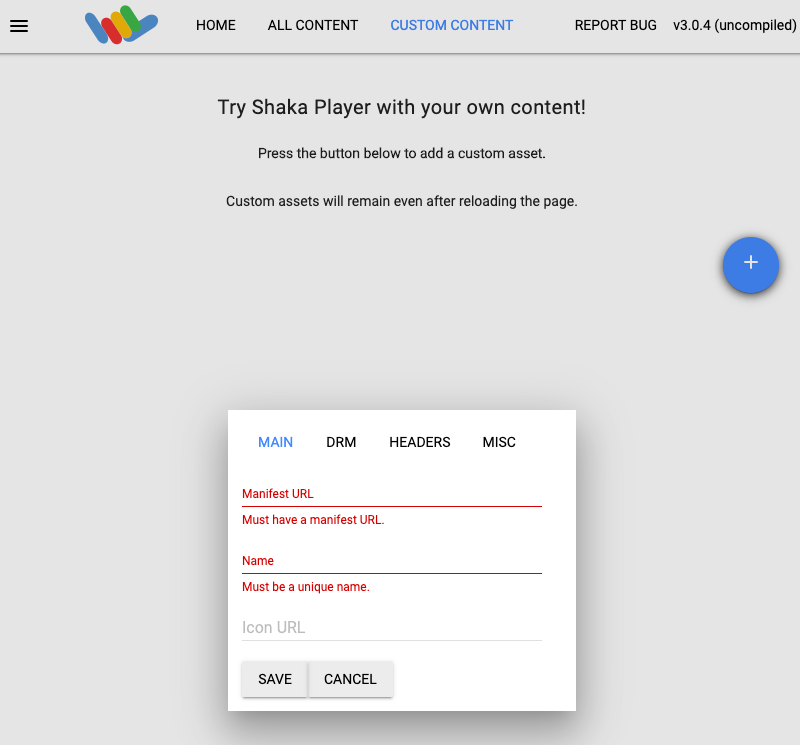
    8. Geben Sie einen Namen in das Feld Name ein.

    9. Klicken Sie auf Speichern.

    10. Klicken Sie auf Wiedergabe.

    Bereinigen

    Löschen Sie das Google Cloud -Projekt mit den Ressourcen, damit Ihrem Google Cloud -Konto die auf dieser Seite verwendeten Ressourcen nicht in Rechnung gestellt werden.

    Bucket löschen

    1. Wechseln Sie in der Google Cloud Console zur Seite „Cloud Storage-Browser“.

      Zum Cloud Storage-Browser

    2. Klicken Sie das Kästchen neben dem von Ihnen erstellten Bucket an.

    3. Klicken Sie auf Löschen.

    4. Klicken Sie im angezeigten Pop-up-Fenster auf Löschen, um den Bucket und seine Inhalte endgültig zu löschen.

    Job löschen

    REST

    Ersetzen Sie diese Werte in den folgenden Anfragedaten:

  23. JOB_ID: Die ID des von Ihnen erstellten Jobs.
  24. PROJECT_ID: Ihre Google Cloud -Projekt-ID
  25. LOCATION: Der Standort Ihres Jobs. Verwenden Sie eine der unterstützten Regionen.
    Standorte anzeigen
    • us-central1
    • us-west1
    • us-west2
    • us-east1
    • us-east4
    • southamerica-east1
    • northamerica-northeast1
    • asia-east1
    • asia-northeast1
    • asia-northeast3
    • asia-south1
    • asia-southeast1
    • australia-southeast1
    • europe-west1
    • europe-west2
    • europe-west4
    • me-west1
    • me-central1
    • me-central2
  26. Wenn Sie die Anfrage senden möchten, maximieren Sie eine der folgenden Optionen:

    Sie sollten eine JSON-Antwort ähnlich wie diese erhalten:

    {}
    

    gcloud

    1. Ersetzen Sie im Befehl gcloud Folgendes:
      • JOB_ID: Die ID des von Ihnen erstellten Jobs.
      • LOCATION: Der Standort Ihres Jobs. Verwenden Sie eine der unterstützten Regionen.
        Standorte anzeigen
        • us-central1
        • us-west1
        • us-west2
        • us-east1
        • us-east4
        • southamerica-east1
        • northamerica-northeast1
        • asia-east1
        • asia-northeast1
        • asia-northeast3
        • asia-south1
        • asia-southeast1
        • australia-southeast1
        • europe-west1
        • europe-west2
        • europe-west4
        • me-west1
        • me-central1
        • me-central2
    2. Führen Sie dazu diesen Befehl aus:
      gcloud transcoder jobs delete JOB_ID --location=LOCATION
      Die Antwort sieht ungefähr so aus:
      Deleted job [projects/PROJECT_ID/locations/LOCATION/jobs/JOB_ID].
      

    C#

    Folgen Sie der Einrichtungsanleitung für C# in der Transcoder API-Kurzanleitung: Clientbibliotheken verwenden, bevor Sie dieses Beispiel anwenden. Weitere Informationen finden Sie in der Referenzdokumentation zur Transcoder API für C#.

    Richten Sie die Standardanmeldedaten für Anwendungen ein, um sich bei der Transcoder API zu authentifizieren. Weitere Informationen finden Sie unter Authentifizierung für eine lokale Entwicklungsumgebung einrichten.

    
    using Google.Cloud.Video.Transcoder.V1;
    
    public class DeleteJobSample
    {
        public void DeleteJob(string projectId, string location, string jobId)
        {
            // Create the client.
            TranscoderServiceClient client = TranscoderServiceClient.Create();
    
            // Build the job name.
            JobName jobName = JobName.FromProjectLocationJob(projectId, location, jobId);
    
            // Call the API.
            client.DeleteJob(jobName);
        }
    }

    Go

    Folgen Sie der Einrichtungsanleitung für Go in der Transcoder API-Kurzanleitung: Clientbibliotheken verwenden, bevor Sie dieses Beispiel anwenden. Weitere Informationen finden Sie in der Referenzdokumentation zur Transcoder API für Go.

    Richten Sie die Standardanmeldedaten für Anwendungen ein, um sich bei der Transcoder API zu authentifizieren. Weitere Informationen finden Sie unter Authentifizierung für eine lokale Entwicklungsumgebung einrichten.

    import (
    	"context"
    	"fmt"
    	"io"
    
    	transcoder "cloud.google.com/go/video/transcoder/apiv1"
    	"cloud.google.com/go/video/transcoder/apiv1/transcoderpb"
    )
    
    // deleteJob deletes a previously-created job. See
    // https://cloud.google.com/transcoder/docs/how-to/jobs#delete_jobs for more
    // information.
    func deleteJob(w io.Writer, projectID string, location string, jobID string) error {
    	// projectID := "my-project-id"
    	// location := "us-central1"
    	// jobID := "my-job-id"
    	ctx := context.Background()
    	client, err := transcoder.NewClient(ctx)
    	if err != nil {
    		return fmt.Errorf("NewClient: %w", err)
    	}
    	defer client.Close()
    
    	req := &transcoderpb.DeleteJobRequest{
    		Name: fmt.Sprintf("projects/%s/locations/%s/jobs/%s", projectID, location, jobID),
    	}
    
    	err = client.DeleteJob(ctx, req)
    	if err != nil {
    		return fmt.Errorf("DeleteJob: %w", err)
    	}
    
    	fmt.Fprintf(w, "Deleted job")
    	return nil
    }
    

    Java

    Folgen Sie der Einrichtungsanleitung für Java in der Transcoder API-Kurzanleitung: Clientbibliotheken verwenden, bevor Sie dieses Beispiel anwenden. Weitere Informationen finden Sie in der Referenzdokumentation zur Transcoder API für Java.

    Richten Sie die Standardanmeldedaten für Anwendungen ein, um sich bei der Transcoder API zu authentifizieren. Weitere Informationen finden Sie unter Authentifizierung für eine lokale Entwicklungsumgebung einrichten.

    
    import com.google.cloud.video.transcoder.v1.DeleteJobRequest;
    import com.google.cloud.video.transcoder.v1.JobName;
    import com.google.cloud.video.transcoder.v1.TranscoderServiceClient;
    import java.io.IOException;
    
    public class DeleteJob {
    
      public static void main(String[] args) throws Exception {
        // TODO(developer): Replace these variables before running the sample.
        String projectId = "my-project-id";
        String location = "us-central1";
        String jobId = "my-job-id";
    
        deleteJob(projectId, location, jobId);
      }
    
      // Deletes a job.
      public static void deleteJob(String projectId, String location, String jobId) throws IOException {
        // Initialize client that will be used to send requests. This client only needs to be created
        // once, and can be reused for multiple requests.
        try (TranscoderServiceClient transcoderServiceClient = TranscoderServiceClient.create()) {
          JobName jobName =
              JobName.newBuilder().setProject(projectId).setLocation(location).setJob(jobId).build();
          DeleteJobRequest deleteJobRequest = DeleteJobRequest.newBuilder().setName(jobName.toString())
              .build();
    
          // Send the delete job request and process the response.
          transcoderServiceClient.deleteJob(deleteJobRequest);
          System.out.println("Deleted job");
        }
      }
    }

    Node.js

    Folgen Sie der Einrichtungsanleitung für Node.js in der Transcoder API-Kurzanleitung: Clientbibliotheken verwenden, bevor Sie dieses Beispiel anwenden. Weitere Informationen finden Sie in der Referenzdokumentation zur Transcoder API für Node.js.

    Richten Sie die Standardanmeldedaten für Anwendungen ein, um sich bei der Transcoder API zu authentifizieren. Weitere Informationen finden Sie unter Authentifizierung für eine lokale Entwicklungsumgebung einrichten.

    /**
     * TODO(developer): Uncomment these variables before running the sample.
     */
    // projectId = 'my-project-id';
    // location = 'us-central1';
    // jobId = 'my-job-id';
    
    // Imports the Transcoder library
    const {TranscoderServiceClient} =
      require('@google-cloud/video-transcoder').v1;
    
    // Instantiates a client
    const transcoderServiceClient = new TranscoderServiceClient();
    
    async function deleteJob() {
      // Construct request
      const request = {
        name: transcoderServiceClient.jobPath(projectId, location, jobId),
      };
      await transcoderServiceClient.deleteJob(request);
      console.log('Deleted job');
    }
    
    deleteJob();

    PHP

    Folgen Sie der Einrichtungsanleitung für PHP in der Transcoder API-Kurzanleitung: Clientbibliotheken verwenden, bevor Sie dieses Beispiel anwenden. Weitere Informationen finden Sie in der Referenzdokumentation zur Transcoder API für PHP.

    Richten Sie die Standardanmeldedaten für Anwendungen ein, um sich bei der Transcoder API zu authentifizieren. Weitere Informationen finden Sie unter Authentifizierung für eine lokale Entwicklungsumgebung einrichten.

    use Google\Cloud\Video\Transcoder\V1\Client\TranscoderServiceClient;
    use Google\Cloud\Video\Transcoder\V1\DeleteJobRequest;
    
    /**
     * Deletes a Transcoder job.
     *
     * @param string $projectId The ID of your Google Cloud Platform project.
     * @param string $location The location of the job.
     * @param string $jobId The job ID.
     */
    function delete_job($projectId, $location, $jobId)
    {
        // Instantiate a client.
        $transcoderServiceClient = new TranscoderServiceClient();
    
        $formattedName = $transcoderServiceClient->jobName($projectId, $location, $jobId);
        $request = (new DeleteJobRequest())
            ->setName($formattedName);
        $transcoderServiceClient->deleteJob($request);
    
        print('Deleted job' . PHP_EOL);
    }

    Python

    Folgen Sie der Einrichtungsanleitung für Python in der Transcoder API-Kurzanleitung: Clientbibliotheken verwenden, bevor Sie dieses Beispiel anwenden. Weitere Informationen finden Sie in der Referenzdokumentation zur Transcoder API für Python.

    Richten Sie die Standardanmeldedaten für Anwendungen ein, um sich bei der Transcoder API zu authentifizieren. Weitere Informationen finden Sie unter Authentifizierung für eine lokale Entwicklungsumgebung einrichten.

    
    import argparse
    
    from google.cloud.video.transcoder_v1.services.transcoder_service import (
        TranscoderServiceClient,
    )
    
    
    def delete_job(
        project_id: str,
        location: str,
        job_id: str,
    ) -> None:
        """Gets a job.
    
        Args:
            project_id: The GCP project ID.
            location: The location this job is in.
            job_id: The job ID."""
    
        client = TranscoderServiceClient()
    
        name = f"projects/{project_id}/locations/{location}/jobs/{job_id}"
        response = client.delete_job(name=name)
        print("Deleted job")
        return response


    Ruby

    Folgen Sie der Einrichtungsanleitung für Ruby in der Transcoder API-Kurzanleitung: Clientbibliotheken verwenden, bevor Sie dieses Beispiel anwenden. Weitere Informationen finden Sie in der Referenzdokumentation zur Transcoder API für Ruby.

    Richten Sie die Standardanmeldedaten für Anwendungen ein, um sich bei der Transcoder API zu authentifizieren. Weitere Informationen finden Sie unter Authentifizierung für eine lokale Entwicklungsumgebung einrichten.

    # project_id = "YOUR-GOOGLE-CLOUD-PROJECT"  # (e.g. "my-project")
    # location   = "YOUR-JOB-LOCATION"  # (e.g. "us-central1")
    # job_id     = "YOUR-JOB-ID"  # (e.g. "c82c295b-3f5a-47df-8562-938a89d40fd0")
    
    # Require the Transcoder client library.
    require "google/cloud/video/transcoder"
    
    # Create a Transcoder client.
    client = Google::Cloud::Video::Transcoder.transcoder_service
    
    # Build the resource name of the job.
    name = client.job_path project: project_id, location: location, job: job_id
    
    # Delete the job.
    client.delete_job name: name
    
    # Print a success message.
    puts "Deleted job"

    Anmeldedaten widerrufen

    1. Optional: Revoke the authentication credentials that you created, and delete the local credential file.

      gcloud auth application-default revoke
    2. Optional: Revoke credentials from the gcloud CLI.

      gcloud auth revoke

    Nächste Schritte