Menyisipkan slate ke live stream

Halaman ini menjelaskan cara membuat slate (layar pemblokir) dan memasukkannya ke live stream. Slate adalah konten yang dapat menggantikan konten live stream utama kapan pun Anda ingin (misalnya, jika Anda mengalami masalah teknis pada streaming input atau menyembunyikan konten sensitif pada streaming input).

Siapkan autentikasi dan project Google Cloud Anda

Jika Anda belum membuat project Google Cloud dan kredensial, lihat bagian Sebelum memulai.

Mengupload video ke bucket Cloud Storage

  1. Di konsol Google Cloud, buka halaman Browser Cloud Storage.
    Buka halaman Browser Cloud Storage
  2. Klik nama bucket untuk membukanya.
  3. Klik Upload files.
  4. Pilih file video yang akan diupload dari komputer Anda. Anda dapat menggunakan video contoh berdurasi 60 detik.

Video Anda kini disimpan ke bucket Cloud Storage.

Membuat aset

Aset adalah video atau gambar yang dapat digunakan dengan Live Stream API. Aset digunakan untuk membuat peristiwa saluran slate (layar pemblokir). Anda harus membuat aset jauh sebelum berencana menggunakannya untuk slate karena API membutuhkan waktu untuk memproses aset tersebut. Jika aset belum siap setelah dua detik dari waktu eksekusi peristiwa slate, layar hitam akan ditampilkan hingga aset siap.

Untuk membuat aset, gunakan metode projects.locations.assets.create. Contoh berikut membuat aset video.

REST

Sebelum menggunakan salah satu data permintaan, lakukan penggantian berikut:

  • PROJECT_NUMBER: nomor project Google Cloud Anda; nomor ini berada di kolom Nomor project pada halaman Setelan IAM
  • LOCATION: lokasi tempat membuat aset; gunakan salah satu wilayah yang didukung
    Tampilkan lokasi
    • us-central1
    • us-east1
    • us-east4
    • us-west1
    • us-west2
    • northamerica-northeast1
    • southamerica-east1
    • asia-east1
    • asia-east2
    • asia-northeast1
    • asia-southeast1
    • australia-southeast1
    • europe-west1
    • europe-west2
    • europe-west3
    • europe-west4
  • ASSET_ID: ID yang ditentukan pengguna untuk aset baru yang akan dibuat. Nilai ini harus terdiri dari 1-63 karakter, diawali dan diakhiri dengan [a-z0-9], serta dapat berisi tanda hubung (-) di antara karakter. Misalnya, my-asset.
  • ASSET_URI: URI video di bucket Cloud Storage untuk digunakan, seperti gs://my-bucket/my-video.mp4 (lihat format media yang didukung)

Untuk mengirim permintaan Anda, perluas salah satu opsi berikut:

Anda akan melihat respons JSON seperti berikut:

{
  "name": "projects/PROJECT_NUMBER/locations/LOCATION/operations/OPERATION_ID",
  "metadata": {
    "@type": "type.googleapis.com/google.cloud.video.livestream.v1.OperationMetadata",
    "createTime": CREATE_TIME,
    "target": "projects/PROJECT_NUMBER/locations/LOCATION/assets/ASSET_ID",
    "verb": "create",
    "requestedCancellation": false,
    "apiVersion": "v1"
  },
  "done": false
}
Perintah ini menghasilkan operasi yang berjalan lama (LRO) yang dapat digunakan untuk melacak progres permintaan Anda. Lihat Mengelola operasi yang berjalan lama untuk mengetahui informasi selengkapnya.

C#

Untuk mempelajari cara menginstal dan menggunakan library klien untuk Live Stream API, lihat Library klien Live Stream API. Untuk mengetahui informasi selengkapnya, lihat dokumentasi referensi API C# Live Stream API.

Untuk melakukan autentikasi ke Live Stream API, siapkan Kredensial Default Aplikasi. Untuk mengetahui informasi selengkapnya, baca Menyiapkan autentikasi untuk lingkungan pengembangan lokal.


using Google.Api.Gax.ResourceNames;
using Google.Cloud.Video.LiveStream.V1;
using Google.LongRunning;
using System.Threading.Tasks;

public class CreateAssetSample
{
    public async Task<Asset> CreateAssetAsync(
         string projectId, string locationId, string assetId, string assetUri)
    {
        // Create the client.
        LivestreamServiceClient client = LivestreamServiceClient.Create();

        CreateAssetRequest request = new CreateAssetRequest
        {
            ParentAsLocationName = LocationName.FromProjectLocation(projectId, locationId),
            AssetId = assetId,
            Asset = new Asset
            {
                Video = new Asset.Types.VideoAsset
                {
                    Uri = assetUri
                }
            }
        };

        // Make the request.
        Operation<Asset, OperationMetadata> response = await client.CreateAssetAsync(request);

        // Poll until the returned long-running operation is complete.
        Operation<Asset, OperationMetadata> completedResponse = await response.PollUntilCompletedAsync();

        // Retrieve the operation result.
        return completedResponse.Result;
    }
}

Go

Untuk mempelajari cara menginstal dan menggunakan library klien untuk Live Stream API, lihat Library klien Live Stream API. Untuk mengetahui informasi selengkapnya, lihat dokumentasi referensi API Go Live Stream API.

Untuk melakukan autentikasi ke Live Stream API, siapkan Kredensial Default Aplikasi. Untuk mengetahui informasi selengkapnya, baca Menyiapkan autentikasi untuk lingkungan pengembangan lokal.

import (
	"context"
	"fmt"
	"io"

	livestream "cloud.google.com/go/video/livestream/apiv1"
	"cloud.google.com/go/video/livestream/apiv1/livestreampb"
)

// createAsset creates an asset. This asset references a video file
// in Cloud Storage.
func createAsset(w io.Writer, projectID, location, assetID, assetURI string) error {
	// projectID := "my-project-id"
	// location := "us-central1"
	// assetID := "my-asset"
	// assetURI := "gs://my-bucket/my-video.mp4"
	ctx := context.Background()
	client, err := livestream.NewClient(ctx)
	if err != nil {
		return fmt.Errorf("NewClient: %w", err)
	}
	defer client.Close()

	req := &livestreampb.CreateAssetRequest{
		Parent:  fmt.Sprintf("projects/%s/locations/%s", projectID, location),
		AssetId: assetID,
		Asset: &livestreampb.Asset{
			Resource: &livestreampb.Asset_Video{
				Video: &livestreampb.Asset_VideoAsset{
					Uri: assetURI,
				},
			},
		},
	}
	// Creates the asset.
	op, err := client.CreateAsset(ctx, req)
	if err != nil {
		return fmt.Errorf("CreateAsset: %w", err)
	}
	response, err := op.Wait(ctx)
	if err != nil {
		return fmt.Errorf("Wait: %w", err)
	}

	fmt.Fprintf(w, "Asset: %v", response.Name)
	return nil
}

Java

Untuk mempelajari cara menginstal dan menggunakan library klien untuk Live Stream API, lihat Library klien Live Stream API. Untuk mengetahui informasi selengkapnya, lihat dokumentasi referensi API Java Live Stream API.

Untuk melakukan autentikasi ke Live Stream API, siapkan Kredensial Default Aplikasi. Untuk mengetahui informasi selengkapnya, baca Menyiapkan autentikasi untuk lingkungan pengembangan lokal.


import com.google.cloud.video.livestream.v1.Asset;
import com.google.cloud.video.livestream.v1.Asset.VideoAsset;
import com.google.cloud.video.livestream.v1.CreateAssetRequest;
import com.google.cloud.video.livestream.v1.LivestreamServiceClient;
import com.google.cloud.video.livestream.v1.LocationName;
import java.io.IOException;
import java.util.concurrent.ExecutionException;
import java.util.concurrent.TimeUnit;
import java.util.concurrent.TimeoutException;

public class CreateAsset {

  public static void main(String[] args) throws Exception {
    // TODO(developer): Replace these variables before running the sample.
    String projectId = "my-project-id";
    String location = "us-central1";
    String assetId = "my-asset-id";
    String assetUri = "gs://my-bucket/my-video.mp4";

    createAsset(projectId, location, assetId, assetUri);
  }

  public static void createAsset(String projectId, String location, String assetId, String assetUri)
      throws InterruptedException, ExecutionException, TimeoutException, IOException {
    // Initialize client that will be used to send requests. This client only needs to be created
    // once, and can be reused for multiple requests. After completing all of your requests, call
    // the "close" method on the client to safely clean up any remaining background resources.
    LivestreamServiceClient livestreamServiceClient = LivestreamServiceClient.create();
    var createAssetRequest =
        CreateAssetRequest.newBuilder()
            .setParent(LocationName.of(projectId, location).toString())
            .setAssetId(assetId)
            .setAsset(
                Asset.newBuilder()
                    .setVideo(
                        VideoAsset.newBuilder()
                            .setUri(assetUri)
                            .build())
                    .build())
            .build();
    // First API call in a project can take up to 15 minutes.
    Asset result =
        livestreamServiceClient.createAssetAsync(createAssetRequest).get(15, TimeUnit.MINUTES);
    System.out.println("Asset: " + result.getName());
    livestreamServiceClient.close();
  }
}

Node.js

Untuk mempelajari cara menginstal dan menggunakan library klien untuk Live Stream API, lihat Library klien Live Stream API. Untuk mengetahui informasi selengkapnya, lihat dokumentasi referensi API Node.js Live Stream API.

Untuk melakukan autentikasi ke Live Stream API, siapkan Kredensial Default Aplikasi. Untuk mengetahui informasi selengkapnya, baca Menyiapkan autentikasi untuk lingkungan pengembangan lokal.

/**
 * TODO(developer): Uncomment these variables before running the sample.
 */
// projectId = 'my-project-id';
// location = 'us-central1';
// assetId = 'my-asset';
// assetUri = 'gs://my-bucket/my-video.mp4';

// Imports the Livestream library
const {LivestreamServiceClient} = require('@google-cloud/livestream').v1;

// Instantiates a client
const livestreamServiceClient = new LivestreamServiceClient();

async function createAsset() {
  // Construct request
  const request = {
    parent: livestreamServiceClient.locationPath(projectId, location),
    assetId: assetId,
    asset: {
      video: {
        uri: assetUri,
      },
    },
  };

  // Run request
  const [operation] = await livestreamServiceClient.createAsset(request);
  const response = await operation.promise();
  const [asset] = response;
  console.log(`Asset: ${asset.name}`);
}

createAsset();

PHP

Untuk mempelajari cara menginstal dan menggunakan library klien untuk Live Stream API, lihat Library klien Live Stream API. Untuk mengetahui informasi selengkapnya, lihat dokumentasi referensi API PHP Live Stream API.

Untuk melakukan autentikasi ke Live Stream API, siapkan Kredensial Default Aplikasi. Untuk mengetahui informasi selengkapnya, baca Menyiapkan autentikasi untuk lingkungan pengembangan lokal.

use Google\Cloud\Video\LiveStream\V1\Asset;
use Google\Cloud\Video\LiveStream\V1\Client\LivestreamServiceClient;
use Google\Cloud\Video\LiveStream\V1\CreateAssetRequest;

/**
 * Creates an asset. You can use an asset to create a slate.
 *
 * @param string  $callingProjectId   The project ID to run the API call under
 * @param string  $location           The location of the asset
 * @param string  $assetId            The ID of the asset to be created
 * @param string  $assetUri           The Cloud Storage URI of the asset
 */
function create_asset(
    string $callingProjectId,
    string $location,
    string $assetId,
    string $assetUri
): void {
    // Instantiate a client.
    $livestreamClient = new LivestreamServiceClient();

    $parent = $livestreamClient->locationName($callingProjectId, $location);
    $asset = (new Asset())
        ->setVideo(
            (new Asset\VideoAsset())
                ->setUri($assetUri));

    // Run the asset creation request. The response is a long-running operation ID.
    $request = (new CreateAssetRequest())
        ->setParent($parent)
        ->setAsset($asset)
        ->setAssetId($assetId);
    $operationResponse = $livestreamClient->createAsset($request);
    $operationResponse->pollUntilComplete();
    if ($operationResponse->operationSucceeded()) {
        $result = $operationResponse->getResult();
        // Print results
        printf('Asset: %s' . PHP_EOL, $result->getName());
    } else {
        $error = $operationResponse->getError();
        // handleError($error)
    }
}

Python

Untuk mempelajari cara menginstal dan menggunakan library klien untuk Live Stream API, lihat Library klien Live Stream API. Untuk mengetahui informasi selengkapnya, lihat dokumentasi referensi API Python Live Stream API.

Untuk melakukan autentikasi ke Live Stream API, siapkan Kredensial Default Aplikasi. Untuk mengetahui informasi selengkapnya, baca Menyiapkan autentikasi untuk lingkungan pengembangan lokal.


import argparse

from google.cloud.video import live_stream_v1
from google.cloud.video.live_stream_v1.services.livestream_service import (
    LivestreamServiceClient,
)

def create_asset(
    project_id: str, location: str, asset_id: str, asset_uri: str
) -> live_stream_v1.types.Asset:
    """Creates an asset.
    Args:
        project_id: The GCP project ID.
        location: The location in which to create the asset.
        asset_id: The user-defined asset ID.
        asset_uri: The asset URI (e.g., 'gs://my-bucket/my-video.mp4')."""

    client = LivestreamServiceClient()

    parent = f"projects/{project_id}/locations/{location}"

    asset = live_stream_v1.types.Asset(
        video=live_stream_v1.types.Asset.VideoAsset(
            uri=asset_uri,
        )
    )
    operation = client.create_asset(parent=parent, asset=asset, asset_id=asset_id)
    response = operation.result(600)
    print(f"Asset: {response.name}")

    return response

Ruby

Untuk mempelajari cara menginstal dan menggunakan library klien untuk Live Stream API, lihat Library klien Live Stream API. Untuk mengetahui informasi selengkapnya, lihat dokumentasi referensi API Ruby Live Stream API.

Untuk melakukan autentikasi ke Live Stream API, siapkan Kredensial Default Aplikasi. Untuk mengetahui informasi selengkapnya, baca Menyiapkan autentikasi untuk lingkungan pengembangan lokal.

require "google/cloud/video/live_stream"

##
# Create an asset
#
# @param project_id [String] Your Google Cloud project (e.g. "my-project")
# @param location [String] The location (e.g. "us-central1")
# @param asset_id [String] Your asset name (e.g. "my-asset")
# @param asset_uri [String] Your asset URI (e.g. "gs://my-bucket/my-video.mp4")
#
def create_asset project_id:, location:, asset_id:, asset_uri:
  # Create a Live Stream client.
  client = Google::Cloud::Video::LiveStream.livestream_service

  # Build the resource name of the parent.
  parent = client.location_path project: project_id, location: location

  # Set the asset fields.
  new_asset = {
    video: {
      uri: asset_uri
    }
  }

  operation = client.create_asset parent: parent, asset: new_asset, asset_id: asset_id

  # The returned object is of type Gapic::Operation. You can use this
  # object to check the status of an operation, cancel it, or wait
  # for results. Here is how to block until completion:
  operation.wait_until_done!

  # Print the asset name.
  puts "Asset: #{operation.response.name}"
end

Membuat endpoint input

Untuk membuat endpoint input, gunakan metode projects.locations.inputs.create.

REST

Sebelum menggunakan salah satu data permintaan, lakukan penggantian berikut:

  • PROJECT_NUMBER: nomor project Google Cloud Anda; nomor ini berada di kolom Nomor project pada halaman Setelan IAM
  • LOCATION: lokasi untuk membuat endpoint input; gunakan salah satu region yang didukung
    Tampilkan lokasi
    • us-central1
    • us-east1
    • us-east4
    • us-west1
    • us-west2
    • northamerica-northeast1
    • southamerica-east1
    • asia-east1
    • asia-east2
    • asia-northeast1
    • asia-southeast1
    • australia-southeast1
    • europe-west1
    • europe-west2
    • europe-west3
    • europe-west4
  • INPUT_ID: ID yang ditentukan pengguna untuk endpoint input baru yang akan dibuat (tempat Anda mengirimkan aliran input). Nilai ini harus terdiri dari 1-63 karakter, diawali dan diakhiri dengan [a-z0-9], serta dapat berisi tanda hubung (-) di antara karakter. Misalnya, my-input.

Untuk mengirim permintaan Anda, perluas salah satu opsi berikut:

Anda akan melihat respons JSON seperti berikut:

{
  "name": "projects/PROJECT_NUMBER/locations/LOCATION/operations/OPERATION_ID",
  "metadata": {
    "@type": "type.googleapis.com/google.cloud.video.livestream.v1.OperationMetadata",
    "createTime": CREATE_TIME,
    "target": "projects/PROJECT_NUMBER/locations/LOCATION/inputs/INPUT_ID",
    "verb": "create",
    "requestedCancellation": false,
    "apiVersion": "v1"
  },
  "done": false
}
Perintah ini menghasilkan operasi yang berjalan lama (LRO) yang dapat digunakan untuk melacak progres permintaan Anda. Lihat Mengelola operasi yang berjalan lama untuk mengetahui informasi selengkapnya.

C#

Untuk mempelajari cara menginstal dan menggunakan library klien untuk Live Stream API, lihat Library klien Live Stream API. Untuk mengetahui informasi selengkapnya, lihat dokumentasi referensi API C# Live Stream API.

Untuk melakukan autentikasi ke Live Stream API, siapkan Kredensial Default Aplikasi. Untuk mengetahui informasi selengkapnya, baca Menyiapkan autentikasi untuk lingkungan pengembangan lokal.


using Google.Api.Gax.ResourceNames;
using Google.Cloud.Video.LiveStream.V1;
using Google.LongRunning;
using System.Threading.Tasks;

public class CreateInputSample
{
    public async Task<Input> CreateInputAsync(
         string projectId, string locationId, string inputId)
    {
        // Create the client.
        LivestreamServiceClient client = LivestreamServiceClient.Create();

        CreateInputRequest request = new CreateInputRequest
        {
            ParentAsLocationName = LocationName.FromProjectLocation(projectId, locationId),
            InputId = inputId,
            Input = new Input
            {
                Type = Input.Types.Type.RtmpPush
            }
        };

        // Make the request.
        Operation<Input, OperationMetadata> response = await client.CreateInputAsync(request);

        // Poll until the returned long-running operation is complete.
        Operation<Input, OperationMetadata> completedResponse = await response.PollUntilCompletedAsync();

        // Retrieve the operation result.
        return completedResponse.Result;
    }
}

Go

Untuk mempelajari cara menginstal dan menggunakan library klien untuk Live Stream API, lihat Library klien Live Stream API. Untuk mengetahui informasi selengkapnya, lihat dokumentasi referensi API Go Live Stream API.

Untuk melakukan autentikasi ke Live Stream API, siapkan Kredensial Default Aplikasi. Untuk mengetahui informasi selengkapnya, baca Menyiapkan autentikasi untuk lingkungan pengembangan lokal.

import (
	"context"
	"fmt"
	"io"

	livestream "cloud.google.com/go/video/livestream/apiv1"
	"cloud.google.com/go/video/livestream/apiv1/livestreampb"
)

// createInput creates an input endpoint. You send an input video stream to this
// endpoint.
func createInput(w io.Writer, projectID, location, inputID string) error {
	// projectID := "my-project-id"
	// location := "us-central1"
	// inputID := "my-input"
	ctx := context.Background()
	client, err := livestream.NewClient(ctx)
	if err != nil {
		return fmt.Errorf("NewClient: %w", err)
	}
	defer client.Close()

	req := &livestreampb.CreateInputRequest{
		Parent:  fmt.Sprintf("projects/%s/locations/%s", projectID, location),
		InputId: inputID,
		Input: &livestreampb.Input{
			Type: livestreampb.Input_RTMP_PUSH,
		},
	}
	// Creates the input.
	op, err := client.CreateInput(ctx, req)
	if err != nil {
		return fmt.Errorf("CreateInput: %w", err)
	}
	response, err := op.Wait(ctx)
	if err != nil {
		return fmt.Errorf("Wait: %w", err)
	}

	fmt.Fprintf(w, "Input: %v", response.Name)
	return nil
}

Java

Untuk mempelajari cara menginstal dan menggunakan library klien untuk Live Stream API, lihat Library klien Live Stream API. Untuk mengetahui informasi selengkapnya, lihat dokumentasi referensi API Java Live Stream API.

Untuk melakukan autentikasi ke Live Stream API, siapkan Kredensial Default Aplikasi. Untuk mengetahui informasi selengkapnya, baca Menyiapkan autentikasi untuk lingkungan pengembangan lokal.


import com.google.cloud.video.livestream.v1.CreateInputRequest;
import com.google.cloud.video.livestream.v1.Input;
import com.google.cloud.video.livestream.v1.LivestreamServiceClient;
import com.google.cloud.video.livestream.v1.LocationName;
import java.io.IOException;
import java.util.concurrent.ExecutionException;
import java.util.concurrent.TimeUnit;
import java.util.concurrent.TimeoutException;

public class CreateInput {

  public static void main(String[] args) throws Exception {
    // TODO(developer): Replace these variables before running the sample.
    String projectId = "my-project-id";
    String location = "us-central1";
    String inputId = "my-input-id";

    createInput(projectId, location, inputId);
  }

  public static void createInput(String projectId, String location, String inputId)
      throws InterruptedException, ExecutionException, TimeoutException, IOException {
    // Initialize client that will be used to send requests. This client only needs to be created
    // once, and can be reused for multiple requests. After completing all of your requests, call
    // the "close" method on the client to safely clean up any remaining background resources.
    LivestreamServiceClient livestreamServiceClient = LivestreamServiceClient.create();
    var createInputRequest =
        CreateInputRequest.newBuilder()
            .setParent(LocationName.of(projectId, location).toString())
            .setInputId(inputId)
            .setInput(Input.newBuilder().setType(Input.Type.RTMP_PUSH).build())
            .build();
    // First API call in a project can take up to 15 minutes.
    Input result =
        livestreamServiceClient.createInputAsync(createInputRequest).get(15, TimeUnit.MINUTES);
    System.out.println("Input: " + result.getName());
    livestreamServiceClient.close();
  }
}

Node.js

Untuk mempelajari cara menginstal dan menggunakan library klien untuk Live Stream API, lihat Library klien Live Stream API. Untuk mengetahui informasi selengkapnya, lihat dokumentasi referensi API Node.js Live Stream API.

Untuk melakukan autentikasi ke Live Stream API, siapkan Kredensial Default Aplikasi. Untuk mengetahui informasi selengkapnya, baca Menyiapkan autentikasi untuk lingkungan pengembangan lokal.

/**
 * TODO(developer): Uncomment these variables before running the sample.
 */
// projectId = 'my-project-id';
// location = 'us-central1';
// inputId = 'my-input';

// Imports the Livestream library
const {LivestreamServiceClient} = require('@google-cloud/livestream').v1;

// Instantiates a client
const livestreamServiceClient = new LivestreamServiceClient();

async function createInput() {
  // Construct request
  const request = {
    parent: livestreamServiceClient.locationPath(projectId, location),
    inputId: inputId,
    input: {
      type: 'RTMP_PUSH',
    },
  };

  // Run request
  const [operation] = await livestreamServiceClient.createInput(request);
  const response = await operation.promise();
  const [input] = response;
  console.log(`Input: ${input.name}`);
}

createInput();

PHP

Untuk mempelajari cara menginstal dan menggunakan library klien untuk Live Stream API, lihat Library klien Live Stream API. Untuk mengetahui informasi selengkapnya, lihat dokumentasi referensi API PHP Live Stream API.

Untuk melakukan autentikasi ke Live Stream API, siapkan Kredensial Default Aplikasi. Untuk mengetahui informasi selengkapnya, baca Menyiapkan autentikasi untuk lingkungan pengembangan lokal.

use Google\Cloud\Video\LiveStream\V1\Input;
use Google\Cloud\Video\LiveStream\V1\Client\LivestreamServiceClient;
use Google\Cloud\Video\LiveStream\V1\CreateInputRequest;

/**
 * Creates an input. You send an input video stream to this endpoint.
 *
 * @param string  $callingProjectId   The project ID to run the API call under
 * @param string  $location           The location of the input
 * @param string  $inputId            The ID of the input to be created
 */
function create_input(
    string $callingProjectId,
    string $location,
    string $inputId
): void {
    // Instantiate a client.
    $livestreamClient = new LivestreamServiceClient();

    $parent = $livestreamClient->locationName($callingProjectId, $location);
    $input = (new Input())
        ->setType(Input\Type::RTMP_PUSH);

    // Run the input creation request. The response is a long-running operation ID.
    $request = (new CreateInputRequest())
        ->setParent($parent)
        ->setInput($input)
        ->setInputId($inputId);
    $operationResponse = $livestreamClient->createInput($request);
    $operationResponse->pollUntilComplete();
    if ($operationResponse->operationSucceeded()) {
        $result = $operationResponse->getResult();
        // Print results
        printf('Input: %s' . PHP_EOL, $result->getName());
    } else {
        $error = $operationResponse->getError();
        // handleError($error)
    }
}

Python

Untuk mempelajari cara menginstal dan menggunakan library klien untuk Live Stream API, lihat Library klien Live Stream API. Untuk mengetahui informasi selengkapnya, lihat dokumentasi referensi API Python Live Stream API.

Untuk melakukan autentikasi ke Live Stream API, siapkan Kredensial Default Aplikasi. Untuk mengetahui informasi selengkapnya, baca Menyiapkan autentikasi untuk lingkungan pengembangan lokal.


import argparse

from google.cloud.video import live_stream_v1
from google.cloud.video.live_stream_v1.services.livestream_service import (
    LivestreamServiceClient,
)

def create_input(
    project_id: str, location: str, input_id: str
) -> live_stream_v1.types.Input:
    """Creates an input.
    Args:
        project_id: The GCP project ID.
        location: The location in which to create the input.
        input_id: The user-defined input ID."""

    client = LivestreamServiceClient()

    parent = f"projects/{project_id}/locations/{location}"

    input = live_stream_v1.types.Input(
        type_="RTMP_PUSH",
    )
    operation = client.create_input(parent=parent, input=input, input_id=input_id)
    response = operation.result(900)
    print(f"Input: {response.name}")

    return response

Ruby

Untuk mempelajari cara menginstal dan menggunakan library klien untuk Live Stream API, lihat Library klien Live Stream API. Untuk mengetahui informasi selengkapnya, lihat dokumentasi referensi API Ruby Live Stream API.

Untuk melakukan autentikasi ke Live Stream API, siapkan Kredensial Default Aplikasi. Untuk mengetahui informasi selengkapnya, baca Menyiapkan autentikasi untuk lingkungan pengembangan lokal.

require "google/cloud/video/live_stream"

##
# Create an input endpoint
#
# @param project_id [String] Your Google Cloud project (e.g. "my-project")
# @param location [String] The location (e.g. "us-central1")
# @param input_id [String] Your input name (e.g. "my-input")
#
def create_input project_id:, location:, input_id:
  # Create a Live Stream client.
  client = Google::Cloud::Video::LiveStream.livestream_service

  # Build the resource name of the parent.
  parent = client.location_path project: project_id, location: location

  # Set the input fields.
  new_input = {
    type: Google::Cloud::Video::LiveStream::V1::Input::Type::RTMP_PUSH
  }

  operation = client.create_input parent: parent, input: new_input, input_id: input_id

  # The returned object is of type Gapic::Operation. You can use this
  # object to check the status of an operation, cancel it, or wait
  # for results. Here is how to block until completion:
  operation.wait_until_done!

  # Print the input name.
  puts "Input: #{operation.response.name}"
end

Mendapatkan detail endpoint input

Untuk mendapatkan detail endpoint input, gunakan metode projects.locations.inputs.get.

REST

Sebelum menggunakan salah satu data permintaan, lakukan penggantian berikut:

  • PROJECT_NUMBER: nomor project Google Cloud Anda; nomor ini berada di kolom Nomor project pada halaman Setelan IAM
  • LOCATION: lokasi tempat endpoint input Anda berada; gunakan salah satu region yang didukung
    Tampilkan lokasi
    • us-central1
    • us-east1
    • us-east4
    • us-west1
    • us-west2
    • northamerica-northeast1
    • southamerica-east1
    • asia-east1
    • asia-east2
    • asia-northeast1
    • asia-southeast1
    • australia-southeast1
    • europe-west1
    • europe-west2
    • europe-west3
    • europe-west4
  • INPUT_ID: ID yang ditetapkan pengguna untuk endpoint input

Untuk mengirim permintaan Anda, perluas salah satu opsi berikut:

Anda akan melihat respons JSON seperti berikut:

{
  "name": "projects/PROJECT_NUMBER/locations/LOCATION/inputs/INPUT_ID",
  "createTime": CREATE_TIME,
  "updateTime": UPDATE_TIME,
  "type": "RTMP_PUSH",
  "uri":  INPUT_STREAM_URI, # For example, "rtmp://1.2.3.4/live/b8ebdd94-c8d9-4d88-a16e-b963c43a953b",
  "tier": "HD"
}

C#

Untuk mempelajari cara menginstal dan menggunakan library klien untuk Live Stream API, lihat Library klien Live Stream API. Untuk mengetahui informasi selengkapnya, lihat dokumentasi referensi API C# Live Stream API.

Untuk melakukan autentikasi ke Live Stream API, siapkan Kredensial Default Aplikasi. Untuk mengetahui informasi selengkapnya, baca Menyiapkan autentikasi untuk lingkungan pengembangan lokal.


using Google.Cloud.Video.LiveStream.V1;

public class GetInputSample
{
    public Input GetInput(
         string projectId, string locationId, string inputId)
    {
        // Create the client.
        LivestreamServiceClient client = LivestreamServiceClient.Create();

        GetInputRequest request = new GetInputRequest
        {
            InputName = InputName.FromProjectLocationInput(projectId, locationId, inputId)
        };

        // Make the request.
        Input response = client.GetInput(request);
        return response;
    }
}

Go

Untuk mempelajari cara menginstal dan menggunakan library klien untuk Live Stream API, lihat Library klien Live Stream API. Untuk mengetahui informasi selengkapnya, lihat dokumentasi referensi API Go Live Stream API.

Untuk melakukan autentikasi ke Live Stream API, siapkan Kredensial Default Aplikasi. Untuk mengetahui informasi selengkapnya, baca Menyiapkan autentikasi untuk lingkungan pengembangan lokal.

import (
	"context"
	"fmt"
	"io"

	livestream "cloud.google.com/go/video/livestream/apiv1"
	"cloud.google.com/go/video/livestream/apiv1/livestreampb"
)

// getInput gets a previously-created input endpoint.
func getInput(w io.Writer, projectID, location, inputID string) error {
	// projectID := "my-project-id"
	// location := "us-central1"
	// inputID := "my-input-id"
	ctx := context.Background()
	client, err := livestream.NewClient(ctx)
	if err != nil {
		return fmt.Errorf("NewClient: %w", err)
	}
	defer client.Close()

	req := &livestreampb.GetInputRequest{
		Name: fmt.Sprintf("projects/%s/locations/%s/inputs/%s", projectID, location, inputID),
	}

	response, err := client.GetInput(ctx, req)
	if err != nil {
		return fmt.Errorf("GetInput: %w", err)
	}

	fmt.Fprintf(w, "Input: %v", response.Name)
	return nil
}

Java

Untuk mempelajari cara menginstal dan menggunakan library klien untuk Live Stream API, lihat Library klien Live Stream API. Untuk mengetahui informasi selengkapnya, lihat dokumentasi referensi API Java Live Stream API.

Untuk melakukan autentikasi ke Live Stream API, siapkan Kredensial Default Aplikasi. Untuk mengetahui informasi selengkapnya, baca Menyiapkan autentikasi untuk lingkungan pengembangan lokal.


import com.google.cloud.video.livestream.v1.Input;
import com.google.cloud.video.livestream.v1.InputName;
import com.google.cloud.video.livestream.v1.LivestreamServiceClient;
import java.io.IOException;

public class GetInput {

  public static void main(String[] args) throws Exception {
    // TODO(developer): Replace these variables before running the sample.
    String projectId = "my-project-id";
    String location = "us-central1";
    String inputId = "my-input-id";

    getInput(projectId, location, inputId);
  }

  public static void getInput(String projectId, String location, String inputId)
      throws IOException {
    // Initialize client that will be used to send requests. This client only needs to be created
    // once, and can be reused for multiple requests. In this example, try-with-resources is used
    // which automatically calls close() on the client to clean up resources.
    try (LivestreamServiceClient livestreamServiceClient = LivestreamServiceClient.create()) {
      InputName name = InputName.of(projectId, location, inputId);
      Input response = livestreamServiceClient.getInput(name);
      System.out.println("Input: " + response.getName());
    }
  }
}

Node.js

Untuk mempelajari cara menginstal dan menggunakan library klien untuk Live Stream API, lihat Library klien Live Stream API. Untuk mengetahui informasi selengkapnya, lihat dokumentasi referensi API Node.js Live Stream API.

Untuk melakukan autentikasi ke Live Stream API, siapkan Kredensial Default Aplikasi. Untuk mengetahui informasi selengkapnya, baca Menyiapkan autentikasi untuk lingkungan pengembangan lokal.

/**
 * TODO(developer): Uncomment these variables before running the sample.
 */
// projectId = 'my-project-id';
// location = 'us-central1';
// inputId = 'my-input';

// Imports the Livestream library
const {LivestreamServiceClient} = require('@google-cloud/livestream').v1;

// Instantiates a client
const livestreamServiceClient = new LivestreamServiceClient();

async function getInput() {
  // Construct request
  const request = {
    name: livestreamServiceClient.inputPath(projectId, location, inputId),
  };
  const [input] = await livestreamServiceClient.getInput(request);
  console.log(`Input: ${input.name}`);
}

getInput();

PHP

Untuk mempelajari cara menginstal dan menggunakan library klien untuk Live Stream API, lihat Library klien Live Stream API. Untuk mengetahui informasi selengkapnya, lihat dokumentasi referensi API PHP Live Stream API.

Untuk melakukan autentikasi ke Live Stream API, siapkan Kredensial Default Aplikasi. Untuk mengetahui informasi selengkapnya, baca Menyiapkan autentikasi untuk lingkungan pengembangan lokal.

use Google\Cloud\Video\LiveStream\V1\Client\LivestreamServiceClient;
use Google\Cloud\Video\LiveStream\V1\GetInputRequest;

/**
 * Gets an input.
 *
 * @param string  $callingProjectId   The project ID to run the API call under
 * @param string  $location           The location of the input
 * @param string  $inputId            The ID of the input
 */
function get_input(
    string $callingProjectId,
    string $location,
    string $inputId
): void {
    // Instantiate a client.
    $livestreamClient = new LivestreamServiceClient();
    $formattedName = $livestreamClient->inputName($callingProjectId, $location, $inputId);

    // Get the input.
    $request = (new GetInputRequest())
        ->setName($formattedName);
    $response = $livestreamClient->getInput($request);
    // Print results
    printf('Input: %s' . PHP_EOL, $response->getName());
}

Python

Untuk mempelajari cara menginstal dan menggunakan library klien untuk Live Stream API, lihat Library klien Live Stream API. Untuk mengetahui informasi selengkapnya, lihat dokumentasi referensi API Python Live Stream API.

Untuk melakukan autentikasi ke Live Stream API, siapkan Kredensial Default Aplikasi. Untuk mengetahui informasi selengkapnya, baca Menyiapkan autentikasi untuk lingkungan pengembangan lokal.


import argparse

from google.cloud.video import live_stream_v1
from google.cloud.video.live_stream_v1.services.livestream_service import (
    LivestreamServiceClient,
)

def get_input(
    project_id: str, location: str, input_id: str
) -> live_stream_v1.types.Input:
    """Gets an input.
    Args:
        project_id: The GCP project ID.
        location: The location of the input.
        input_id: The user-defined input ID."""

    client = LivestreamServiceClient()

    name = f"projects/{project_id}/locations/{location}/inputs/{input_id}"
    response = client.get_input(name=name)
    print(f"Input: {response.name}")

    return response

Ruby

Untuk mempelajari cara menginstal dan menggunakan library klien untuk Live Stream API, lihat Library klien Live Stream API. Untuk mengetahui informasi selengkapnya, lihat dokumentasi referensi API Ruby Live Stream API.

Untuk melakukan autentikasi ke Live Stream API, siapkan Kredensial Default Aplikasi. Untuk mengetahui informasi selengkapnya, baca Menyiapkan autentikasi untuk lingkungan pengembangan lokal.

require "google/cloud/video/live_stream"

##
# Get an input endpoint
#
# @param project_id [String] Your Google Cloud project (e.g. "my-project")
# @param location [String] The location (e.g. "us-central1")
# @param input_id [String] Your input name (e.g. "my-input")
#
def get_input project_id:, location:, input_id:
  # Create a Live Stream client.
  client = Google::Cloud::Video::LiveStream.livestream_service

  # Build the resource name of the input.
  name = client.input_path project: project_id, location: location, input: input_id

  # Get the input.
  input = client.get_input name: name

  # Print the input name.
  puts "Input: #{input.name}"
end

Temukan kolom uri, lalu salin INPUT_STREAM_URI yang ditampilkan untuk digunakan nanti di bagian Mengirim aliran input.

Membuat saluran

Untuk membuat saluran, gunakan metode projects.locations.channels.create. Contoh berikut membuat saluran yang menghasilkan live stream HLS. Live stream terdiri dari satu versi definisi tinggi (1280x720).

REST

Sebelum menggunakan salah satu data permintaan, lakukan penggantian berikut:

  • PROJECT_NUMBER: nomor project Google Cloud Anda; nomor ini berada di kolom Nomor project pada halaman Setelan IAM
  • LOCATION: lokasi tempat membuat saluran; gunakan salah satu wilayah yang didukung
    Tampilkan lokasi
    • us-central1
    • us-east1
    • us-east4
    • us-west1
    • us-west2
    • northamerica-northeast1
    • southamerica-east1
    • asia-east1
    • asia-east2
    • asia-northeast1
    • asia-southeast1
    • australia-southeast1
    • europe-west1
    • europe-west2
    • europe-west3
    • europe-west4
  • CHANNEL_ID: ID yang ditetapkan pengguna untuk saluran yang akan dibuat; nilai ini harus terdiri dari 1-63 karakter, diawali dan diakhiri dengan [a-z0-9], serta dapat berisi tanda hubung (-) di antara karakter
  • INPUT_ID: ID yang ditetapkan pengguna untuk endpoint input
  • BUCKET_NAME: nama bucket Cloud Storage yang Anda buat untuk menyimpan manifes live stream dan file segmen

Untuk mengirim permintaan Anda, perluas salah satu opsi berikut:

Anda akan melihat respons JSON seperti berikut:

{
  "name": "projects/PROJECT_NUMBER/locations/LOCATION/operations/OPERATION_ID",
  "metadata": {
    "@type": "type.googleapis.com/google.cloud.video.livestream.v1.OperationMetadata",
    "createTime": CREATE_TIME,
    "target": "projects/PROJECT_NUMBER/locations/LOCATION/channels/CHANNEL_ID",
    "verb": "create",
    "requestedCancellation": false,
    "apiVersion": "v1"
  },
  "done": false
}
Perintah ini menghasilkan operasi yang berjalan lama (LRO) yang dapat digunakan untuk melacak progres permintaan Anda. Lihat Mengelola operasi yang berjalan lama untuk mengetahui informasi selengkapnya.

C#

Untuk mempelajari cara menginstal dan menggunakan library klien untuk Live Stream API, lihat Library klien Live Stream API. Untuk mengetahui informasi selengkapnya, lihat dokumentasi referensi API C# Live Stream API.

Untuk melakukan autentikasi ke Live Stream API, siapkan Kredensial Default Aplikasi. Untuk mengetahui informasi selengkapnya, baca Menyiapkan autentikasi untuk lingkungan pengembangan lokal.


using Google.Api.Gax.ResourceNames;
using Google.Cloud.Video.LiveStream.V1;
using Google.LongRunning;
using System.Threading.Tasks;

public class CreateChannelSample
{
    public async Task<Channel> CreateChannelAsync(
         string projectId, string locationId, string channelId, string inputId, string outputUri)
    {
        // Create the client.
        LivestreamServiceClient client = LivestreamServiceClient.Create();

        InputAttachment inputAttachment = new InputAttachment
        {
            Key = "my-input",
            InputAsInputName = InputName.FromProjectLocationInput(projectId, locationId, inputId)
        };

        VideoStream videoStream = new VideoStream
        {
            H264 = new VideoStream.Types.H264CodecSettings
            {
                Profile = "high",
                BitrateBps = 3000000,
                FrameRate = 30,
                HeightPixels = 720,
                WidthPixels = 1280
            }
        };

        ElementaryStream elementaryStreamVideo = new ElementaryStream
        {
            Key = "es_video",
            VideoStream = videoStream
        };

        AudioStream audioStream = new AudioStream
        {
            Codec = "aac",
            ChannelCount = 2,
            BitrateBps = 160000
        };

        ElementaryStream elementaryStreamAudio = new ElementaryStream
        {
            Key = "es_audio",
            AudioStream = audioStream
        };

        MuxStream muxVideo = new MuxStream
        {
            Key = "mux_video",
            ElementaryStreams = { "es_video" },
            SegmentSettings = new SegmentSettings
            {
                SegmentDuration = new Google.Protobuf.WellKnownTypes.Duration
                {
                    Seconds = 2
                }
            }
        };

        MuxStream muxAudio = new MuxStream
        {
            Key = "mux_audio",
            ElementaryStreams = { "es_audio" },
            SegmentSettings = new SegmentSettings
            {
                SegmentDuration = new Google.Protobuf.WellKnownTypes.Duration
                {
                    Seconds = 2
                }
            }
        };

        CreateChannelRequest request = new CreateChannelRequest
        {
            ParentAsLocationName = LocationName.FromProjectLocation(projectId, locationId),
            ChannelId = channelId,
            Channel = new Channel
            {
                InputAttachments = { inputAttachment },
                Output = new Channel.Types.Output
                {
                    Uri = outputUri
                },
                ElementaryStreams = { elementaryStreamVideo, elementaryStreamAudio },
                MuxStreams = { muxVideo, muxAudio },
                Manifests = {
                    new Manifest {
                        FileName = "manifest.m3u8",
                        Type = Manifest.Types.ManifestType.Hls,
                        MuxStreams = { "mux_video", "mux_audio" },
                        MaxSegmentCount = 5
                    }
                }
            }
        };

        // Make the request.
        Operation<Channel, OperationMetadata> response = await client.CreateChannelAsync(request);

        // Poll until the returned long-running operation is complete.
        Operation<Channel, OperationMetadata> completedResponse = await response.PollUntilCompletedAsync();

        // Retrieve the operation result.
        return completedResponse.Result;
    }
}

Go

Untuk mempelajari cara menginstal dan menggunakan library klien untuk Live Stream API, lihat Library klien Live Stream API. Untuk mengetahui informasi selengkapnya, lihat dokumentasi referensi API Go Live Stream API.

Untuk melakukan autentikasi ke Live Stream API, siapkan Kredensial Default Aplikasi. Untuk mengetahui informasi selengkapnya, baca Menyiapkan autentikasi untuk lingkungan pengembangan lokal.

import (
	"context"
	"fmt"
	"io"

	"github.com/golang/protobuf/ptypes/duration"

	livestream "cloud.google.com/go/video/livestream/apiv1"
	"cloud.google.com/go/video/livestream/apiv1/livestreampb"
)

// createChannel creates a channel.
func createChannel(w io.Writer, projectID, location, channelID, inputID, outputURI string) error {
	// projectID := "my-project-id"
	// location := "us-central1"
	// channelID := "my-channel"
	// inputID := "my-input"
	// outputURI := "gs://my-bucket/my-output-folder/"
	ctx := context.Background()
	client, err := livestream.NewClient(ctx)
	if err != nil {
		return fmt.Errorf("NewClient: %w", err)
	}
	defer client.Close()

	req := &livestreampb.CreateChannelRequest{
		Parent:    fmt.Sprintf("projects/%s/locations/%s", projectID, location),
		ChannelId: channelID,
		Channel: &livestreampb.Channel{
			InputAttachments: []*livestreampb.InputAttachment{
				{
					Key:   "my-input",
					Input: fmt.Sprintf("projects/%s/locations/%s/inputs/%s", projectID, location, inputID),
				},
			},
			Output: &livestreampb.Channel_Output{
				Uri: outputURI,
			},
			ElementaryStreams: []*livestreampb.ElementaryStream{
				{
					Key: "es_video",
					ElementaryStream: &livestreampb.ElementaryStream_VideoStream{
						VideoStream: &livestreampb.VideoStream{
							CodecSettings: &livestreampb.VideoStream_H264{
								H264: &livestreampb.VideoStream_H264CodecSettings{
									Profile:      "high",
									BitrateBps:   3000000,
									FrameRate:    30,
									HeightPixels: 720,
									WidthPixels:  1280,
								},
							},
						},
					},
				},
				{
					Key: "es_audio",
					ElementaryStream: &livestreampb.ElementaryStream_AudioStream{
						AudioStream: &livestreampb.AudioStream{
							Codec:        "aac",
							ChannelCount: 2,
							BitrateBps:   160000,
						},
					},
				},
			},
			MuxStreams: []*livestreampb.MuxStream{
				{
					Key:               "mux_video",
					ElementaryStreams: []string{"es_video"},
					SegmentSettings: &livestreampb.SegmentSettings{
						SegmentDuration: &duration.Duration{
							Seconds: 2,
						},
					},
				},
				{
					Key:               "mux_audio",
					ElementaryStreams: []string{"es_audio"},
					SegmentSettings: &livestreampb.SegmentSettings{
						SegmentDuration: &duration.Duration{
							Seconds: 2,
						},
					},
				},
			},
			Manifests: []*livestreampb.Manifest{
				{
					FileName:        "manifest.m3u8",
					Type:            livestreampb.Manifest_HLS,
					MuxStreams:      []string{"mux_video", "mux_audio"},
					MaxSegmentCount: 5,
				},
			},
		},
	}
	// Creates the channel.
	op, err := client.CreateChannel(ctx, req)
	if err != nil {
		return fmt.Errorf("CreateChannel: %w", err)
	}
	response, err := op.Wait(ctx)
	if err != nil {
		return fmt.Errorf("Wait: %w", err)
	}

	fmt.Fprintf(w, "Channel: %v", response.Name)
	return nil
}

Java

Untuk mempelajari cara menginstal dan menggunakan library klien untuk Live Stream API, lihat Library klien Live Stream API. Untuk mengetahui informasi selengkapnya, lihat dokumentasi referensi API Java Live Stream API.

Untuk melakukan autentikasi ke Live Stream API, siapkan Kredensial Default Aplikasi. Untuk mengetahui informasi selengkapnya, baca Menyiapkan autentikasi untuk lingkungan pengembangan lokal.


import com.google.cloud.video.livestream.v1.AudioStream;
import com.google.cloud.video.livestream.v1.Channel;
import com.google.cloud.video.livestream.v1.Channel.Output;
import com.google.cloud.video.livestream.v1.CreateChannelRequest;
import com.google.cloud.video.livestream.v1.ElementaryStream;
import com.google.cloud.video.livestream.v1.InputAttachment;
import com.google.cloud.video.livestream.v1.InputName;
import com.google.cloud.video.livestream.v1.LivestreamServiceClient;
import com.google.cloud.video.livestream.v1.LocationName;
import com.google.cloud.video.livestream.v1.Manifest;
import com.google.cloud.video.livestream.v1.Manifest.ManifestType;
import com.google.cloud.video.livestream.v1.MuxStream;
import com.google.cloud.video.livestream.v1.SegmentSettings;
import com.google.cloud.video.livestream.v1.VideoStream;
import com.google.cloud.video.livestream.v1.VideoStream.H264CodecSettings;
import com.google.protobuf.Duration;
import java.io.IOException;
import java.util.concurrent.ExecutionException;
import java.util.concurrent.TimeUnit;
import java.util.concurrent.TimeoutException;

public class CreateChannel {

  public static void main(String[] args) throws Exception {
    // TODO(developer): Replace these variables before running the sample.
    String projectId = "my-project-id";
    String location = "us-central1";
    String channelId = "my-channel-id";
    String inputId = "my-input-id";
    String outputUri = "gs://my-bucket/my-output-folder/";

    createChannel(projectId, location, channelId, inputId, outputUri);
  }

  public static void createChannel(
      String projectId, String location, String channelId, String inputId, String outputUri)
      throws InterruptedException, ExecutionException, TimeoutException, IOException {
    // Initialize client that will be used to send requests. This client only needs to be created
    // once, and can be reused for multiple requests. After completing all of your requests, call
    // the "close" method on the client to safely clean up any remaining background resources.
    LivestreamServiceClient livestreamServiceClient = LivestreamServiceClient.create();
    VideoStream videoStream =
        VideoStream.newBuilder()
            .setH264(
                H264CodecSettings.newBuilder()
                    .setProfile("high")
                    .setBitrateBps(3000000)
                    .setFrameRate(30)
                    .setHeightPixels(720)
                    .setWidthPixels(1280))
            .build();

    AudioStream audioStream =
        AudioStream.newBuilder().setCodec("aac").setChannelCount(2).setBitrateBps(160000).build();

    var createChannelRequest =
        CreateChannelRequest.newBuilder()
            .setParent(LocationName.of(projectId, location).toString())
            .setChannelId(channelId)
            .setChannel(
                Channel.newBuilder()
                    .addInputAttachments(
                        0,
                        InputAttachment.newBuilder()
                            .setKey("my-input")
                            .setInput(InputName.of(projectId, location, inputId).toString())
                            .build())
                    .setOutput(Output.newBuilder().setUri(outputUri).build())
                    .addElementaryStreams(
                        ElementaryStream.newBuilder()
                            .setKey("es_video")
                            .setVideoStream(videoStream))
                    .addElementaryStreams(
                        ElementaryStream.newBuilder()
                            .setKey("es_audio")
                            .setAudioStream(audioStream))
                    .addMuxStreams(
                        MuxStream.newBuilder()
                            .setKey("mux_video")
                            .addElementaryStreams("es_video")
                            .setSegmentSettings(
                                SegmentSettings.newBuilder()
                                    .setSegmentDuration(
                                        Duration.newBuilder().setSeconds(2).build())
                                    .build())
                            .build())
                    .addMuxStreams(
                        MuxStream.newBuilder()
                            .setKey("mux_audio")
                            .addElementaryStreams("es_audio")
                            .setSegmentSettings(
                                SegmentSettings.newBuilder()
                                    .setSegmentDuration(
                                        Duration.newBuilder().setSeconds(2).build())
                                    .build())
                            .build())
                    .addManifests(
                        Manifest.newBuilder()
                            .setFileName("manifest.m3u8")
                            .setType(ManifestType.HLS)
                            .addMuxStreams("mux_video")
                            .addMuxStreams("mux_audio")
                            .setMaxSegmentCount(5)
                            .build()))
            .build();
    // First API call in a project can take up to 10 minutes.
    Channel result =
        livestreamServiceClient
            .createChannelAsync(createChannelRequest)
            .get(10, TimeUnit.MINUTES);
    System.out.println("Channel: " + result.getName());
    livestreamServiceClient.close();
  }
}

Node.js

Untuk mempelajari cara menginstal dan menggunakan library klien untuk Live Stream API, lihat Library klien Live Stream API. Untuk mengetahui informasi selengkapnya, lihat dokumentasi referensi API Node.js Live Stream API.

Untuk melakukan autentikasi ke Live Stream API, siapkan Kredensial Default Aplikasi. Untuk mengetahui informasi selengkapnya, baca Menyiapkan autentikasi untuk lingkungan pengembangan lokal.

/**
 * TODO(developer): Uncomment these variables before running the sample.
 */
// projectId = 'my-project-id';
// location = 'us-central1';
// channelId = 'my-channel';
// inputId = 'my-input';
// outputUri = 'gs://my-bucket/my-output-folder/';

// Imports the Livestream library
const {LivestreamServiceClient} = require('@google-cloud/livestream').v1;

// Instantiates a client
const livestreamServiceClient = new LivestreamServiceClient();

async function createChannel() {
  // Construct request
  const request = {
    parent: livestreamServiceClient.locationPath(projectId, location),
    channelId: channelId,
    channel: {
      inputAttachments: [
        {
          key: 'my-input',
          input: livestreamServiceClient.inputPath(
            projectId,
            location,
            inputId
          ),
        },
      ],
      output: {
        uri: outputUri,
      },
      elementaryStreams: [
        {
          key: 'es_video',
          videoStream: {
            h264: {
              profile: 'high',
              heightPixels: 720,
              widthPixels: 1280,
              bitrateBps: 3000000,
              frameRate: 30,
            },
          },
        },
        {
          key: 'es_audio',
          audioStream: {
            codec: 'aac',
            channelCount: 2,
            bitrateBps: 160000,
          },
        },
      ],
      muxStreams: [
        {
          key: 'mux_video',
          elementaryStreams: ['es_video'],
          segmentSettings: {
            seconds: 2,
          },
        },
        {
          key: 'mux_audio',
          elementaryStreams: ['es_audio'],
          segmentSettings: {
            seconds: 2,
          },
        },
      ],
      manifests: [
        {
          fileName: 'manifest.m3u8',
          type: 'HLS',
          muxStreams: ['mux_video', 'mux_audio'],
          maxSegmentCount: 5,
        },
      ],
    },
  };

  // Run request
  const [operation] = await livestreamServiceClient.createChannel(request);
  const response = await operation.promise();
  const [channel] = response;
  console.log(`Channel: ${channel.name}`);
}

createChannel();

PHP

Untuk mempelajari cara menginstal dan menggunakan library klien untuk Live Stream API, lihat Library klien Live Stream API. Untuk mengetahui informasi selengkapnya, lihat dokumentasi referensi API PHP Live Stream API.

Untuk melakukan autentikasi ke Live Stream API, siapkan Kredensial Default Aplikasi. Untuk mengetahui informasi selengkapnya, baca Menyiapkan autentikasi untuk lingkungan pengembangan lokal.

use Google\Cloud\Video\LiveStream\V1\AudioStream;
use Google\Cloud\Video\LiveStream\V1\Channel;
use Google\Cloud\Video\LiveStream\V1\ElementaryStream;
use Google\Cloud\Video\LiveStream\V1\InputAttachment;
use Google\Cloud\Video\LiveStream\V1\Client\LivestreamServiceClient;
use Google\Cloud\Video\LiveStream\V1\CreateChannelRequest;
use Google\Cloud\Video\LiveStream\V1\Manifest;
use Google\Cloud\Video\LiveStream\V1\MuxStream;
use Google\Cloud\Video\LiveStream\V1\SegmentSettings;
use Google\Cloud\Video\LiveStream\V1\VideoStream;
use Google\Protobuf\Duration;

/**
 * Creates a channel.
 *
 * @param string  $callingProjectId   The project ID to run the API call under
 * @param string  $location           The location of the channel
 * @param string  $channelId          The ID of the channel to be created
 * @param string  $inputId            The ID of the input for the channel
 * @param string  $outputUri          Uri of the channel output folder in a
 *                                    Cloud Storage bucket. (e.g.
 *                                    "gs://my-bucket/my-output-folder/")
 */
function create_channel(
    string $callingProjectId,
    string $location,
    string $channelId,
    string $inputId,
    string $outputUri
): void {
    // Instantiate a client.
    $livestreamClient = new LivestreamServiceClient();

    $parent = $livestreamClient->locationName($callingProjectId, $location);
    $channelName = $livestreamClient->channelName($callingProjectId, $location, $channelId);
    $inputName = $livestreamClient->inputName($callingProjectId, $location, $inputId);

    $channel = (new Channel())
        ->setName($channelName)
        ->setInputAttachments([
            new InputAttachment([
                'key' => 'my-input',
                'input' => $inputName
            ])
        ])
        ->setElementaryStreams([
            new ElementaryStream([
                'key' => 'es_video',
                'video_stream' => new VideoStream([
                    'h264' => new VideoStream\H264CodecSettings([
                        'profile' => 'high',
                        'width_pixels' => 1280,
                        'height_pixels' => 720,
                        'bitrate_bps' => 3000000,
                        'frame_rate' => 30
                    ])
                ]),
            ]),
            new ElementaryStream([
                'key' => 'es_audio',
                'audio_stream' => new AudioStream([
                    'codec' => 'aac',
                    'channel_count' => 2,
                    'bitrate_bps' => 160000
                ])
            ])
        ])
        ->setOutput(new Channel\Output(['uri' => $outputUri]))
        ->setMuxStreams([
            new MuxStream([
                'key' => 'mux_video',
                'elementary_streams' => ['es_video'],
                'segment_settings' => new SegmentSettings([
                    'segment_duration' => new Duration(['seconds' => 2])
                ])
            ]),
            new MuxStream([
                'key' => 'mux_audio',
                'elementary_streams' => ['es_audio'],
                'segment_settings' => new SegmentSettings([
                    'segment_duration' => new Duration(['seconds' => 2])
                ])
            ]),
        ])
        ->setManifests([
            new Manifest([
                'file_name' => 'manifest.m3u8',
                'type' => Manifest\ManifestType::HLS,
                'mux_streams' => ['mux_video', 'mux_audio'],
                'max_segment_count' => 5
            ])
        ]);

    // Run the channel creation request. The response is a long-running operation ID.
    $request = (new CreateChannelRequest())
        ->setParent($parent)
        ->setChannel($channel)
        ->setChannelId($channelId);
    $operationResponse = $livestreamClient->createChannel($request);
    $operationResponse->pollUntilComplete();
    if ($operationResponse->operationSucceeded()) {
        $result = $operationResponse->getResult();
        // Print results
        printf('Channel: %s' . PHP_EOL, $result->getName());
    } else {
        $error = $operationResponse->getError();
        // handleError($error)
    }
}

Python

Untuk mempelajari cara menginstal dan menggunakan library klien untuk Live Stream API, lihat Library klien Live Stream API. Untuk mengetahui informasi selengkapnya, lihat dokumentasi referensi API Python Live Stream API.

Untuk melakukan autentikasi ke Live Stream API, siapkan Kredensial Default Aplikasi. Untuk mengetahui informasi selengkapnya, baca Menyiapkan autentikasi untuk lingkungan pengembangan lokal.


import argparse

from google.cloud.video import live_stream_v1
from google.cloud.video.live_stream_v1.services.livestream_service import (
    LivestreamServiceClient,
)
from google.protobuf import duration_pb2 as duration

def create_channel(
    project_id: str, location: str, channel_id: str, input_id: str, output_uri: str
) -> live_stream_v1.types.Channel:
    """Creates a channel.
    Args:
        project_id: The GCP project ID.
        location: The location in which to create the channel.
        channel_id: The user-defined channel ID.
        input_id: The user-defined input ID.
        output_uri: Uri of the channel output folder in a Cloud Storage bucket."""

    client = LivestreamServiceClient()
    parent = f"projects/{project_id}/locations/{location}"
    input = f"projects/{project_id}/locations/{location}/inputs/{input_id}"
    name = f"projects/{project_id}/locations/{location}/channels/{channel_id}"

    channel = live_stream_v1.types.Channel(
        name=name,
        input_attachments=[
            live_stream_v1.types.InputAttachment(
                key="my-input",
                input=input,
            ),
        ],
        output=live_stream_v1.types.Channel.Output(
            uri=output_uri,
        ),
        elementary_streams=[
            live_stream_v1.types.ElementaryStream(
                key="es_video",
                video_stream=live_stream_v1.types.VideoStream(
                    h264=live_stream_v1.types.VideoStream.H264CodecSettings(
                        profile="high",
                        width_pixels=1280,
                        height_pixels=720,
                        bitrate_bps=3000000,
                        frame_rate=30,
                    ),
                ),
            ),
            live_stream_v1.types.ElementaryStream(
                key="es_audio",
                audio_stream=live_stream_v1.types.AudioStream(
                    codec="aac", channel_count=2, bitrate_bps=160000
                ),
            ),
        ],
        mux_streams=[
            live_stream_v1.types.MuxStream(
                key="mux_video",
                elementary_streams=["es_video"],
                segment_settings=live_stream_v1.types.SegmentSettings(
                    segment_duration=duration.Duration(
                        seconds=2,
                    ),
                ),
            ),
            live_stream_v1.types.MuxStream(
                key="mux_audio",
                elementary_streams=["es_audio"],
                segment_settings=live_stream_v1.types.SegmentSettings(
                    segment_duration=duration.Duration(
                        seconds=2,
                    ),
                ),
            ),
        ],
        manifests=[
            live_stream_v1.types.Manifest(
                file_name="manifest.m3u8",
                type_="HLS",
                mux_streams=["mux_video", "mux_audio"],
                max_segment_count=5,
            ),
        ],
    )
    operation = client.create_channel(
        parent=parent, channel=channel, channel_id=channel_id
    )
    response = operation.result(600)
    print(f"Channel: {response.name}")

    return response

Ruby

Untuk mempelajari cara menginstal dan menggunakan library klien untuk Live Stream API, lihat Library klien Live Stream API. Untuk mengetahui informasi selengkapnya, lihat dokumentasi referensi API Ruby Live Stream API.

Untuk melakukan autentikasi ke Live Stream API, siapkan Kredensial Default Aplikasi. Untuk mengetahui informasi selengkapnya, baca Menyiapkan autentikasi untuk lingkungan pengembangan lokal.

require "google/cloud/video/live_stream"

##
# Create a channel
#
# @param project_id [String] Your Google Cloud project (e.g. "my-project")
# @param location [String] The location (e.g. "us-central1")
# @param channel_id [String] Your channel name (e.g. "my-channel")
# @param input_id [String] Your input name (e.g. "my-input")
# @param output_uri [String] Uri of the channel output folder in a Cloud Storage
#     bucket. (e.g. "gs://my-bucket/my-output-folder/";)
#
def create_channel project_id:, location:, channel_id:, input_id:, output_uri:
  # Create a Live Stream client.
  client = Google::Cloud::Video::LiveStream.livestream_service

  # Build the resource name of the parent.
  parent = client.location_path project: project_id, location: location
  # Build the resource name of the input.
  input_path = client.input_path project: project_id, location: location, input: input_id

  # Set the channel fields.
  new_channel = {
    input_attachments: [
      {
        key: "my-input",
        input: input_path
      }
    ],
    output: {
      uri: output_uri
    },
    elementary_streams: [
      {
        key: "es_video",
        video_stream: {
          h264: {
            profile: "high",
            bitrate_bps: 3_000_000,
            frame_rate: 30,
            height_pixels: 720,
            width_pixels: 1280
          }
        }
      },
      {
        key: "es_audio",
        audio_stream: {
          codec: "aac",
          channel_count: 2,
          bitrate_bps: 160_000
        }
      }
    ],
    mux_streams: [
      {
        key: "mux_video",
        elementary_streams: [
          "es_video"
        ],
        segment_settings: {
          segment_duration: {
            seconds: 2
          }
        }
      },
      {
        key: "mux_audio",
        elementary_streams: [
          "es_audio"
        ],
        segment_settings: {
          segment_duration: {
            seconds: 2
          }
        }
      }
    ],
    manifests: [
      {
        file_name: "main.m3u8",
        type: Google::Cloud::Video::LiveStream::V1::Manifest::ManifestType::HLS,
        mux_streams: [
          "mux_video", "mux_audio"
        ],
        max_segment_count: 5
      }
    ]
  }

  operation = client.create_channel parent: parent, channel: new_channel, channel_id: channel_id

  # The returned object is of type Gapic::Operation. You can use this
  # object to check the status of an operation, cancel it, or wait
  # for results. Here is how to block until completion:
  operation.wait_until_done!

  # Print the channel name.
  puts "Channel: #{operation.response.name}"
end

Memulai channel

Untuk memulai saluran, gunakan metode projects.locations.channels.start.

REST

Sebelum menggunakan salah satu data permintaan, lakukan penggantian berikut:

  • PROJECT_NUMBER: nomor project Google Cloud Anda; nomor ini berada di kolom Nomor project pada halaman Setelan IAM
  • LOCATION: lokasi lokasi channel Anda; gunakan salah satu wilayah yang didukung
    Tampilkan lokasi
    • us-central1
    • us-east1
    • us-east4
    • us-west1
    • us-west2
    • northamerica-northeast1
    • southamerica-east1
    • asia-east1
    • asia-east2
    • asia-northeast1
    • asia-southeast1
    • australia-southeast1
    • europe-west1
    • europe-west2
    • europe-west3
    • europe-west4
  • CHANNEL_ID: ID yang ditetapkan pengguna untuk channel

Untuk mengirim permintaan Anda, perluas salah satu opsi berikut:

Anda akan melihat respons JSON seperti berikut:

{
  "name": "projects/PROJECT_NUMBER/locations/LOCATION/operations/OPERATION_ID",
  "metadata": {
    "@type": "type.googleapis.com/google.cloud.video.livestream.v1.OperationMetadata",
    "createTime": CREATE_TIME,
    "target": "projects/PROJECT_NUMBER/locations/LOCATION/channels/CHANNEL_ID",
    "verb": "start",
    "requestedCancellation": false,
    "apiVersion": "v1"
  },
  "done": false
}
Perintah ini menghasilkan operasi yang berjalan lama (LRO) yang dapat digunakan untuk melacak progres permintaan Anda. Lihat Mengelola operasi yang berjalan lama untuk mengetahui informasi selengkapnya.

C#

Untuk mempelajari cara menginstal dan menggunakan library klien untuk Live Stream API, lihat Library klien Live Stream API. Untuk mengetahui informasi selengkapnya, lihat dokumentasi referensi API C# Live Stream API.

Untuk melakukan autentikasi ke Live Stream API, siapkan Kredensial Default Aplikasi. Untuk mengetahui informasi selengkapnya, baca Menyiapkan autentikasi untuk lingkungan pengembangan lokal.


using Google.Cloud.Video.LiveStream.V1;
using Google.LongRunning;
using System.Threading.Tasks;

public class StartChannelSample
{
    public async Task StartChannelAsync(
         string projectId, string locationId, string channelId)
    {
        // Create the client.
        LivestreamServiceClient client = LivestreamServiceClient.Create();

        StartChannelRequest request = new StartChannelRequest
        {
            ChannelName = ChannelName.FromProjectLocationChannel(projectId, locationId, channelId)
        };

        // Make the request.
        Operation<ChannelOperationResponse, OperationMetadata> response = await client.StartChannelAsync(request);

        // Poll until the returned long-running operation is complete.
        await response.PollUntilCompletedAsync();
    }
}

Go

Untuk mempelajari cara menginstal dan menggunakan library klien untuk Live Stream API, lihat Library klien Live Stream API. Untuk mengetahui informasi selengkapnya, lihat dokumentasi referensi API Go Live Stream API.

Untuk melakukan autentikasi ke Live Stream API, siapkan Kredensial Default Aplikasi. Untuk mengetahui informasi selengkapnya, baca Menyiapkan autentikasi untuk lingkungan pengembangan lokal.

import (
	"context"
	"fmt"
	"io"

	livestream "cloud.google.com/go/video/livestream/apiv1"
	"cloud.google.com/go/video/livestream/apiv1/livestreampb"
)

// startChannel starts a channel.
func startChannel(w io.Writer, projectID, location, channelID string) error {
	// projectID := "my-project-id"
	// location := "us-central1"
	// channelID := "my-channel-id"
	ctx := context.Background()
	client, err := livestream.NewClient(ctx)
	if err != nil {
		return fmt.Errorf("NewClient: %w", err)
	}
	defer client.Close()

	req := &livestreampb.StartChannelRequest{
		Name: fmt.Sprintf("projects/%s/locations/%s/channels/%s", projectID, location, channelID),
	}

	op, err := client.StartChannel(ctx, req)
	if err != nil {
		return fmt.Errorf("StartChannel: %w", err)
	}
	_, err = op.Wait(ctx)
	if err != nil {
		return fmt.Errorf("Wait: %w", err)
	}

	fmt.Fprintf(w, "Started channel")
	return nil
}

Java

Untuk mempelajari cara menginstal dan menggunakan library klien untuk Live Stream API, lihat Library klien Live Stream API. Untuk mengetahui informasi selengkapnya, lihat dokumentasi referensi API Java Live Stream API.

Untuk melakukan autentikasi ke Live Stream API, siapkan Kredensial Default Aplikasi. Untuk mengetahui informasi selengkapnya, baca Menyiapkan autentikasi untuk lingkungan pengembangan lokal.


import com.google.cloud.video.livestream.v1.ChannelName;
import com.google.cloud.video.livestream.v1.LivestreamServiceClient;
import java.io.IOException;
import java.util.concurrent.ExecutionException;
import java.util.concurrent.TimeUnit;
import java.util.concurrent.TimeoutException;

public class StartChannel {

  public static void main(String[] args) throws Exception {
    // TODO(developer): Replace these variables before running the sample.
    String projectId = "my-project-id";
    String location = "us-central1";
    String channelId = "my-channel-id";

    startChannel(projectId, location, channelId);
  }

  public static void startChannel(String projectId, String location, String channelId)
      throws InterruptedException, ExecutionException, TimeoutException, IOException {
    // Initialize client that will be used to send requests. This client only needs to be created
    // once, and can be reused for multiple requests. After completing all of your requests, call
    // the "close" method on the client to safely clean up any remaining background resources.
    LivestreamServiceClient livestreamServiceClient = LivestreamServiceClient.create();
    ChannelName name = ChannelName.of(projectId, location, channelId);
    // First API call in a project can take up to 15 minutes.
    livestreamServiceClient.startChannelAsync(name).get(15, TimeUnit.MINUTES);
    System.out.println("Started channel");
    livestreamServiceClient.close();
  }
}

Node.js

Untuk mempelajari cara menginstal dan menggunakan library klien untuk Live Stream API, lihat Library klien Live Stream API. Untuk mengetahui informasi selengkapnya, lihat dokumentasi referensi API Node.js Live Stream API.

Untuk melakukan autentikasi ke Live Stream API, siapkan Kredensial Default Aplikasi. Untuk mengetahui informasi selengkapnya, baca Menyiapkan autentikasi untuk lingkungan pengembangan lokal.

/**
 * TODO(developer): Uncomment these variables before running the sample.
 */
// projectId = 'my-project-id';
// location = 'us-central1';
// channelId = 'my-channel';

// Imports the Livestream library
const {LivestreamServiceClient} = require('@google-cloud/livestream').v1;

// Instantiates a client
const livestreamServiceClient = new LivestreamServiceClient();

async function startChannel() {
  // Construct request
  const request = {
    name: livestreamServiceClient.channelPath(projectId, location, channelId),
  };
  const [operation] = await livestreamServiceClient.startChannel(request);
  await operation.promise();
  console.log('Started channel');
}

startChannel();

PHP

Untuk mempelajari cara menginstal dan menggunakan library klien untuk Live Stream API, lihat Library klien Live Stream API. Untuk mengetahui informasi selengkapnya, lihat dokumentasi referensi API PHP Live Stream API.

Untuk melakukan autentikasi ke Live Stream API, siapkan Kredensial Default Aplikasi. Untuk mengetahui informasi selengkapnya, baca Menyiapkan autentikasi untuk lingkungan pengembangan lokal.

use Google\Cloud\Video\LiveStream\V1\Client\LivestreamServiceClient;
use Google\Cloud\Video\LiveStream\V1\StartChannelRequest;

/**
 * Starts a channel.
 *
 * @param string  $callingProjectId   The project ID to run the API call under
 * @param string  $location           The location of the channel
 * @param string  $channelId          The ID of the channel
 */
function start_channel(
    string $callingProjectId,
    string $location,
    string $channelId
): void {
    // Instantiate a client.
    $livestreamClient = new LivestreamServiceClient();
    $formattedName = $livestreamClient->channelName($callingProjectId, $location, $channelId);

    // Run the channel start request. The response is a long-running operation ID.
    $request = (new StartChannelRequest())
        ->setName($formattedName);
    $operationResponse = $livestreamClient->startChannel($request);
    $operationResponse->pollUntilComplete();
    if ($operationResponse->operationSucceeded()) {
        // Print results
        printf('Started channel' . PHP_EOL);
    } else {
        $error = $operationResponse->getError();
        // handleError($error)
    }
}

Python

Untuk mempelajari cara menginstal dan menggunakan library klien untuk Live Stream API, lihat Library klien Live Stream API. Untuk mengetahui informasi selengkapnya, lihat dokumentasi referensi API Python Live Stream API.

Untuk melakukan autentikasi ke Live Stream API, siapkan Kredensial Default Aplikasi. Untuk mengetahui informasi selengkapnya, baca Menyiapkan autentikasi untuk lingkungan pengembangan lokal.


import argparse

from google.cloud.video import live_stream_v1
from google.cloud.video.live_stream_v1.services.livestream_service import (
    LivestreamServiceClient,
)

def start_channel(
    project_id: str, location: str, channel_id: str
) -> live_stream_v1.types.ChannelOperationResponse:
    """Starts a channel.
    Args:
        project_id: The GCP project ID.
        location: The location of the channel.
        channel_id: The user-defined channel ID."""

    client = LivestreamServiceClient()

    name = f"projects/{project_id}/locations/{location}/channels/{channel_id}"
    operation = client.start_channel(name=name)
    response = operation.result(900)
    print("Started channel")

    return response

Ruby

Untuk mempelajari cara menginstal dan menggunakan library klien untuk Live Stream API, lihat Library klien Live Stream API. Untuk mengetahui informasi selengkapnya, lihat dokumentasi referensi API Ruby Live Stream API.

Untuk melakukan autentikasi ke Live Stream API, siapkan Kredensial Default Aplikasi. Untuk mengetahui informasi selengkapnya, baca Menyiapkan autentikasi untuk lingkungan pengembangan lokal.

require "google/cloud/video/live_stream"

##
# Starts a channel
#
# @param project_id [String] Your Google Cloud project (e.g. "my-project")
# @param location [String] The location (e.g. "us-central1")
# @param channel_id [String] Your channel name (e.g. "my-channel")
#
def start_channel project_id:, location:, channel_id:
  # Create a Live Stream client.
  client = Google::Cloud::Video::LiveStream.livestream_service

  # Build the resource name of the channel.
  name = client.channel_path project: project_id, location: location, channel: channel_id

  # Start the channel.
  operation = client.start_channel name: name

  # The returned object is of type Gapic::Operation. You can use this
  # object to check the status of an operation, cancel it, or wait
  # for results. Here is how to block until completion:
  operation.wait_until_done!

  # Print a success message.
  puts "Started channel"
end

Mengirim streaming input

Jika Anda menggunakan ffmpeg untuk mengirim streaming uji, buka jendela terminal baru. Jalankan perintah berikut menggunakan INPUT_STREAM_URI dari bagian Mendapatkan detail endpoint input:

ffmpeg -re -f lavfi -i "testsrc=size=1280x720 [out0]; sine=frequency=500 [out1]" \
  -acodec aac -vcodec h264 -f flv INPUT_STREAM_URI

Memutar live stream

Untuk memutar file media yang dihasilkan di Shaka Player, selesaikan langkah-langkah berikut:

  1. Buat agar bucket Cloud Storage yang Anda buat dapat dibaca oleh publik.
  2. Untuk mengaktifkan cross-origin resource sharing (CORS) di bucket Cloud Storage, lakukan tindakan berikut:
    1. Buat file JSON yang berisi hal berikut:
      [
        {
          "origin": ["https://shaka-player-demo.appspot.com/"],
          "responseHeader": ["Content-Type", "Range"],
          "method": ["GET", "HEAD"],
          "maxAgeSeconds": 3600
        }
      ]
    2. Jalankan perintah berikut setelah mengganti JSON_FILE_NAME dengan nama file JSON yang Anda buat di langkah sebelumnya:
      gsutil cors set JSON_FILE_NAME.json gs://BUCKET_NAME
  3. Di bucket Cloud Storage, temukan file yang dihasilkan. Klik Copy URL di kolom Public access file.
  4. Buka Shaka Player, pemain live stream online.
  5. Klik Konten Kustom di menu navigasi atas.
  6. Klik tombol +.
  7. Tempelkan URL publik file ke dalam kotak Manifest URL.

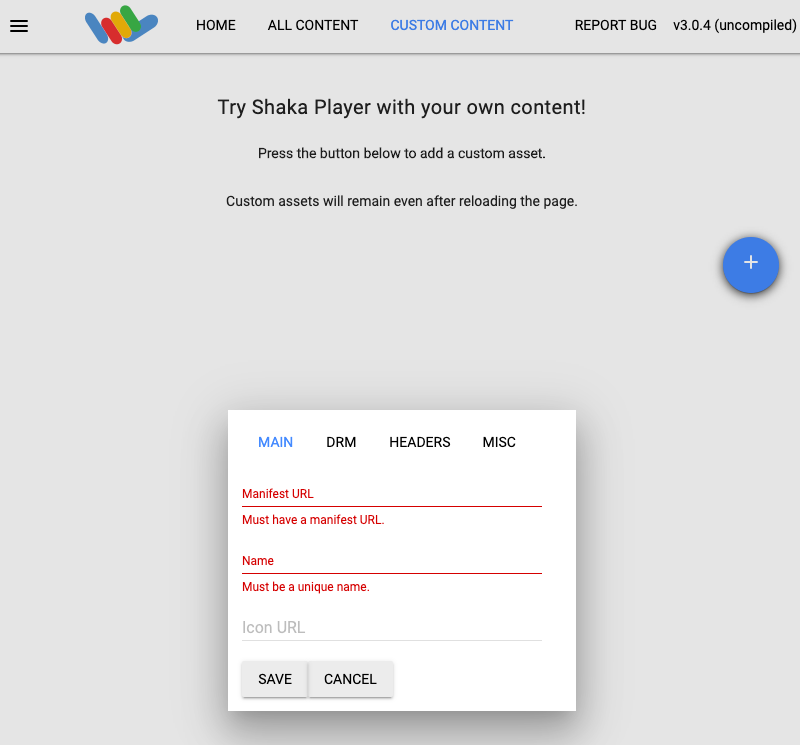
  8. Ketik nama di kotak Name.

  9. Klik Save.

  10. Klik Play.

Anda akan melihat pemutaran pola pengujian sebagai live stream.

Video pola uji

Membuat peristiwa channel

Untuk membuat peristiwa saluran, gunakan metode projects.locations.channels.events.create. Contoh berikut menyisipkan slate sebagai peristiwa channel di live stream.

Jika aset slate belum siap (dua detik setelah eksekusi peristiwa dimulai), layar hitam akan ditampilkan sampai aset slate siap.

REST

Sebelum menggunakan salah satu data permintaan, lakukan penggantian berikut:

  • PROJECT_NUMBER: nomor project Google Cloud Anda; nomor ini berada di kolom Nomor project pada halaman Setelan IAM
  • LOCATION: lokasi lokasi channel Anda; gunakan salah satu wilayah yang didukung
    Tampilkan lokasi
    • us-central1
    • us-east1
    • us-east4
    • us-west1
    • us-west2
    • northamerica-northeast1
    • southamerica-east1
    • asia-east1
    • asia-east2
    • asia-northeast1
    • asia-southeast1
    • australia-southeast1
    • europe-west1
    • europe-west2
    • europe-west3
    • europe-west4
  • CHANNEL_ID: ID yang ditetapkan pengguna untuk channel
  • EVENT_ID: ID yang ditentukan pengguna untuk peristiwa
  • ASSET_ID: ID yang ditentukan pengguna untuk aset slate

Untuk mengirim permintaan Anda, perluas salah satu opsi berikut:

Anda akan melihat respons JSON seperti berikut:

{
  "name": "projects/PROJECT_NUMBER/locations/LOCATION/channels/CHANNEL_ID/events/EVENT_ID",
  "createTime": CREATE_TIME,
  "updateTime": UPDATE_TIME,
  "slate": {
    "duration": "60s",
    "asset": "projects/PROJECT_NUMBER/locations/LOCATION/assets/ASSET_ID"
  },
  "executeNow": "true",
  "state": "PENDING"
}

Periksa live stream untuk melihat apakah slate sudah disisipkan. Anda juga dapat memeriksa apakah peristiwa memiliki state yang ditetapkan ke SUCCEEDED (lihat Mendapatkan detail peristiwa saluran).

Untuk membuat slate yang berjalan lama, hapus kolom duration dari objek slate. Untuk menghapus slate yang berjalan lama, buat peristiwa kembali ke saluran program.