Neste tutorial, mostramos como configurar o F5 BIG-IP ao integrar com o Google Distributed Cloud usando o modo de balanceamento de carga manual no Google Distributed Cloud.
A plataforma F5 BIG-IP oferece vários serviços para ajudar você a melhorar a segurança, a disponibilidade e o desempenho dos seus apps. Esses serviços incluem balanceamento de carga da camada 7, firewall de rede, firewall de aplicativos da Web (WAF), serviços de DNS e muito mais. Para o Google Distributed Cloud, o BIG-IP fornece acesso externo e serviços de balanceamento de carga L3/4.
Configurações avançadas
Depois que o utilitário de configuração for concluído, crie uma partição administrativa para cada cluster de usuário que você pretende expor e acessar.
Inicialmente, você define uma partição para o primeiro cluster de usuário. Não use as partições de cluster para mais nada. Cada um dos clusters precisa ter uma partição exclusiva.
Como configurar o BIG-IP para endpoints externos do Google Distributed Cloud
Se você não desativou o ingresso agrupado, é necessário configurar o BIG-IP com os servidores virtuais (VIPs), correspondentes aos seguintes endpoints do Google Distributed Cloud:
Partição de usuários
- VIP para o controlador de entrada do cluster de usuário (porta exposta:
443) - VIP para o controlador de entrada do cluster de usuário (porta exposta:
80)
- VIP para o controlador de entrada do cluster de usuário (porta exposta:
Criar objeto de nó
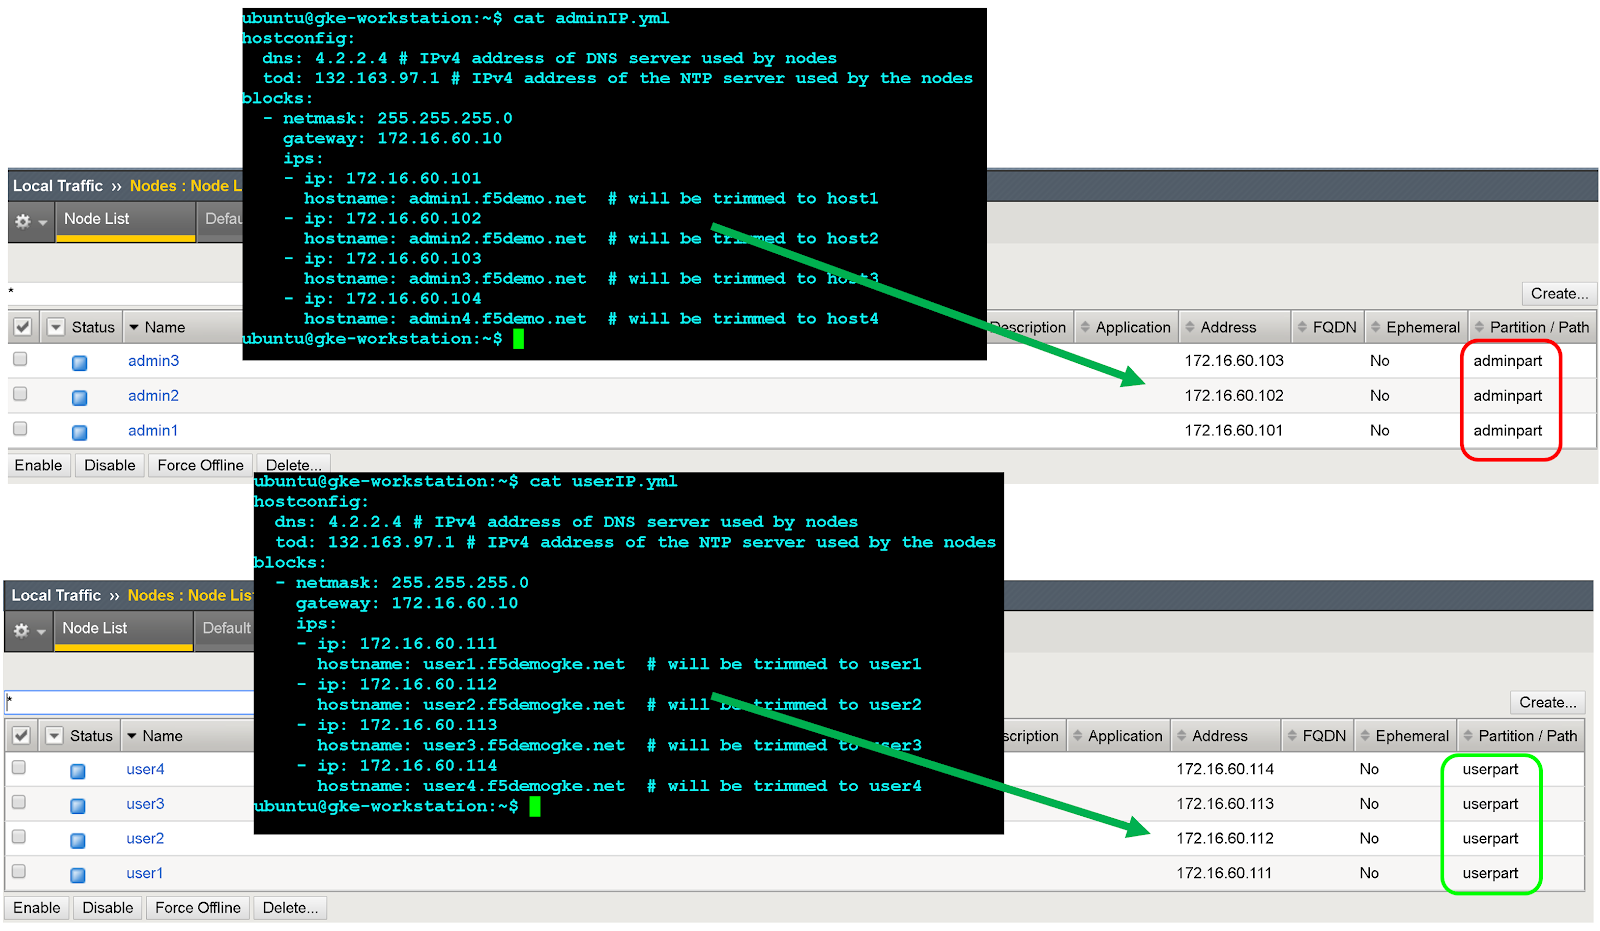
Os endereços IP externo do nó do cluster são usados para configurar objetos de nó no sistema BIG-IP. Você vai criar um objeto de nó para cada nó de cluster do Google Distributed Cloud. Os nós são adicionados a pools de back-end que são associados a servidores virtuais.
- Para fazer login no console de gerenciamento do BIG-IP, acesse o endereço IP. O endereço é fornecido durante a instalação.
- Clique na Partição de usuário que você criou anteriormente.
- Acesse Tráfego local > Nós > Lista de nós.
- Clique em Criar.
Insira um nome e um endereço IP para cada host do cluster e clique em Concluído.
Criar pools de back-end
Crie um pool de back-end para cada porta de nó.
- No console de gerenciamento do BIG-IP, clique em Partição do usuário para a partição que você criou antes.
- Acesse Tráfego local > Pools > Lista de pools.
- Clique em Criar.
- Na lista suspensa Configuração, clique em Avançado.
- No campo Nome, use
Istio-80-pool. - Para verificar a acessibilidade do membro do pool, em Monitor de integridade, clique em tcp. Opcional: como essa é uma configuração manual, você também pode aproveitar monitores avançados, conforme apropriado para sua implantação.
Em Ação em caso de falha do serviço, clique em Rejeitar.
Neste tutorial, na lista suspensa Método de balanceamento de carga, clique em Round Robin.
Na seção Novos membros, clique em Lista de nós e selecione o nó criado anteriormente.
No campo Porta do serviço, insira o
nodePortapropriado do arquivo de configuração ouspec.ports[?].nodePortno serviço de entrada do Istio do Kubernetes em tempo de execução (nome:istio-ingress, namespace:gke-system).Clique em Adicionar.
Repita as etapas 8 e 9 e adicione cada instância de nó de cluster.
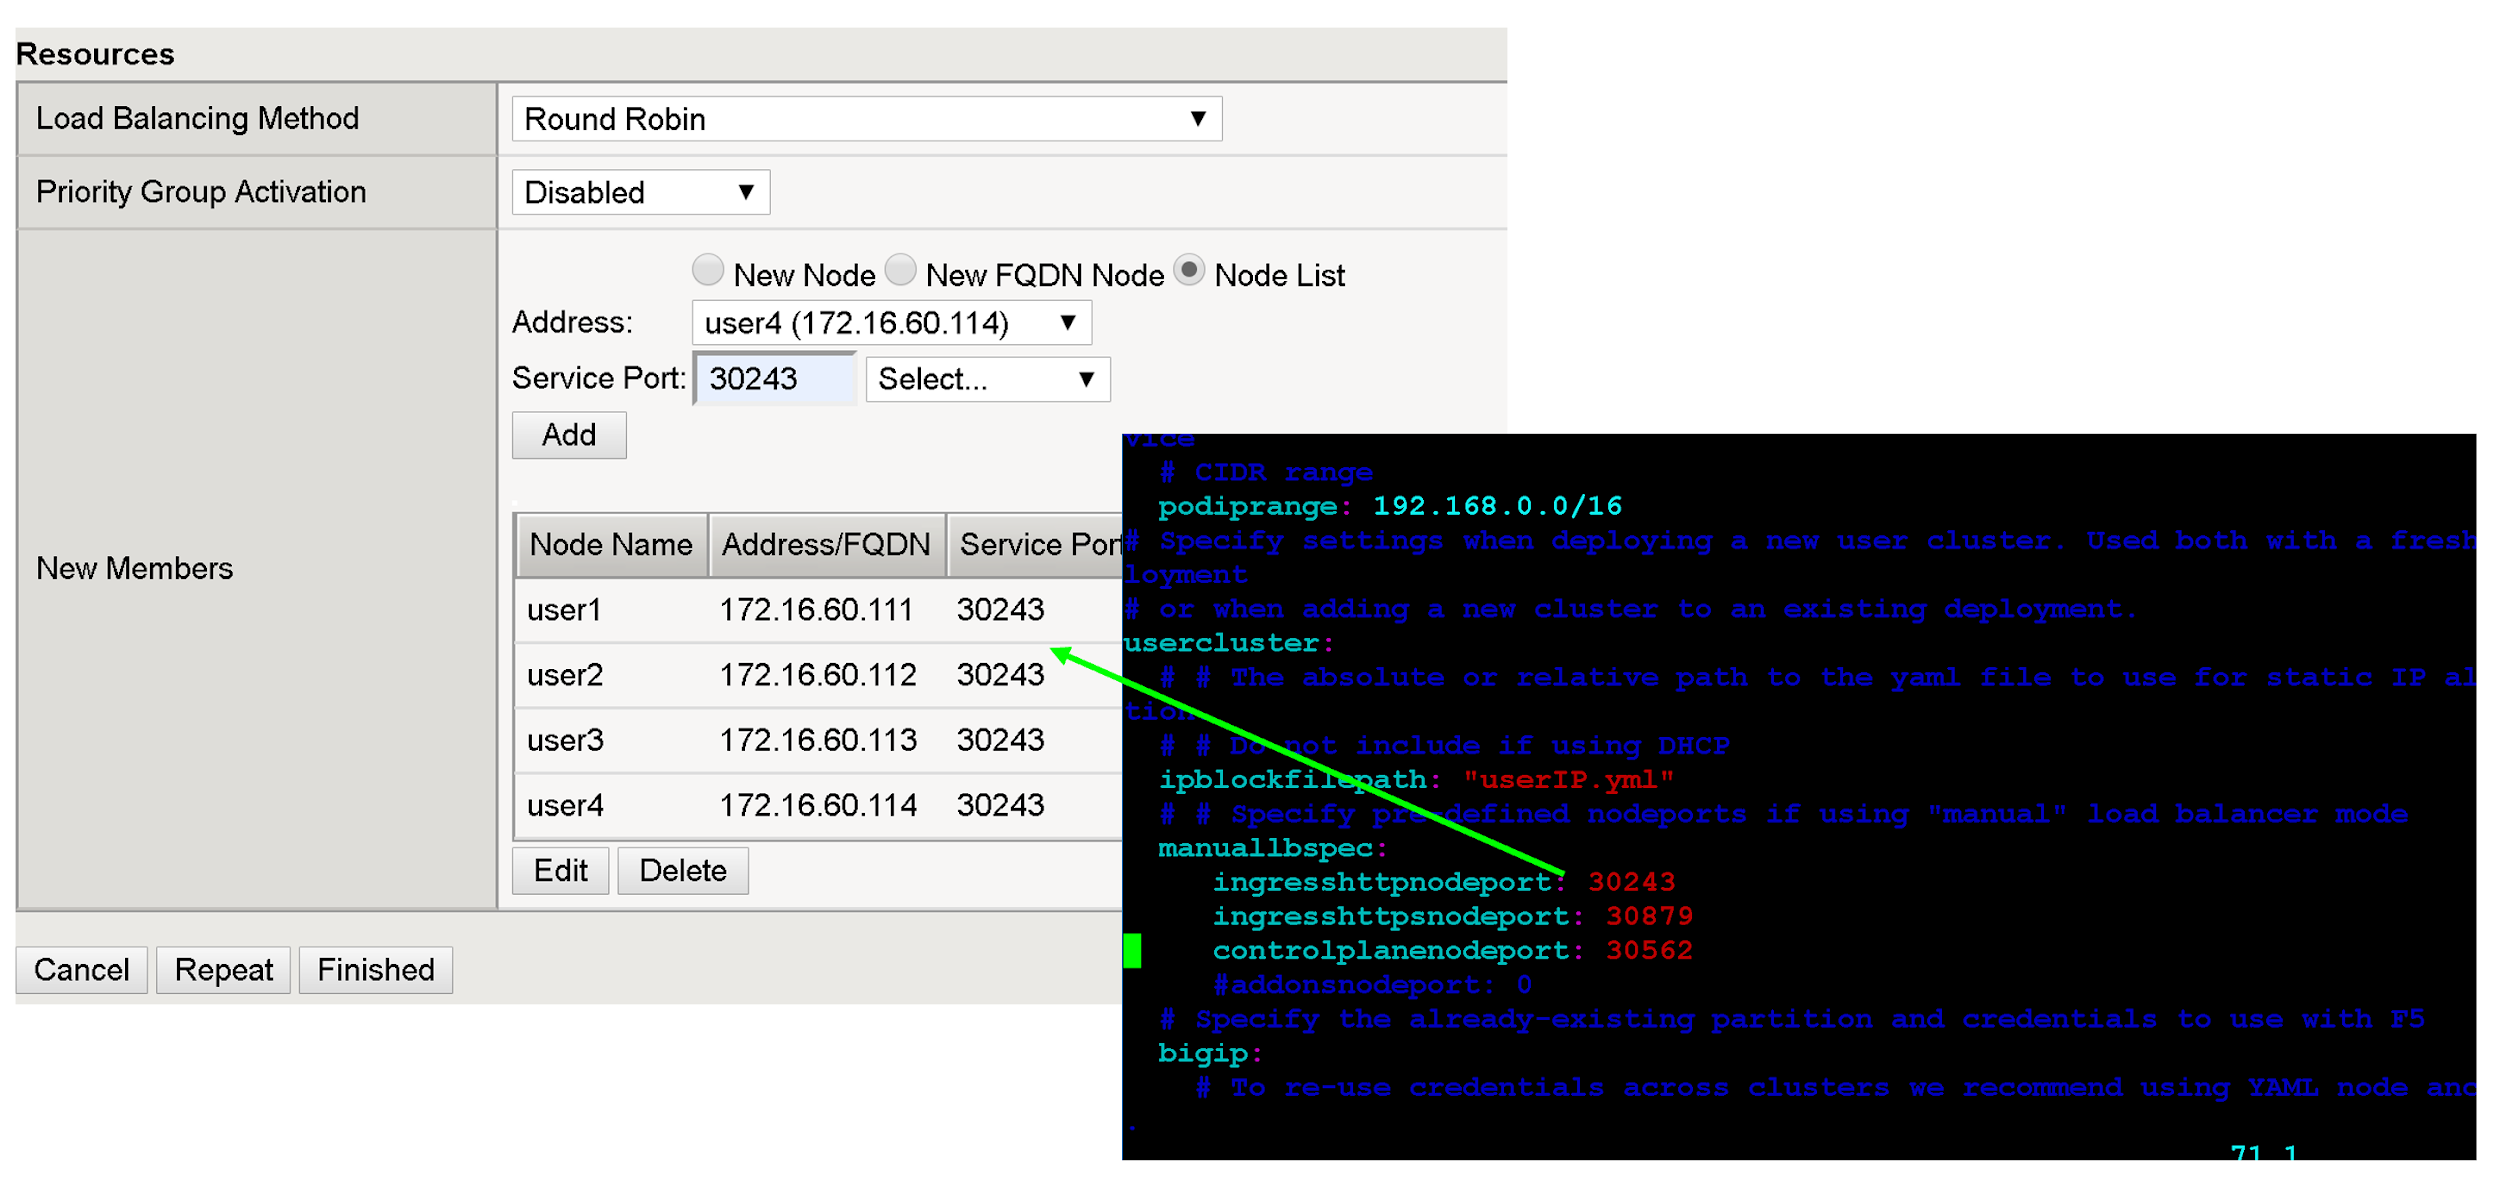
Clique em Concluído.
Repita todas as etapas desta seção para os nodePorts do cluster de usuário restantes.
Criar servidores virtuais
Você cria um total de dois servidores virtuais no BIG-IP para o primeiro cluster de usuário. Os servidores virtuais correspondem às combinações "VIP + porta".
- No console de gerenciamento do BIG-IP, clique na partição do usuário que você criou anteriormente.
- Acesse Tráfego local > Servidores virtuais > Lista de servidores virtuais.
- Clique em Criar.
- No campo Nome, use
istio-ingress-80. No campo Endereço/máscara de destino, insira o endereço IP do VIP. Para este tutorial, use o VIP de entrada HTTP em
configuration fileouspec.loadBalancerIPno serviço de entrada do Istio do Kubernetes em tempo de execução (nome:istio-ingress, namespace:gke-system).No campo Porta do serviço, insira a porta de listener apropriada para o VIP. Para este tutorial, use a porta
80ouspec.ports[?].portno serviço de entrada do Istio do Kubernetes de tempo de execução (nome:istio-ingress, namespace:gke-system).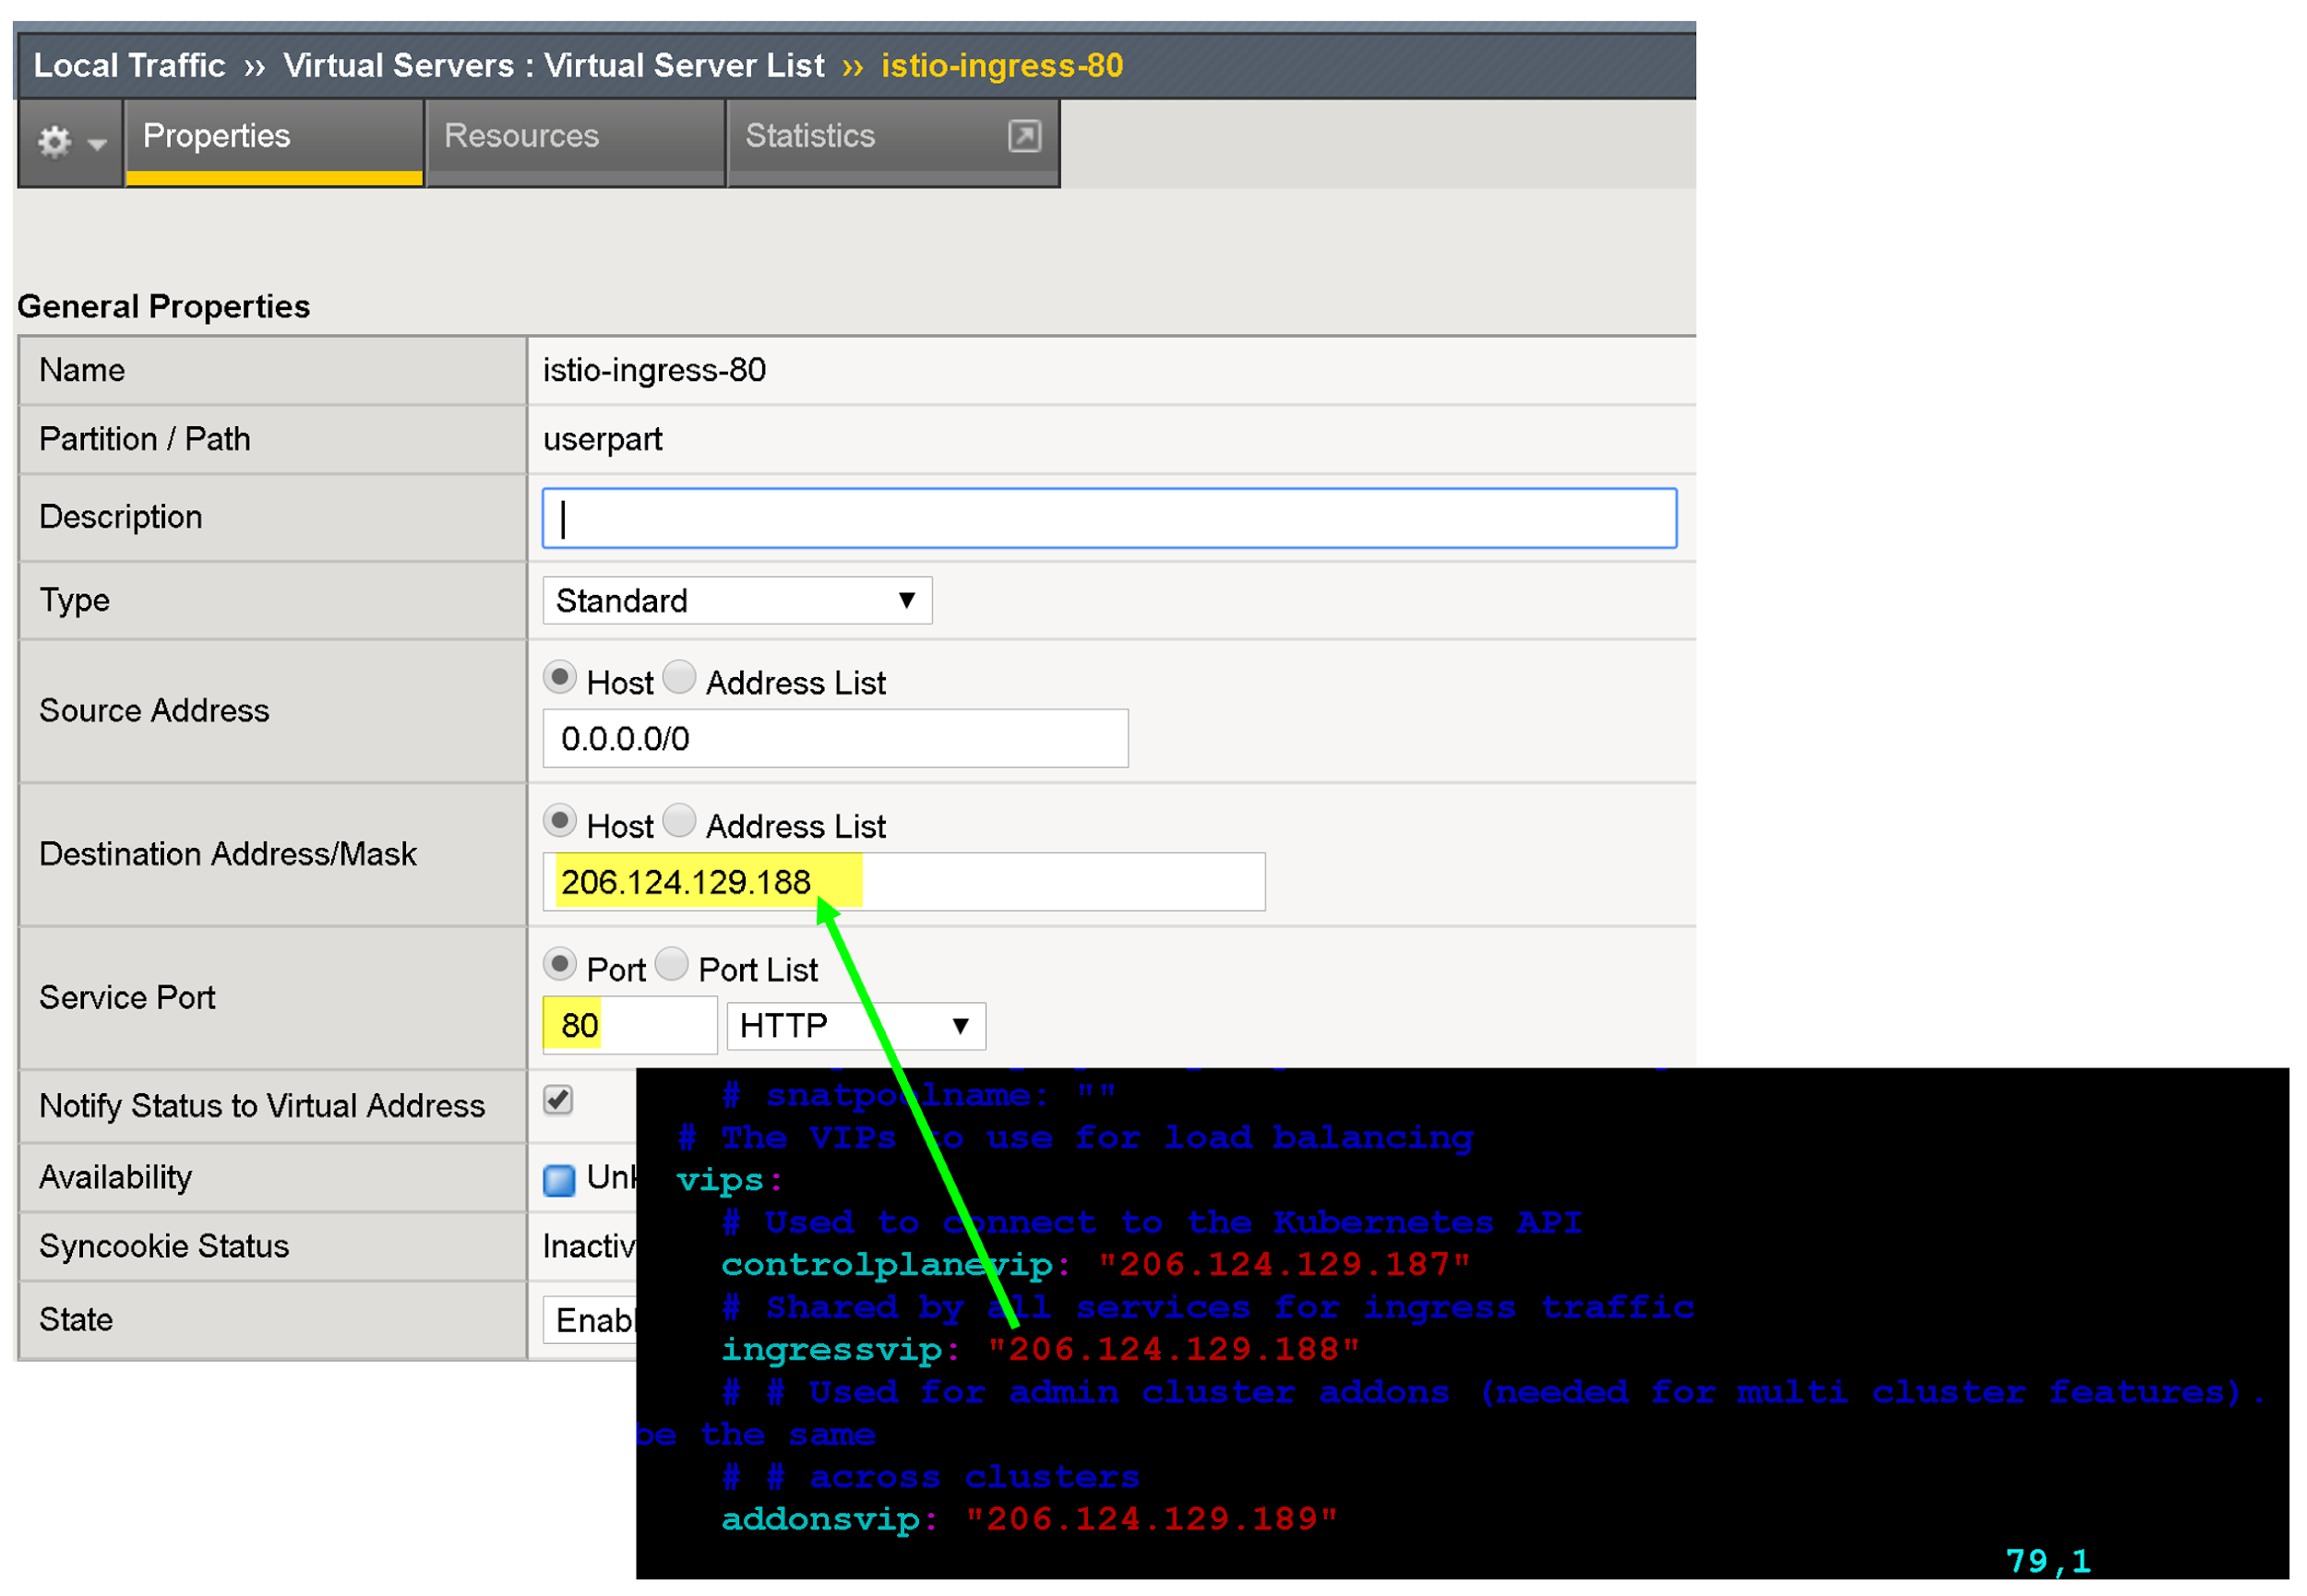
Há várias opções de configuração para melhorar o endpoint do app, como associar perfis específicos do protocolo, perfis de certificado e políticas de WAF.
Em Tradução de endereço de origem, clique em Mapa automático.
Em Pool padrão, selecione o pool adequado que você criou antes.
Clique em Concluído.
A seguir
Para melhorar ainda mais a segurança e o desempenho dos VIPs externos, considere o seguinte:
Saiba mais sobre os Serviços de aplicativos BIG-IP da F5.
Saiba mais sobre as configurações e os recursos do BIG-IP: