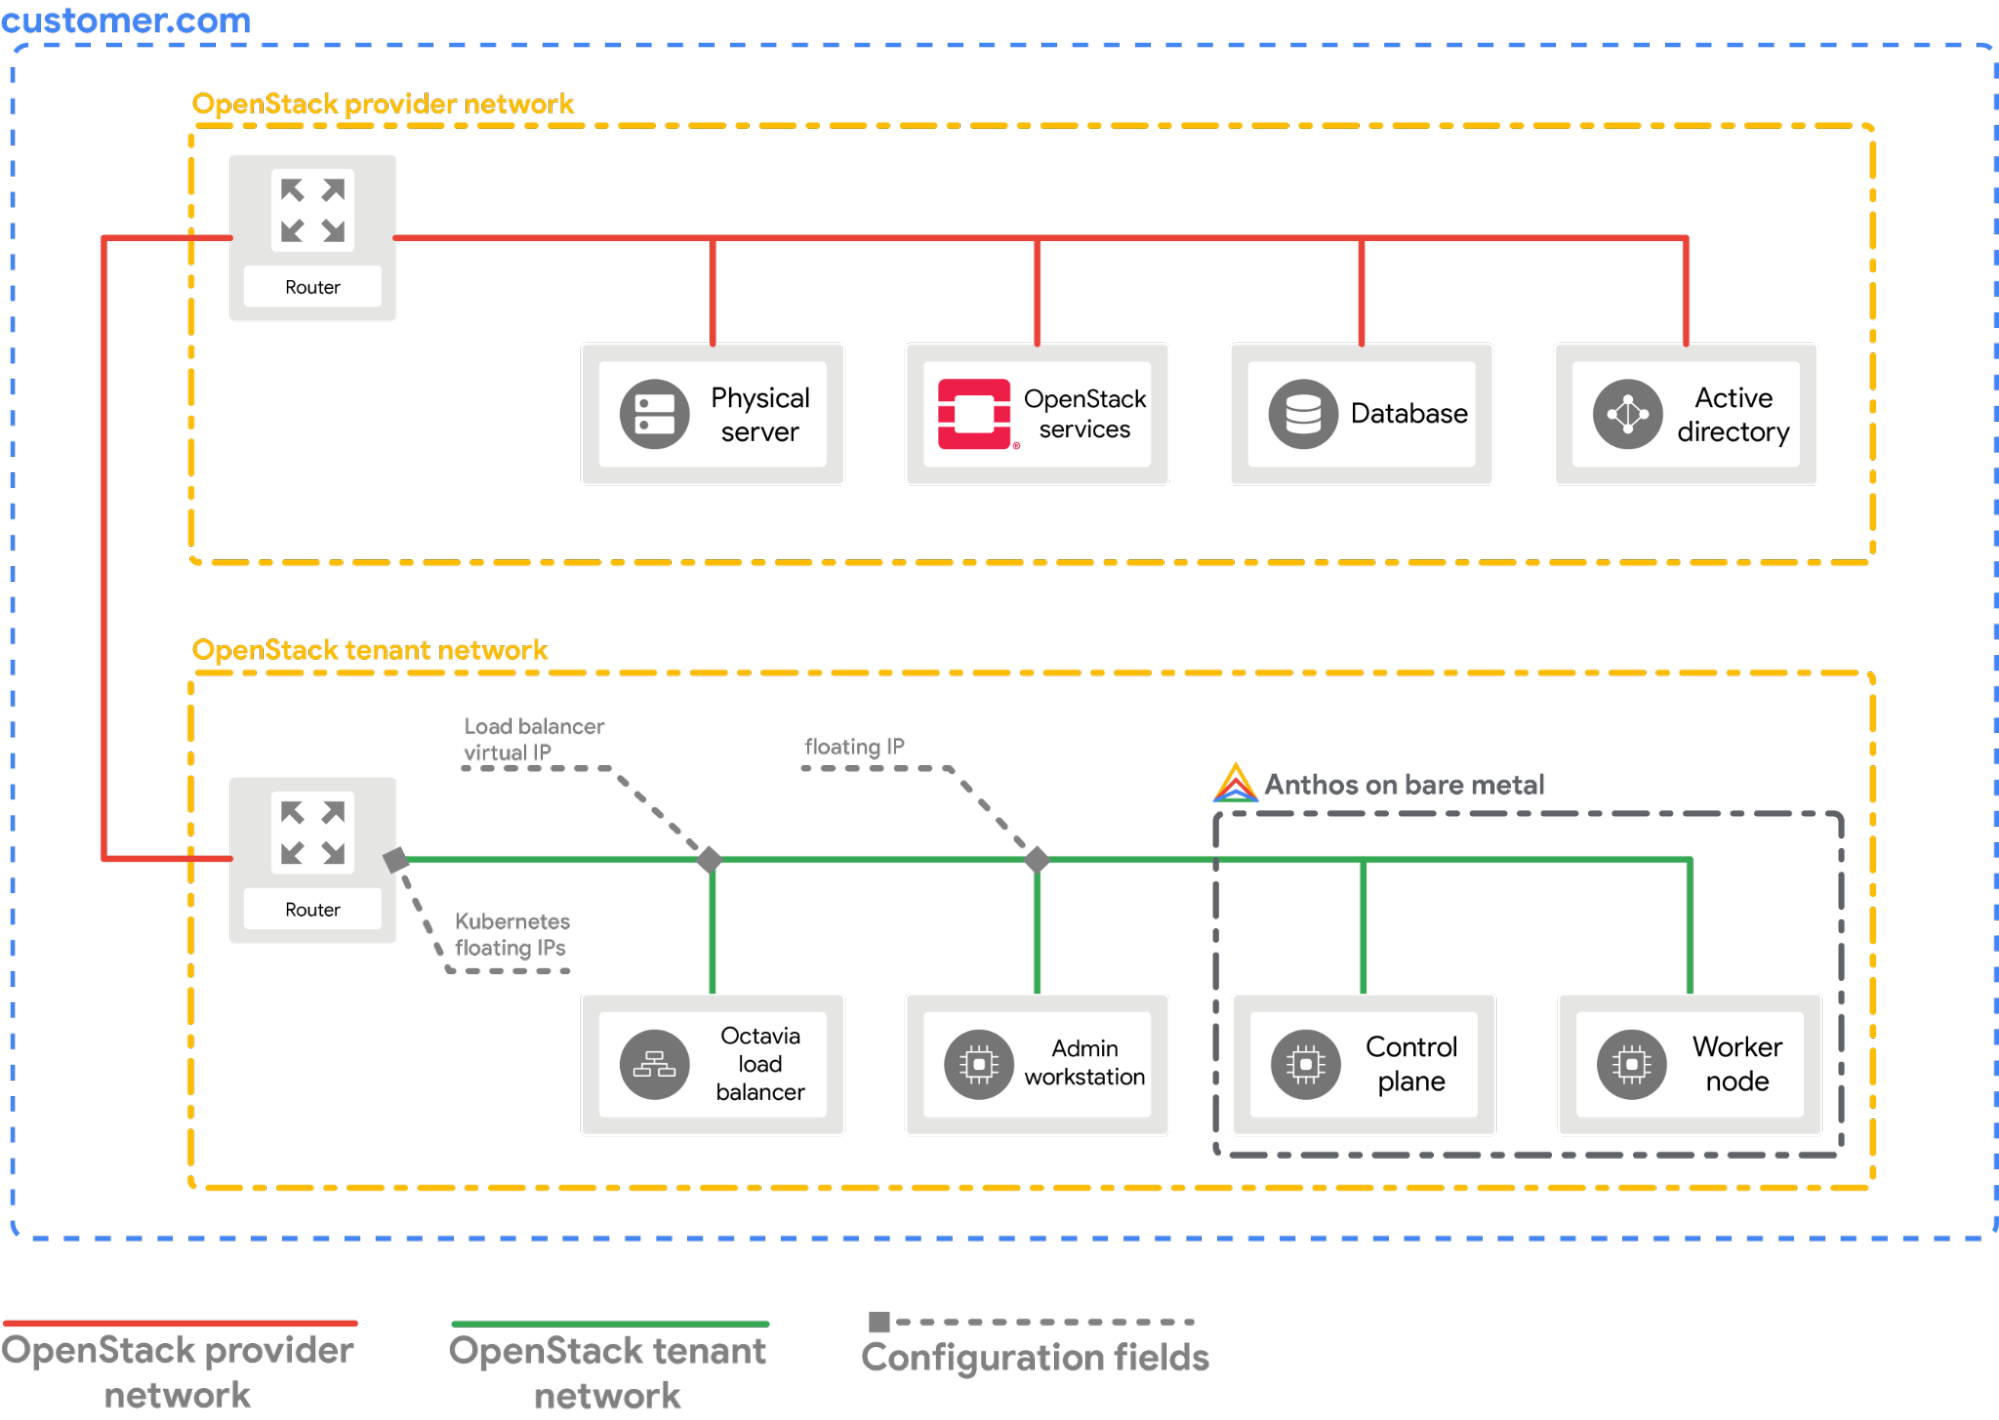
이 가이드에서는 OpenStack에 베어메탈 클러스터 배포 가이드에 설명된 것과 비슷한 설정으로 OpenStack 환경에서 Google Distributed Cloud로 만든 클러스터가 실행된다고 가정합니다. 이 단계를 시도하기 전에 먼저 해당 가이드를 참조하세요.
제공업체 구성
다음 섹션에서는 로컬 워크스테이션의 터미널 창에서 시작한다고 가정합니다.
OpenStack 클라이언트 구성(openrc) 파일을 얻습니다. OpenStack WebUI에서 다운로드할 수 있습니다.
sourcePATH_TO_OPENRC_FILE/openrc
OpenStack Kubernetes 클라우드 제공업체를 위한 구성 파일을 만듭니다.
cat > cloud.conf << EOF
[Global]
auth-url=${OS_AUTH_URL}
username=${OS_USERNAME}
password=${OS_PASSWORD}
region=RegionOne
tenant-name=admin
domain-id=default
# this is for using a self-signed cert if your using a CA then comment this line
# and point to the CA certificate using the "ca-file" arg
tls-Insecure=true
[LoadBalancer]
use-octavia=true
# this is generally the public network on OpenStack
floating-network-id=PUBLIC_NETWORK_ID
# this should be private network subnet where vip is allocated for the ABM nodes
subnet-id=ABM_NETWORK_SUBNET_ID
[BlockStorage]
bs-version=v2
EOF
다음을 바꿉니다.
OS_AUTH_URL, OS_USERNAME, OS_PASSWORD: 이러한 변수는 openrc 파일을 가져와서 환경에 이미 설정되어 있어야 합니다. 그러면 변수가 자동으로 선택됩니다.
PUBLIC_NETWORK_ID: 유동 IP 주소가 할당된 OpenStack 배포에서 공개적으로 액세스 가능한 네트워크입니다. 이 ID는 Kubernetes 서비스에 대해 LoadBalancer IPs가 할당된 이 네트워크에서 가져옵니다. 한 줄 명령어를 사용하여
OpenStack 환경에서 이 IP를 가져올 수 있습니다.
ABM_NETWORK_SUBNET_ID: 이것이 Google Distributed Cloud 소프트웨어 전용을 실행하는 VM에 대해 IP가 할당된 OpenStack 배포의 비공개 네트워크에 있는 서브넷입니다. OpenStack에서 공개 네트워크 ID 가져오기와 비슷한 명령어를 사용하여 OpenStack 환경에서 이 IP를 가져올 수 있습니다.
abm-ws VM의 비공개 유동 IP 주소를 가져옵니다.
exportOPENSTACK_IPS=$(openstackfloatingiplist--tags=abm_ws_floatingip-fjson)exportFLOATING_IP=$(jq-c'.[]."Floating IP Address"' <<< $OPENSTACK_IPS|tr-d'"')
# make sure the kubectl client is pointing towards your clusterexportKUBECONFIG=~/bmctl-workspace/CLUSTER_NAME/CLUSTER_NAME-kubeconfig
# store the provider configurations as a Kubernetes secret
kubectlcreatesecret-nkube-systemgenericcloud-config--from-file=cloud.conf
Kubernetes용 OpenStack 클라우드 제공업체를 설치합니다.
# create the necessary roles for the OpenStack provider
kubectlapply-fhttps://raw.githubusercontent.com/kubernetes/cloud-provider-openstack/master/manifests/controller-manager/cloud-controller-manager-roles.yaml
# create the required role-bindings for the OpenStack provider
kubectlapply-fhttps://raw.githubusercontent.com/kubernetes/cloud-provider-openstack/master/manifests/controller-manager/cloud-controller-manager-role-bindings.yaml
# create the OpenStack controller manager
kubectlapply-fhttps://raw.githubusercontent.com/kubernetes/cloud-provider-openstack/master/manifests/controller-manager/openstack-cloud-controller-manager-ds.yaml
# wait for the external IP to be assigned
kubectlgetserviceapi-server-lb
NAMETYPECLUSTER-IPEXTERNAL-IPPORT(S)AGE
api-server-lbLoadBalancer10.203.77.215172.29.249.15980:32378/TCP4m12s
EXTERNAL-IP를 사용하여 액세스하는 Point-Of-Sales 애플리케이션
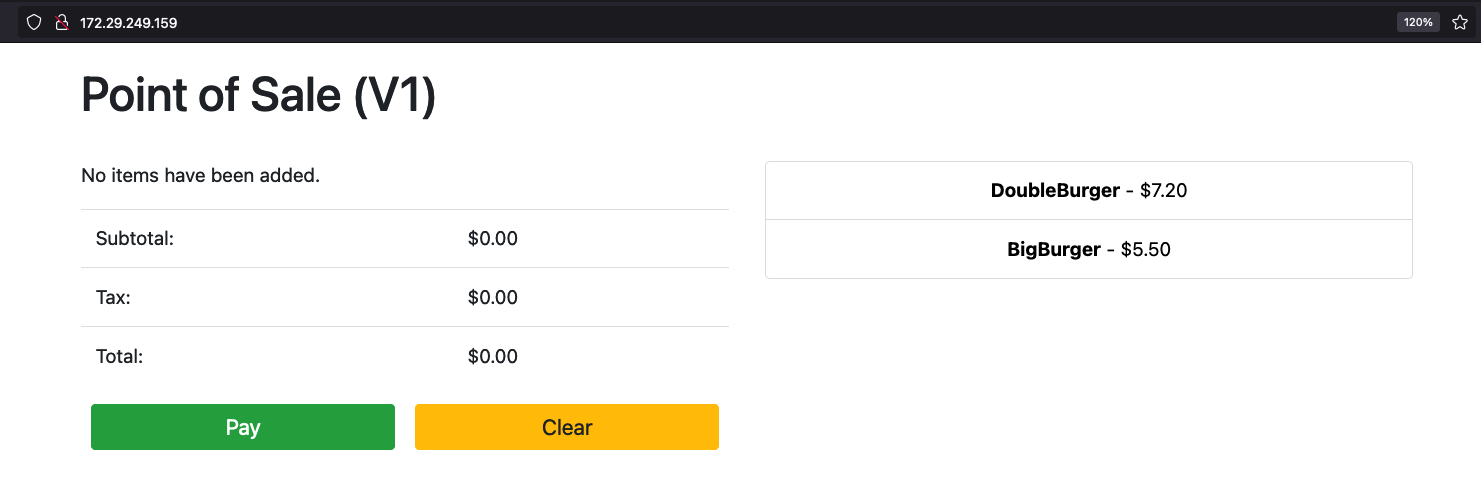
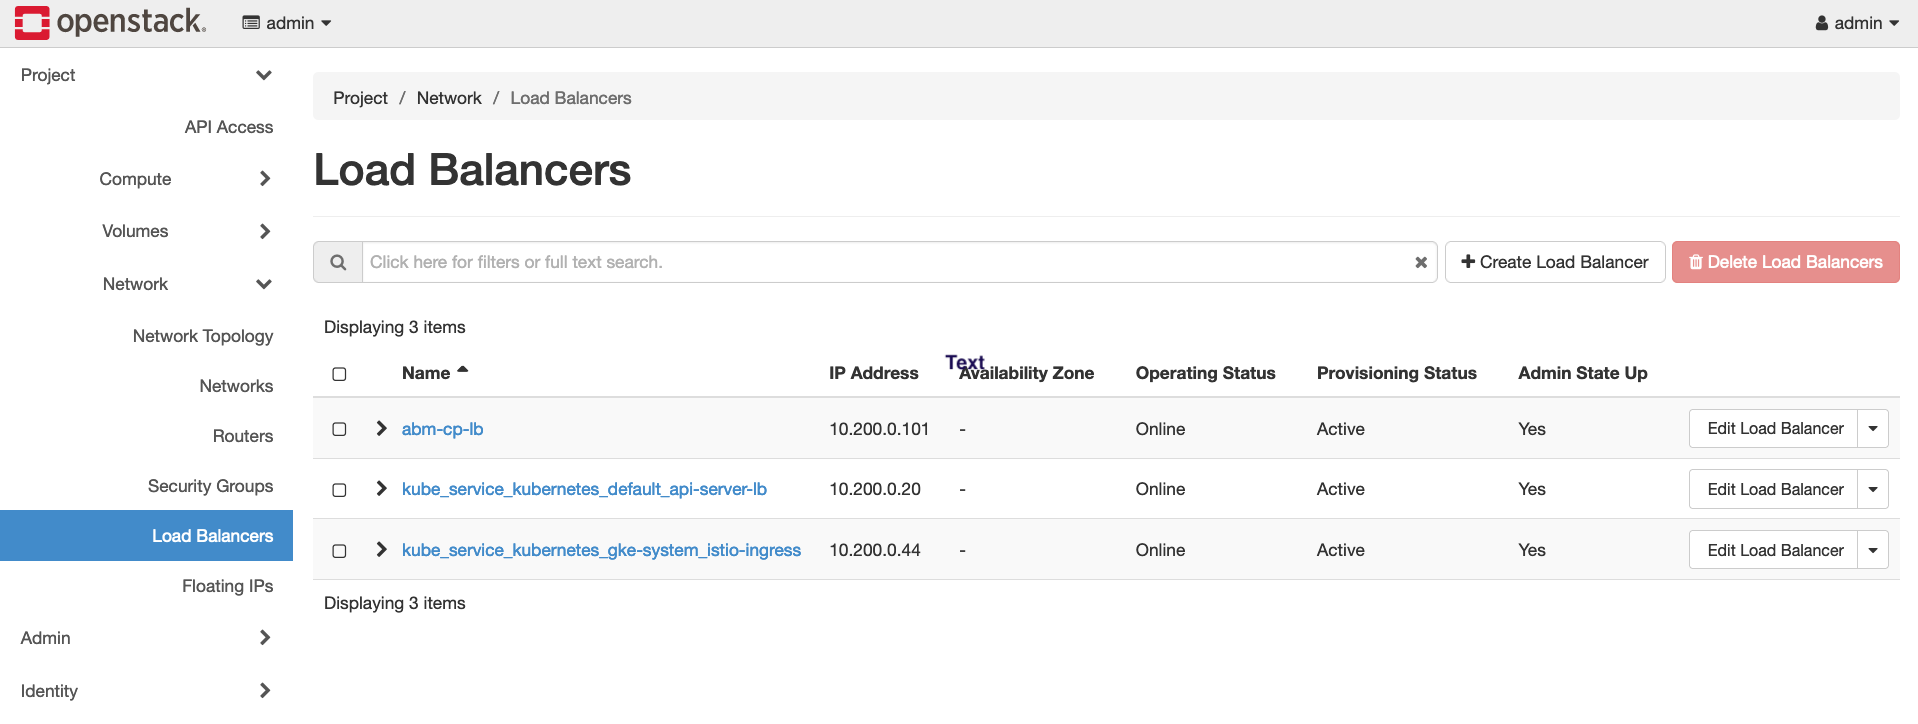
OpenStack WebUI를 방문하면 OpenStack에서 생성 중인 새 OpenStack 부하 분산기를 확인할 수 있습니다.
[[["이해하기 쉬움","easyToUnderstand","thumb-up"],["문제가 해결됨","solvedMyProblem","thumb-up"],["기타","otherUp","thumb-up"]],[["이해하기 어려움","hardToUnderstand","thumb-down"],["잘못된 정보 또는 샘플 코드","incorrectInformationOrSampleCode","thumb-down"],["필요한 정보/샘플이 없음","missingTheInformationSamplesINeed","thumb-down"],["번역 문제","translationIssue","thumb-down"],["기타","otherDown","thumb-down"]],["최종 업데이트: 2025-09-01(UTC)"],[],[],null,["This guide explains how to configure the\n[OpenStack Cloud Provider for Kubernetes](https://github.com/kubernetes/cloud-provider-openstack)\nin your bare metal cluster. The OpenStack Cloud Provider must be\nconfigured to expose Kubernetes Services using the\n[OpenStack LBaaS](https://docs.openstack.org/mitaka/networking-guide/config-lbaas.html).\n\nPrerequisites\n\nThis guide assumes that you have a cluster created with Google Distributed Cloud\nrunning in your OpenStack environment with a setup\nsimilar to what is explained in the [Deploy a bare metal cluster on\nOpenStack](/kubernetes-engine/distributed-cloud/bare-metal/docs/installing/openstack-abm-install) guide. Follow that guide first before trying\nthese steps.\n\n| **Warning:** All the commands that follow assume that the environment for Google Distributed Cloud in OpenStack was setup using this [Terraform script](https://github.com/GoogleCloudPlatform/anthos-samples/tree/master/anthos-bm-openstack-terraform#terraform-example-to-create-openstack-vms-for-anthos). Therefore, the names, such as VM name, Network name, and Root user, used in the commands are what is used by the Terraform script. Adjust the commands according to your setup if you configured the OpenStack environment manually.\n\nConfigure the provider\n\nThe following section assumes that you are starting from a terminal window in\nyour local workstation.\n\n1. Source the OpenStack client configuration (`openrc`) file. You can download\n it from the OpenStack WebUI.\n\n source \u003cvar translate=\"no\"\u003ePATH_TO_OPENRC_FILE\u003c/var\u003e/openrc\n\n2. Create the configuration file for the OpenStack Kubernetes Cloud Provider.\n\n cat \u003e cloud.conf \u003c\u003c EOF\n [Global]\n auth-url=${OS_AUTH_URL}\n username=${OS_USERNAME}\n password=${OS_PASSWORD}\n region=RegionOne\n tenant-name=admin\n domain-id=default\n # this is for using a self-signed cert if your using a CA then comment this line\n # and point to the CA certificate using the \"ca-file\" arg\n tls-Insecure=true \n\n [LoadBalancer]\n use-octavia=true\n # this is generally the public network on OpenStack\n floating-network-id=\u003cvar translate=\"no\"\u003ePUBLIC_NETWORK_ID\u003c/var\u003e\n # this should be private network subnet where vip is allocated for the ABM nodes\n subnet-id=\u003cvar translate=\"no\"\u003eABM_NETWORK_SUBNET_ID\u003c/var\u003e\n\n [BlockStorage]\n bs-version=v2\n EOF\n\n Replace the following:\n - \u003cvar translate=\"no\"\u003e\u003ccode translate=\"no\" dir=\"ltr\"\u003eOS_AUTH_URL\u003c/code\u003e\u003c/var\u003e, \u003cvar translate=\"no\"\u003e\u003ccode translate=\"no\" dir=\"ltr\"\u003eOS_USERNAME\u003c/code\u003e\u003c/var\u003e, \u003cvar translate=\"no\"\u003e\u003ccode translate=\"no\" dir=\"ltr\"\u003eOS_PASSWORD\u003c/code\u003e\u003c/var\u003e: These variables should be already set in the environment by source-ing the `openrc` file. Thus, they will be automatically picked up.\n - \u003cvar translate=\"no\"\u003e\u003ccode translate=\"no\" dir=\"ltr\"\u003ePUBLIC_NETWORK_ID\u003c/code\u003e\u003c/var\u003e: This is the publicly accessible network in your OpenStack deployment from which **Floating IP addresses** are allocated. It is from this network the `LoadBalancer IPs` for the Kubernetes services will be assigned. You can use a [one-line command](https://github.com/GoogleCloudPlatform/anthos-samples/blob/master/anthos-bm-openstack-terraform/docs/openstack_cloud_provider.md#4-get-the-id-of-the-public-network-in-openstack) to fetch this IP from your OpenStack environment.\n - \u003cvar translate=\"no\"\u003e\u003ccode translate=\"no\" dir=\"ltr\"\u003eABM_NETWORK_SUBNET_ID\u003c/code\u003e\u003c/var\u003e: This is the subnet on the private network in your OpenStack deployment from which IPs are allocated for the VMs running Google Distributed Cloud software-only. You can use a command similar to [Get the ID of the public network in OpenStack](https://github.com/GoogleCloudPlatform/anthos-samples/blob/master/anthos-bm-openstack-terraform/docs/openstack_cloud_provider.md#5-get-the-id-of-the-subnetwork-connecting-the-anthos-on-bare-metal-vms-in-openstack) to fetch this IP from your OpenStack environment.\n\n | **Note:** Edit the `cloud.conf` file to meet your needs and environment. What is shown here is only an example. For more information about all configuration parameters, see the [OpenStack Cloud Provider docs](https://github.com/kubernetes/cloud-provider-openstack/blob/master/docs/openstack-cloud-controller-manager/using-openstack-cloud-controller-manager.md#config-openstack-cloud-controller-manager).\n3. Fetch the **public floating IP address** of the `abm-ws` VM.\n\n export OPENSTACK_IPS=$(openstack floating ip list --tags=abm_ws_floatingip -f json)\n export FLOATING_IP=$(jq -c '.[].\"Floating IP Address\"' \u003c\u003c\u003c $OPENSTACK_IPS | tr -d '\"')\n\n4. Copy the `cloud.conf` file into the `abm-ws` VM in OpenStack.\n\n scp ./cloud.conf ubuntu@$FLOATING_IP:~\n\n | **Note:** If you have public key authentication configured for your VM use the `\"-o IdentitiesOnly=yes -i \u003cPATH_TO_KEY\u003e\"` flags with the SCP/SSH commands.\n5. Use SSH to connect securely to the `abm-ws` VM and sign in as a `root` user.\n\n The `root` user as configured by the\n [Terraform scripts](https://github.com/GoogleCloudPlatform/anthos-samples/tree/master/anthos-bm-openstack-terraform#terraform-example-to-create-openstack-vms-for-anthos)\n is `abm`. \n\n ssh ubuntu@$FLOATING_IP\n sudo -u abm -i\n\n6. Copy the `cloud.conf` files into the `$HOME` directory of the `root` user.\n\n cp /home/ubuntu/cloud.conf $HOME\n\n7. Create a `Kubernetes Secret` with the configuration.\n\n # make sure the kubectl client is pointing towards your cluster\n export KUBECONFIG=~/bmctl-workspace/\u003cvar translate=\"no\"\u003eCLUSTER_NAME\u003c/var\u003e/\u003cvar translate=\"no\"\u003eCLUSTER_NAME\u003c/var\u003e-kubeconfig\n\n # store the provider configurations as a Kubernetes secret\n kubectl create secret -n kube-system generic cloud-config --from-file=cloud.conf\n\n8. Install the OpenStack Cloud Provider for Kubernetes.\n\n # create the necessary roles for the OpenStack provider\n kubectl apply -f https://raw.githubusercontent.com/kubernetes/cloud-provider-openstack/master/manifests/controller-manager/cloud-controller-manager-roles.yaml\n\n # create the required role-bindings for the OpenStack provider\n kubectl apply -f https://raw.githubusercontent.com/kubernetes/cloud-provider-openstack/master/manifests/controller-manager/cloud-controller-manager-role-bindings.yaml\n\n # create the OpenStack controller manager\n kubectl apply -f https://raw.githubusercontent.com/kubernetes/cloud-provider-openstack/master/manifests/controller-manager/openstack-cloud-controller-manager-ds.yaml\n\nValidate the OpenStack integration\n\n1. Deploy the sample\n [Point-Of-Sales application](https://github.com/GoogleCloudPlatform/point-of-sale).\n\n kubectl apply -f https://raw.githubusercontent.com/GoogleCloudPlatform/anthos-samples/master/anthos-bm-openstack-terraform/resources/point-of-sales.yaml\n\n2. Verify if the application pods are running.\n\n kubectl get pods\n\n Expected output: \n\n NAME READY STATUS RESTARTS AGE\n api-server-7db4777f7f-zflk5 1/1 Running 0 74s\n inventory-58c6fb5568-dqk2x 1/1 Running 0 74s\n payments-68d5d65d5c-5mjl6 1/1 Running 0 74s\n\n3. Exposed the application through a service of type `LoadBalancer`.\n\n kubectl apply -f https://raw.githubusercontent.com/GoogleCloudPlatform/anthos-samples/master/anthos-bm-openstack-terraform/resources/point-of-sales-service.yaml\n\n4. Try accessing the service from a browser.\n\n # wait for the external IP to be assigned\n kubectl get service api-server-lb\n\n NAME TYPE CLUSTER-IP EXTERNAL-IP PORT(S) AGE\n api-server-lb LoadBalancer 10.203.77.215 172.29.249.159 80:32378/TCP 4m12s\n\n Point-Of-Sales application accessed using the `EXTERNAL-IP`.\n\n You can notice a new **OpenStack Load Balancer** being created in OpenStack by\n visiting the OpenStack WebUI."]]