Questa guida spiega come configurare il provider cloud OpenStack per Kubernetes nel cluster bare metal. Il provider cloud OpenStack deve essere configurato per esporre i servizi Kubernetes utilizzando OpenStack LBaaS.
Prerequisiti
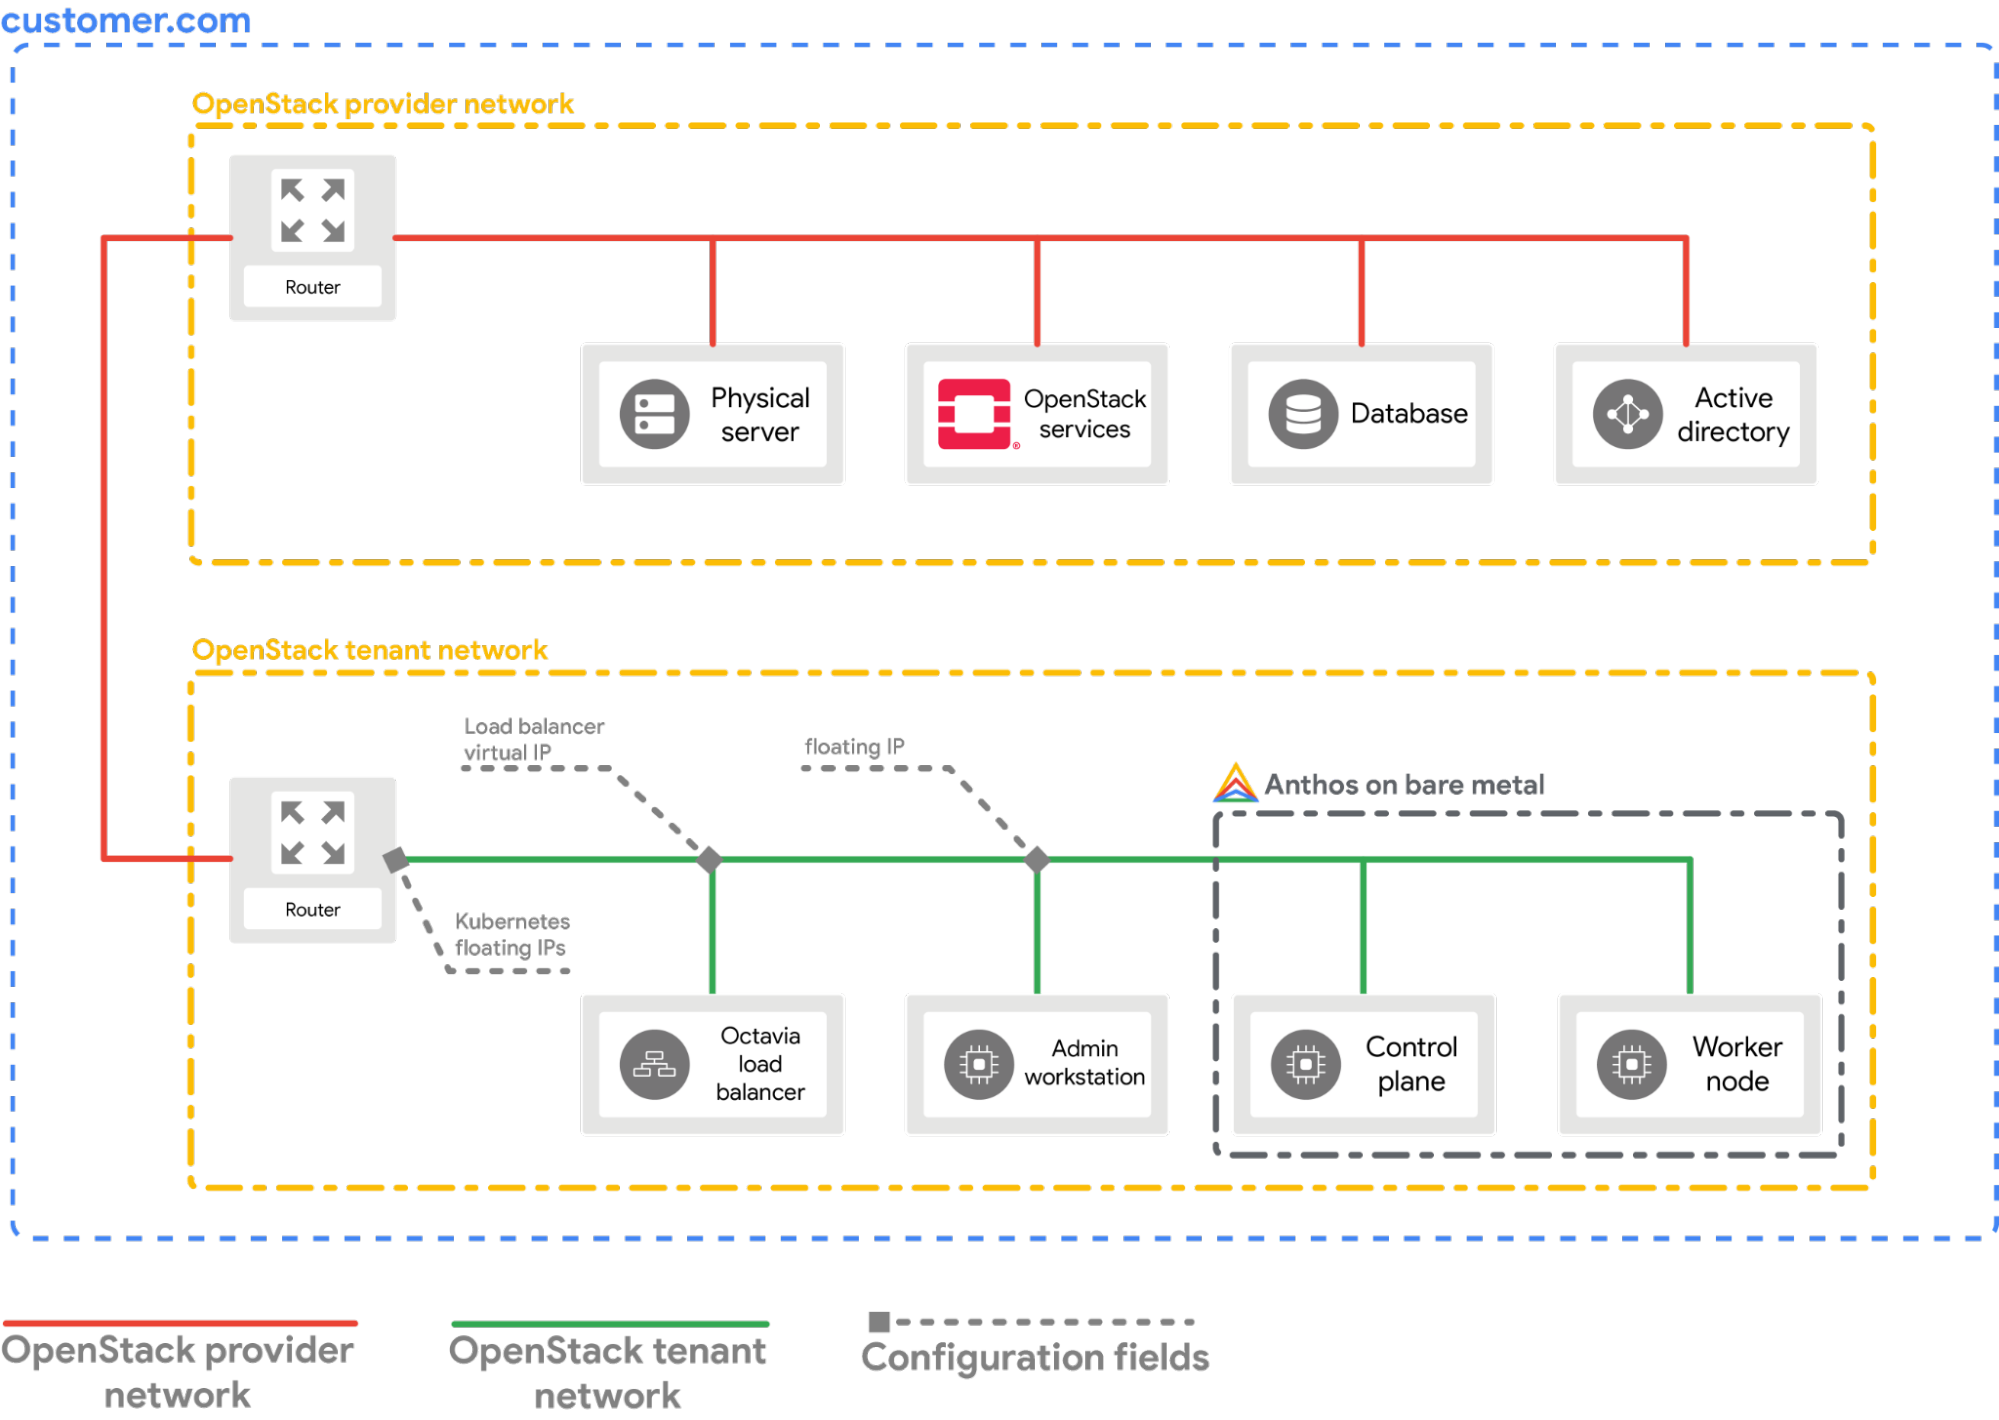
Questa guida presuppone che tu abbia creato un cluster con Google Distributed Cloud in esecuzione nel tuo ambiente OpenStack con una configurazione simile a quella spiegata nella guida Deploy di un cluster bare metal su OpenStack. Segui prima questa guida prima di provare questi passaggi.
Configura il provider
La sezione seguente presuppone che tu stia partendo da una finestra del terminale nella tua workstation locale.
Recupera il file di configurazione del client OpenStack (
openrc). Puoi scaricarlo dalla GUI web di OpenStack.source PATH_TO_OPENRC_FILE/openrcCrea il file di configurazione per il provider cloud OpenStack Kubernetes.
cat > cloud.conf << EOF
[Global]
auth-url=${OS_AUTH_URL}
username=${OS_USERNAME}
password=${OS_PASSWORD}
region=RegionOne
tenant-name=admin
domain-id=default
# this is for using a self-signed cert if your using a CA then comment this line
# and point to the CA certificate using the "ca-file" arg
tls-Insecure=true

[LoadBalancer]
use-octavia=true
# this is generally the public network on OpenStack
floating-network-id=PUBLIC_NETWORK_ID
# this should be private network subnet where vip is allocated for the ABM nodes
subnet-id=ABM_NETWORK_SUBNET_ID

[BlockStorage]
bs-version=v2
EOF
Sostituisci quanto segue:
OS_AUTH_URL,OS_USERNAME,OS_PASSWORD: queste variabili devono essere già impostate nell'ambiente tramite l'origine del fileopenrc. Pertanto, verranno selezionati automaticamente.PUBLIC_NETWORK_ID: questa è la rete accessibile pubblicamente nel tuo deployment OpenStack da cui vengono allocati gli indirizzi IP mobili. È da questa rete che verrà assegnatoLoadBalancer IPsper i servizi Kubernetes. Puoi utilizzare un comando di una riga per recuperare questo IP dal tuo ambiente OpenStack.ABM_NETWORK_SUBNET_ID: questa è la subnet sulla rete privata nella tua implementazione OpenStack da cui vengono allocati gli IP per le VM che eseguono solo il software Google Distributed Cloud. Puoi utilizzare un comando simile a Recupera l'ID della rete pubblica in OpenStack per recuperare questo IP dal tuo ambiente OpenStack.
Recupera l'indirizzo IP mobile pubblico della VM
abm-ws.export OPENSTACK_IPS=$(openstack floating ip list --tags=abm_ws_floatingip -f json) export FLOATING_IP=$(jq -c '.[]."Floating IP Address"' <<< $OPENSTACK_IPS | tr -d '"')Copia il file
cloud.confnella VMabm-wsin OpenStack.scp ./cloud.conf ubuntu@$FLOATING_IP:~Utilizza SSH per connetterti in modo sicuro alla VM
abm-wse accedere come utenteroot.L'utente
rootconfigurato dagli script Terraform èabm.ssh ubuntu@$FLOATING_IP sudo -u abm -iCopia i file
cloud.confnella directory$HOMEdell'utenteroot.cp /home/ubuntu/cloud.conf $HOMECrea un
Kubernetes Secretcon la configurazione.# make sure the kubectl client is pointing towards your cluster export KUBECONFIG=~/bmctl-workspace/CLUSTER_NAME/CLUSTER_NAME-kubeconfig # store the provider configurations as a Kubernetes secret kubectl create secret -n kube-system generic cloud-config --from-file=cloud.confInstalla il provider cloud OpenStack per Kubernetes.
# create the necessary roles for the OpenStack provider
kubectl apply -f https://raw.githubusercontent.com/kubernetes/cloud-provider-openstack/master/manifests/controller-manager/cloud-controller-manager-roles.yaml

# create the required role-bindings for the OpenStack provider
kubectl apply -f https://raw.githubusercontent.com/kubernetes/cloud-provider-openstack/master/manifests/controller-manager/cloud-controller-manager-role-bindings.yaml

# create the OpenStack controller manager
kubectl apply -f https://raw.githubusercontent.com/kubernetes/cloud-provider-openstack/master/manifests/controller-manager/openstack-cloud-controller-manager-ds.yaml
Convalidare l'integrazione di OpenStack
Esegui il deployment dell'applicazione Point-Of-Sales di esempio.
kubectl apply -f https://raw.githubusercontent.com/GoogleCloudPlatform/anthos-samples/master/anthos-bm-openstack-terraform/resources/point-of-sales.yamlVerifica se i pod dell'applicazione sono in esecuzione.
kubectl get podsOutput previsto:
NAME                          READY   STATUS    RESTARTS   AGE
api-server-7db4777f7f-zflk5   1/1     Running   0          74s
inventory-58c6fb5568-dqk2x    1/1     Running   0          74s
payments-68d5d65d5c-5mjl6     1/1     Running   0          74s
L'applicazione è stata esposta tramite un servizio di tipo
LoadBalancer.kubectl apply -f https://raw.githubusercontent.com/GoogleCloudPlatform/anthos-samples/master/anthos-bm-openstack-terraform/resources/point-of-sales-service.yamlProva ad accedere al servizio da un browser.
# wait for the external IP to be assigned
kubectl get service api-server-lb

NAME            TYPE           CLUSTER-IP      EXTERNAL-IP      PORT(S)        AGE
api-server-lb   LoadBalancer   10.203.77.215   172.29.249.159   80:32378/TCP   4m12s
Applicazione point of sale a cui si accede utilizzando
EXTERNAL-IP.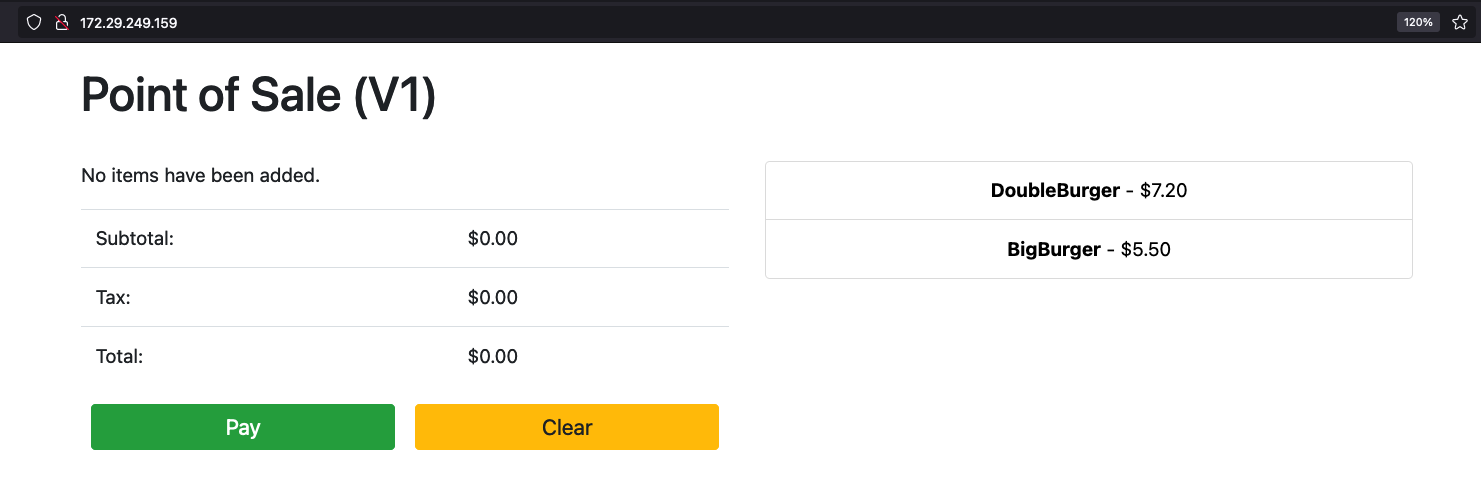
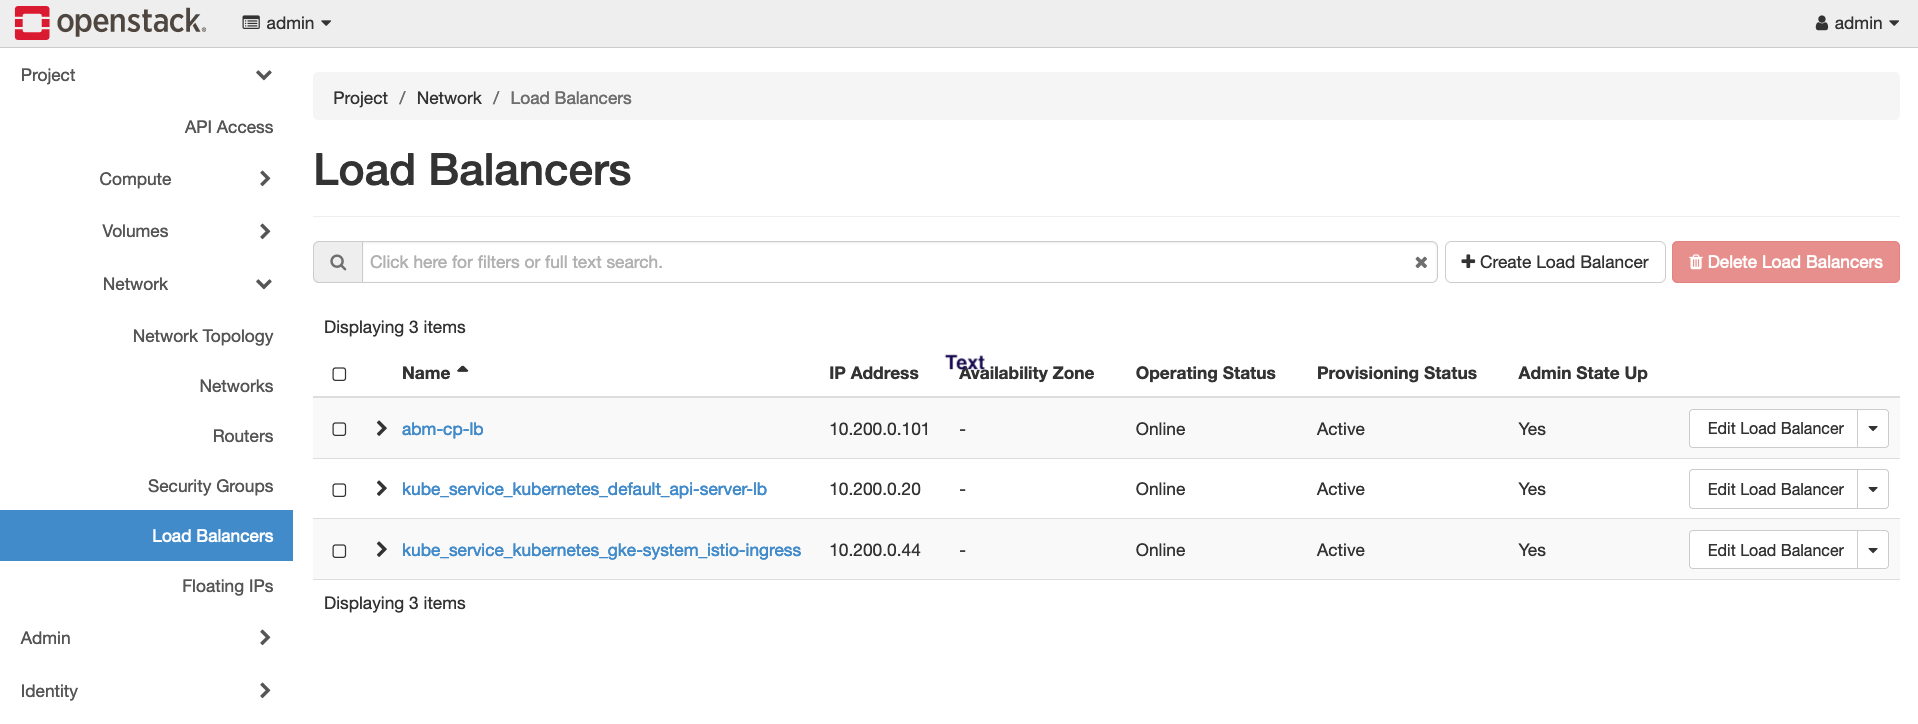
Puoi notare la creazione di un nuovo bilanciamento del carico OpenStack in OpenStack visitando la GUI web di OpenStack.