Restez organisé à l'aide des collections
Enregistrez et classez les contenus selon vos préférences.
Créer une instance de VM Deep Learning à l'aide de la console Google Cloud
Cette page explique comment créer une instance Deep Learning VM Image à l'aide de Google Cloud Marketplace dans la console Google Cloud .
Avant de commencer
Sign in to your Google Cloud account. If you're new to
Google Cloud,
create an account to evaluate how our products perform in
real-world scenarios. New customers also get $300 in free credits to
run, test, and deploy workloads.
In the Google Cloud console, on the project selector page,
select or create a Google Cloud project.
Cliquez sur Commencer. Si vous voyez une fenêtre de sélection de projet, choisissez le projet dans lequel créer l'instance. Si vous lancez une VM Compute Engine pour la première fois, vous devez attendre la fin du processus de configuration initiale de l'API.
Sur la page New Deep Learning VM deployment (Nouveau déploiement Deep Learning VM), saisissez d'abord un nom de déploiement. Il correspond à la racine du nom de votre machine virtuelle.
Compute Engine ajoute -vm à ce nom lorsque vous nommez votre instance.
Sélectionnez une zone ou conservez celle par défaut.
Sous Type de machine, sélectionnez les spécifications de votre choix pour votre VM ou conservez la valeur par défaut.
Sous GPU, sélectionnez le type de GPU et le nombre de GPU, ou conservez les valeurs par défaut.
Si vous ne souhaitez pas utiliser de GPU, cliquez sur le bouton Supprimer le GPU.
Vous pouvez sélectionner l'option Enable access to JupyterLab via URL instead of SSH (Autoriser l'accès à JupyterLab via une URL au lieu de SSH) disponible en version bêta. L'activation de cette fonctionnalité bêta vous permet d'accéder à votre instance JupyterLab à l'aide d'une URL. Toute personne disposant du rôle d'éditeur ou de propriétaire dans votre projet Google Cloud peut accéder à cette URL. Cette fonctionnalité n'est disponible qu'aux États-Unis, dans l'Union européenne et en Asie.
Sélectionnez un framework de machine learning ou conservez celui par défaut.
Cliquez sur Déployer.
Vous venez de créer votre première instance Deep Learning VM.
Une fois l'instance déployée, la console Google Cloud ouvre la page Deployment Manager sur laquelle vous pouvez gérer vos instances Deep Learning VM et d'autres déploiements.
Accéder à la nouvelle instance
Une fois que vous avez créé votre instance Deep Learning VM, elle démarre automatiquement. Pour y accéder, procédez comme suit :
Accédez à la page "Instances de VM" de la console Google Cloud .
Sous la colonne Nom, cliquez sur le nom de votre instance de machine virtuelle.
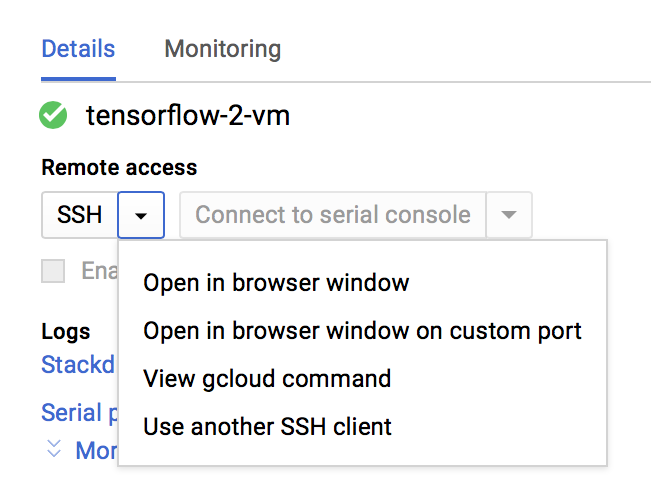
Dans la section Accès à distance, cliquez sur la première liste déroulante et choisissez le mode d'accès souhaité à l'instance. Vous pouvez choisir d'interagir avec une interface utilisateur graphique ou de vous servir de la ligne de commande.
Compute Engine va propager vos clés SSH et créer votre utilisateur. Pour en savoir plus, consultez la page Se connecter à des instances.
Arrêter l'instance
Accédez à la page "Instances de VM" de la console Google Cloud .
Sauf indication contraire, le contenu de cette page est régi par une licence Creative Commons Attribution 4.0, et les échantillons de code sont régis par une licence Apache 2.0. Pour en savoir plus, consultez les Règles du site Google Developers. Java est une marque déposée d'Oracle et/ou de ses sociétés affiliées.
Dernière mise à jour le 2025/09/04 (UTC).
[[["Facile à comprendre","easyToUnderstand","thumb-up"],["J'ai pu résoudre mon problème","solvedMyProblem","thumb-up"],["Autre","otherUp","thumb-up"]],[["Difficile à comprendre","hardToUnderstand","thumb-down"],["Informations ou exemple de code incorrects","incorrectInformationOrSampleCode","thumb-down"],["Il n'y a pas l'information/les exemples dont j'ai besoin","missingTheInformationSamplesINeed","thumb-down"],["Problème de traduction","translationIssue","thumb-down"],["Autre","otherDown","thumb-down"]],["Dernière mise à jour le 2025/09/04 (UTC)."],[[["\u003cp\u003eThis guide outlines how to create a Deep Learning VM instance using the Google Cloud Marketplace within the Google Cloud console, starting with the "Get started" button.\u003c/p\u003e\n"],["\u003cp\u003eUsers can customize their VM by selecting a deployment name, zone, machine type, GPU type, number of GPUs, and a machine learning framework, or they can opt for default settings.\u003c/p\u003e\n"],["\u003cp\u003eAfter deployment, the VM can be accessed via the VM Instances page, where users can choose between interacting with a graphical user interface or on the command line.\u003c/p\u003e\n"],["\u003cp\u003eThe instance can be manually stopped and started from the VM Instances page, and finally, the deployment can be deleted to avoid incurring unnecessary charges.\u003c/p\u003e\n"],["\u003cp\u003eJupyterLab access via a URL is an available beta feature in select regions, granting access to users in the Editor or Owner role within your Google Cloud project.\u003c/p\u003e\n"]]],[],null,["# Quickstart: Create a Deep Learning VM instance by using the Google Cloud console\n\nCreate a Deep Learning VM instance by using the Google Cloud console\n====================================================================\n\nThis page shows you how to create a Deep Learning VM Images instance\nby using Google Cloud Marketplace in the Google Cloud console.\n\nBefore you begin\n----------------\n\n- Sign in to your Google Cloud account. If you're new to Google Cloud, [create an account](https://console.cloud.google.com/freetrial) to evaluate how our products perform in real-world scenarios. New customers also get $300 in free credits to run, test, and deploy workloads.\n- In the Google Cloud console, on the project selector page,\n select or create a Google Cloud project.\n\n | **Note**: If you don't plan to keep the resources that you create in this procedure, create a project instead of selecting an existing project. After you finish these steps, you can delete the project, removing all resources associated with the project.\n\n [Go to project selector](https://console.cloud.google.com/projectselector2/home/dashboard)\n-\n [Verify that billing is enabled for your Google Cloud project](/billing/docs/how-to/verify-billing-enabled#confirm_billing_is_enabled_on_a_project).\n\n- In the Google Cloud console, on the project selector page,\n select or create a Google Cloud project.\n\n | **Note**: If you don't plan to keep the resources that you create in this procedure, create a project instead of selecting an existing project. After you finish these steps, you can delete the project, removing all resources associated with the project.\n\n [Go to project selector](https://console.cloud.google.com/projectselector2/home/dashboard)\n-\n [Verify that billing is enabled for your Google Cloud project](/billing/docs/how-to/verify-billing-enabled#confirm_billing_is_enabled_on_a_project).\n\n| **Note:** This quickstart assumes that all settings will remain at their defaults. For more information about the VM options available to you, see [Choose an\n| Image](/deep-learning-vm/docs/images).\n\nCreate a new instance\n---------------------\n\n1. Go to the Deep Learning VM Cloud Marketplace page in\n the Google Cloud console.\n\n [Go to the Deep Learning VM Cloud Marketplace page](https://console.cloud.google.com/marketplace/details/click-to-deploy-images/deeplearning)\n2. Click **Get started**. If you see a project selection window,\n choose the project in which to create the instance. If this is the first\n time you've launched a Compute Engine VM, you must wait for the initial API\n configuration process to complete.\n\n3. On the **New Deep Learning VM deployment** page, enter a\n **Deployment name** . This will be the root of your virtual machine name.\n Compute Engine appends `-vm` to this name when naming your instance.\n\n4. Select a **Zone**, or keep the default.\n\n5. Under **Machine type**, select the specifications that you\n want for your VM, or keep the default.\n\n6. Under **GPUs** , select the **GPU type** and **Number of GPUs** ,\n or keep the default values.\n If you don't want to use GPUs,\n click the **Delete GPU** button.\n\n7. You have the option to select **Enable access to JupyterLab via URL\n instead of SSH (Beta)**. Enabling this Beta feature lets you\n access your JupyterLab\n instance using a URL. Anyone who is in the Editor or Owner role in your\n Google Cloud project can access this URL. This feature\n only works in the United States, the European Union, and Asia.\n\n8. Select a machine learning **Framework**, or keep the default.\n\n9. Click **Deploy**.\n\nYou've just created your first Deep Learning VM instance.\nAfter the instance is deployed, the Google Cloud console opens\nthe [Deployment Manager page](https://console.cloud.google.com/dm/deployments)\nwhere you can manage your\nDeep Learning VM instances and other deployments.\n\nAccess your new instance\n------------------------\n\nOnce you've created your Deep Learning VM instance, it starts\nautomatically. To access it:\n\n1. Go to the VM Instances page in the Google Cloud console.\n\n [Go to the VM\n Instances page](https://console.cloud.google.com/compute/instances)\n2. Under the **Name** column,\n click the name of your virtual machine instance.\n\n3. In the **Remote Access** section, click the first drop-down list and\n choose how you'd like to access the instance. You can choose to interact\n with a graphical user interface or on the command line.\n\n [](../images/dlvm-qs1.png)\n\n \u003cbr /\u003e\n\nCompute Engine will propagate your SSH keys and create your user. For more\ninformation, see [Connecting to\nInstances](/compute/docs/instances/connecting-to-instance).\n\nStop the instance\n-----------------\n\n1. Go to the VM Instances page in the Google Cloud console.\n\n [Go to the VM\n Instances page](https://console.cloud.google.com/compute/instances)\n2. Select the checkbox next to the Deep Learning VM instance.\n\n3. Click **Stop**.\n\nStart the instance\n------------------\n\nAfter an instance is created, the instance starts automatically. To start the instance\nmanually when it's stopped:\n\n1. Go to the VM Instances page in the Google Cloud console.\n\n [Go to the VM\n Instances page](https://console.cloud.google.com/compute/instances)\n2. Select the checkbox next to the Deep Learning VM instance.\n\n3. Click **Start**.\n\nClean up\n--------\n\n\nTo avoid incurring charges to your Google Cloud account for\nthe resources used on this page, follow these steps.\n\n1. Go to the Deployments page in the Google Cloud console.\n\n [Go to the\n Deployments page](https://console.cloud.google.com/dm/deployments)\n2. Select the checkbox next to the Deep Learning VM deployment.\n\n3. Click **Delete**.\n\nWhat's next\n-----------\n\n- Read a more in-depth description of this process in [Creating a\n Deep Learning VM instance from\n Google Cloud Marketplace](/deep-learning-vm/docs/cloud-marketplace).\n- Learn more about [Images, image families, and\n instances](/deep-learning-vm/docs/concepts-images)."]]