Where should I run my stuff? Choosing a Google Cloud compute option
Priyanka Vergadia
Staff Developer Advocate, Google Cloud
Brian Dorsey
Developer Advocate
Where should you run your workload? It depends...Choosing the right infrastructure options to run your application is critical, both for the success of your application and for the team that is managing and developing it. This post breaks down some of the most important factors that you need to consider when deciding where you should run your stuff!
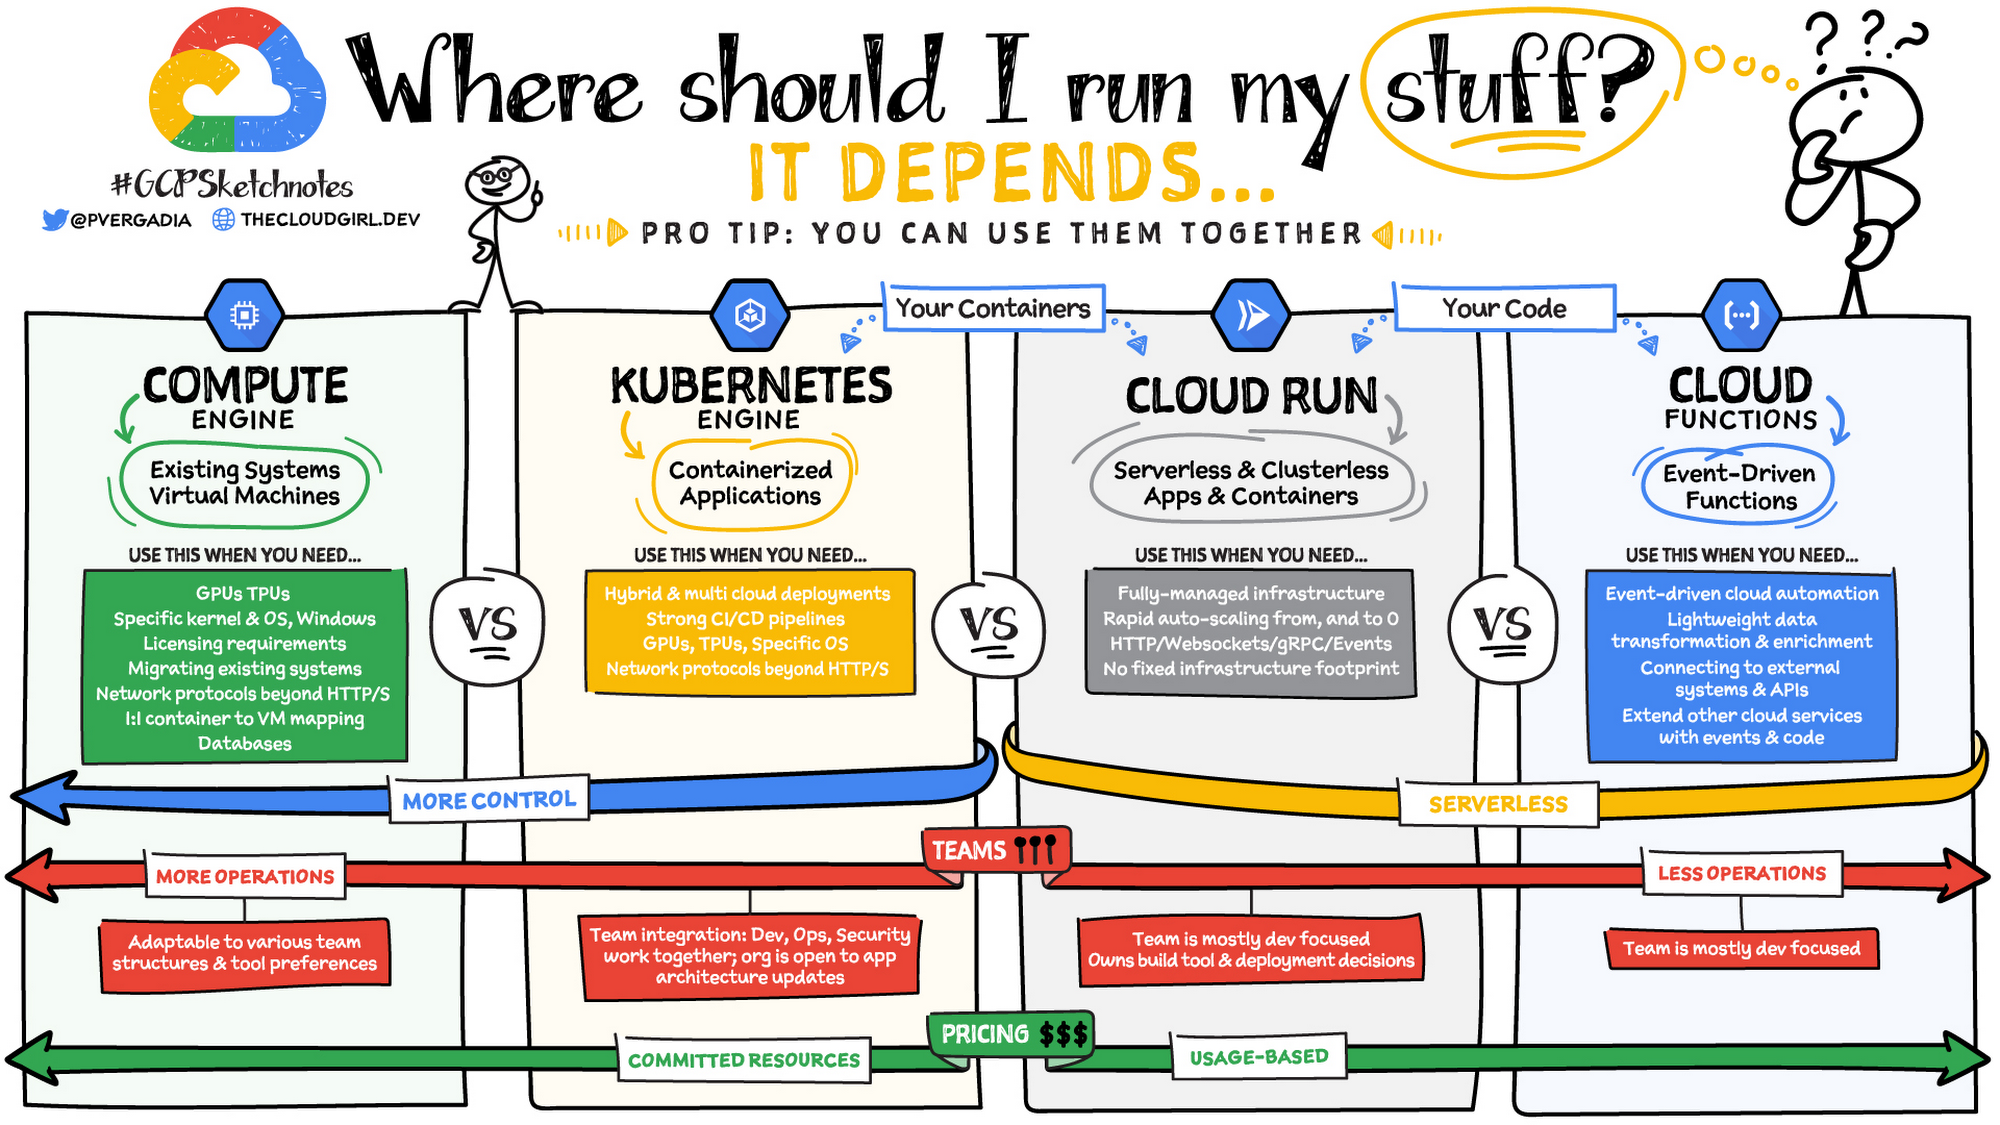
Click to enlarge
What are these services?
Compute Engine - Virtual machines. You reserve a configuration of CPU, memory, disk, and GPUs, and decide what OS and additional software to run.
Kubernetes Engine - Managed Kubernetes clusters. Kubernetes is an open-source system for automating deployment, scaling, and management of containerized applications. You create a cluster and configure which containers to run; Kubernetes keeps them running and manages scaling, updates and connectivity.
Cloud Run - A fully managed serverless platform that runs individual containers. You give code or a container to Cloud Run, and it hosts and auto scales as needed to respond to web and other events.
App Engine - A fully managed serverless platform for complete web applications. App Engine handles the networking, application scaling, and database scaling. You write a web application in one of the supported languages, deploy to App Engine, and it handles scaling, updating versions, and so on.
Cloud Functions - Event-driven serverless functions. You write individual function code and Cloud Functions calls your function when events happen (for example, HTTP, Pub/Sub, and Cloud Storage changes, among others).
What level of abstraction do you need?
If you need more control over the underlying infrastructure (for example, the operating system, disk images, CPU, RAM, and disk) then it makes sense to use Compute Engine. This is a typical path for legacy application migrations and existing systems that require a specific OS.
Containers provide a way to virtualize an OS so that multiple workloads can run on a single OS instance. They are fast and lightweight, and they provide portability. If your applications are containerized then you have two main options.
If you just want to code up your HTTP-based application and leave the scalability and deployment of the app to Google Cloud then App Engine — a serverless, fully-managed option that is designed for hosting and running web applications — is a good option for you.
If your code is a function and just performs an action based on an event/trigger, then deploying it with Cloud Functions makes sense.
What is your use case?
Use Compute Engine if you are migrating a legacy application with specific licensing, OS, kernel, or networking requirements. Examples: Windows-based applications, genomics processing, SAP HANA.
Use GKE if your application needs a specific OS or network protocols beyond HTTP/s. When you use GKE, you are using Kubernetes, which makes it easy to deploy and expand into hybrid and multi-cloud environments. Anthos is a platform specifically designed for hybrid and multi-cloud deployments. It provides single-pane-of-glass visibility across all clusters from infrastructure through to application performance and topology. Example: Microservices-based applications.
Use Cloud Run if you just need to deploy a containerized application in a programming language of your choice with HTTP/s and websocket support. Examples: websites, APIs, data processing apps, webhooks.
Use App Engine if you want to deploy and host a web based application (HTTP/s) in a serverless platform. Examples: web applications, mobile app backends
Use Cloud Functions if your code is a function and just performs an action based on an event/trigger from Pub/Sub or Cloud Storage. Example: Kick off a video transcoding function as soon as a video is saved in your Cloud Storage bucket.
Need portability with open source?
If your requirement is based on portability and open-source support take a look at GKE, Cloud Run, and Cloud Functions. They are all based on open-source frameworks that help you avoid vendor lock-in and give you the freedom to expand your infrastructure into hybrid and multi-cloud environments. GKE clusters are powered by the Kubernetes open-source cluster management system, which provides the mechanisms through which you interact with your cluster. Cloud Run for Anthos is powered by Knative, an open-source project that supports serverless workloads on Kubernetes. Cloud Functions use an open-source FaaS (function as a service) framework to run functions across multiple environments.
What are your team dynamics like?
If you have a small team of developers and you want their attention focused on the code, then a serverless option such as Cloud Run or App Engine is a good choice because you won’t have to have a team managing the infrastructure, scale, and operations. If you have bigger teams, along with your own tools and processes, then Compute Engine or GKE makes more sense because it enables you to define your own process for CI/CD, security, scale, and operations.
What type of billing model do you prefer?
Compute Engine and GKE billing models are based on resources, which means you pay for the instances you have provisioned, independent of usage. You can also take advantage of sustained and committed use discounts.
Cloud Run, App Engine, and Cloud Functions are billed per request, which means you pay as you go.
Conclusion
It’s important to consider all the relevant factors that play a role in picking appropriate compute options for your application. Remember that no decision is necessarily final; you can always move from one option to another.
To explore these points in more detail, please take a look at the "Where Should I Run My Stuff?" video, and to dive into GKE check out this training.
For more #GCPSketchnote, follow the GitHub repo & thecloudgirl.dev. For similar cloud content follow us on Twitter at @pvergadia and @briandorsey