Mantieni tutto organizzato con le raccolte
Salva e classifica i contenuti in base alle tue preferenze.
Creare un esperimento
Questa pagina mostra come interagire con Vertex AI Experiments
utilizzando il riquadro laterale in Colab Enterprise.
Per accedere Google Cloud a servizi e API eseguendo codice nel
notebook Colab Enterprise, puoi utilizzare le
credenziali associate al tuo Account Google. Per saperne di più, consulta
Servizi e API di Access Google Cloud .
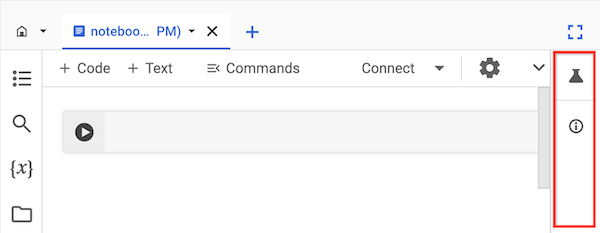
Il riquadro laterale è un modo aggiuntivo per interagire con
Vertex AI Experiments senza uscire dall'interfaccia
di Colab Enterprise.
Il riquadro laterale viene visualizzato a destra di un blocco note aperto.
Prima di iniziare
Sign in to your Google Cloud account. If you're new to
Google Cloud,
create an account to evaluate how our products perform in
real-world scenarios. New customers also get $300 in free credits to
run, test, and deploy workloads.
In the Google Cloud console, on the project selector page,
select or create a Google Cloud project.
Per ottenere le autorizzazioni
necessarie per utilizzare il riquadro laterale in un blocco note Colab Enterprise,
chiedi all'amministratore di concederti i
seguenti ruoli IAM sul progetto:
Vertex AI Experiments ti aiuta a monitorare e analizzare diverse architetture di modelli, iperparametri e ambienti di addestramento consentendoti di monitorare i passaggi, gli input e gli output di un'esecuzione dell'esperimento.
Per saperne di più, consulta Introduzione a
Vertex AI Experiments.
Creare e visualizzare un esperimento
Puoi creare e visualizzare i risultati di un esperimento utilizzando il
riquadro laterale in Colab Enterprise.
Nella console Google Cloud , vai alla pagina
I miei blocchi note di Colab Enterprise.
Nel menu Regione, seleziona la regione che contiene il notebook.
Fai clic sul notebook che vuoi aprire. Se non hai ancora creato un blocco note,
creane uno.
A destra del notebook, nel riquadro laterale, fai clic sul pulsante
Esperimenti.
Il riquadro laterale espande la scheda Esperimenti.
Fai clic sul pulsante Inserisci codice di esempio.
Colab Enterprise aggiunge celle di codice al notebook per
interagire con un esperimento.
Nel notebook, individua la cella di codice che memorizza i valori dei parametri.
Utilizzerai questi parametri per interagire con
Vertex AI Experiments.
Aggiorna i valori dei seguenti parametri:
PROJECT_ID: l'ID del progetto in cui si trova il notebook.
REGION: la regione in cui si trova il notebook.
BUCKET_URI: un URI bucket Cloud Storage, nel formato gs://BUCKET_NAME.
Può essere un bucket esistente oppure puoi crearlo quando
esegui il codice. Questo bucket deve trovarsi nello stesso progetto e nella stessa regione
del notebook Colab Enterprise.
EXPERIMENT_NAME: il nome dell'esperimento.
Se l'esperimento non esiste, Vertex AI Experiments
ne crea uno.
Se devi creare il bucket Cloud Storage, trova e
rimuovi il commento dalla seguente riga di codice:
Esegui le celle di codice che il riquadro laterale ha aggiunto al notebook.
Dopo l'esecuzione dell'ultima cella di codice, fai clic sul pulsante
Visualizza
esperimento visualizzato.
Nel riquadro laterale, fai clic sulla scheda Esecuzioni o
Dettagli per visualizzare le informazioni sull'esperimento.
Per scoprire di più, vedi
Creare e gestire le esecuzioni di esperimenti.
[[["Facile da capire","easyToUnderstand","thumb-up"],["Il problema è stato risolto","solvedMyProblem","thumb-up"],["Altra","otherUp","thumb-up"]],[["Difficile da capire","hardToUnderstand","thumb-down"],["Informazioni o codice di esempio errati","incorrectInformationOrSampleCode","thumb-down"],["Mancano le informazioni o gli esempi di cui ho bisogno","missingTheInformationSamplesINeed","thumb-down"],["Problema di traduzione","translationIssue","thumb-down"],["Altra","otherDown","thumb-down"]],["Ultimo aggiornamento 2025-09-04 UTC."],[[["\u003cp\u003eThe Colab Enterprise side panel provides a way to interact with Vertex AI Experiments directly within the notebook interface.\u003c/p\u003e\n"],["\u003cp\u003eTo use the side panel, users must have the Colab Enterprise User and Vertex AI User IAM roles assigned to their project.\u003c/p\u003e\n"],["\u003cp\u003eVertex AI Experiments allows users to track and analyze various aspects of model development, such as architectures, hyperparameters, and training environments.\u003c/p\u003e\n"],["\u003cp\u003eCreating an experiment involves navigating to the Colab Enterprise My notebooks page, opening a notebook, and using the Experiments tab in the side panel to insert sample code.\u003c/p\u003e\n"],["\u003cp\u003eAfter running the code cells, users can view detailed information about their experiment runs within the side panel's Runs and Details tabs.\u003c/p\u003e\n"]]],[],null,["# Create an experiment\n====================\n\nThis page shows you how to interact with Vertex AI Experiments\nby using the side panel in Colab Enterprise.\n\nTo access Google Cloud services and APIs by running code in\nyour Colab Enterprise notebook, you can use the\ncredentials associated with your Google Account. To learn more, see\n[Access Google Cloud services and APIs](/colab/docs/run-code-adc).\n\nThe side panel is an additional way to interact with\nVertex AI Experiments without leaving the Colab Enterprise\ninterface.\n\nThe side panel appears to the right of an open notebook.\n\nBefore you begin\n----------------\n\n- Sign in to your Google Cloud account. If you're new to Google Cloud, [create an account](https://console.cloud.google.com/freetrial) to evaluate how our products perform in real-world scenarios. New customers also get $300 in free credits to run, test, and deploy workloads.\n- In the Google Cloud console, on the project selector page,\n select or create a Google Cloud project.\n\n | **Note**: If you don't plan to keep the resources that you create in this procedure, create a project instead of selecting an existing project. After you finish these steps, you can delete the project, removing all resources associated with the project.\n\n [Go to project selector](https://console.cloud.google.com/projectselector2/home/dashboard)\n-\n [Verify that billing is enabled for your Google Cloud project](/billing/docs/how-to/verify-billing-enabled#confirm_billing_is_enabled_on_a_project).\n\n-\n\n\n Enable the Vertex AI, Dataform, and Compute Engine APIs.\n\n\n [Enable the APIs](https://console.cloud.google.com/flows/enableapi?apiid=aiplatform.googleapis.com, dataform.googleapis.com, compute.googleapis.com&redirect=https://console.cloud.google.com)\n\n- In the Google Cloud console, on the project selector page,\n select or create a Google Cloud project.\n\n | **Note**: If you don't plan to keep the resources that you create in this procedure, create a project instead of selecting an existing project. After you finish these steps, you can delete the project, removing all resources associated with the project.\n\n [Go to project selector](https://console.cloud.google.com/projectselector2/home/dashboard)\n-\n [Verify that billing is enabled for your Google Cloud project](/billing/docs/how-to/verify-billing-enabled#confirm_billing_is_enabled_on_a_project).\n\n-\n\n\n Enable the Vertex AI, Dataform, and Compute Engine APIs.\n\n\n [Enable the APIs](https://console.cloud.google.com/flows/enableapi?apiid=aiplatform.googleapis.com, dataform.googleapis.com, compute.googleapis.com&redirect=https://console.cloud.google.com)\n\n### Required roles\n\n\nTo get the permissions that\nyou need to use the side panel in a Colab Enterprise notebook,\n\nask your administrator to grant you the\nfollowing IAM roles on the project:\n\n- [Colab Enterprise User](/iam/docs/roles-permissions/aiplatform#aiplatform.colabEnterpriseUser) (`roles/aiplatform.colabEnterpriseUser`)\n- [Vertex AI User](/iam/docs/roles-permissions/aiplatform#aiplatform.user) (`roles/aiplatform.user`)\n\n\nFor more information about granting roles, see [Manage access to projects, folders, and organizations](/iam/docs/granting-changing-revoking-access).\n\n\nYou might also be able to get\nthe required permissions through [custom\nroles](/iam/docs/creating-custom-roles) or other [predefined\nroles](/iam/docs/roles-overview#predefined).\n| One or more of the required roles includes the `dataform.repositories.list` permission. Users who are granted the `dataform.repositories.list` permission or the [Code Creator\n| (`roles/dataform.codeCreator`)](/iam/docs/understanding-roles#dataform.codeCreator) role in a project can list the names of code assets in that project by using the Dataform API or the Dataform command-line interface (CLI). Non-administrators using BigQuery Studio can only see code assets that they created or that were shared with them.\n\nVertex AI Experiments\n---------------------\n\nVertex AI Experiments helps you track and analyze different\nmodel architectures, hyperparameters, and training environments by\nletting you track the steps, inputs, and outputs of an experiment run.\nTo learn more, see [Introduction to\nVertex AI Experiments](/vertex-ai/docs/experiments/intro-vertex-ai-experiments).\n\nCreate and view an experiment\n-----------------------------\n\nYou can create and view the results of an experiment by using the\nside panel in Colab Enterprise.\n\n1. In the Google Cloud console, go to\n the Colab Enterprise **My notebooks** page.\n\n [Go to My notebooks](https://console.cloud.google.com/vertex-ai/colab/notebooks)\n2. In the **Region** menu, select the region that contains your notebook.\n\n3. Click the notebook that you want to open. If you haven't created a notebook yet,\n [create a notebook](/colab/docs/create-console-quickstart#create).\n\n4.\n To the right of your notebook, in the side panel, click the\n **Experiments** button.\n\n The side panel expands the **Experiments** tab.\n5. Click the **Insert sample code** button.\n\n\n Colab Enterprise adds code cells to your notebook for\n interacting with an experiment.\n6.\n In your notebook, find the code cell that stores parameter values.\n You'll use these parameters to interact with\n Vertex AI Experiments.\n\n7.\n Update the values for the following parameters:\n\n - \u003cvar translate=\"no\"\u003ePROJECT_ID\u003c/var\u003e: The ID of the project that your notebook is in.\n - \u003cvar translate=\"no\"\u003eREGION\u003c/var\u003e: The region that your notebook is in.\n - \u003cvar translate=\"no\"\u003eBUCKET_URI\u003c/var\u003e: A Cloud Storage bucket URI, in the format `gs://`\u003cvar translate=\"no\"\u003eBUCKET_NAME\u003c/var\u003e. This can be an existing bucket, or you can create it when you run the code. This bucket must be in the same project and region as your Colab Enterprise notebook.\n - \u003cvar translate=\"no\"\u003eEXPERIMENT_NAME\u003c/var\u003e: The name of your experiment. If your experiment doesn't exist, Vertex AI Experiments creates one.\n8.\n If you need to create your Cloud Storage bucket, find and\n uncomment the following line of code:\n\n ```\n # ! gcloud storage buckets create {BUCKET_URI} --location={REGION} --project={PROJECT_ID}\n ```\n9. Run the code cells that the side panel added to your notebook.\n\n10.\n After the last code cell runs, click the\n **View\n experiment** button that appears.\n\n11.\n In the side panel, click the **Runs** tab or\n **Details** tab to see information about your experiment.\n To learn more, see\n [Create and\n manage experiment runs](/vertex-ai/docs/experiments/create-manage-exp-run).\n\n | The side panel shows information about your experiment runs. You can create, manage, and delete runs by using [Vertex AI Experiments\n | in the Google Cloud console](https://console.cloud.google.com/vertex-ai/experiments) or through the Vertex AI API.\n\nWhat's next\n-----------\n\n- Learn more about\n [Vertex AI Experiments](/vertex-ai/docs/experiments/intro-vertex-ai-experiments).\n\n- To find a notebook that can help you get your project started quickly,\n see the [notebook gallery](https://console.cloud.google.com/vertex-ai/colab/notebook-gallery)."]]