Restez organisé à l'aide des collections
Enregistrez et classez les contenus selon vos préférences.
Créer un test
Cette page vous explique comment interagir avec Vertex AI Experiments à l'aide du panneau latéral de Colab Enterprise.
Pour accéder aux services et aux API en exécutant du code dans votre notebook Colab Enterprise, vous pouvez utiliser les identifiants associés à votre compte Google. Google Cloud Pour en savoir plus, consultez Accéder aux services et aux API Google Cloud .
Le panneau latéral est un moyen supplémentaire d'interagir avec Vertex AI Experiments sans quitter l'interface Colab Enterprise.
Le panneau latéral s'affiche à droite d'un notebook ouvert.
Avant de commencer
Sign in to your Google Cloud account. If you're new to
Google Cloud,
create an account to evaluate how our products perform in
real-world scenarios. New customers also get $300 in free credits to
run, test, and deploy workloads.
In the Google Cloud console, on the project selector page,
select or create a Google Cloud project.
Pour obtenir les autorisations nécessaires pour utiliser le panneau latéral dans un notebook Colab Enterprise, demandez à votre administrateur de vous accorder les rôles IAM suivants sur le projet :
Vertex AI Experiments vous aide à suivre et à analyser différentes architectures de modèle, différents hyperparamètres et différents environnements d'entraînement en vous permettant de suivre les étapes, les entrées et les sorties d'une exécution de test.
Pour en savoir plus, consultez la présentation de Vertex AI Experiments.
Créer et afficher un test
Vous pouvez créer un test et afficher ses résultats à l'aide du panneau latéral de Colab Enterprise.
Dans la console Google Cloud , accédez à la page Mes notebooks de Colab Enterprise.
Dans le menu Région, sélectionnez la région qui contient votre notebook.
Cliquez sur le notebook que vous souhaitez ouvrir. Si vous n'avez pas encore créé de notebook, créez-en un.
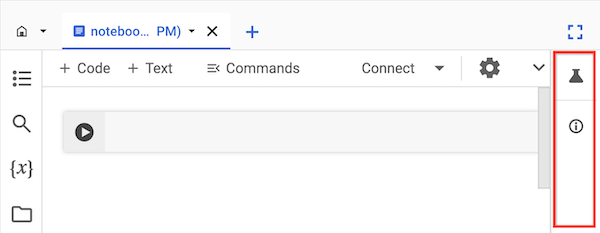
À droite de votre notebook, dans le panneau latéral, cliquez sur le bouton Tests.
Le panneau latéral développe l'onglet Tests.
Cliquez sur le bouton Insérer l'exemple de code.
Colab Enterprise ajoute des cellules de code à votre notebook pour interagir avec une expérience.
Dans votre notebook, recherchez la cellule de code qui stocke les valeurs des paramètres.
Vous utiliserez ces paramètres pour interagir avec Vertex AI Experiments.
Mettez à jour les valeurs des paramètres suivants :
PROJECT_ID : ID du projet dans lequel se trouve votre notebook.
REGION : région de votre notebook.
BUCKET_URI : URI de bucket Cloud Storage, au format gs://BUCKET_NAME.
Il peut s'agir d'un bucket existant ou d'un bucket que vous pouvez créer lorsque vous exécutez le code. Ce bucket doit se trouver dans le même projet et la même région que votre notebook Colab Enterprise.
EXPERIMENT_NAME : nom de votre test.
Si votre test n'existe pas, Vertex AI Experiments en crée un.
Si vous devez créer votre bucket Cloud Storage, recherchez et supprimez le commentaire de la ligne de code suivante :
Exécutez les cellules de code que le panneau latéral a ajoutées à votre notebook.
Une fois la dernière cellule de code exécutée, cliquez sur le bouton Voir l'expérience qui s'affiche.
Dans le panneau latéral, cliquez sur l'onglet Exécutions ou Détails pour afficher des informations sur votre expérience.
Pour en savoir plus, consultez Créer et gérer des exécutions de tests.
Pour trouver un notebook qui peut vous aider à démarrer rapidement votre projet, consultez la galerie de notebooks.
Sauf indication contraire, le contenu de cette page est régi par une licence Creative Commons Attribution 4.0, et les échantillons de code sont régis par une licence Apache 2.0. Pour en savoir plus, consultez les Règles du site Google Developers. Java est une marque déposée d'Oracle et/ou de ses sociétés affiliées.
Dernière mise à jour le 2025/09/04 (UTC).
[[["Facile à comprendre","easyToUnderstand","thumb-up"],["J'ai pu résoudre mon problème","solvedMyProblem","thumb-up"],["Autre","otherUp","thumb-up"]],[["Difficile à comprendre","hardToUnderstand","thumb-down"],["Informations ou exemple de code incorrects","incorrectInformationOrSampleCode","thumb-down"],["Il n'y a pas l'information/les exemples dont j'ai besoin","missingTheInformationSamplesINeed","thumb-down"],["Problème de traduction","translationIssue","thumb-down"],["Autre","otherDown","thumb-down"]],["Dernière mise à jour le 2025/09/04 (UTC)."],[[["\u003cp\u003eThe Colab Enterprise side panel provides a way to interact with Vertex AI Experiments directly within the notebook interface.\u003c/p\u003e\n"],["\u003cp\u003eTo use the side panel, users must have the Colab Enterprise User and Vertex AI User IAM roles assigned to their project.\u003c/p\u003e\n"],["\u003cp\u003eVertex AI Experiments allows users to track and analyze various aspects of model development, such as architectures, hyperparameters, and training environments.\u003c/p\u003e\n"],["\u003cp\u003eCreating an experiment involves navigating to the Colab Enterprise My notebooks page, opening a notebook, and using the Experiments tab in the side panel to insert sample code.\u003c/p\u003e\n"],["\u003cp\u003eAfter running the code cells, users can view detailed information about their experiment runs within the side panel's Runs and Details tabs.\u003c/p\u003e\n"]]],[],null,["# Create an experiment\n====================\n\nThis page shows you how to interact with Vertex AI Experiments\nby using the side panel in Colab Enterprise.\n\nTo access Google Cloud services and APIs by running code in\nyour Colab Enterprise notebook, you can use the\ncredentials associated with your Google Account. To learn more, see\n[Access Google Cloud services and APIs](/colab/docs/run-code-adc).\n\nThe side panel is an additional way to interact with\nVertex AI Experiments without leaving the Colab Enterprise\ninterface.\n\nThe side panel appears to the right of an open notebook.\n\nBefore you begin\n----------------\n\n- Sign in to your Google Cloud account. If you're new to Google Cloud, [create an account](https://console.cloud.google.com/freetrial) to evaluate how our products perform in real-world scenarios. New customers also get $300 in free credits to run, test, and deploy workloads.\n- In the Google Cloud console, on the project selector page,\n select or create a Google Cloud project.\n\n | **Note**: If you don't plan to keep the resources that you create in this procedure, create a project instead of selecting an existing project. After you finish these steps, you can delete the project, removing all resources associated with the project.\n\n [Go to project selector](https://console.cloud.google.com/projectselector2/home/dashboard)\n-\n [Verify that billing is enabled for your Google Cloud project](/billing/docs/how-to/verify-billing-enabled#confirm_billing_is_enabled_on_a_project).\n\n-\n\n\n Enable the Vertex AI, Dataform, and Compute Engine APIs.\n\n\n [Enable the APIs](https://console.cloud.google.com/flows/enableapi?apiid=aiplatform.googleapis.com, dataform.googleapis.com, compute.googleapis.com&redirect=https://console.cloud.google.com)\n\n- In the Google Cloud console, on the project selector page,\n select or create a Google Cloud project.\n\n | **Note**: If you don't plan to keep the resources that you create in this procedure, create a project instead of selecting an existing project. After you finish these steps, you can delete the project, removing all resources associated with the project.\n\n [Go to project selector](https://console.cloud.google.com/projectselector2/home/dashboard)\n-\n [Verify that billing is enabled for your Google Cloud project](/billing/docs/how-to/verify-billing-enabled#confirm_billing_is_enabled_on_a_project).\n\n-\n\n\n Enable the Vertex AI, Dataform, and Compute Engine APIs.\n\n\n [Enable the APIs](https://console.cloud.google.com/flows/enableapi?apiid=aiplatform.googleapis.com, dataform.googleapis.com, compute.googleapis.com&redirect=https://console.cloud.google.com)\n\n### Required roles\n\n\nTo get the permissions that\nyou need to use the side panel in a Colab Enterprise notebook,\n\nask your administrator to grant you the\nfollowing IAM roles on the project:\n\n- [Colab Enterprise User](/iam/docs/roles-permissions/aiplatform#aiplatform.colabEnterpriseUser) (`roles/aiplatform.colabEnterpriseUser`)\n- [Vertex AI User](/iam/docs/roles-permissions/aiplatform#aiplatform.user) (`roles/aiplatform.user`)\n\n\nFor more information about granting roles, see [Manage access to projects, folders, and organizations](/iam/docs/granting-changing-revoking-access).\n\n\nYou might also be able to get\nthe required permissions through [custom\nroles](/iam/docs/creating-custom-roles) or other [predefined\nroles](/iam/docs/roles-overview#predefined).\n| One or more of the required roles includes the `dataform.repositories.list` permission. Users who are granted the `dataform.repositories.list` permission or the [Code Creator\n| (`roles/dataform.codeCreator`)](/iam/docs/understanding-roles#dataform.codeCreator) role in a project can list the names of code assets in that project by using the Dataform API or the Dataform command-line interface (CLI). Non-administrators using BigQuery Studio can only see code assets that they created or that were shared with them.\n\nVertex AI Experiments\n---------------------\n\nVertex AI Experiments helps you track and analyze different\nmodel architectures, hyperparameters, and training environments by\nletting you track the steps, inputs, and outputs of an experiment run.\nTo learn more, see [Introduction to\nVertex AI Experiments](/vertex-ai/docs/experiments/intro-vertex-ai-experiments).\n\nCreate and view an experiment\n-----------------------------\n\nYou can create and view the results of an experiment by using the\nside panel in Colab Enterprise.\n\n1. In the Google Cloud console, go to\n the Colab Enterprise **My notebooks** page.\n\n [Go to My notebooks](https://console.cloud.google.com/vertex-ai/colab/notebooks)\n2. In the **Region** menu, select the region that contains your notebook.\n\n3. Click the notebook that you want to open. If you haven't created a notebook yet,\n [create a notebook](/colab/docs/create-console-quickstart#create).\n\n4.\n To the right of your notebook, in the side panel, click the\n **Experiments** button.\n\n The side panel expands the **Experiments** tab.\n5. Click the **Insert sample code** button.\n\n\n Colab Enterprise adds code cells to your notebook for\n interacting with an experiment.\n6.\n In your notebook, find the code cell that stores parameter values.\n You'll use these parameters to interact with\n Vertex AI Experiments.\n\n7.\n Update the values for the following parameters:\n\n - \u003cvar translate=\"no\"\u003ePROJECT_ID\u003c/var\u003e: The ID of the project that your notebook is in.\n - \u003cvar translate=\"no\"\u003eREGION\u003c/var\u003e: The region that your notebook is in.\n - \u003cvar translate=\"no\"\u003eBUCKET_URI\u003c/var\u003e: A Cloud Storage bucket URI, in the format `gs://`\u003cvar translate=\"no\"\u003eBUCKET_NAME\u003c/var\u003e. This can be an existing bucket, or you can create it when you run the code. This bucket must be in the same project and region as your Colab Enterprise notebook.\n - \u003cvar translate=\"no\"\u003eEXPERIMENT_NAME\u003c/var\u003e: The name of your experiment. If your experiment doesn't exist, Vertex AI Experiments creates one.\n8.\n If you need to create your Cloud Storage bucket, find and\n uncomment the following line of code:\n\n ```\n # ! gcloud storage buckets create {BUCKET_URI} --location={REGION} --project={PROJECT_ID}\n ```\n9. Run the code cells that the side panel added to your notebook.\n\n10.\n After the last code cell runs, click the\n **View\n experiment** button that appears.\n\n11.\n In the side panel, click the **Runs** tab or\n **Details** tab to see information about your experiment.\n To learn more, see\n [Create and\n manage experiment runs](/vertex-ai/docs/experiments/create-manage-exp-run).\n\n | The side panel shows information about your experiment runs. You can create, manage, and delete runs by using [Vertex AI Experiments\n | in the Google Cloud console](https://console.cloud.google.com/vertex-ai/experiments) or through the Vertex AI API.\n\nWhat's next\n-----------\n\n- Learn more about\n [Vertex AI Experiments](/vertex-ai/docs/experiments/intro-vertex-ai-experiments).\n\n- To find a notebook that can help you get your project started quickly,\n see the [notebook gallery](https://console.cloud.google.com/vertex-ai/colab/notebook-gallery)."]]