Create a notebook by using the Google Cloud console
Learn how to create a Colab Enterprise notebook and run its code on a default runtime by using the Google Cloud console. This page also describes how to rename, import, and delete a notebook.
To follow step-by-step guidance for this task directly in the Google Cloud console, click Guide me:
Before you begin
- Sign in to your Google Cloud account. If you're new to Google Cloud, create an account to evaluate how our products perform in real-world scenarios. New customers also get $300 in free credits to run, test, and deploy workloads.
-
In the Google Cloud console, on the project selector page, select or create a Google Cloud project.
Roles required to select or create a project
- Select a project: Selecting a project doesn't require a specific IAM role—you can select any project that you've been granted a role on.
-
Create a project: To create a project, you need the Project Creator
(
roles/resourcemanager.projectCreator), which contains theresourcemanager.projects.createpermission. Learn how to grant roles.
-
Verify that billing is enabled for your Google Cloud project.
-
Enable the Vertex AI, Dataform, and Compute Engine APIs.
Roles required to enable APIs
To enable APIs, you need the Service Usage Admin IAM role (
roles/serviceusage.serviceUsageAdmin), which contains theserviceusage.services.enablepermission. Learn how to grant roles. -
In the Google Cloud console, on the project selector page, select or create a Google Cloud project.
Roles required to select or create a project
- Select a project: Selecting a project doesn't require a specific IAM role—you can select any project that you've been granted a role on.
-
Create a project: To create a project, you need the Project Creator
(
roles/resourcemanager.projectCreator), which contains theresourcemanager.projects.createpermission. Learn how to grant roles.
-
Verify that billing is enabled for your Google Cloud project.
-
Enable the Vertex AI, Dataform, and Compute Engine APIs.
Roles required to enable APIs
To enable APIs, you need the Service Usage Admin IAM role (
roles/serviceusage.serviceUsageAdmin), which contains theserviceusage.services.enablepermission. Learn how to grant roles.
Required roles
To get the permissions that
you need to create a Colab Enterprise notebook and run the notebook's code on a runtime,
ask your administrator to grant you the
Colab Enterprise User (roles/aiplatform.colabEnterpriseUser)
IAM role on the project.
For more information about granting roles, see Manage access to projects, folders, and organizations.
You might also be able to get the required permissions through custom roles or other predefined roles.
Create a notebook
To create a Colab Enterprise notebook by using the Google Cloud console:-
In the Google Cloud console, go to the Colab Enterprise My notebooks page.
-
In the Region menu, select the region where you want to create your notebook.
-
Click New notebook.
Colab Enterprise creates and opens your notebook.
When you finish the tasks that are described in this document, you can avoid continued billing by deleting the resources that you created. For more information, see Clean up.
Run code in the default runtime
To run a Colab Enterprise notebook's code on the default runtime, do the following:
-
In the Google Cloud console, go to the Colab Enterprise My notebooks page.
-
In the Region menu, select the region that contains your notebook.
-
Click the notebook that you want to open.
-
Hold the pointer over the code cell that you want to run, and then click the Run cell button.
-
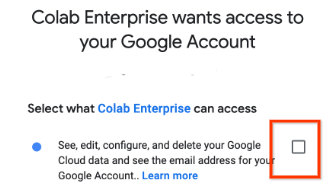
If this is your first time connecting to a runtime with end-user credentials enabled, a Sign in dialog appears.
To grant Colab Enterprise access to your user credentials, complete the following steps:
-
In the Sign in dialog, click your user account.
-
Select See, edit, configure, and delete your Google Cloud data... to grant Colab Enterprise access to your user credentials.
-
Click Continue.
-
After your runtime starts, Colab Enterprise connects to the runtime and runs the code in the cell.
Rename your notebook
To rename a Colab Enterprise notebook:-
In the Google Cloud console, go to the Colab Enterprise My notebooks page.
-
In the Region menu, select the region that contains your notebook.
-
Next to the notebook that you want to rename, click the Actions menu, and then select Rename.
-
In the Rename notebook dialog, change the name of the notebook, and then click Rename.
Import a notebook
To import a notebook into Colab Enterprise:-
In the Google Cloud console, go to the Colab Enterprise My notebooks page.
-
In the Region menu, select the region where you want to import your notebook.
-
Click Import.
-
In the Import notebooks dialog, select an Import source.
-
If you selected:
- Your computer, navigate to and select a notebook file to import.
- Cloud Storage, navigate to and select a notebook in Cloud Storage.
- URL, enter the URL of the notebook file to import.
-
To add another notebook, click Add notebook.
-
After you've added the notebooks that you want to import, click Import.
Colab Enterprise imports your notebook files.
Clean up
To avoid incurring charges to your Google Cloud account for the resources used in this tutorial, either delete the project that contains the resources, or keep the project and delete the individual resources.
Delete the project
- In the Google Cloud console, go to the Manage resources page.
- In the project list, select the project that you want to delete, and then click Delete.
- In the dialog, type the project ID, and then click Shut down to delete the project.
Delete your notebook
-
In the Google Cloud console, go to the Colab Enterprise My notebooks page.
-
In the Region menu, select the region that contains the notebook that you want to delete.
-
Next to the notebook that you want to delete, click the Actions menu, and then select Delete notebook.
-
In the Delete notebook dialog, click Confirm.
What's next
Read the Introduction to Colab Enterprise.
To find a notebook that can help you get your project started quickly, see the notebook gallery.