Acesse os produtos e serviços do Google Cloud pelo seu código usando as APIs do Cloud. Essas APIs do Cloud expõem uma interface REST JSON simples que podem ser chamadas por meio de bibliotecas de cliente.
Neste documento, descrevemos como procurar APIs disponíveis, ativar APIs do Cloud e adicionar bibliotecas de cliente do Cloud ao projeto e configurar a autenticação, dependendo das suas necessidades de desenvolvimento.
Como procurar APIs do Cloud
Para explorar todas as APIs do Google Cloud disponíveis no seu ambiente de desenvolvimento integrado, siga estas etapas:
- Selecione Ferramentas > Cloud Code > Adicionar bibliotecas do Cloud e gerenciar APIs do Cloud.
- Expanda a árvore do explorador de APIs do Google Cloud para visualizar todas as APIs disponíveis. O explorador agrupa as APIs do Cloud por categoria. Também é possível procurar uma API específica usando a barra de pesquisa das APIs da Pesquisa Google.
- Clique em uma API para ver mais detalhes, como o status, instruções de instalação específicas da linguagem para suas bibliotecas de cliente correspondentes e documentação relevante.
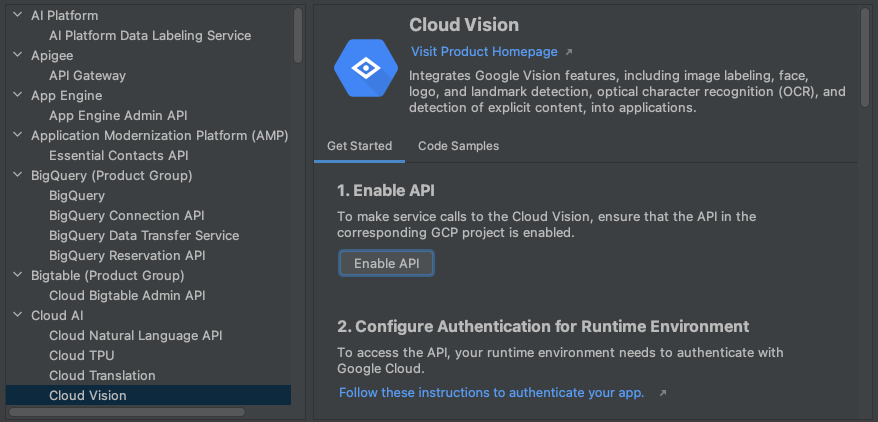
Como ativar APIs do Cloud
Para ativar rapidamente as APIs do Cloud em um projeto usando os detalhes da API, siga estas etapas:
- Na visualização de detalhes da API Cloud, escolha um projeto do Google Cloud para o qual você quer ativar a API do Cloud.
- Clique no botão Ativar API.
Depois que a API for ativada, você verá uma mensagem confirmando essa alteração.
Como adicionar as bibliotecas de cliente do Cloud
Para adicionar bibliotecas ao seu projeto no IntelliJ, siga estas etapas:
Para projetos Java Maven
- Selecione Ferramentas > Cloud Code > APIs do Cloud.
- Selecione o tipo de biblioteca de sua preferência na biblioteca de cliente do Google Cloud (recomendado) ou na biblioteca de Java Spring Google Cloud.
- No menu suspenso Módulo, selecione o módulo ao qual você quer adicionar a biblioteca.
- Clique em Adicionar dependência do Maven para adicionar BOM e biblioteca de cliente ao seu projeto.
A caixa de diálogo Gerenciar APIs do Google Cloud mostra as bibliotecas compatíveis.

Para todos os outros projetos
- Selecione Ferramentas > Cloud Code > Adicionar bibliotecas do Cloud e gerenciar APIs do Cloud.
- Instale a API seguindo as instruções de instalação listadas na página de detalhes da API para o idioma de sua preferência.
A caixa de diálogo Adicionar bibliotecas do Cloud mostra as bibliotecas compatíveis.
Como configurar a autenticação
Depois de ativar as APIs necessárias e adicionar as bibliotecas de cliente necessárias, configure o aplicativo para que ele seja autenticado com sucesso. A configuração depende do seu tipo de desenvolvimento e da plataforma em que você está executando.
Depois de concluir as etapas de autenticação relevantes, seu aplicativo poderá se autenticar e estar pronto para ser implantado.
Desenvolvimento local
minikube
- Verifique se você tem o Application Default Credentials (ADC) definido executando
gcloud auth application-default login. Isso permite que o minikube encontre o ADC para autenticação.
minikube
- Verifique se você tem o Application Default Credentials (ADC) definido executando
gcloud auth application-default login. Isso permite que o minikube encontre o ADC para autenticação. - Inicie o minikube com
minikube start --addons gcp-auth. Isso ativará o ADC nos pods. Para um guia detalhado sobre a autenticação do minikube no Google Cloud, consulte os documentos do minikube gcp-auth.
Cluster local do Kubernetes
- Verifique se você tem o Application Default Credentials (ADC) definido executando
gcloud auth application-default login. - Ative seu diretório
gcloudlocal nos pods do Kubernetes editando os manifestos de implantação para que as bibliotecas de cliente do Google Cloud encontrem suas credenciais. Exemplo de configuração de pod do Kubernetes:apiVersion: v1 kind: Pod metadata: name: my-app labels: name: my-app spec: containers: - name: my-app image: gcr.io/google-containers/busybox ports: - containerPort: 8080 volumeMounts: - mountPath: /root/.config/gcloud name: gcloud-volume volumes: - name: gcloud-volume hostPath: path: /path/to/home/.config/gcloud
Cloud Run
- Verifique se você tem o Application Default Credentials (ADC) definido
executando
gcloud auth application-default login. Isso permite que o ambiente simulado local do Cloud Run encontre o ADC para autenticação.
Desenvolvimento remoto
Google Kubernetes Engine
- Configure seu cluster e aplicativo do GKE com a Identidade da carga de trabalho para autenticar os serviços do Google Cloud no GKE. Isso associa sua conta de serviço do Kubernetes à sua conta de serviço do Google.
- Se o serviço do Google Cloud que você está tentando acessar exigir outros papéis, conceda-os à conta de serviço do Google que você está usando para desenvolver seu app.
Para ver uma lista de papéis do IAM tipos e papéis predefinidos que você pode conceder a identidades, consulte o Guia Noções básicas sobre papéis. Para ver as etapas de concessão de papéis, consulte Como conceder, alterar e revogar acesso a recursos. - Configure a implantação do Kubernetes para referenciar a conta de
serviço do Kubernetes definindo o campo
.spec.serviceAccountNameno arquivo YAML de implantação do Kubernetes.
Se você estiver trabalhando em um aplicativo criado a partir de um modelo do Cloud Code, esse arquivo estará localizado na pasta kubernetes-manifests.
Cloud Run
- Para criar uma nova conta de serviço exclusiva para implantar seu aplicativo Cloud Run, na página "Contas de serviço", selecione o projeto em que o secret está armazenado.
- Clique em Criar conta de serviço.
- Na caixa de diálogo Criar conta de serviço, forneça um nome descritivo para a conta.
- Altere o ID da conta de serviço para um valor exclusivo e reconhecível e, em seguida, clique em Criar.
- Se o serviço do Google Cloud que você está tentando acessar exigir outros papéis, conceda-os, clique em Continuar e, em seguida, clique em Concluído.
- Para adicionar a conta de serviço à configuração de implantação, navegue até a Cloud Run: Implante executar configuração,
expandirConfigurações avançadas de revisão e, em seguida, especifique sua conta de serviço na Conta de serviço.

Cloud Run
- Configure seu cluster e aplicativo do GKE com a Identidade da carga de trabalho para autenticar os serviços do Google Cloud no GKE. Isso associa sua conta de serviço do Kubernetes à sua conta de serviço do Google.
- Se o serviço do Google Cloud que você está tentando acessar exigir papéis
adicionais, conceda-os à conta de serviço do Google que você está usando para desenvolver
seu app.
A seção Como entender os papéis descreve os tipos de papéis do IAM e lista os papéis predefinidos que podem ser concedidos às identidades. - Para adicionar sua conta de serviço do Kubernetes à configuração de implantação,
navegue até a configuração de execução Cloud Run: Deploy,
expanda a seção Advanced review settings e, em seguida,
Especifique sua conta de serviço do Kubernetes no campo Conta
de serviço.

Desenvolvimento remoto com o Secret Manager ativado
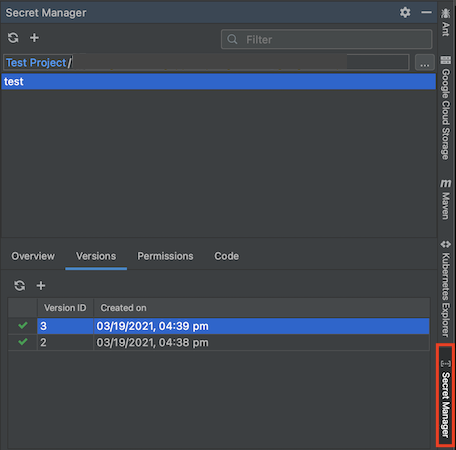
Se você estiver desenvolvendo remotamente com uma conta de serviço para autenticação e seu aplicativo usar secrets, será necessário seguir mais algumas etapas para atribuir à sua conta de serviço do Google o papel necessário para acessar um secret do Secret Manager específico:
Abra o painel do Gerenciador de secrets e selecione o secret que você quer acessar no seu código.
Alterne para a guia "Permissões" e, em seguida, configure as permissões do secret clicando em editar Editar permissão. A página de configuração do Secret Manager é aberta no navegador da Web.
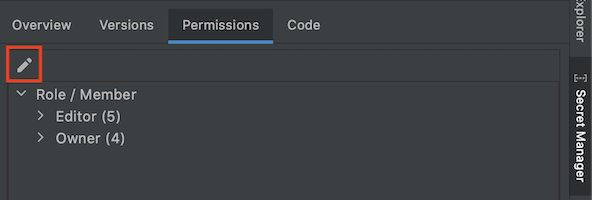
No console Google Cloud , clique em Mostrar painel de informações e em Adicionar principal.
Atribua o papel Acessador de secrets do Gerenciador de secrets à sua conta de serviço.
A conta de serviço tem permissão para acessar este secret.