Vous pouvez accéder aux produits et services Google Cloud à partir de votre code à l'aide des API Cloud. Ces API Cloud présentent une interface REST JSON simple que vous pouvez appeler via des bibliothèques clientes.
Ce document explique comment parcourir les API disponibles, activer des API Cloud, ajouter des bibliothèques clientes Cloud à votre projet, et configurer l'authentification en fonction de vos besoins pour le développement.
Parcourir les API Cloud
Pour explorer toutes les API Google Cloud disponibles dans votre IDE, procédez comme suit :
- Sélectionnez Tools > Cloud Code > Add Cloud libraries and Manage Cloud APIs (Outils > Cloud Code > Ajouter des bibliothèques Cloud et Gérer les API Cloud).
- Développez l'arborescence de l'explorateur des API Google Cloud pour afficher toutes les API disponibles. L'explorateur regroupe les API Cloud par catégorie. Vous pouvez également rechercher une API spécifique à l'aide de la barre de recherche des API.
- Cliquez sur une API pour afficher plus de détails, tels que son état, les instructions d'installation par langage des bibliothèques clientes correspondantes et la documentation correspondante.
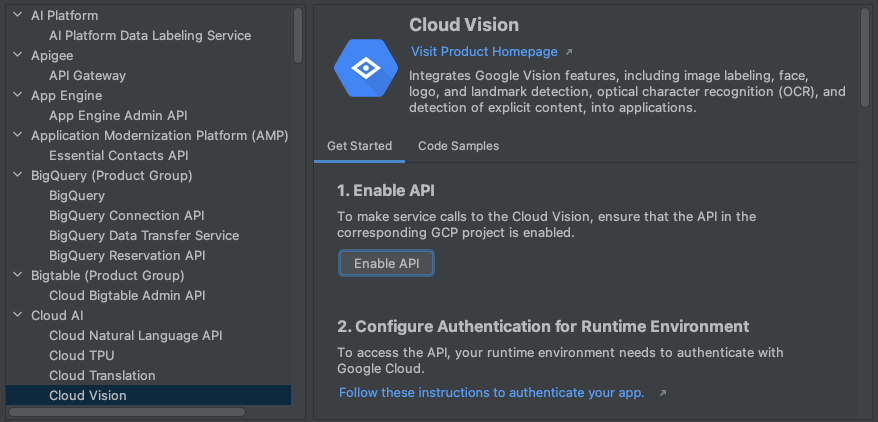
Activer les API Cloud
Pour activer rapidement les API Cloud pour un projet à l'aide des détails de l'API, procédez comme suit :
- Dans la vue Détails de l'API Cloud, choisissez un projet Google Cloud pour lequel vous souhaitez activer l'API Cloud.
- Cliquez sur le bouton Activer l'API.
Une fois l'API activée, un message confirme cette modification.
Ajouter des bibliothèques clientes Google Cloud
Pour ajouter des bibliothèques à votre projet dans IntelliJ, procédez comme suit :
Pour les projets Java Maven
- Sélectionnez Tools > Cloud Code > Cloud APIs (Outils > Cloud Code > API Cloud).
- Sélectionnez le type de bibliothèque souhaité entre la bibliothèque cliente Google Cloud (recommandé) et la bibliothèque Java Spring Google Cloud.
- Dans le menu déroulant Module, sélectionnez le module auquel vous souhaitez ajouter la bibliothèque.
- Cliquez sur Ajouter une dépendance Maven pour ajouter un BOM et une bibliothèque cliente à votre projet.
La boîte de dialogue Manage Google Cloud API (Gérer des API Google Cloud) affiche les bibliothèques prises en charge.

Pour tous les autres projets
- Sélectionnez Tools > Cloud Code > Add Cloud libraries and Manage Cloud APIs (Outils > Cloud Code > Ajouter des bibliothèques Cloud et Gérer les API Cloud).
- Installez l'API en suivant les instructions d'installation indiquées sur la page des détails de l'API correspondant à la langue de votre choix.
La boîte de dialogue Add Google Cloud Libraries (Ajouter des bibliothèques Google Cloud) affiche les bibliothèques prises en charge.
Configurer l'authentification
Une fois que vous avez activé les API et ajouté les bibliothèques clientes nécessaires, vous devez configurer votre application pour qu'elle puisse s'authentifier. La configuration à effectuer dépend du type de développement et de la plate-forme sur laquelle vous exécutez l'application.
Une fois les étapes d'authentification effectuées, votre application peut s'authentifier et est prête à être déployée.
Développement local
Minikube
- Mettez en place les identifiants par défaut de l'application (ADC) en exécutant la commande
gcloud auth application-default login. Cette commande permet à Minikube de trouver les identifiants par défaut de votre application avec lesquels s'authentifier.
Minikube
- Mettez en place les identifiants par défaut de l'application (ADC) en exécutant la commande
gcloud auth application-default login. Cette commande permet à Minikube de trouver les identifiants par défaut de votre application avec lesquels s'authentifier. - Démarrez Minikube à l'aide de la commande
minikube start --addons gcp-auth. Cette opération installe dans vos pods les identifiants par défaut de votre application. Pour un guide d'authentification détaillé de Minikube pour Google Cloud, reportez-vous à la documentation gcp-auth de Minikube.
Cluster Kubernetes local
- Mettez en place les identifiants par défaut de l'application (ADC) en exécutant la commande
gcloud auth application-default login. - Installez votre répertoire local
gclouddans vos pods Kubernetes en modifiant les fichiers manifestes de déploiement afin que les bibliothèques clientes Google Cloud puissent trouver vos identifiants. Exemple de configuration de pod Kubernetes :apiVersion: v1 kind: Pod metadata: name: my-app labels: name: my-app spec: containers: - name: my-app image: gcr.io/google-containers/busybox ports: - containerPort: 8080 volumeMounts: - mountPath: /root/.config/gcloud name: gcloud-volume volumes: - name: gcloud-volume hostPath: path: /path/to/home/.config/gcloud
Cloud Run
- Mettez en place les identifiants par défaut de l'application (ADC) en exécutant la commande
gcloud auth application-default login. Cette commande permet à l'environnement local de simulation de Cloud Run de trouver les identifiants par défaut de votre application avec lesquels s'authentifier.
Développement à distance
Google Kubernetes Engine
- Configurez votre cluster et votre application GKE avec Workload Identity afin d'authentifier les services Google Cloud sur GKE. Cette opération associe votre compte de service Kubernetes à votre compte de service Google.
- Si le service Google Cloud auquel vous souhaitez accéder exige des rôles supplémentaires, attribuez-les au compte de service Google que vous utilisez pour développer votre application.
Pour obtenir la liste des rôles IAM types et rôles prédéfinis que vous pouvez attribuer aux identités, consultez le guide Comprendre les rôles. Pour connaître les étapes à suivre pour attribuer les rôles, consultez la page Accorder, modifier et révoquer les accès à des ressources. - Dans le fichier YAML de votre déploiement Kubernetes, définissez le champ
.spec.serviceAccountNameafin que votre déploiement référence le compte de service Kubernetes.
Si vous travaillez sur une application créée à partir d'un modèle Cloud Code, ce fichier se trouve dans le dossier "kubernetes-manifests".
Cloud Run
- Pour créer un compte de service unique pour le déploiement de votre application Cloud Run, sélectionnez le projet dans lequel votre secret est stocké sur la page "Comptes de service".
- Cliquez sur Créer un compte de service.
- Dans la boîte de dialogue Créer un compte de service, indiquez un nom descriptif pour le compte de service.
- Remplacez l'ID du compte de service par une valeur unique et facilement reconnaissable, puis cliquez sur Créer.
- Si le service Google Cloud auquel vous souhaitez accéder exige des rôles supplémentaires, attribuez-les, et cliquez sur Continuer, puis sur OK.
- Pour ajouter votre compte de service à votre configuration de déploiement, accédez à votre configuration d'exécution Cloud Run: Deploy, développez la section Paramètres de révision avancés puis spécifiez votre compte de service dans le champCompte de service.

Cloud Run
- Configurez votre cluster et votre application GKE avec Workload Identity afin d'authentifier les services Google Cloud sur GKE. Cette opération associe votre compte de service Kubernetes à votre compte de service Google.
- Si le service Google Cloud auquel vous souhaitez accéder exige des rôles supplémentaires, attribuez-les au compte de service Google que vous utilisez pour développer votre application.
Le guide Comprendre les rôles décrit les différents types de rôles IAM et répertorie les rôles prédéfinis disponibles que vous pouvez attribuer aux identités. - Pour ajouter votre compte de service Kubernetes à votre configuration de déploiement, accédez à la configuration d'exécution Cloud Run: Deploy (Cloud Run : Déployer), développez la section Advanced revision settings (Paramètres de révision avancés), puis Spécifiez votre compte de service Kubernetes dans le champ Compte de service.

Développement à distance avec le gestionnaire de secrets activé
Si vous développez votre application à distance, que vous utilisez un compte de service pour l'authentification et que votre application utilise des secrets, vous devez suivre quelques étapes supplémentaires pour attribuer à votre compte de service Google le rôle qui lui permettra d'accéder à un secret spécifique du gestionnaire de secrets :
Ouvrez le panneau "Secret Manager" (Gestionnaire de secrets) et sélectionnez le secret auquel vous souhaitez accéder depuis votre code.
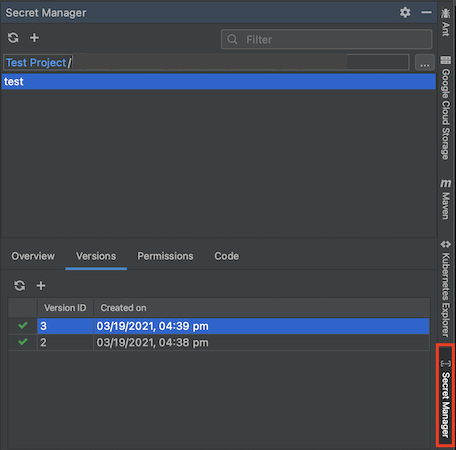
Accédez à l'onglet "Autorisations", puis configurez les autorisations de votre secret en cliquant sur Modifier Modifier l'autorisation. La page de configuration de Secret Manager pour le secret s'ouvre dans votre navigateur Web.
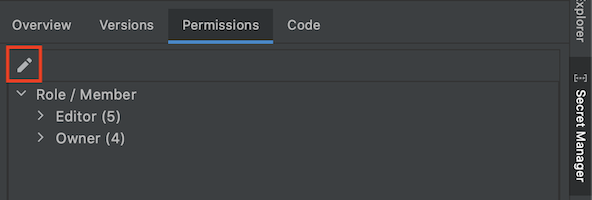
Dans la console Google Cloud , cliquez sur Afficher le panneau d'informations, puis sur Ajouter un compte principal.
Attribuez le rôle Accesseur de secrets de Secret Manager à votre compte de service.
Votre compte de service est autorisé à accéder à ce secret.