Questo documento mostra come configurare l'integrazione di Chrome Enterprise Premium con Microsoft Intune. La configurazione di questa integrazione prevede la configurazione di Intune, della verifica degli endpoint e dell'identità del carico di lavoro di Azure, nonché l'attivazione di Microsoft Intune nelle unità organizzative.
Prima di iniziare
-
Per configurare Intune per Chrome Enterprise Premium, procedi nel seguente modo:
- Comprendi le configurazioni supportate e assicurati che il tuo ambiente soddisfi i requisiti di rete.
- Accedi all'abbonamento di prova o creane uno nuovo a Intune.
- Imposta la registrazione DNS per connettere il nome di dominio della tua azienda a Intune.
- Aggiungi utenti e gruppi o connetti Active Directory per la sincronizzazione con Intune.
- Concedi agli utenti l'autorizzazione a utilizzare Intune assegnando licenze.
Per maggiori informazioni, vedi Configurare Intune.
Assicurati che i dispositivi della tua organizzazione eseguano uno dei seguenti sistemi operativi:
- macOS 10.11 o versioni successive
- Microsoft® Windows 10 o versioni successive
- Configura la verifica degli endpoint per la tua organizzazione.
Connettiti a Intune
- Trova l'ID tenant di Microsoft 365.
- Registra la tua applicazione per ottenere un ID applicazione.
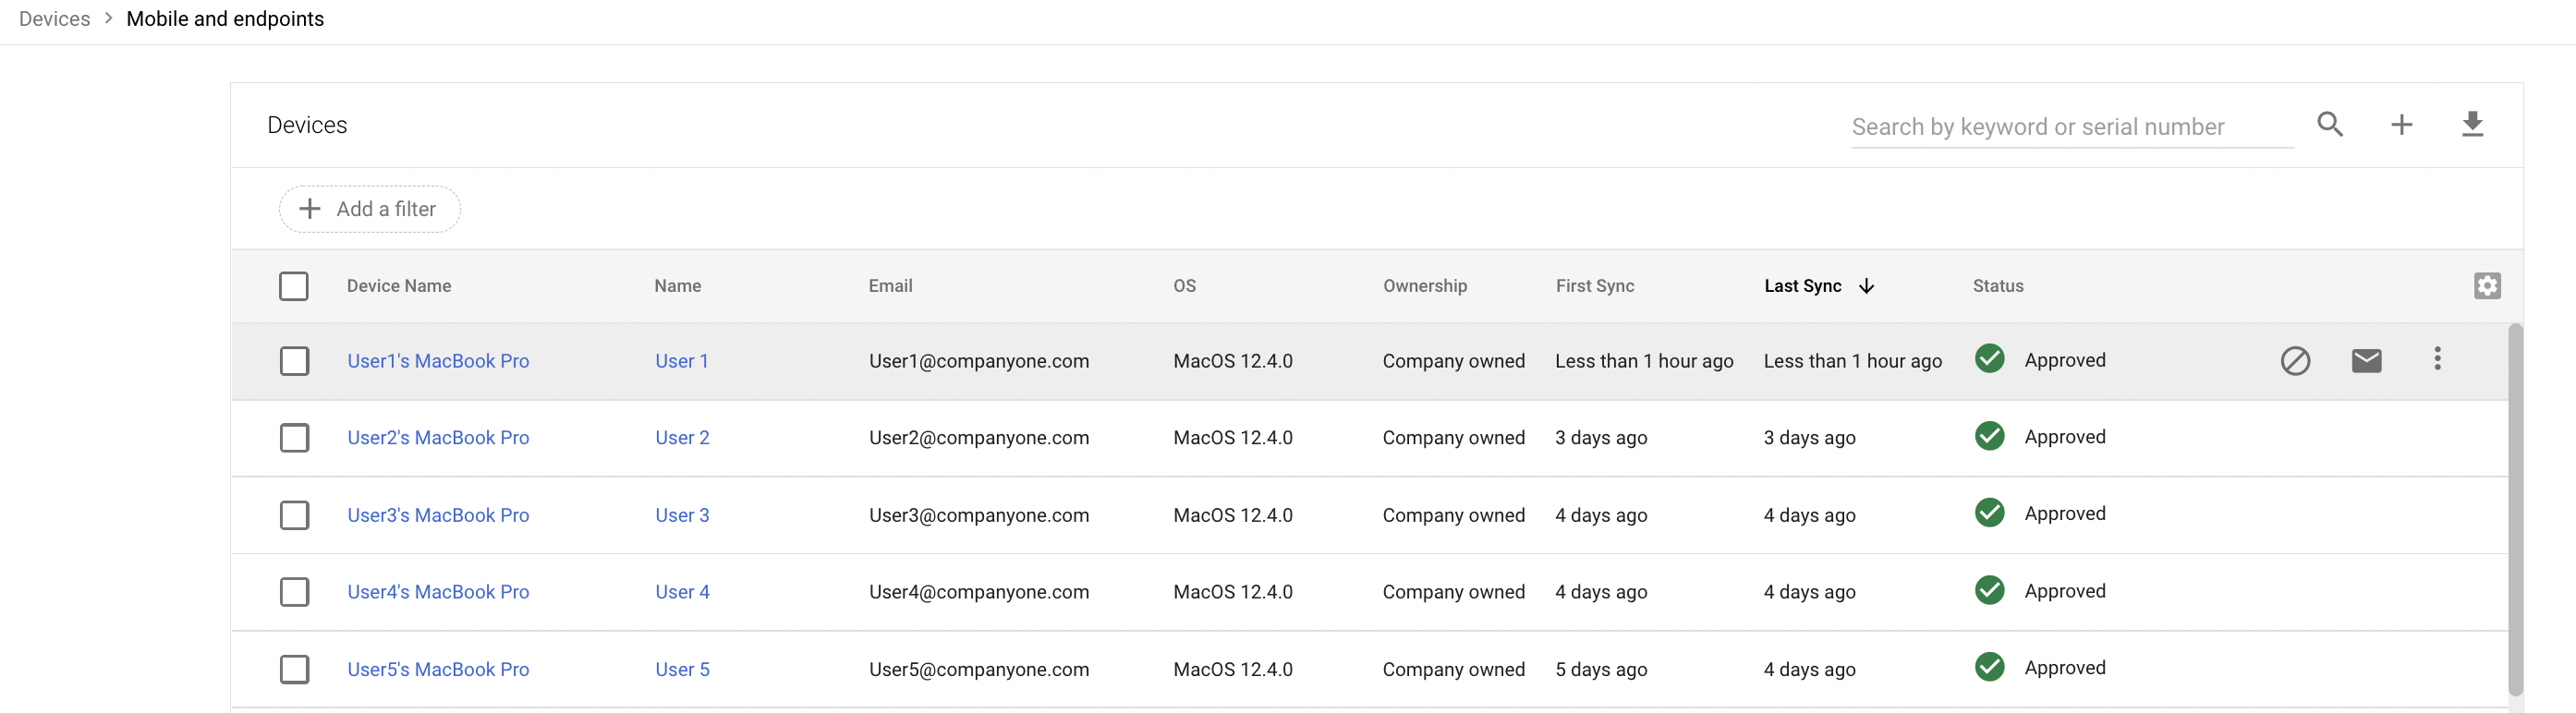
Nella home page della Console di amministrazione, vai a Dispositivi.
Vai a Dispositivi- Nel menu di navigazione, fai clic su Dispositivi mobili ed endpoint > Impostazioni > Integrazioni di terze parti > Sicurezza e partner MDM > Gestisci.
- Cerca Microsoft Intune e fai clic su Apri connessione.
Nella finestra di dialogo Connetti a Intune, inserisci l'ID tenant nel campo ID tenant directory Azure e l'ID applicazione nel campo ID applicazione Azure.
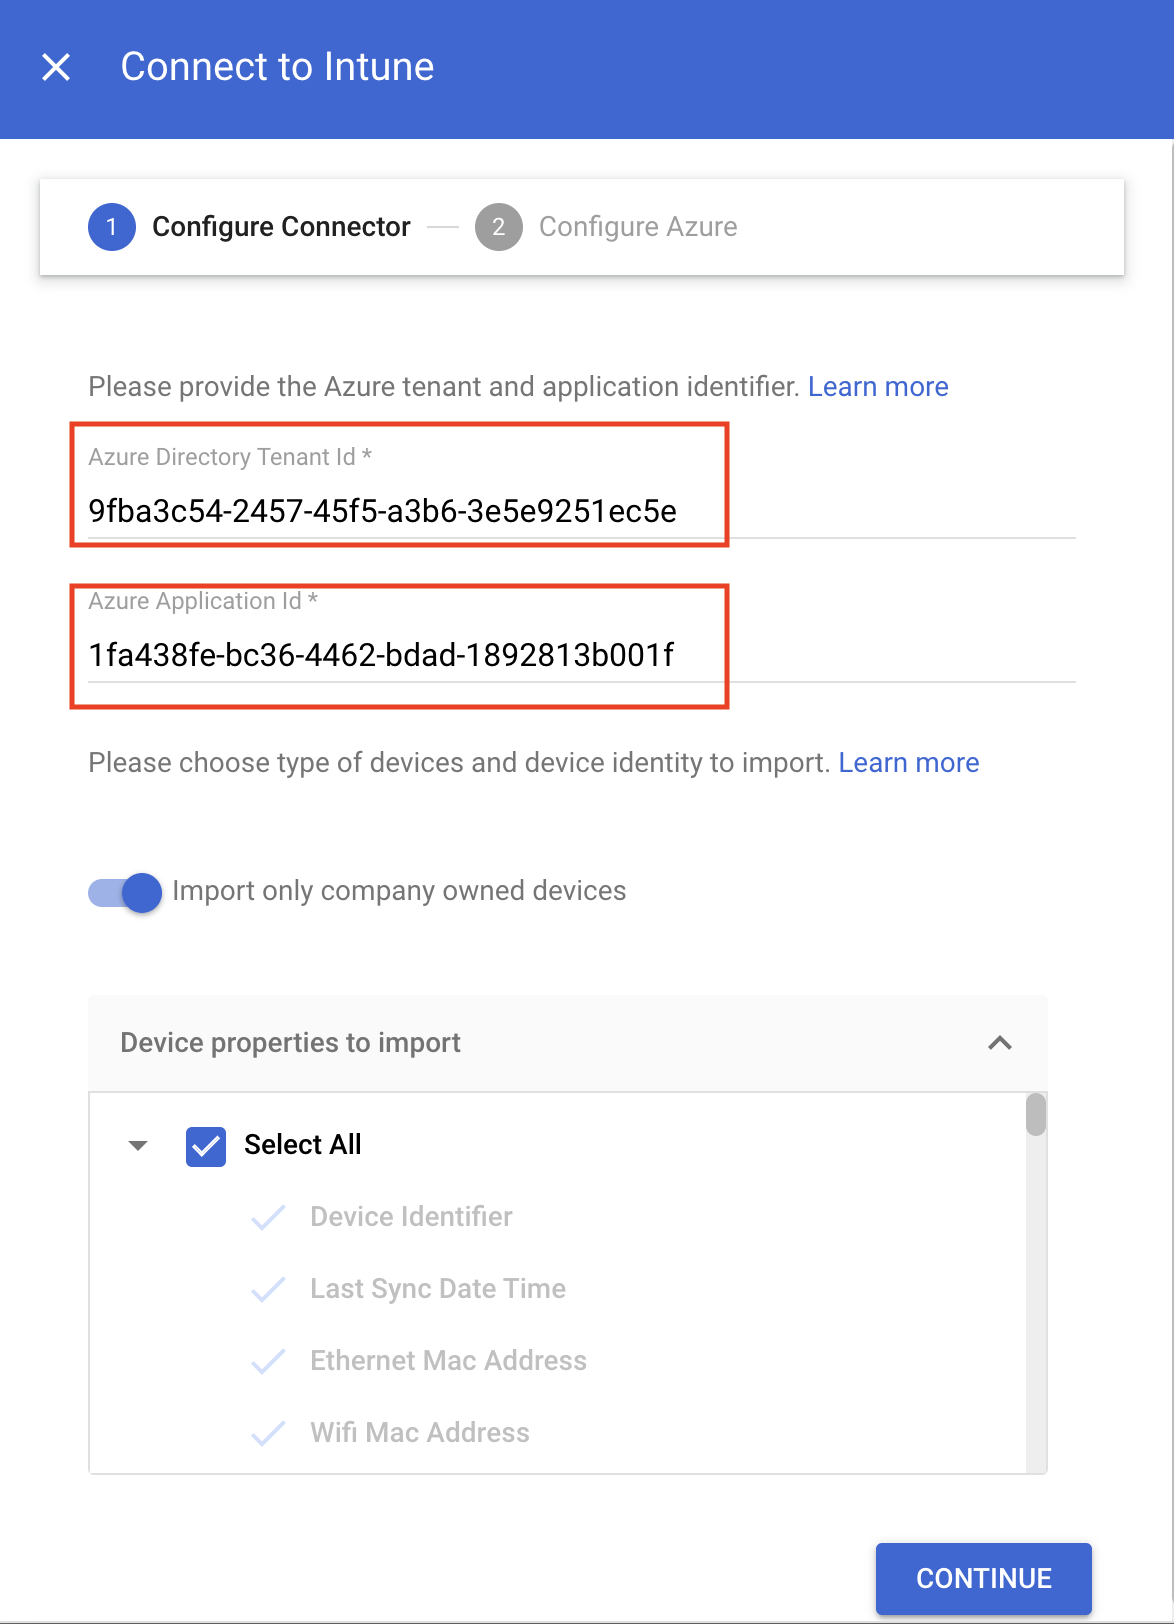
- A seconda che tu voglia importare solo i dispositivi di proprietà dell'azienda o tutti i dispositivi, esegui l'azione appropriata:
- Per importare solo i dispositivi di proprietà dell'azienda, fai clic sul pulsante di attivazione/disattivazione Importa solo i dispositivi di proprietà dell'azienda. Nella sezione Proprietà del dispositivo da importare, seleziona le proprietà da archiviare in Chrome Enterprise Premium.
Per importare tutti i dispositivi, nella sezione Proprietà dispositivo da importare, seleziona le proprietà che devono essere archiviate in Chrome Enterprise Premium.

Le proprietà obbligatorie del dispositivo, come
device identifier,last sync time,serial numberewifi MAC address, vengono raccolte per impostazione predefinita.Per ulteriori informazioni sulle proprietà del dispositivo raccolte da Intune, vedi Proprietà del dispositivo Intune.
- Fai clic su Continua.
- Copia l'ID service account.
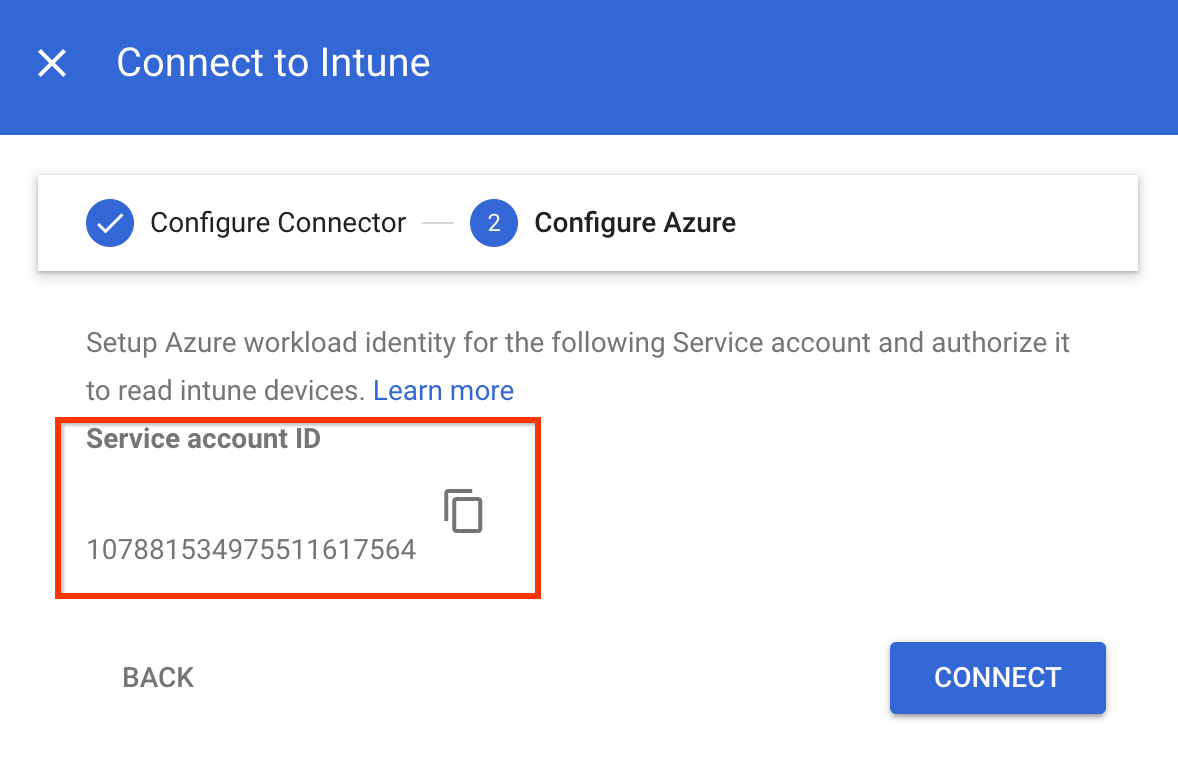
- Utilizza l'ID service account per autorizzare l'identità del carico di lavoro di Azure
a raccogliere dati dai dispositivi Intune:
- Configura la tua app in modo che consideri attendibile un provider di identità esterno.
Specifica i seguenti valori nei campi corrispondenti:
- Nome: un nome qualsiasi per la credenziale federata.
- Identificatore soggetto: l'ID account di servizio che hai copiato.
- Emittente:
https://accounts.google.com.
- Concedi le autorizzazioni all'app:
- Cerca le autorizzazioni
DeviceManagementManagedDevices.Read.AlleDeviceManagementApps.Read.Alle aggiungile a Microsoft Graph. Quando richiedi le autorizzazioni API, seleziona Autorizzazioni applicazione.DeviceManagementManagedDevices.Read.Allfornisce l'accesso in lettura a tutti i dispositivi e alle relative proprietà gestiti da Intune, mentreDeviceManagementApps.Read.Allfornisce l'accesso in lettura ai log di controllo di Intune per gli eventi di eliminazione dei dispositivi. - Concedi il consenso amministratore alle autorizzazioni configurate per la tua applicazione.
- Cerca le autorizzazioni
- Configura la tua app in modo che consideri attendibile un provider di identità esterno.
- Nella finestra di dialogo Connetti a Intune, fai clic su Connetti.
La connessione a Intune è impostata per l'apertura.
Attivare Intune per l'unità organizzativa
Per raccogliere informazioni sul dispositivo utilizzando Intune, attiva Intune per la tua unità organizzativa procedendo nel seguente modo:
Nella home page della Console di amministrazione, vai a Dispositivi.
Vai a Dispositivi- Nel menu di navigazione, fai clic su Dispositivi mobili ed endpoint > Impostazioni > Integrazioni di terze parti > Sicurezza e partner MDM.
- Nel riquadro Unità organizzative, seleziona la tua unità organizzativa.
Seleziona la casella di controllo Microsoft Intune e fai clic su Salva.
Microsoft Intune è ora elencato nella sezione Sicurezza e partner MDM. A seconda delle dimensioni della tua organizzazione, potrebbero essere necessari alcuni secondi per stabilire la connessione tra la verifica degli endpoint e Intune. Una volta stabilita la connessione, i dispositivi potrebbero impiegare da alcuni minuti a un'ora per segnalare i dati di Intune.

Verificare i dati di Intune sui dispositivi
Nella home page della Console di amministrazione, vai a Dispositivi.
Vai a Dispositivi- Fai clic su Endpoint.
Seleziona un dispositivo qualsiasi della tua unità organizzativa per cui è attivato Intune.
Verifica che i dati di Microsoft Intune siano elencati nella sezione Servizi di terze parti.
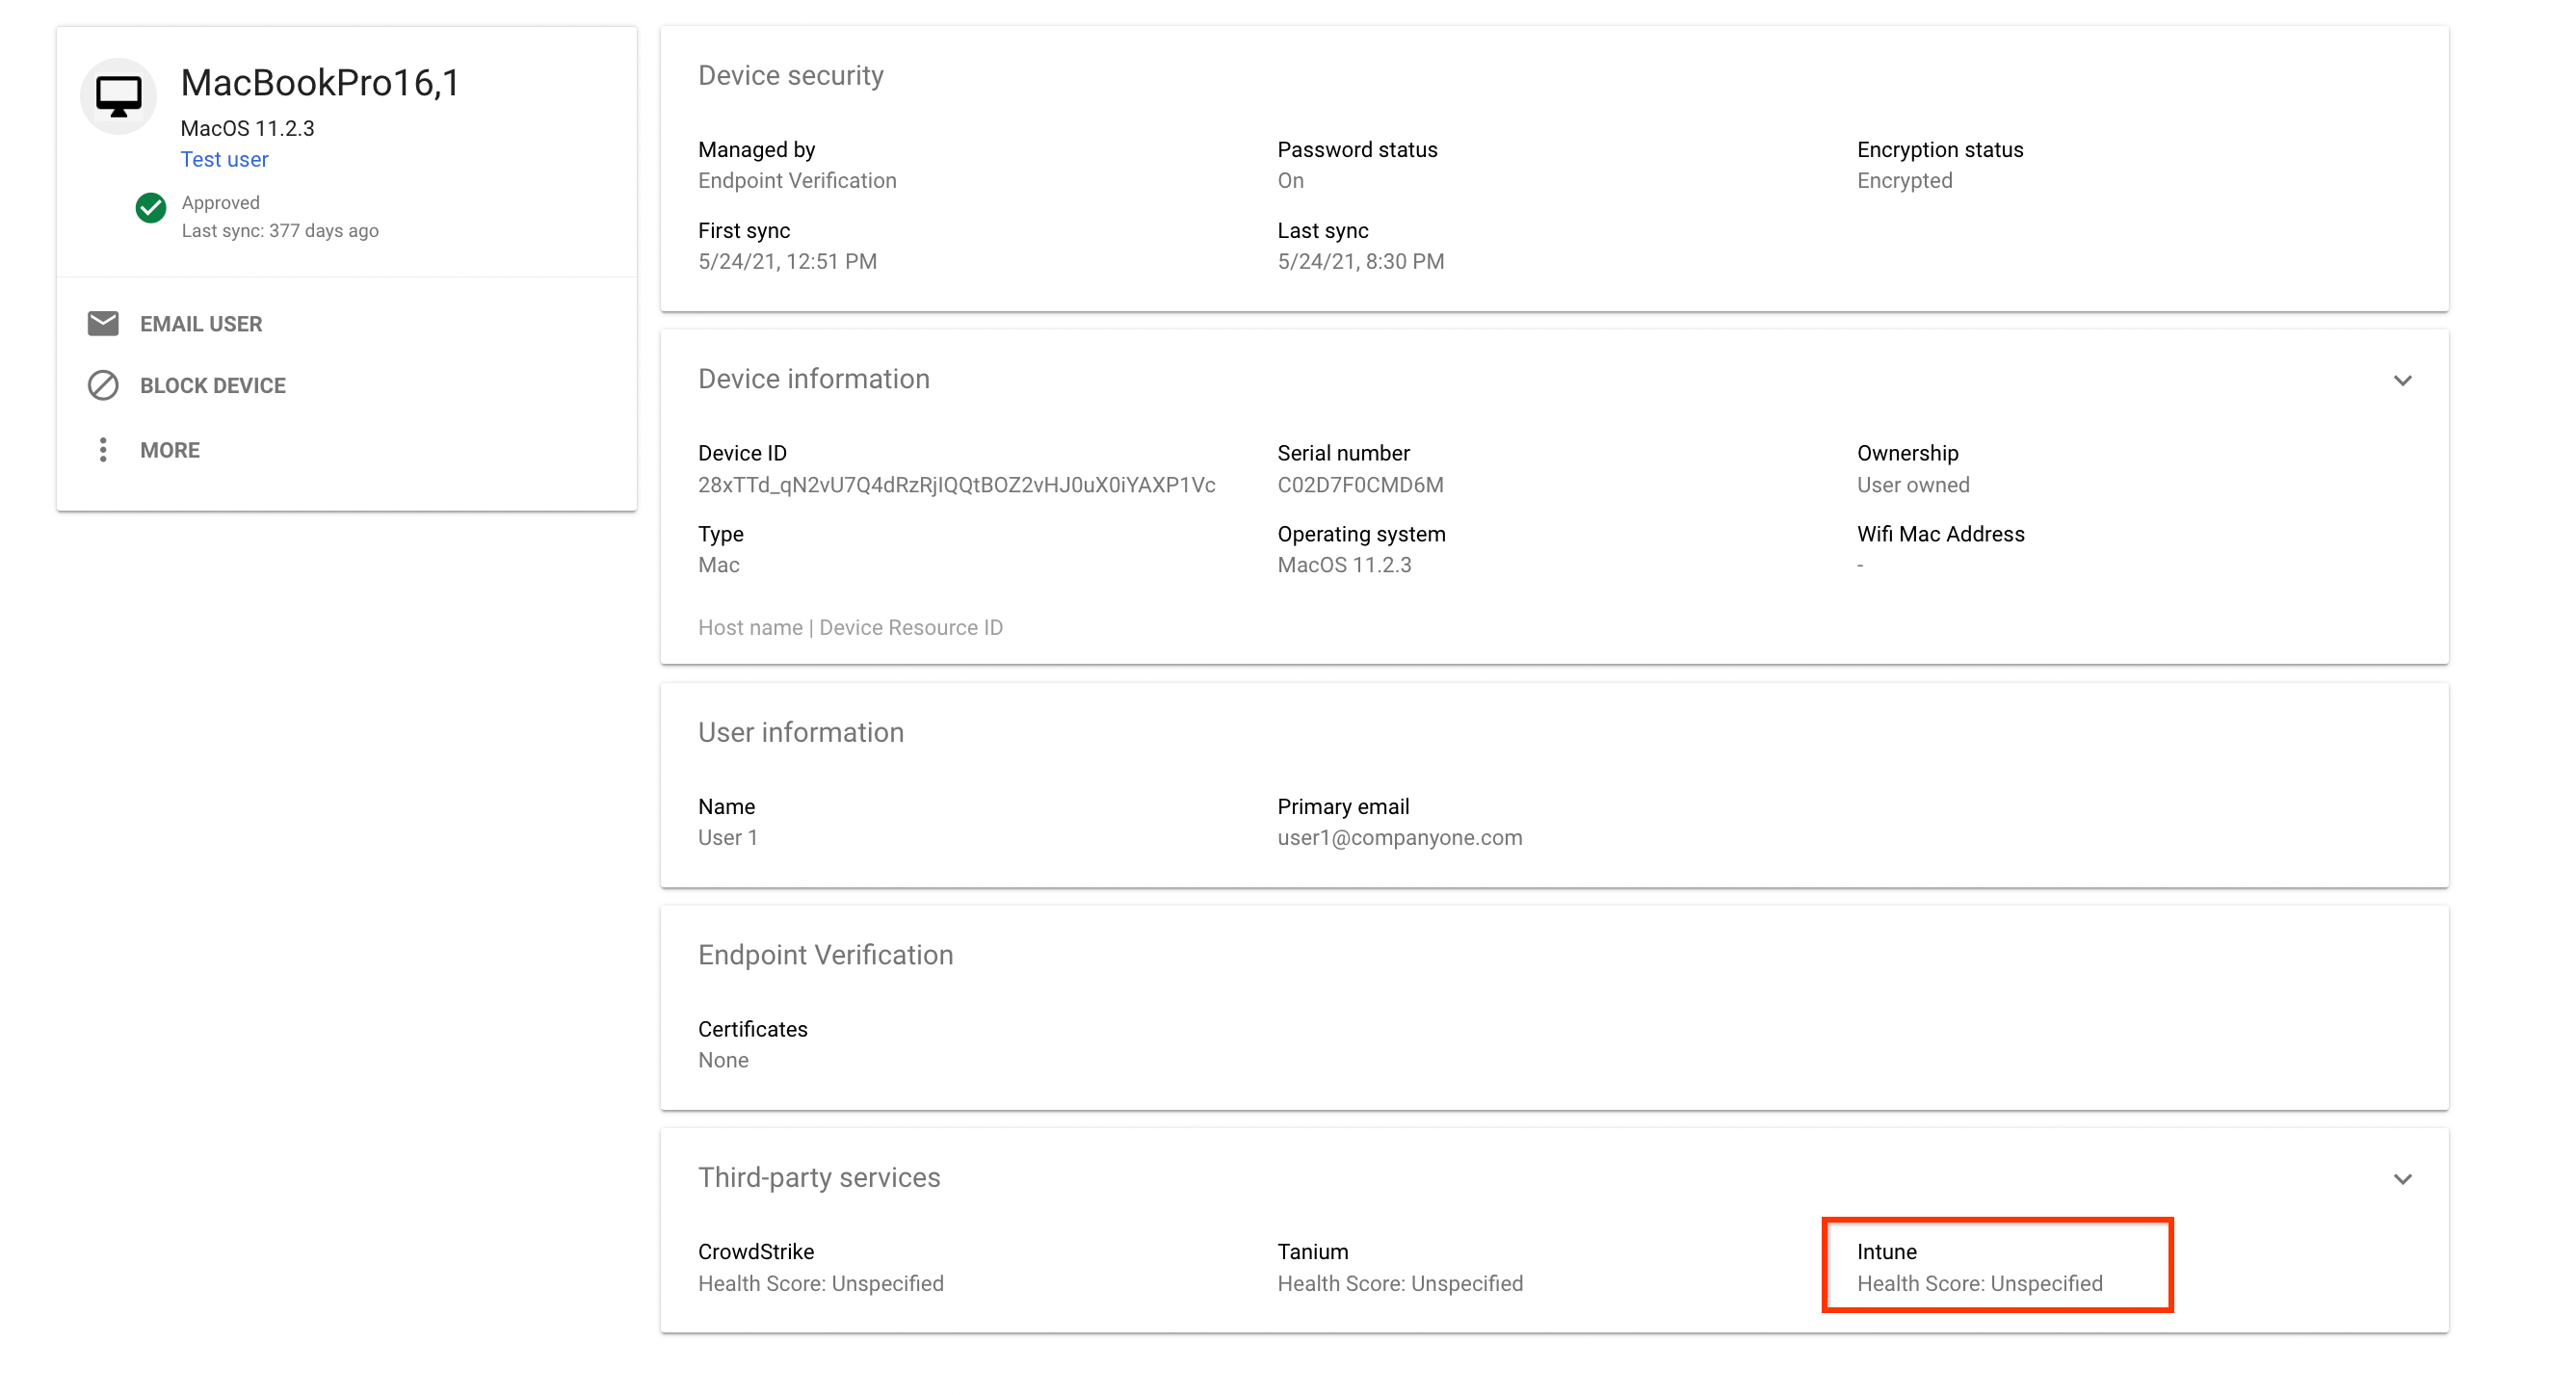
Per visualizzare i dettagli completi, espandi la sezione Servizi di terze parti.
L'immagine seguente mostra i dettagli dei dati raccolti da Intune:

Gli stati di conformità segnalati da Intune sono suddivisi in grandi categorie nei seguenti stati di conformità:
| Stati di conformità nella Console di amministrazione Google | Stati di conformità segnalati da Intune |
|---|---|
COMPLIANCE_STATE_UNSPECIFIED |
unknown, configManager |
COMPLIANT |
compliant |
NON_COMPLIANT |
noncompliant, conflict, error,
inGracePeriod |