En este documento se explica cómo configurar la integración de Chrome Enterprise Premium con Microsoft Intune. Para configurar esta integración, debes configurar Intune, la verificación de endpoints y la identidad de carga de trabajo de Azure, así como habilitar Microsoft Intune en tus unidades organizativas.
Antes de empezar
-
Para configurar Intune para Chrome Enterprise Premium, haz lo siguiente:
- Consulta las configuraciones admitidas y asegúrate de que tu entorno cumpla los requisitos de red.
- Inicia sesión en tu suscripción de prueba o crea una suscripción a Intune.
- Configura el registro de DNS para conectar el nombre de dominio de tu empresa con Intune.
- Añade usuarios y grupos, o conecta Active Directory para sincronizarlo con Intune.
- Asigna licencias para dar permiso a los usuarios para que usen Intune.
Para obtener más información, consulta Configurar Intune.
Asegúrate de que los dispositivos de tu organización ejecuten uno de los siguientes sistemas operativos:
- macOS 10.11 o versiones posteriores
- Microsoft® Windows 10 o una versión posterior
- Configura la verificación de puntos finales en tu organización.
Conectar con Intune
- Busca tu ID de tenant de Microsoft 365.
- Registre su aplicación para obtener un ID de aplicación.
En la página principal de la consola de administración, ve a Dispositivos.
Ir a Dispositivos- En el menú de navegación, haz clic en Móviles y endpoints > Configuración > Integración con terceros > Partners de seguridad y gestión de dispositivos móviles > Gestionar.
- Busca Microsoft Intune y haz clic en Abrir conexión.
En el cuadro de diálogo Connect to Intune (Conectar con Intune), introduce el ID de cliente en el campo Azure directory tenant id (ID de cliente del directorio de Azure) y el ID de aplicación en el campo Azure application id (ID de aplicación de Azure).
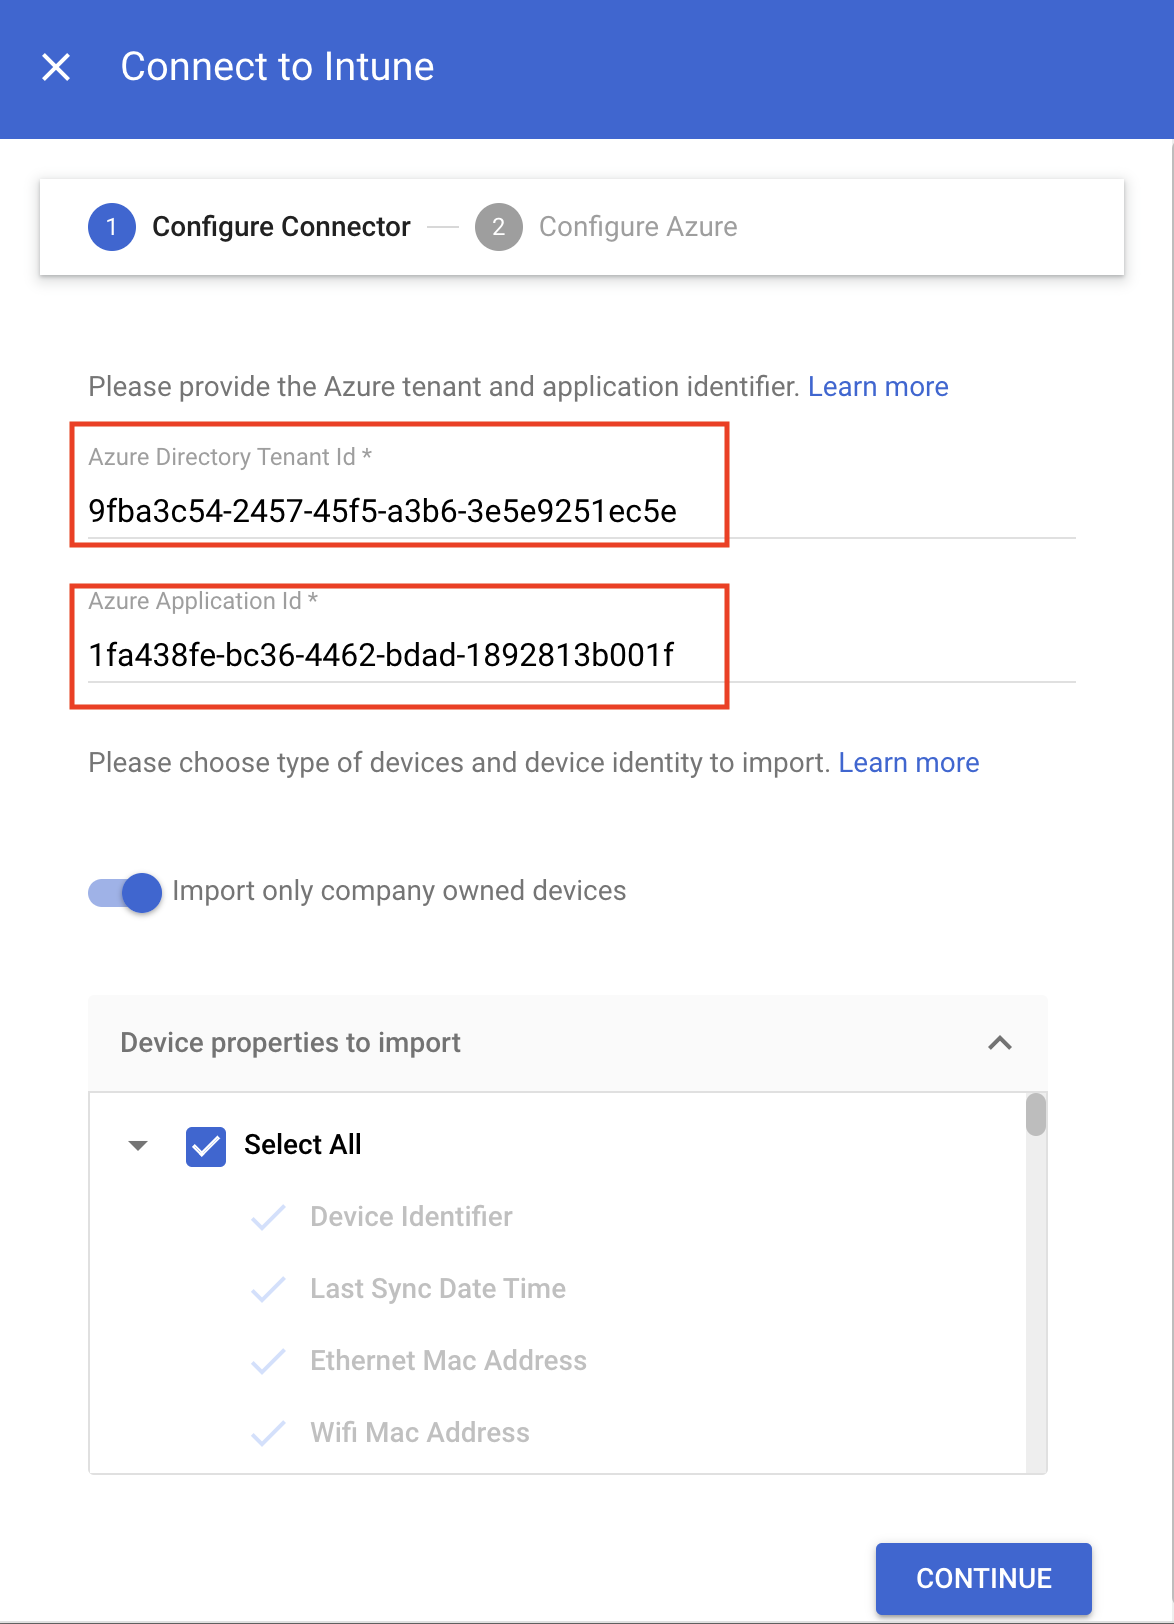
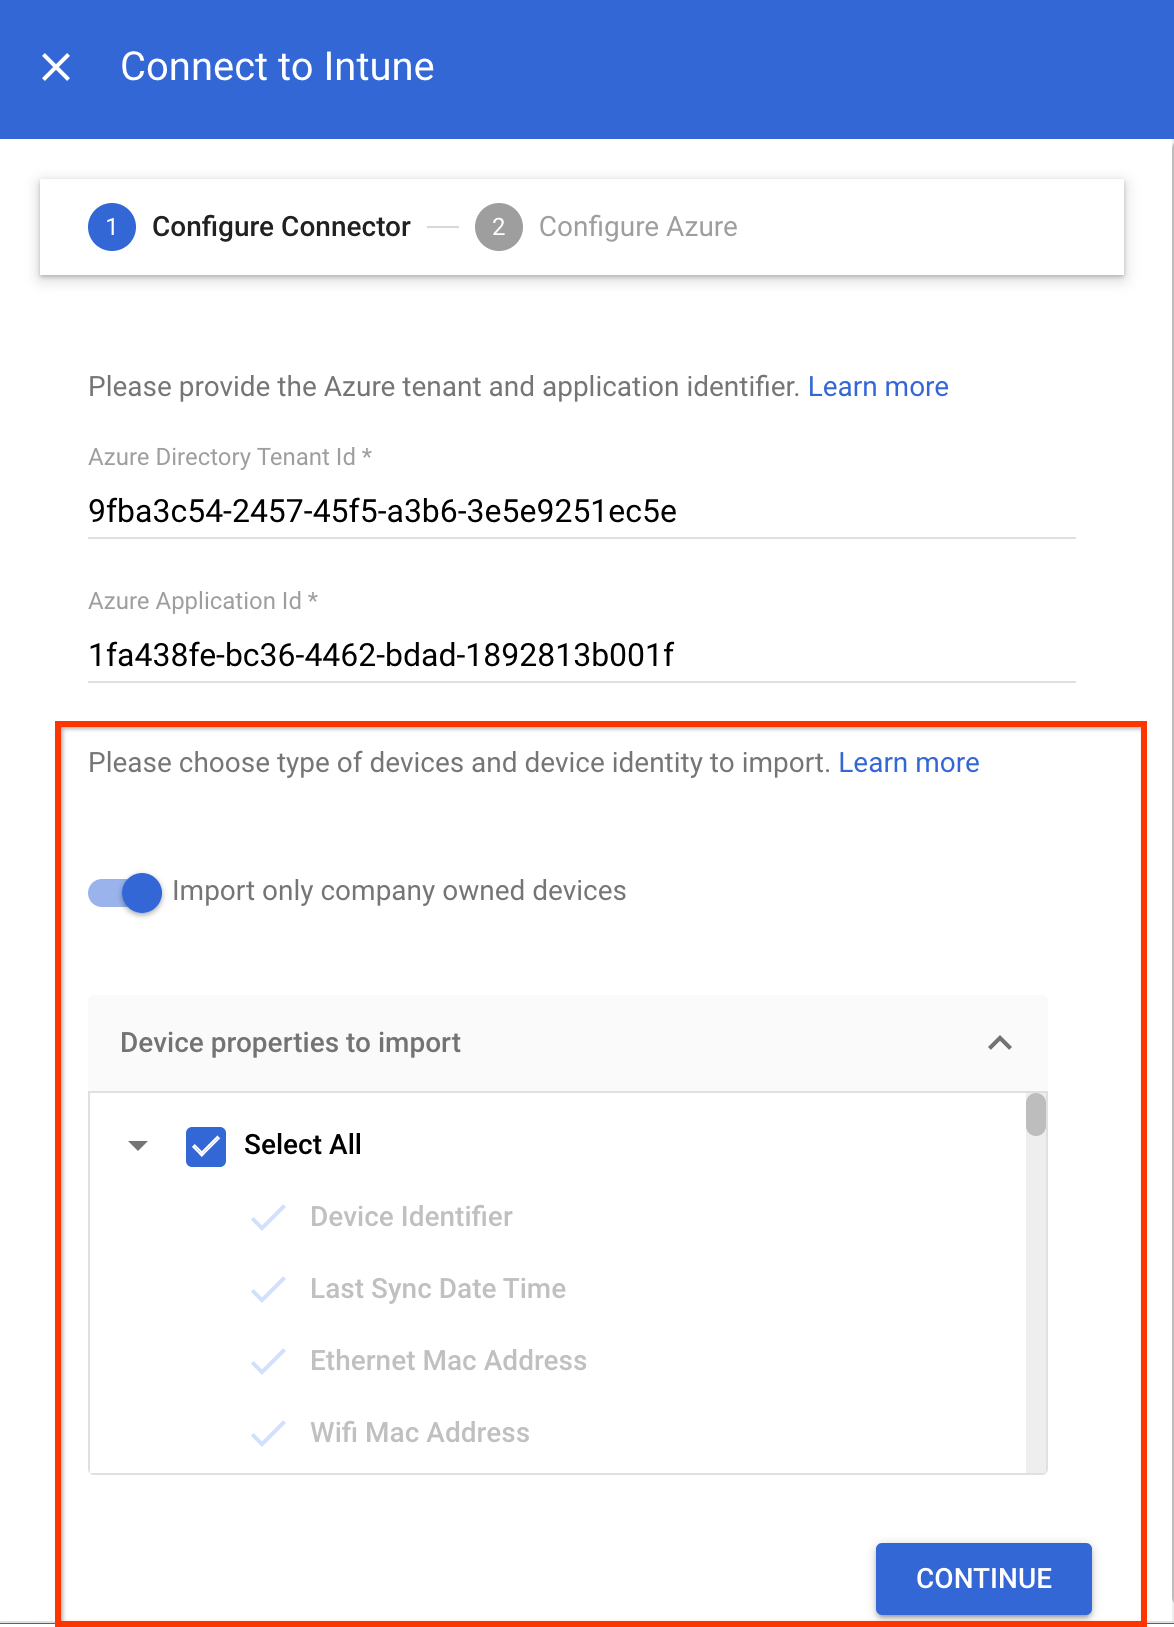
- En función de si quieres importar solo los dispositivos propiedad de la empresa o todos los dispositivos, haz lo siguiente:
- Para importar solo los dispositivos propiedad de la empresa, activa el interruptor Importar solo dispositivos propiedad de la empresa. En la sección Propiedades del dispositivo que se van a importar, seleccione las propiedades que se deben almacenar en Chrome Enterprise Premium.
Para importar todos los dispositivos, en la sección Propiedades de dispositivo que se van a importar, seleccione las propiedades que se deben almacenar en Chrome Enterprise Premium.
Las propiedades obligatorias del dispositivo, como
device identifier,last sync time,serial numberywifi MAC address, se recogen de forma predeterminada.Para obtener más información sobre las propiedades de los dispositivos que recoge Intune, consulta Propiedades de los dispositivos de Intune.
- Haz clic en Continuar.
- Copia el ID de cuenta de servicio.
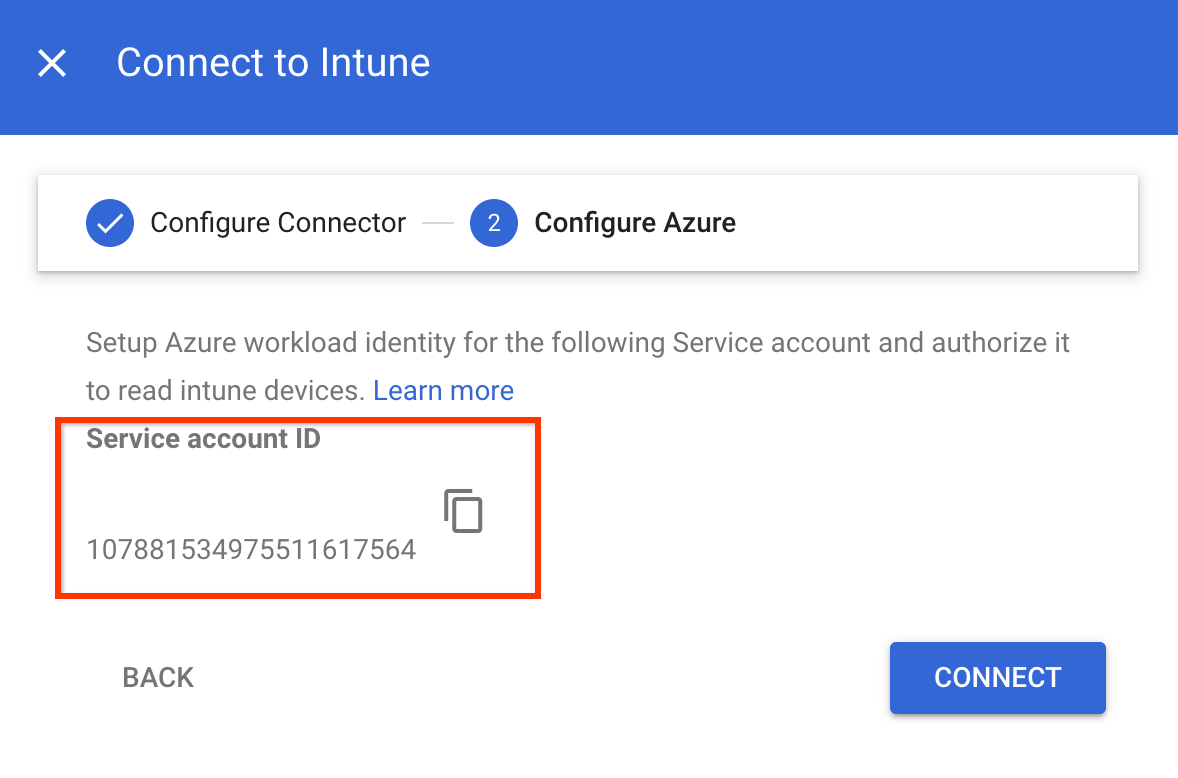
- Usa el ID de cuenta de servicio para autorizar la identidad de carga de trabajo de Azure
para recoger datos de los dispositivos Intune:
- Configura tu aplicación para que confíe en un proveedor de identidades externo.
Especifique los siguientes valores en los campos correspondientes:
- Nombre: cualquier nombre para la credencial federada.
- Identificador de asunto: el ID de cuenta de servicio que has copiado.
- Emisor:
https://accounts.google.com.
- Concede permisos a tu aplicación:
- Busca los permisos
DeviceManagementManagedDevices.Read.AllyDeviceManagementApps.Read.Ally añádelos a Microsoft Graph. Cuando solicites los permisos de la API, selecciona Permisos de la aplicación.DeviceManagementManagedDevices.Read.Allproporciona acceso de lectura a todos los dispositivos y sus propiedades gestionados por Intune, yDeviceManagementApps.Read.Allproporciona acceso de lectura a los registros de auditoría de Intune para los eventos de eliminación de dispositivos. - Concede el consentimiento de administrador a los permisos configurados para tu aplicación.
- Busca los permisos
- Configura tu aplicación para que confíe en un proveedor de identidades externo.
- En el cuadro de diálogo Connect to Intune (Conectar con Intune), haz clic en Connect (Conectar).
La conexión a Intune se abrirá.
Habilitar Intune en tu unidad organizativa
Para recoger información de los dispositivos mediante Intune, habilita Intune en tu unidad organizativa haciendo lo siguiente:
En la página principal de la consola de administración, ve a Dispositivos.
Ir a Dispositivos- En el menú de navegación, haz clic en Móviles y endpoints > Configuración > Integraciones con terceros > Partners de seguridad y gestión de dispositivos móviles.
- En el panel Unidades organizativas, selecciona la unidad organizativa que quieras.
Marca la casilla Microsoft Intune y haz clic en Guardar.
Microsoft Intune ahora aparece en la sección Partners de seguridad y gestión de dispositivos móviles. En función del tamaño de tu organización, puede tardar unos segundos en establecer la conexión entre Verificación de endpoints e Intune. Una vez que se haya establecido la conexión, los dispositivos pueden tardar entre unos minutos y una hora en enviar datos a Intune.

Verificar los datos de Intune en los dispositivos
En la página principal de la consola de administración, ve a Dispositivos.
Ir a Dispositivos- Haz clic en Puntos de conexión.
Selecciona cualquier dispositivo de tu unidad organizativa en el que esté habilitado Intune.

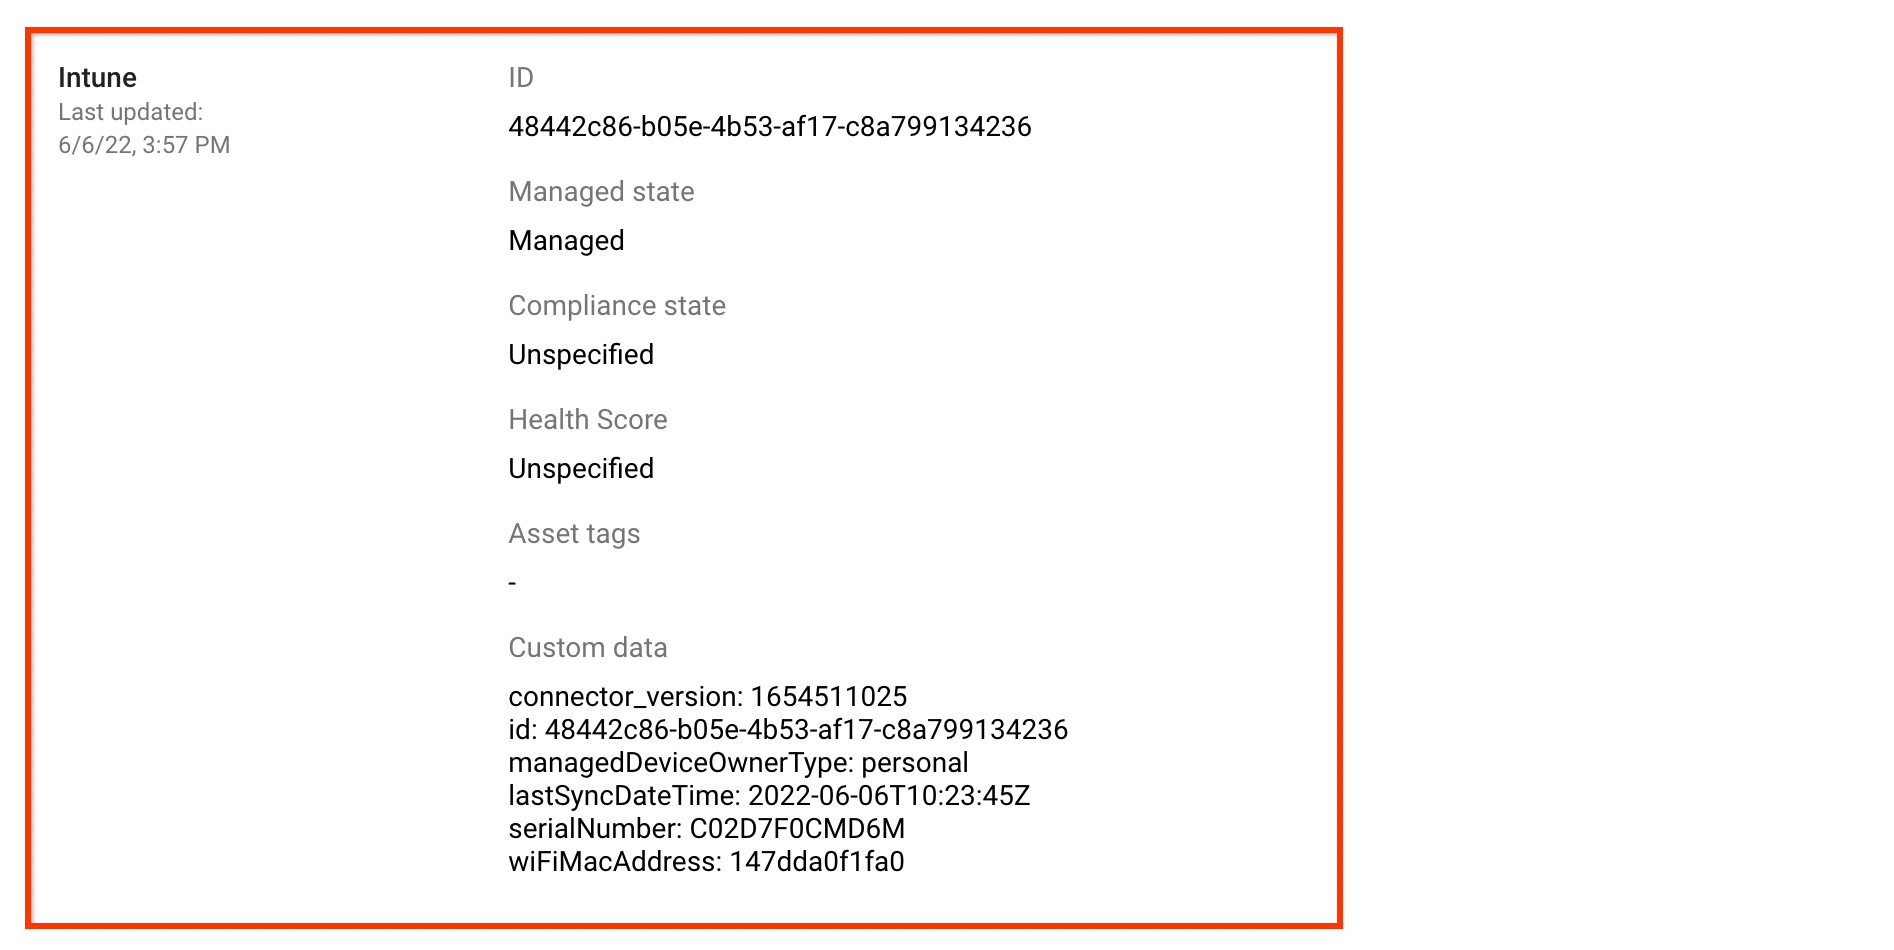
Verifica que los datos de Microsoft Intune se incluyan en la sección Servicios de terceros.

Para ver todos los detalles, despliega la sección Servicios de terceros.
En la siguiente imagen se muestran los detalles de los datos recogidos por Intune:
Los estados de cumplimiento que comunica Intune se clasifican en los siguientes estados de cumplimiento:
| Estados de cumplimiento en la consola de administración de Google | Estados de cumplimiento comunicados por Intune |
|---|---|
COMPLIANCE_STATE_UNSPECIFIED |
unknown, configManager |
COMPLIANT |
compliant |
NON_COMPLIANT |
noncompliant, conflict, error,
inGracePeriod |