Databases on Google Cloud Part 6: BigQuery and No-code SQL-only ML
Abirami Sukumaran
Developer Advocate, Google
BigQuery and No-code SQL-only Machine Learning
I love movies, period. No language, geography or culture constraint when it comes to films. I enjoy not-only watching movies but also like to know about the nuances and qualities that go into making a movie successful. You know how often I have wondered, if only I can alter a few aspects and create an impactful difference in the outcome in terms of the movie’s rating or success factor. That would involve predicting the success score of the movie so I can play around with the variables, dialing values up and down to impact the result. I was hoping to build a quick and easy solution that doesn’t involve so much effort because, come on, let’s face it, as much as I love to talk about movies, I still didn’t want to give up all my time just to prove my prescription theory.
BigQuery
Recently as I was going through this journey of Databases in Google Cloud Blog series, I was incidentally considering BigQuery for part 6 of the series and that is when I remembered the cool thing about BigQuery is that, not only is it a serverless, multi-cloud data warehouse option for my training data that can scale from bytes to petabytes with 0 operational overhead, but it also has built-in Machine Learning (ML) and Analytics that I can use to create no-code predictions just using SQL queries. I can directly access data from external sources through Federated Queries without even having to store or move the data into BigQuery. Is that cool or what! But it’s much cooler than that, read about its features here.
I was finally able to test my personal theories about some factors influencing a movie’s rating or success with possibly the least amount of time and effort from my end. So, are you a big movie buff like myself? Then, fasten your seatbelts, it’s gonna be a bumpy night- read :).
In this blog
You will read about
1. Creating a BigQuery dataset using Cloud Shell and load data from file
2. How I used BigQuery ML for supervised learning to create a Multi-class Regression Prediction model for the Movie Score prediction concept I have been talking about, without having to spend more time coding but just using SQL queries for ML
3. I have also created a similar model using Vertex AI AutoML with BigQuery data using the new direct Integration to BigQuery in Vertex AI without using any additional components for moving your data
BigQuery Dataset using Cloud Shell
BigQuery allows you to focus on analyzing data to find meaningful insights. In this blog, you'll use the bq command-line tool to load a local CSV file into a new BigQuery table. Follow the below steps to enable BigQuery:
Activate Cloud Shell and create your project
In the Google Cloud Console, on the project selector page, select or create a Google Cloud project
Make sure that billing is enabled for your Cloud project. Learn how to check if billing is enabled on a project
Navigate to BigQuery. You can also open the BigQuery web UI directly by entering the following URL in your browser:
https://console.cloud.google.com/bigqueryYou will use Cloud Shell, a command-line environment running in Google Cloud
From the Cloud Console, click Activate Cloud Shell:


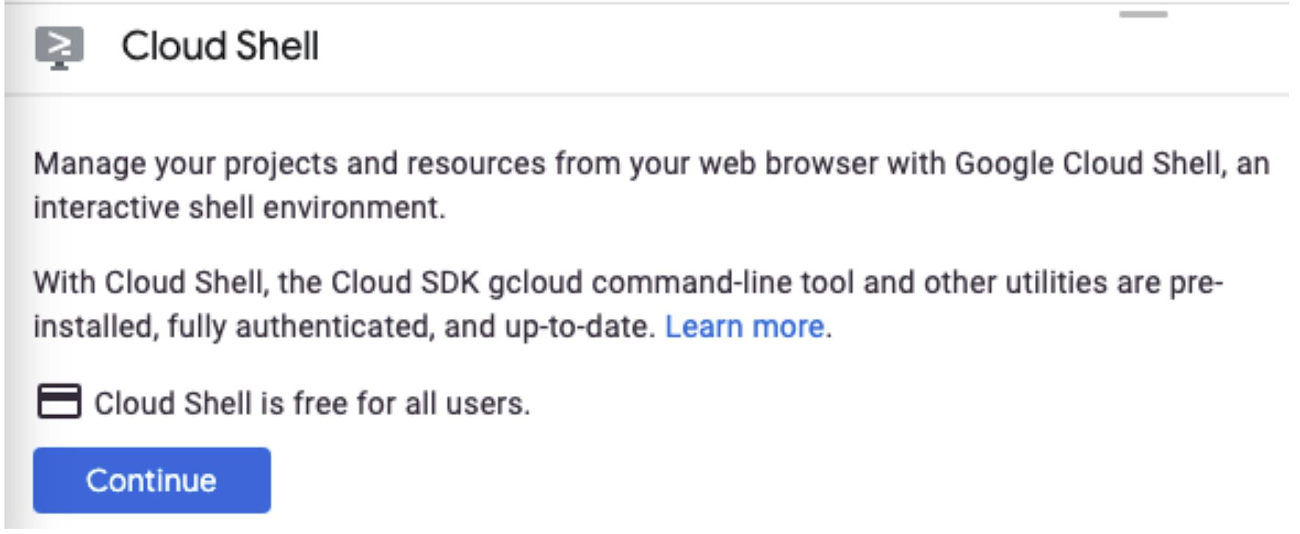
If you've never started Cloud Shell before, you're presented with an intermediate screen (below the fold) describing what it is. If that's the case, click Continue (and you won't ever see it again). Here's what that one-time screen looks like:

gcloud auth list2. Run the following command in Cloud Shell to confirm that the gcloud command knows about your project:
gcloud config list project
If your project is not set, use the following commad to set it:
gcloud config set project <PROJECT_ID>
Creating and loading Dataset
A BigQuery dataset is a collection of tables. All tables in a dataset are stored in the same data location. You can also attach custom access controls to limit access to a dataset and its tables.
1. In Cloud Shell, use the bq mk command to create a dataset called "movies"
bq mk movies
2. Make sure you have the data file (.csv) processed and ready
In this example, I have the movies.csv ready with the below independent parameters:
Name (String)
Rating (String)
Genre (String, Categorical)
Year (Number)
Released (Date)
Director (String)
Writer (String)
Star (String)
Country (String, Categorical)
Budget (Number)
Company (String)
Runtime (Number)
And the dependent variable that we are going to predict:
Score (Number, Categorical)
The file can be downloaded from git. Please feel free to include a public data set of your choice for the experiment.
Options Description:
--source_format=CSV - uses the CSV data format when parsing the data file.
--skip_leading_rows=1 - skips the first line in the CSV file because it is a header row.
Movies.movies - the first positional argument—defines which table the data should be loaded into.
./movies.csv—the second positional argument—defines which file to load. In addition to local files, the bq load command can load files from Cloud Storage with gs://my_bucket/path/to/file URIs.
A schema, which can be defined in a JSON schema file or as a comma-separated list. (I used a comma-separated list)
Hurray! Our csv data is now loaded in the table movies.movies.
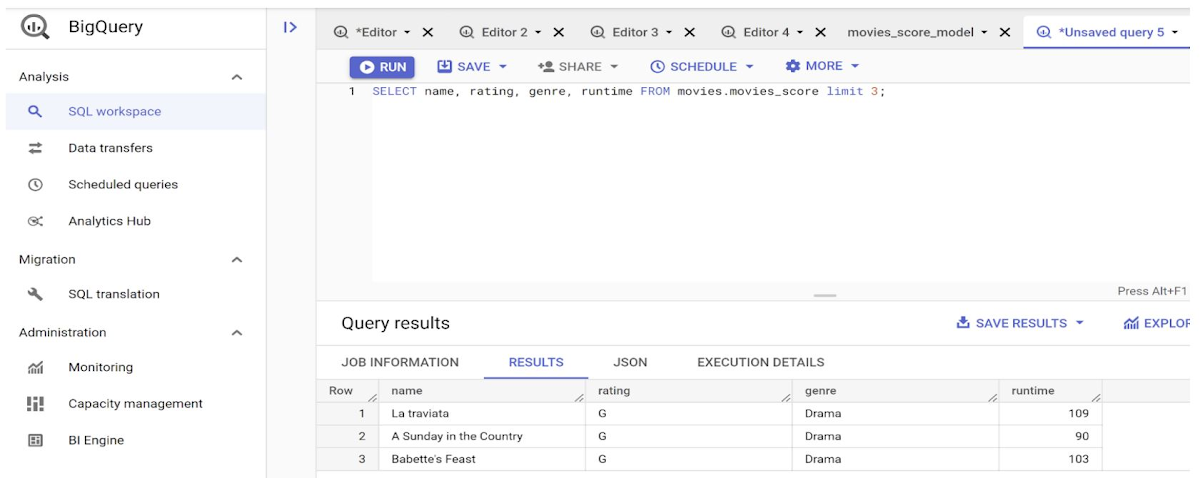
4. Let’s query it, quick!
We can interact with BigQuery in 3 ways:
The bq command
API
I have used the BigQuery Web SQL Workspace to run queries. The SQL Workspace looks like this:


Predicting Movie Success Score (user score on a scale of 1 - 10)
BigQuery ML supports supervised learning with the logistic regression model type. You can use the binary logistic regression model type to predict whether a value falls into one of two categories; or, you can use the multi-class regression model type to predict whether a value falls into one of multiple categories. These are known as classification problems, because they attempt to classify data into two or more categories.
In this experiment, I am predicting the success score (user score / rating) for the movie as a multi-class classification model on the movie dataset.
Select your training data
I have split the movie data into 3 categories in the table using the field “data_cat” that has one of 3 values - TRAIN, TEST and PREDICT. Splitting the dataset for testing and training purposes is an important aspect of the model. In this scenario, visualizing the independent variables of the training dataset for the categories and their impact on the dependent variable and making sure all of those are covered as part of the TEST set as well was crucial in narrowing down that column in the CSV file. If you need more information on understanding dataset splitting, refer to the documentation.
A quick note about the choice of model:
This is an experimental choice of model chosen here, based on the evaluation of results I ran across a few models initially and finally went ahead with LOGISTIC REG to keep it simple and to get results closer to the actual movie rating from several databases. Please note that this should be considered just as a sample for implementing the model and is definitely NOT the recommended model for this use case. One other way of implementing this is to predict the outcome of the movie as GOOD / BAD using this Logistic Regression model instead of predicting the score.
Create the logistic regression model
We can use the CREATE MODEL statement with the option 'LOGISTIC_REG' to create and train a logistic regression model.
Query Details:
The CREATE MODEL statement trains a model using the training data in the SELECT statement
The OPTIONS clause specifies the model type and training options. Here, the LOGISTIC_REG option specifies a logistic regression model type. It is not necessary to specify a binary logistic regression model versus a multiclass logistic regression model: BigQuery ML can determine which to train based on the number of unique values in the label column
data_split_method='NO_SPLIT' forces BQML to train on the data per the query conditions (data_cat = ‘TRAIN’), also note that it's better to use the ‘AUTO_SPLIT’ in this option to allow the framework (or service in this case) to randomize the partition of train/test splits
The input_label_cols option specifies which column in the SELECT statement to use as the label column. Here, the label column is score, so the model will learn which of the 10 values of score is most likely based on the other values present in each row
The 'auto_class_weights=TRUE' option balances the class labels in the training data. By default, the training data is unweighted. If the labels in the training data are imbalanced, the model may learn to predict the most popular class of labels more heavily
The SELECT statement queries the table we loaded with the csv data. The WHERE clause filters the rows in the input table so that only the TRAIN dataset is selected in this step
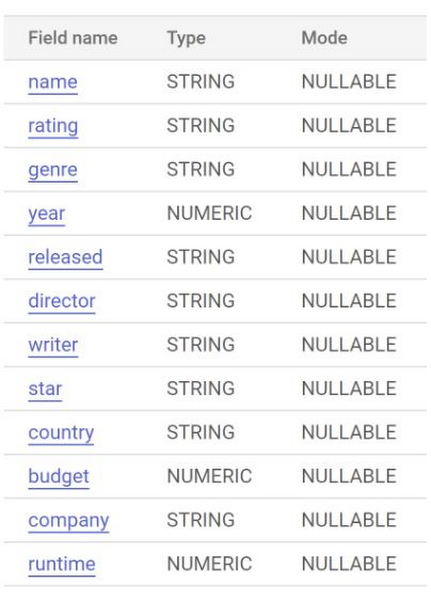
Once created, the below appears in the SCHEMA section of the BigQuery SQL Workspace:
Labels


Features

Evaluate your logistic regression model
After creating your model, evaluate the performance of the model using the ML.EVALUATE function. The ML.EVALUATE function evaluates the predicted values against the actual data. The query to evaluate the model is as follows:
The ML.EVALUATE function takes the model trained in our previous step and evaluation data returned by a SELECT subquery. The function returns a single row of statistics about the model.


Because you performed a logistic regression, the results include the metrics you see in the screenshot above - precision, recall, accuracy, f1-score, log_loss, roc_auc which are really critical in evaluating the performance of the model.
I wanted to take a step deeper for my favorite metrics:
Precision - What proportion of positive identifications was actually correct?
Precision = True Positive / (True Positive + False Positive)Recall - What proportion of actual positives was identified correctly?
Recall = True Positive / (True Positive + False Negative)Accuracy - A metric for evaluating classification models, it is the fraction of predictions our model actually got right
Accuracy = Number of correct predictions / Total number of predictions
You can also call ML.EVALUATE without providing input data. ML.EVALUATE retrieves the evaluation metrics derived during training, which uses the automatically reserved evaluation dataset.
Predict Movie Score using ML.PREDICT
The following query predicts the score of each movie in the PREDICT portion of the dataset.
Below is a snippet of the results:
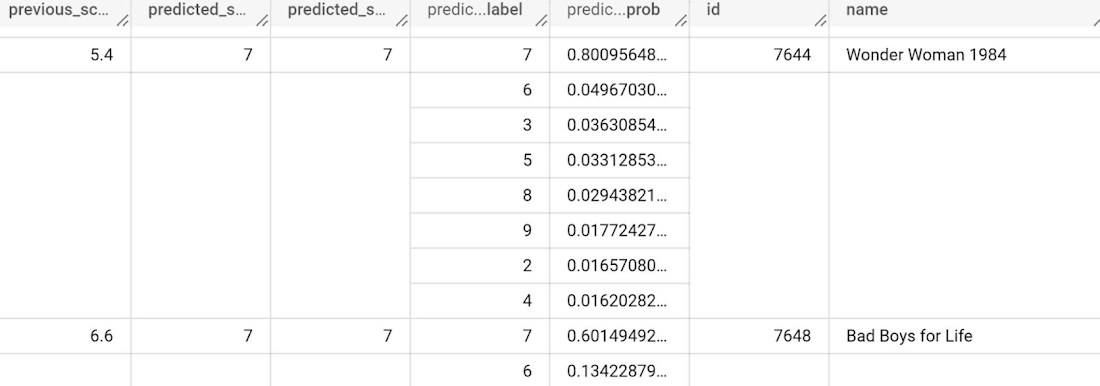

The model result shows the predicted SCORE of the movie on a scale of 1 to 10 (classification). You must be wondering why there are several prediction rows against each movie. That is because the model has returned the possible predicted labels and the probability of occurrence of each one in the decreasing order.
Additionally, you can do two great analysis steps as part of prediction results:
To understand why your model is generating these prediction results, you can use the ML.EXPLAIN_PREDICT function
To know which features are the most important to determine the income bracket in general, you can use the ML.GLOBAL_EXPLAIN function
You can read about these steps in detail in the documentation.
Great! Now that we have successfully completed predicting Movie Score with only SQL queries in a few minutes and with an accuracy of 82%, I would like to introduce you to the last section of our discussion today!
BigQuery AutoML
AutoML is great if you are an engineer or an analyst or just lazy like I am, who want to select the source, click a few buttons to set up the model, let the service do the data science for you and relax until your model results are generated. AUTOML capability is available directly in BQML (model_type=AUTOML_CLASSIFIER or AUTOML_REGRESSOR) and much easier to call if the data is already in BigQuery.
Once the model is created, you can carry out the steps to EVALUATE, PREDICT and EXPLAIN_PREDICT just as we discussed in the the custom BQML model. Read more about BigQuery AutoML in the documentation.
One-click to Deploy BQML Models to Vertex AI Model Registry
You can now see all your ML models within Vertex AI Model Registry, making it easier for your organization to manage and deploy models. This includes models built with BigQuery ML, AutoML, and custom trained models. Here’s how you do it:
Include the model_registry="vertex_ai" option in the CREATE MODEL query so BigQuery ML can pick and choose which models they explicitly want to register to the Vertex AI Model Registry. You can read about this more in this blog.
Using BigQuery data in Vertex AI AutoML Integration
Use your data from BigQuery to directly create an AutoML model with Vertex AI. The scope of this blog doesn’t cover the details of the application that invokes the Vertex AI AutoML API after it is deployed (that is for another blog). However, I am going to cover the part where we have our direct BigQuery datasource integration to Vertex AI without having to move data between services. This implementation is for demonstration of the integration of BigQuery data in Vertex AI AutoML purposes.
Step 1: Go to Vertex AI from Google Cloud Console, select Datasets, click on Create data set, select TABULAR data type and “Regression / classification” option and click Create: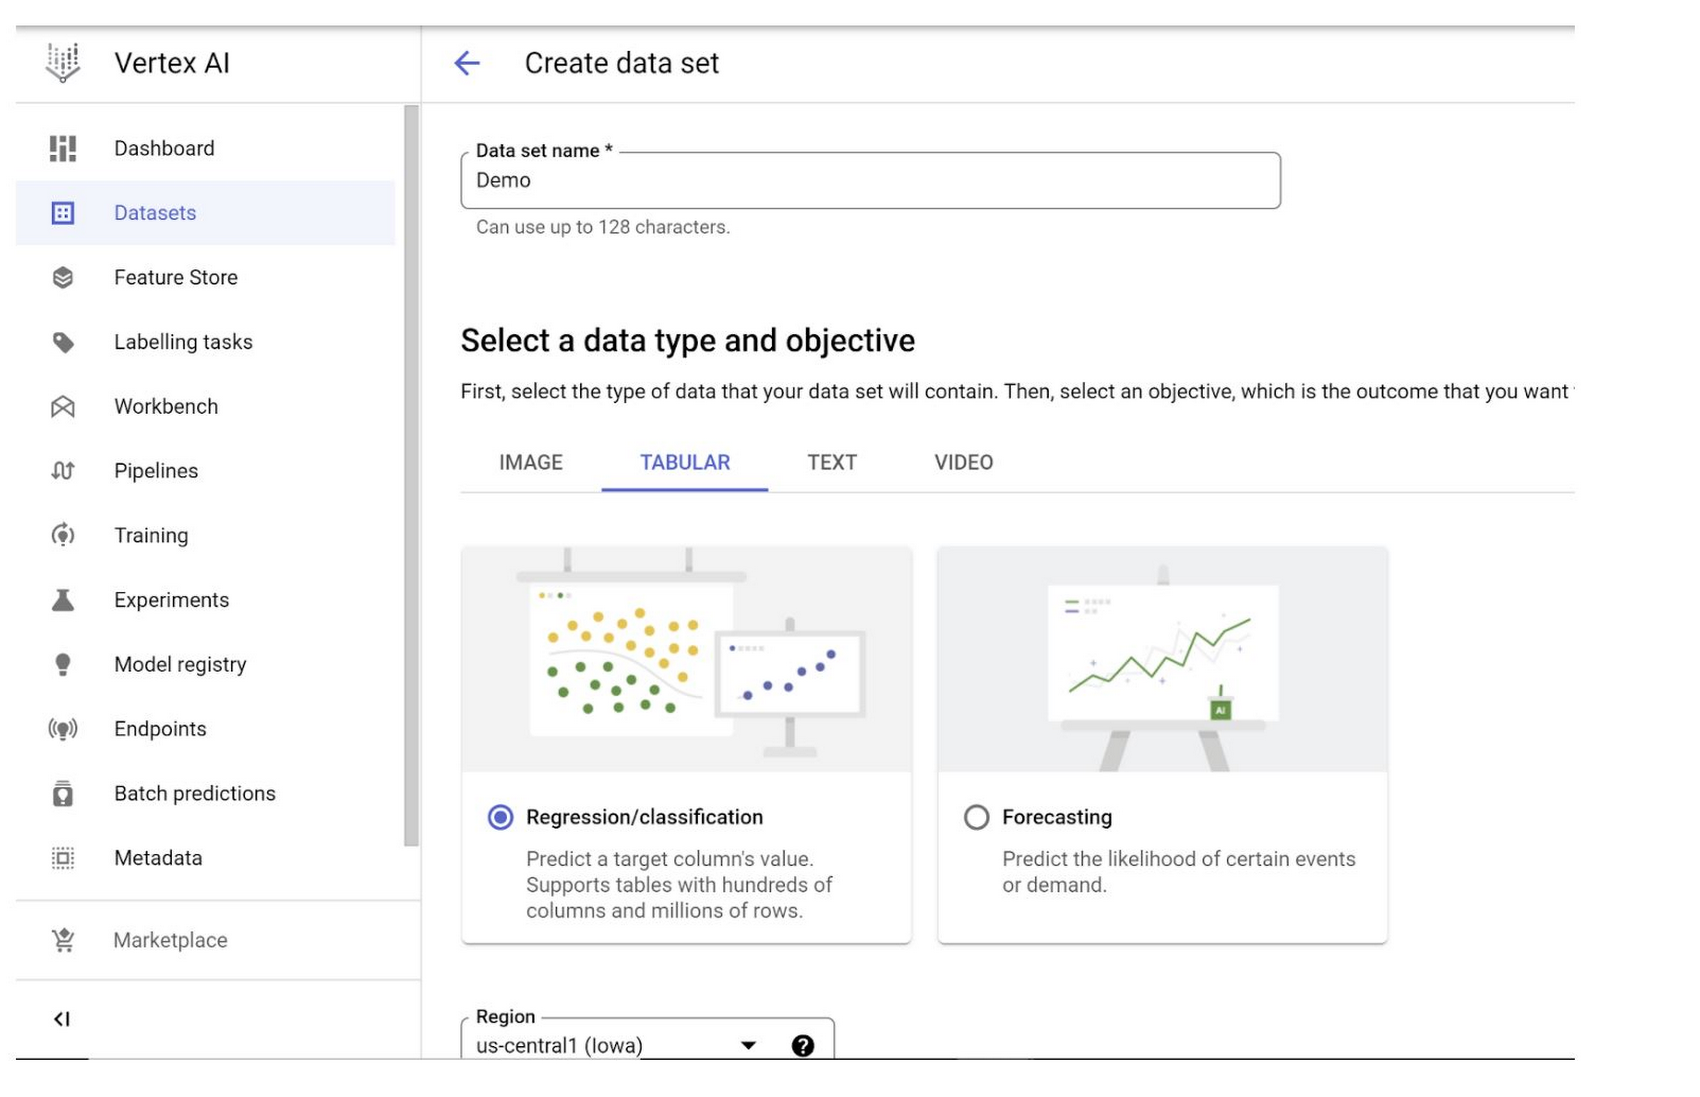

Step 2: In the next page, select a data source:
Select “Select a table or view from BigQuery” option and select the table from BigQuery in the BigQuery path BROWSE field. Click Continue.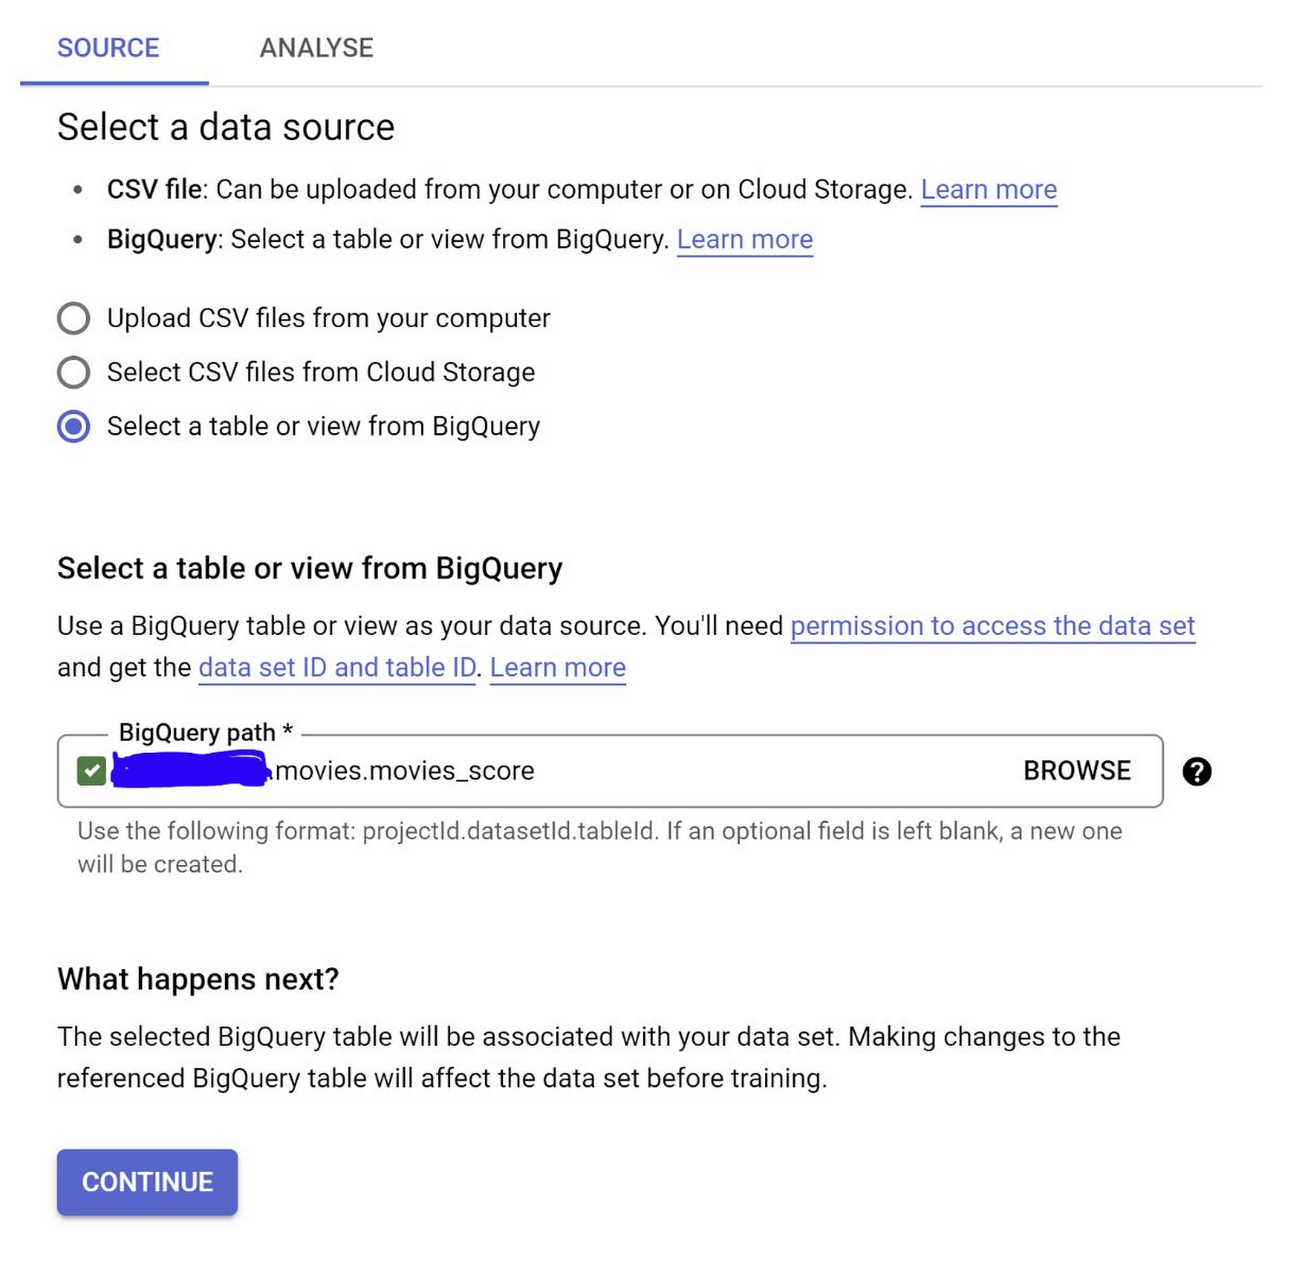

Step 3: Once the dataset is created, you should see the Analyze page with the option to train a new model. Click that:
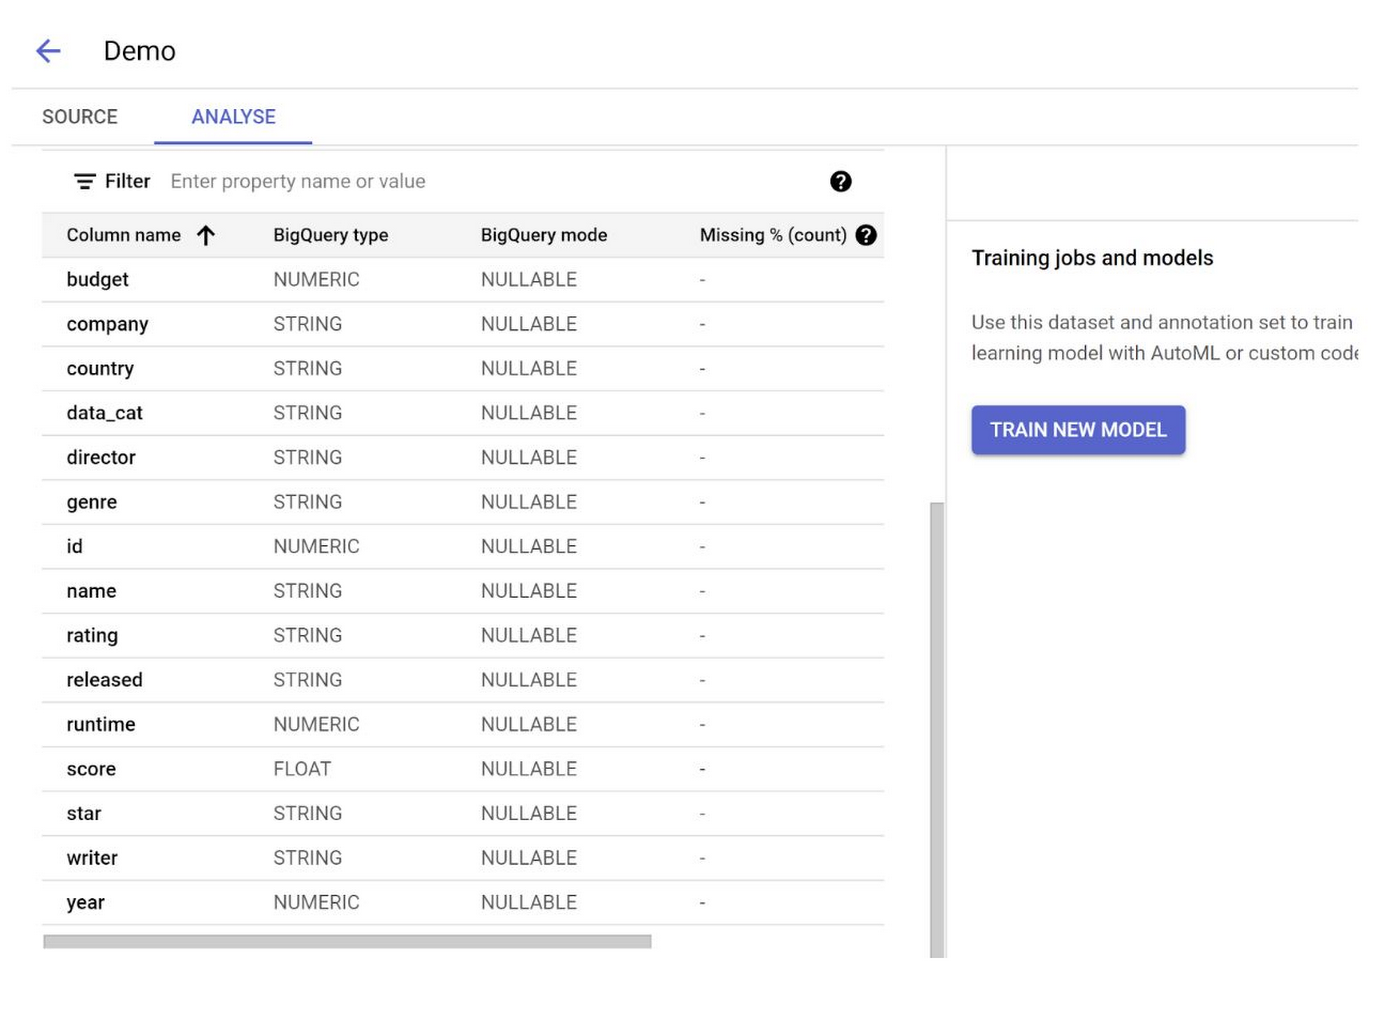

Step 4: Go through the steps in the Training Process
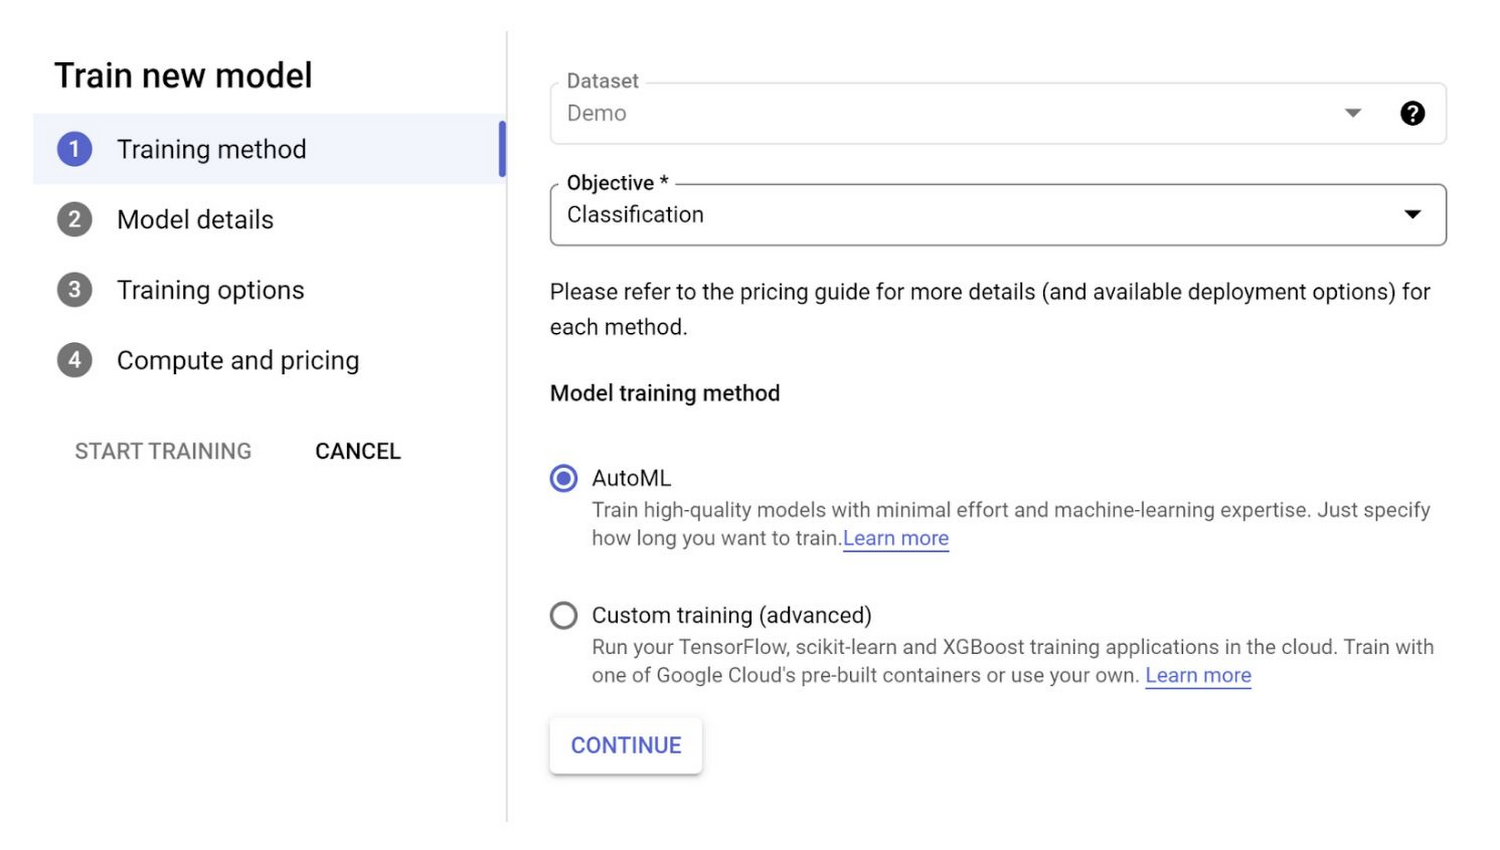
Select AutoML option in first page and click continue:

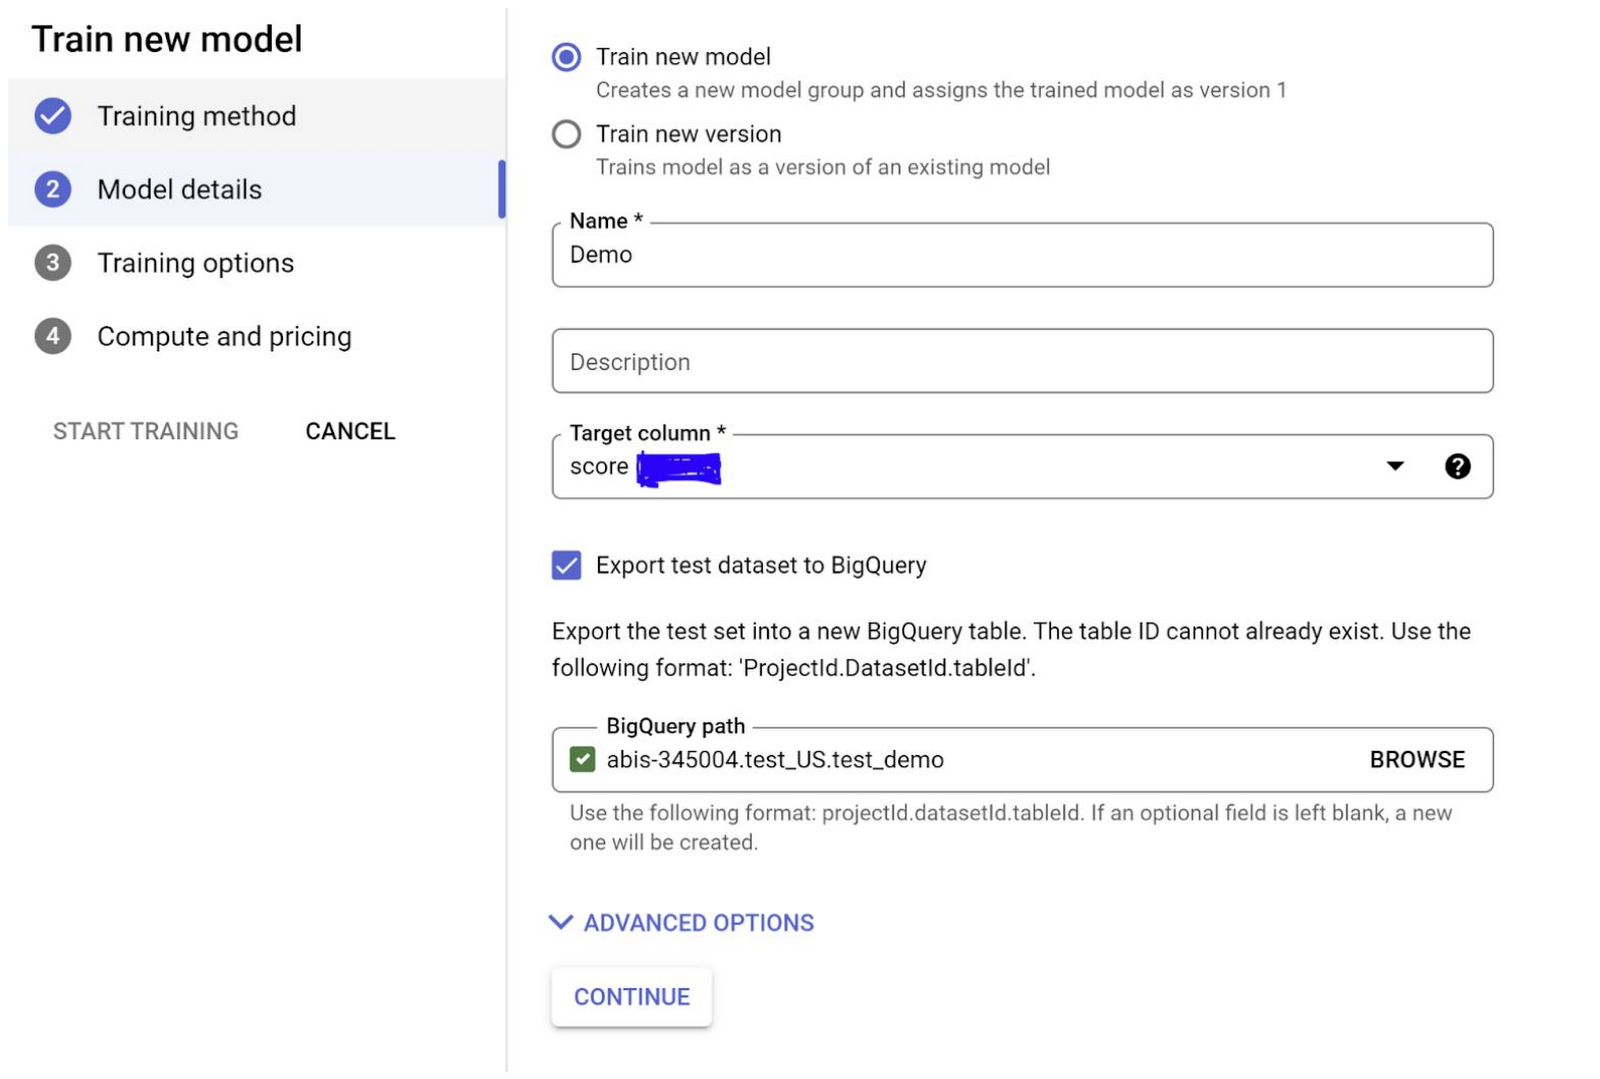
Select Target Column name as “Score” from the drop down that shows and click Continue.
Also note that you can check the “Export test dataset to BigQuery” option which makes it easy to see the test set with results in the database efficiently without an extra integration layer or having to move data between services.

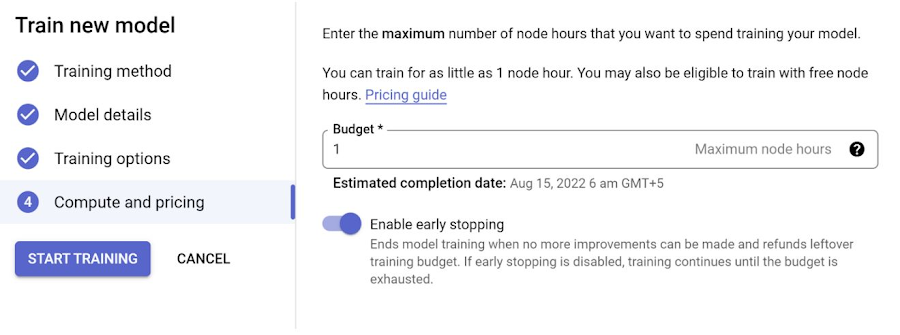
In the next page, you have the option to select any advanced training options you need and the hours you want to set the model to train. Please note that you might want to be mindful of the pricing before you increase the number of node hours you want to use for training.

Step 5: Once the training is completed, you should be able to click Training and see your training listed in the Training Pipelines section. Click that and land on the Model Registry page, you should be able to
1. View and Evaluate the training results
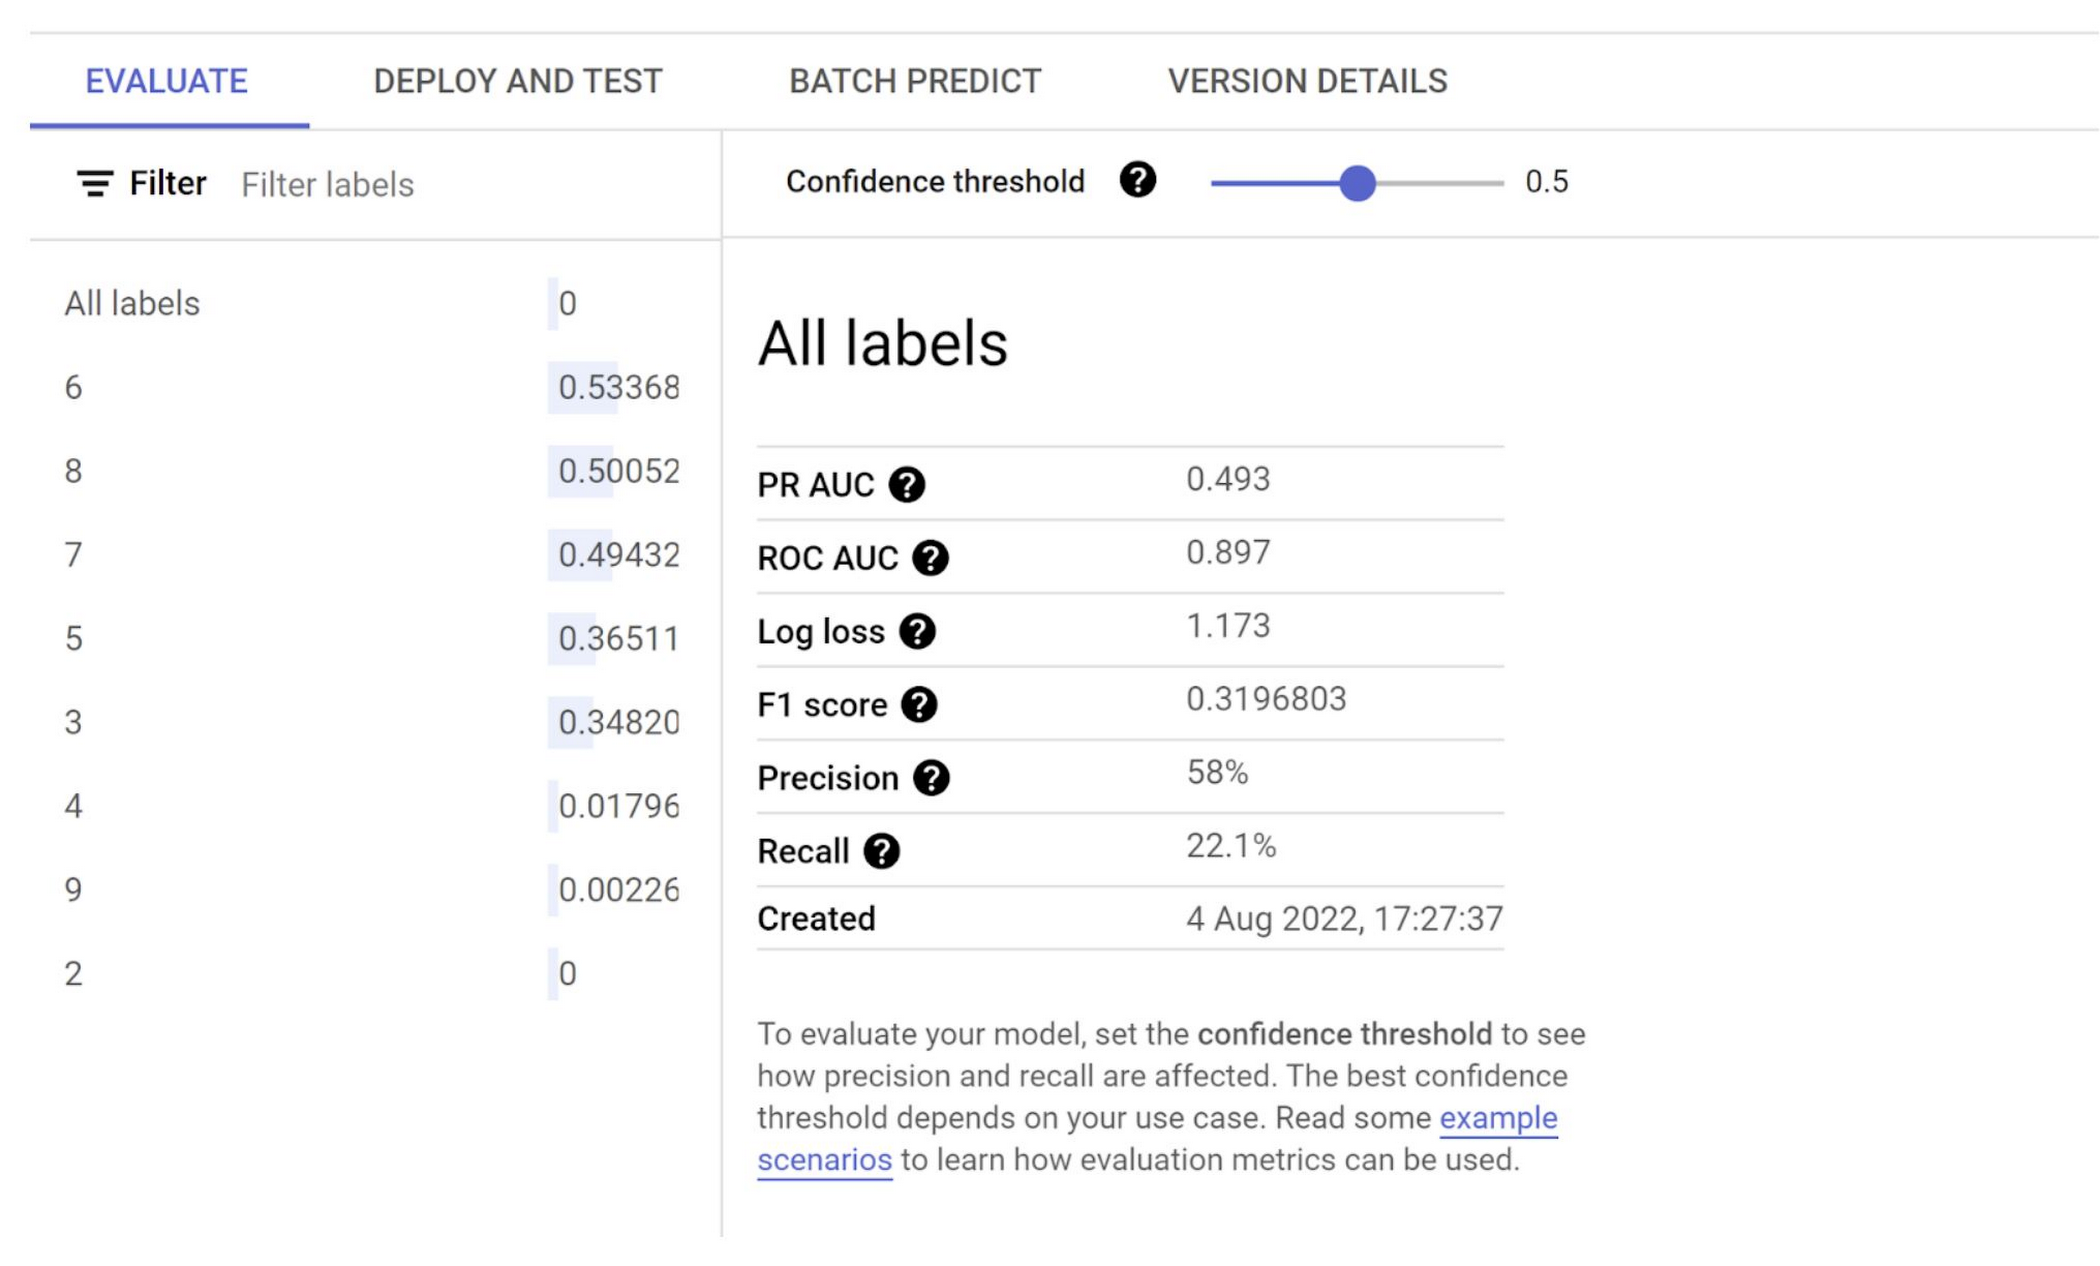

2. Deploy and test the model
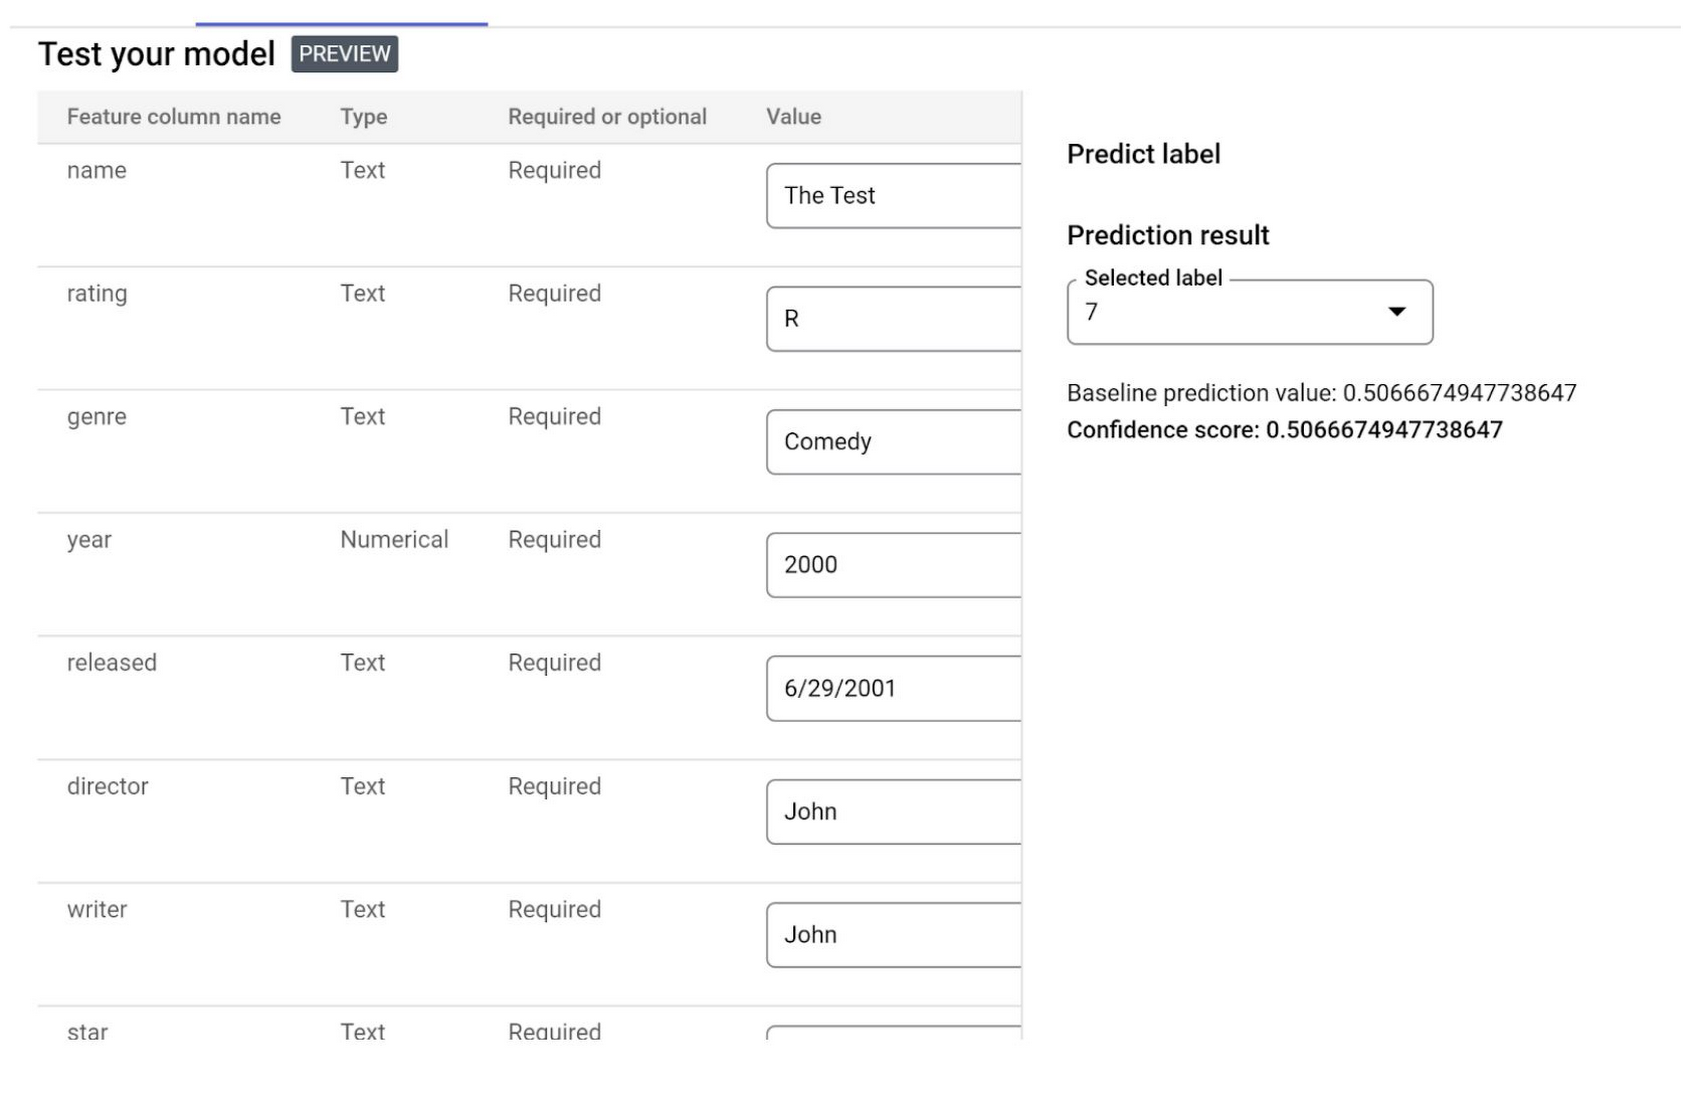

3. Batch predict movie scores
You can integrate batch predictions with BigQuery database objects as well. Read from the BigQuery object (in this case I have created a view to batch predict movies score) and write into a new BigQuery table. Provide the respective BigQuery paths as shown in image and click CREATE: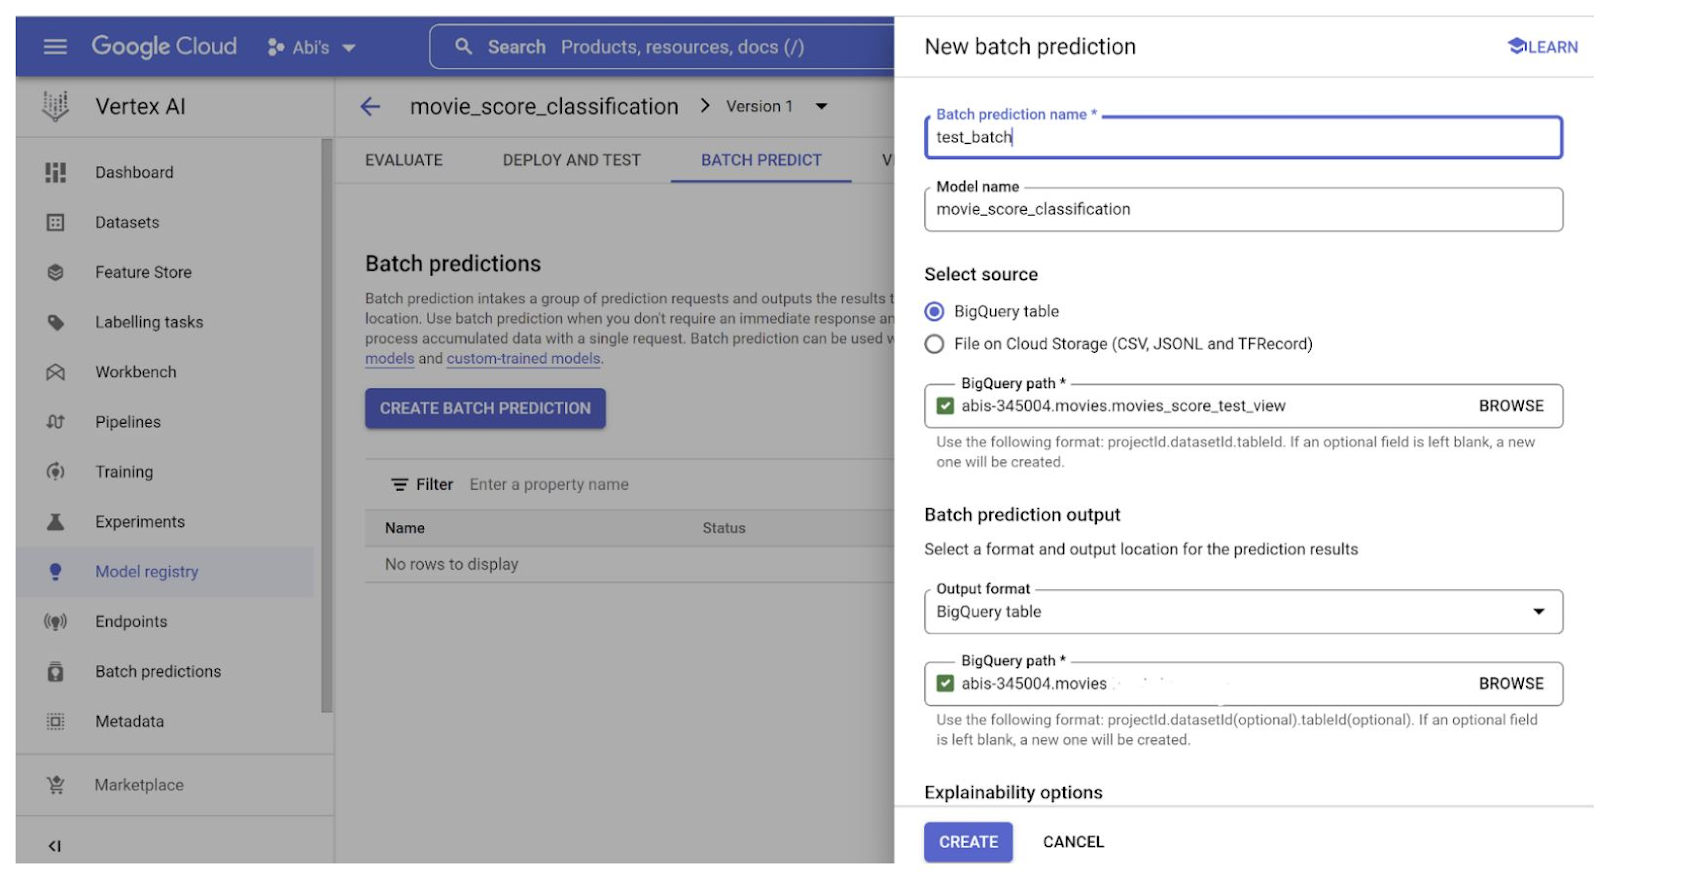

Once it is complete, you should be able to query your database for the batch prediction results.
Voila! In less than 30 minutes, we have:
Set up BigQuery as our database for the analytics project
Created custom prediction model using only BigQuery data SQLs and no other coding
Created BQ Auto ML model using only SQL queries
One click deploy of BQML model to Vertex AI Model Registry
Leveraged BigQuery data to integrate directly with Vertex AI for create an AutoML model for the same experiment
What’s next?
I have used the API from the AutoML model endpoint from this experiment in a web application with transactional data handled by MongoDB and Cloud Functions. That is for the next (and final) part of our series.
In the meantime, I have a few tasks for you!
Analyze and compare the accuracy and other evaluation parameters between the BigQuery ML you created manually using SQLs and Vertex AI Auto ML model
Play around with the independent variables and try to increase the accuracy of the prediction result
Take it one step further and try the same problem as a Linear Regression model by predicting the score as float / decimal point value instead of rounded integers
Use the links below for your reference:
https://cloud.google.com/bigquery-ml/docs/linear-regression-tutorial
https://cloud.google.com/vertex-ai/docs/start/automl-model-types
https://codelabs.developers.google.com/codelabs/bigquery-cli?hl=en#6
Go crazy! May the force be with you!!
