A Guide to Databases on Google Cloud part 3 - Cloud Spanner! & CRUD it with Spring Boot on Cloud Run
Abirami Sukumaran
Staff Developer Advocate, Google
A Guide to Databases on Google Cloud: Part 3 - Cloud Spanner! & CRUD it with Spring Boot on Cloud Run
In this blog
We are going to experiment with CRUD on a Java Spring Boot application using Cloud Spanner’s DML API deployed on Cloud Run, without using a Dockerfile (yes, too good to be true, but it is!). For this experiment, I have taken the use case of the Badminton Court Reservation for a residential community. I have my reasons (happy to share). I have encountered this problem in my community where the same bunch of people occupy all available courts daily. This will serve well because they can only book a slot for an hour a day and that too only on the day of schedule so everyone gets a fair chance. I promise I’m doing it for the kids in my community :P.
Why Spanner?
Before we get into the fun ride of implementing Cloud Spanner on Spring Boot, Jib and Cloud Run, let’s first knock the basics out of the park. Spanner, one of my really favorite Relational Databases is
Fully managed
Mission-critical RDBMS service
Provides External Transactional Consistency, Atomicity, Isolation and Durability
Industry-leading 99.999% availability
Supports Multi-regional instances
TrueTime atomic clocks
Transparent, Synchronous replication
100% online schema changes and maintenance
Serves traffic with Zero downtime
All of these and much more at Global Scale
Whoa! That’s a mouthful (para-ful I know)! Ok, I can see what could possibly trip you off here. I am on it. While I would love to go over every single feature, I am going to describe the 2 striking ones and leave the rest for your action with references, so we can stay on track with our topic for the blog.
TrueTime
TrueTime is a highly available, distributed clock that is provided to applications on all Google servers.
It enables applications to generate monotonically increasing timestamps: an application can compute a timestamp T that is guaranteed to be greater than any timestamp T' if T' finished being generated before T started being generated
This guarantee holds across all servers and all timestamps and Cloud Spanner uses this feature to assign timestamps to transactions
External consistency
We can safely say it is a superset of Strong Consistency, Linearizability and Serializability.
It means the system behaves as if all transactions were executed sequentially even though Cloud Spanner actually runs them across multiple servers and possibly in multiple datacenters for higher performance and availability
If one transaction completes before another starts to commit, the system guarantees that clients can never see a state that includes the effect of the second transaction
For more on these great features, do check out documentation here and here.
It’s almost time to dive into the details of the implementation. We will look at this implementation in 3 parts:
Cloud Spanner Setup and DDL
Modifying Data in Spanner
Spring Boot + Cloud Spanner on Cloud Run Steps
A. Spanner Setup and DDL
Before CRUD-ing on Cloud Spanner, please refer to the self-paced lab or documentation for details on how to set up a Cloud Spanner instance, database and table and to operate with basic DDLs and more
a. In the Google Cloud console, on the project selector page, select or create a Google Cloud projectb. Make sure that billing is enabled for your Cloud project. Learn how to check if billing is enabled on a project
c. Enable the Cloud Spanner API for the project
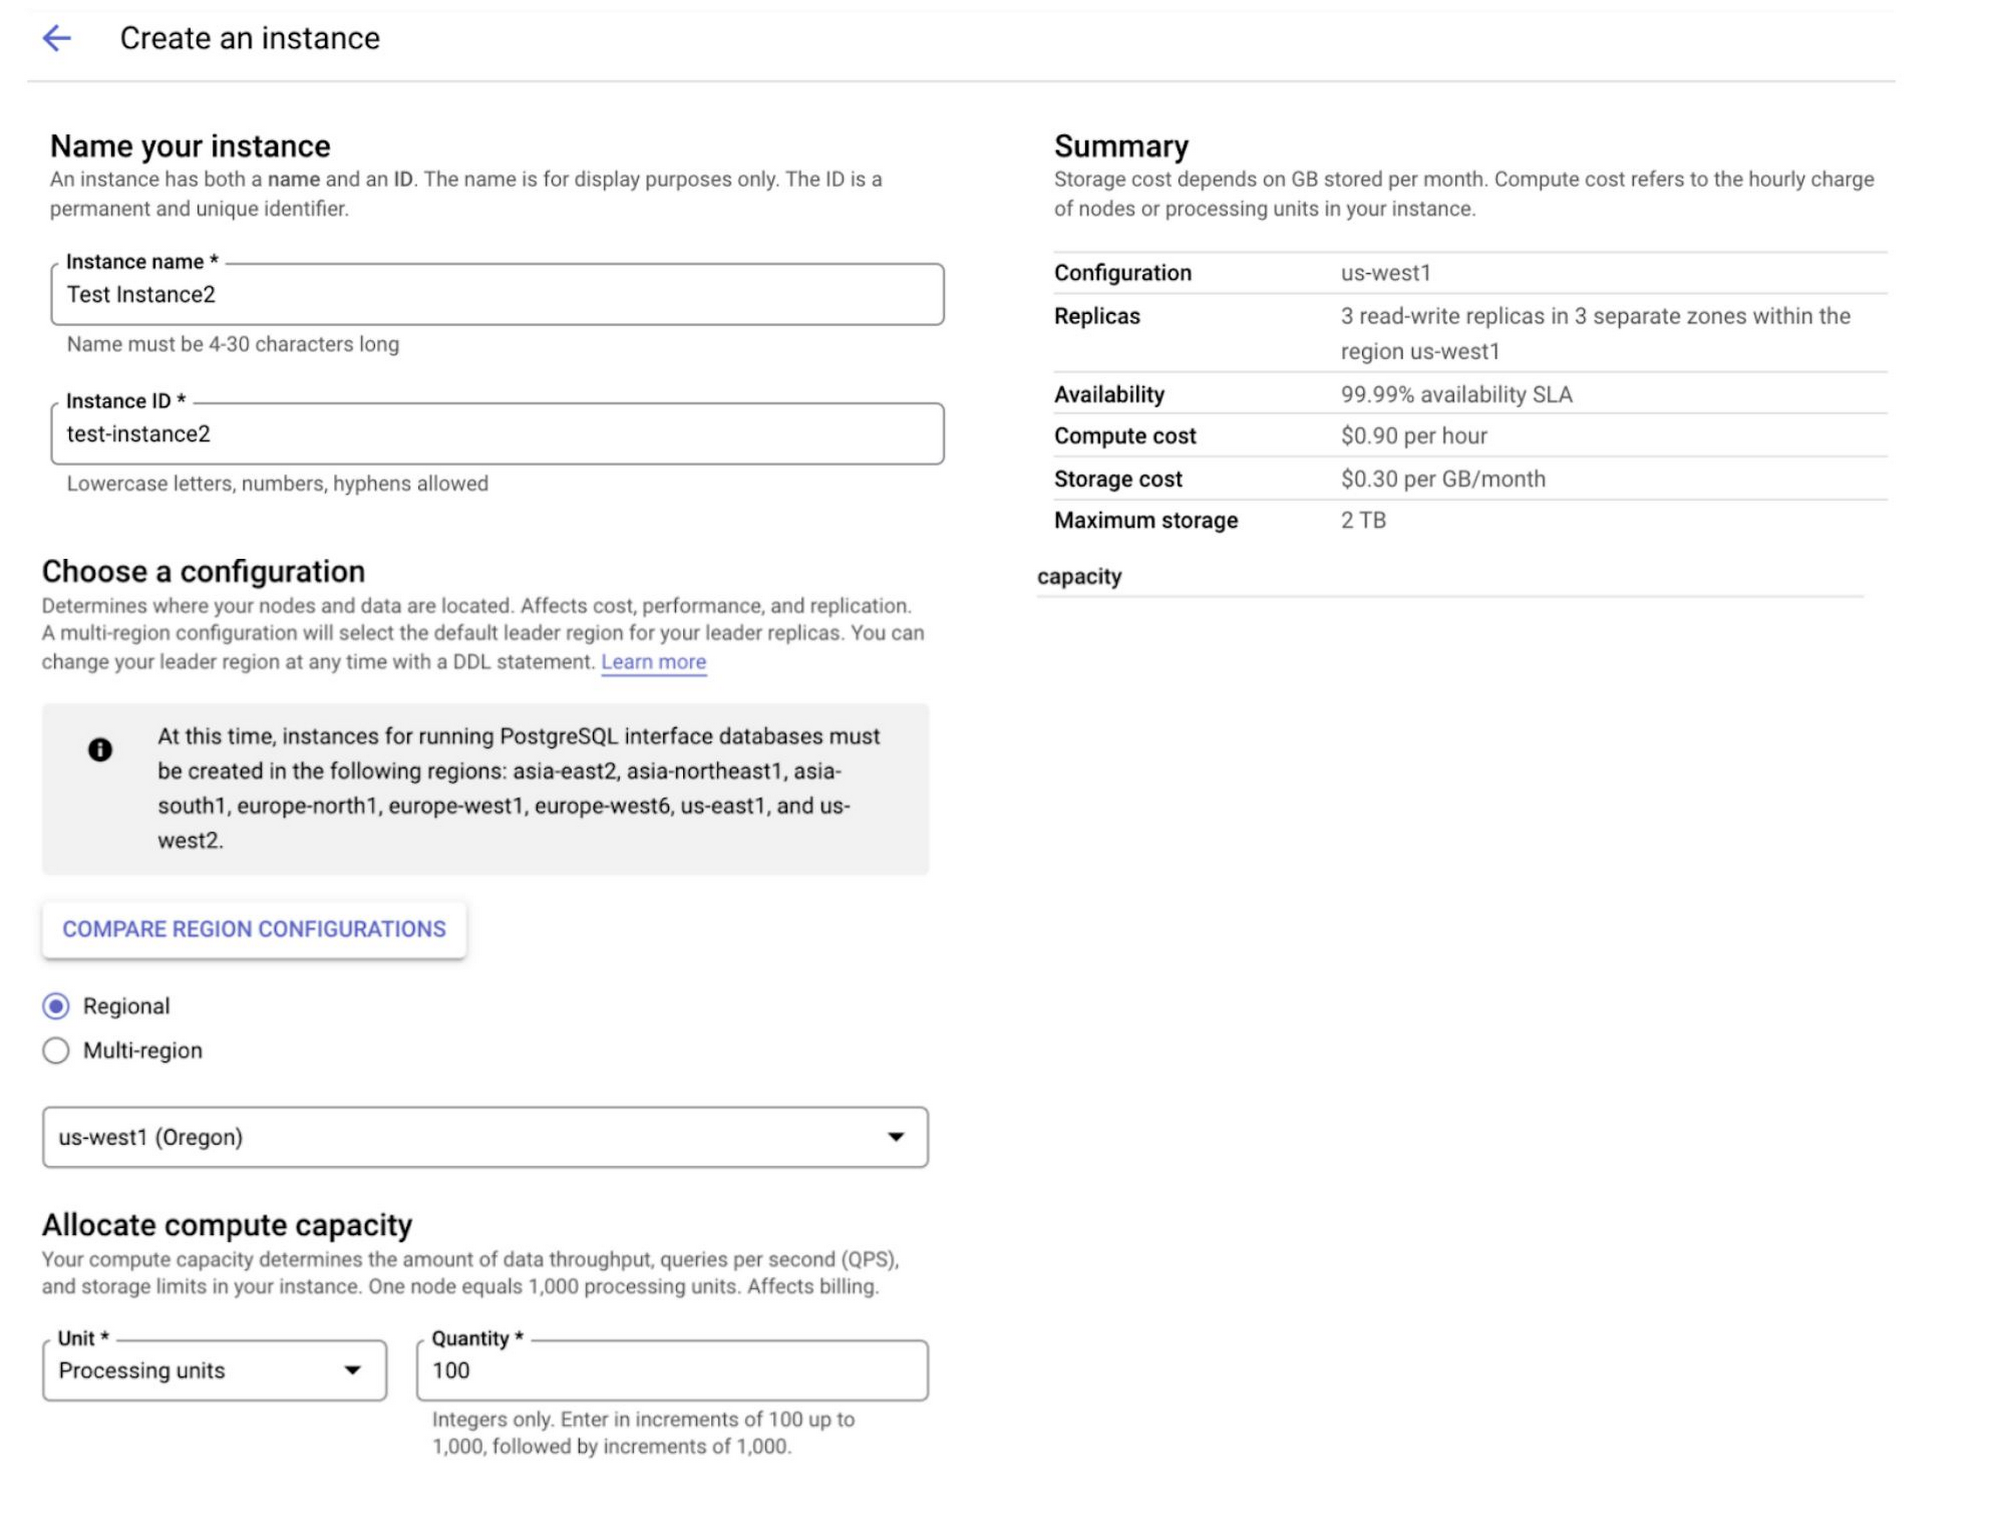
d. Create an Instance
e. For the instance name, enter a name, such as Test Instance
f. The instance ID is automatically entered based on the instance name, for example, as test-instance
g. Retain the default option Regional and select a configuration from the drop-down menu
h. Your instance configuration determines the geographic location where your instances are stored and replicated
i. In Allocate compute capacity, for this test, you can set 100 processing units
j. Click Create. The instance appears in the instances list.
k. Go to Cloud Spanner Instances page
l. Click the instance you created and click Create Database
m. Provide a DB name, a DB dialect and click Create
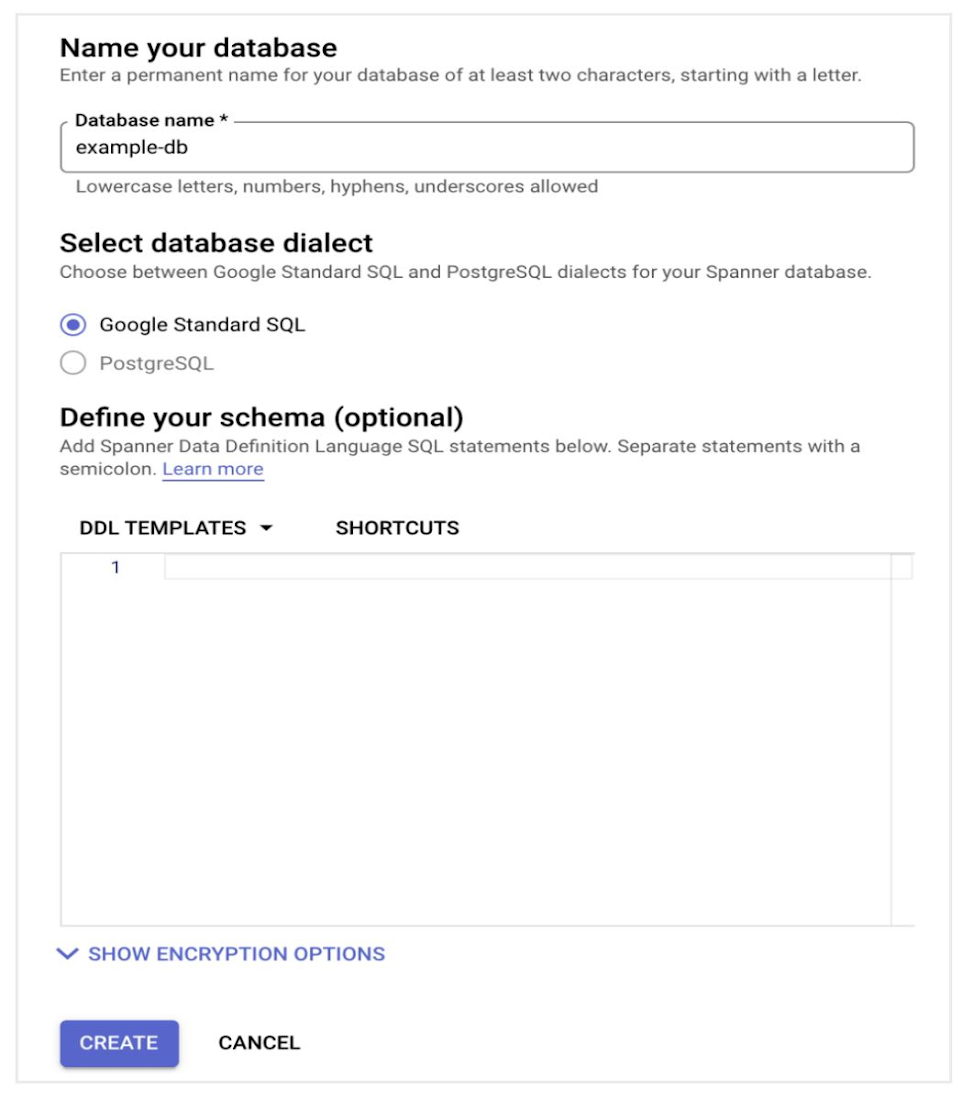
o. In the Write DDL statements page, enter:
p. Click Submit and off you go! For this app, we need tables for holding Transaction (for Reservation info) data
When the update is complete, the page looks like this:

B. Modifying Data in Cloud Spanner
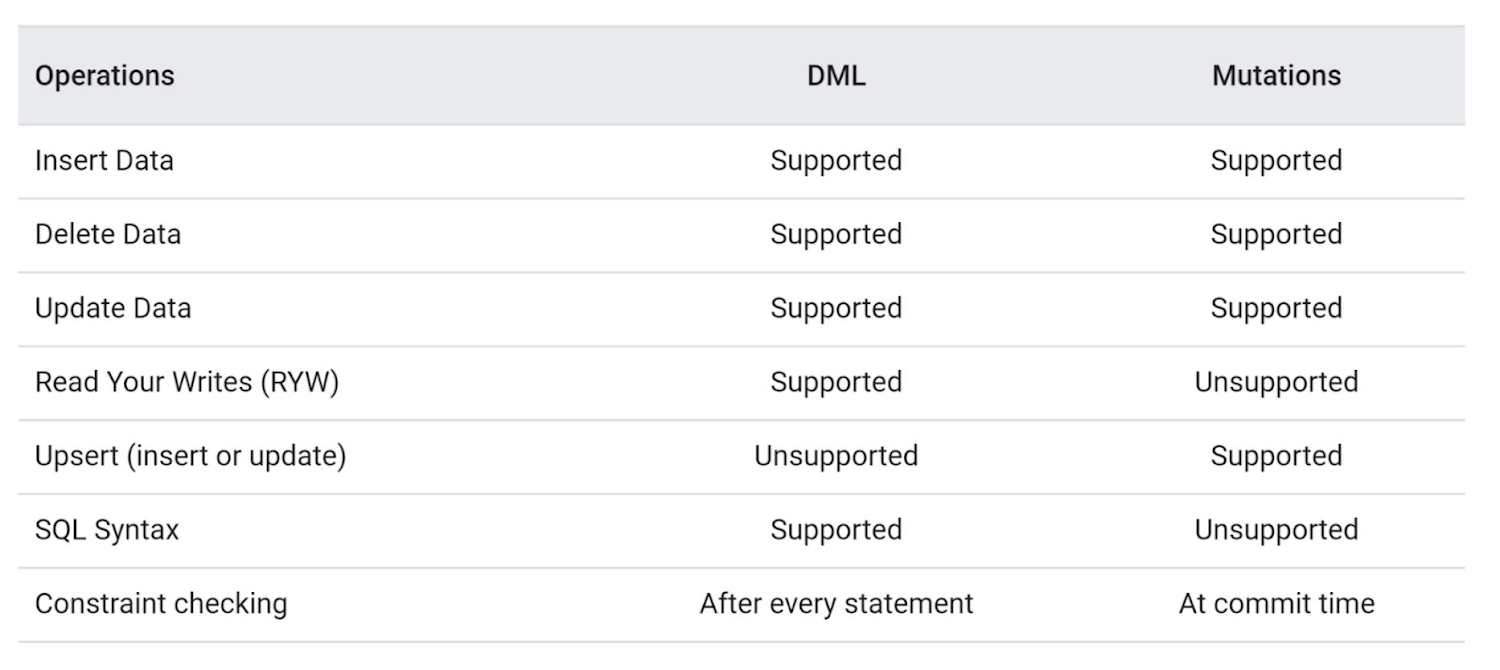
We can modify data in Cloud Spanner in 3 different ways:
Standard DML
Partitioned DML
Mutations
The DML or Data Manipulation Language in Cloud Spanner allows you to manipulate data in your database tables using INSERT, UPDATE, and DELETE statements. You can run DML statements using the client libraries, the Cloud console, and gcloud spanner.
Standard DML - suitable for standard Online Transaction Processing (OLTP) workloads.
For more information, including code samples, see Using DMLPartitioned DML - designed for bulk updates and deletes as in the following examples.
Periodic cleanup and garbage collection
Backfilling new columns with default values
For more information, including code samples, see Using Partitioned DML
Mutations - Represents a sequence of Inserts, Updates and Deletes that Cloud Spanner applies atomically to different rows and tables in the database.
After you define one or more mutations that contain one or more writes, you must apply the mutation to commit the write(s)
Each change is applied in the order in which they were added to the mutation
For more information, including code samples, see documentation.
Note: In our example, I have used the Spring Boot framework and the Spring Data Cloud Spanner module in which I have extended the SpannerRepository interface to encapsulate all of the application logic that queries and modifies data in Cloud Spanner. This interface uses the DML query method for implementing CRUD operations on Cloud Spanner data.
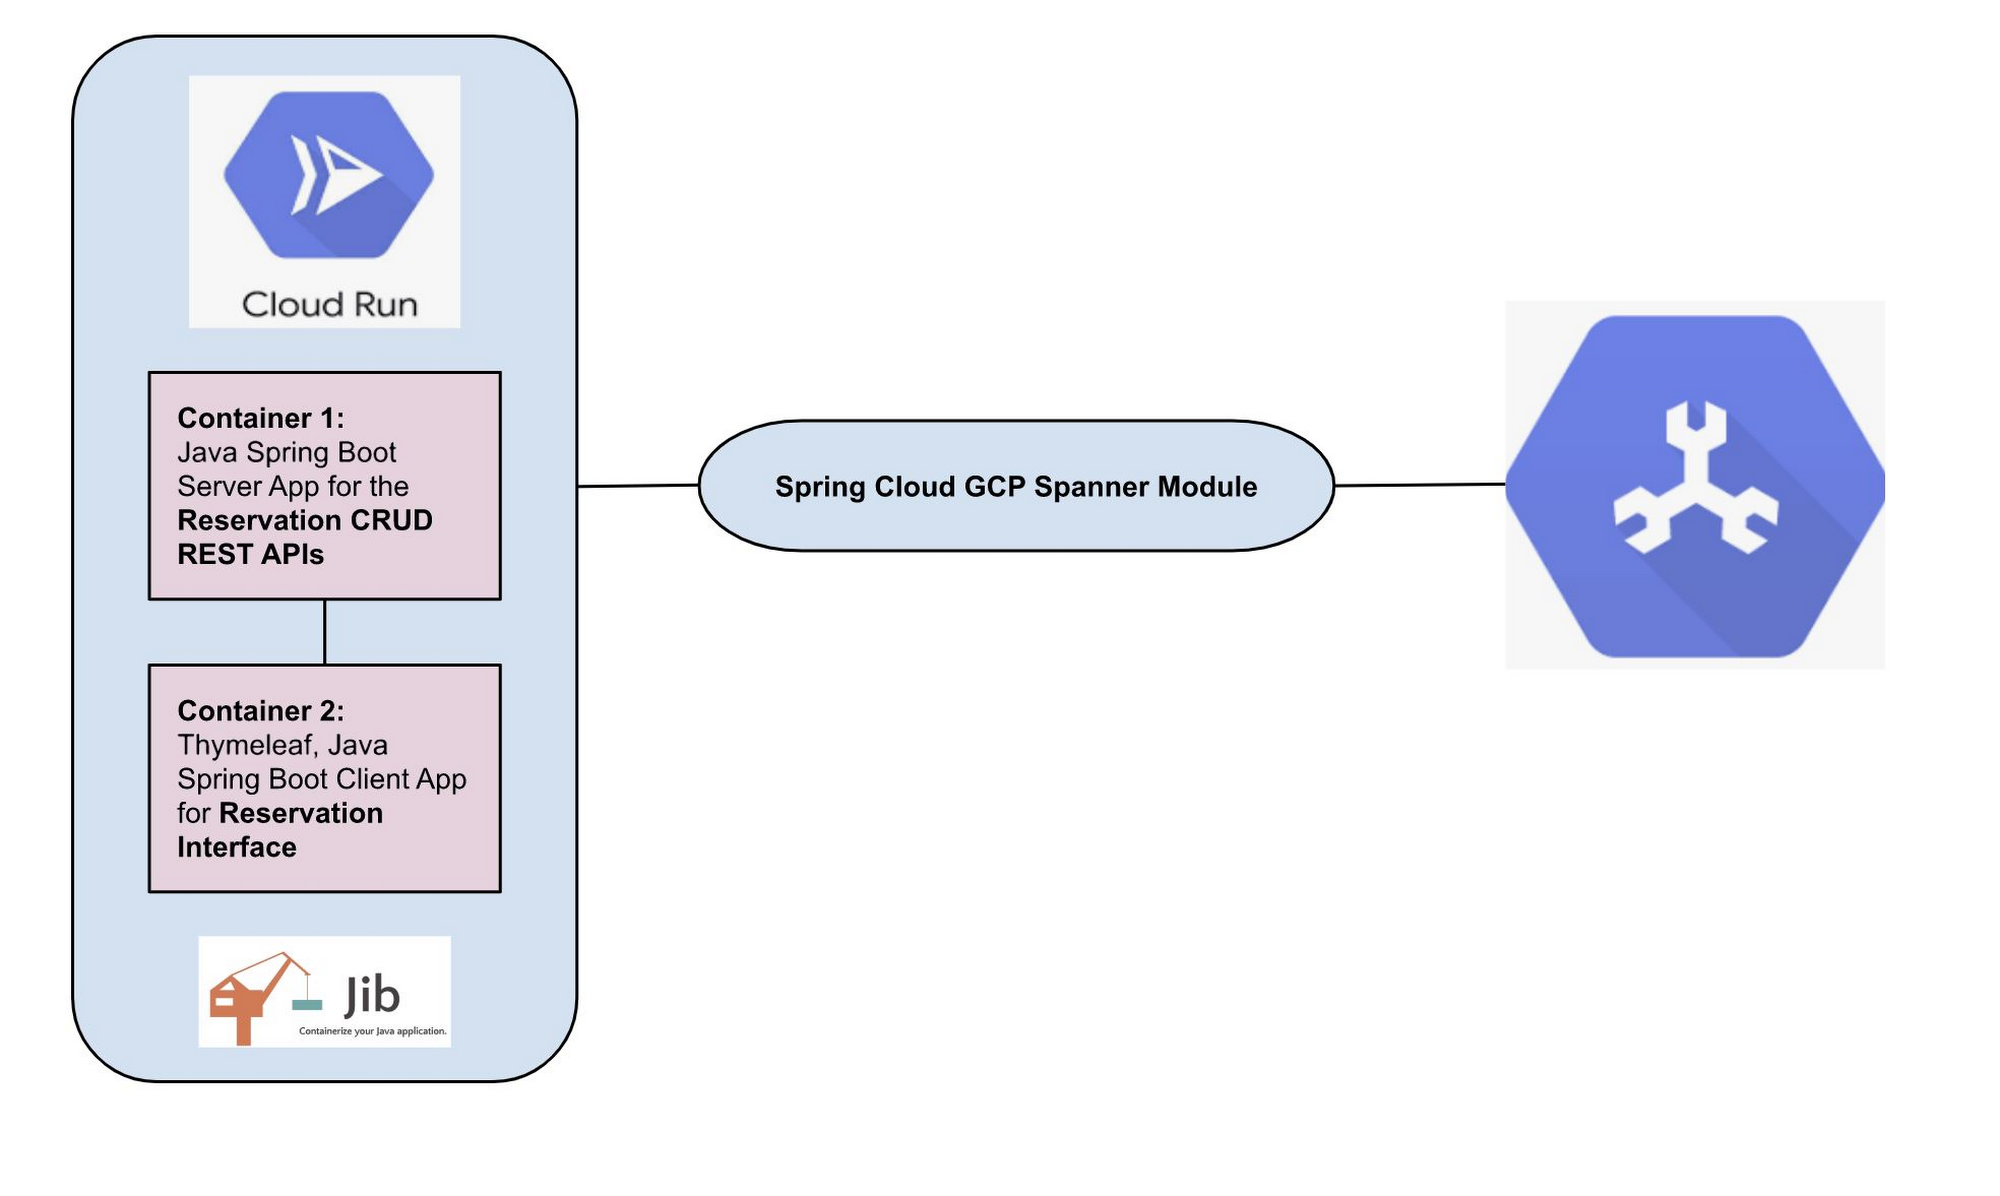
C. Spring Boot + Cloud Spanner on Cloud Run
The Spring Data Cloud Spanner module helps you use Cloud Spanner in any Java application that's built with the Spring Framework.
The following diagram represents the high level architecture of this experiment:
1. Setting Up Cloud Shell, Cloud Run
While Google Cloud can be operated remotely from your laptop, you'll use Cloud Shell, a command-line environment running in Google Cloud
If not already, please follow the steps here to activate Cloud Shell, check you are already authenticated and set to your PROJECT_ID (created / selected in step A.1.a. of this blog
If, for some reason, the project is not set, simply issue the following command:
gcloud config set project <PROJECT_ID>
From Cloud Shell, enable Cloud Run API:
gcloud services enable run.googleapis.com
NOTE: If you don't want to implement the following steps to bootstrap the project yourself, you can clone the project repositories by executing the following commands in Cloud Shell:
git clone https://github.com/AbiramiSukumaran/spanner-example.git
git clone https://github.com/AbiramiSukumaran/springboot-client.git
2. Bootstrapping Spring Boot Java Server App (REST API)
From the Cloud Shell environment, use the following command to initialize and bootstrap a new Spring Boot application:
$ curl https://start.spring.io/starter.tgz -d packaging=jar -d dependencies=cloud-gcp,web,lombok -d baseDir=spanner-example -d bootVersion=2.3.3.RELEASE | tar -xzvf -
$ cd spanner-example
Use this command if you are not cloning the repo. This will create a new spanner-example/ directory with a new Maven project, along with Maven's pom.xml, a Maven wrapper and an application entrypoint.
In the pom.xml file, add the Spring Data Cloud Spanner starter and other dependencies I think you will need:
spanner-example/pom.xml
In application.properties, configure Spanner database connection information:
spanner-example/src/main/resources/application.properties
Build the app:
./mvnw packageCreate the entity class at
../spanner-example/src/main/java/com/example/demo/Reservation.java- With Spring Cloud GCP's Spring Data Spanner support, you can easily create a Java object, and idiomatic ORM mapping to a Spanner table, using Spring Data
In our case, we have ensured Schema Design Best Practices while choosing Primary Keys to avoid hotspots in distribution of server workload.
Create the ReservationRepository class with the following content:
spanner-example/src/main/java/com/example/demo/ReservationRepository.java
The interface extends the SpannerRepository<Reservation, String> where Reservation is the domain class and String is the Primary Key type. Spring Data will automatically provide CRUD access through this interface and you won't need to create any additional code.
Create a REST Controller for basic operations: Insert, Update, Delete, Search, Search by ID and Search with conditions in ReservationController class at:
../spanner-example/src/main/java/com/example/demo/DemoApplication.java
Rebuild and run the application!
./mvnw package./mvnw spring-boot:run
3. Containerize your app without Docker!
With Jib, you can containerize your app in an optimized way without Dockerfile / daemon and publish to any container registry
Before proceeding, you need to activate the Container Registry API. This only needs to be done once per project to make the API accessible:
$ gcloud services enable containerregistry.googleapis.comRun Jib to build a Docker image and publish to Container Registry
$ ./mvnw com.google.cloud.tools:jib-maven-plugin:3.1.1:build \
-Dimage=gcr.io/$GOOGLE_CLOUD_PROJECT/<<your-container-name>>
Note: In this experiment, we did not configure the Jib Maven plugin in pom.xml, but for advanced usage, it is possible to add it in pom.xml with more configuration options
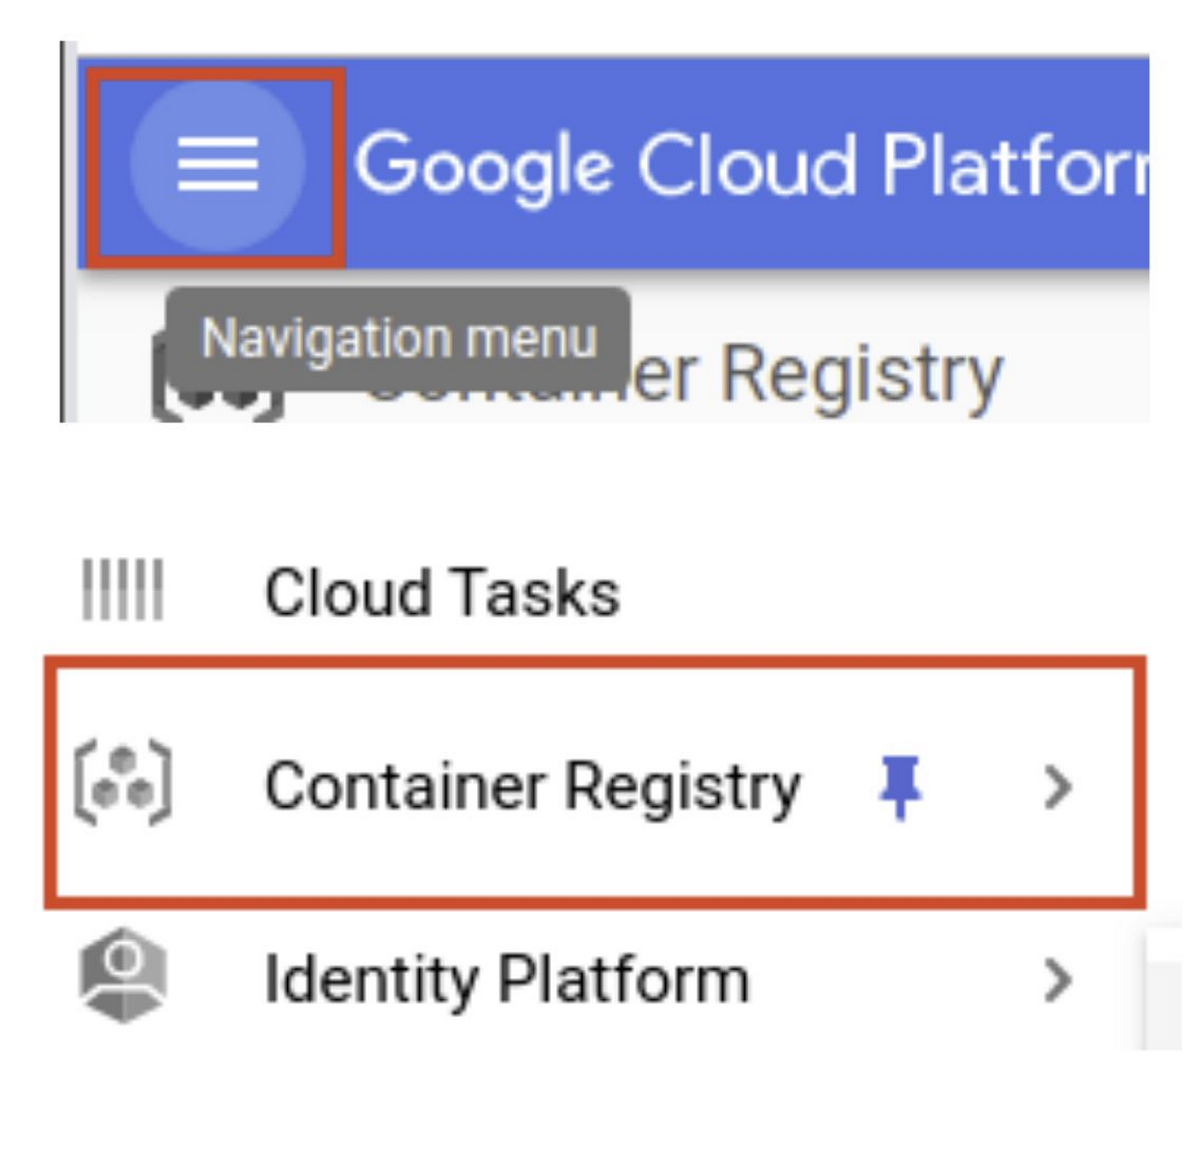
Check if the image is successfully published by going to the Cloud Console, clicking the Navigation menu, and selecting Container Registry
4. Deploy it on Cloud Run
Run the following command to deploy your containerized app to Cloud Run:
gcloud run deploy <<application>> --image gcr.io/$GOOGLE_CLOUD_PROJECT/<<container>> --platform managed --region us-central1 --allow-unauthenticated --update-env-vars DBHOST=$DB_HOST
–allow-unauthenticated will let the service be reached without authentication.
–platform-managed means you are requesting the fully managed environment and not the Kubernetes one via Anthos
–update-env-vars expects the Connection String to be passed on to the environment variable DBHOST
When the deployment is done, you should see the deployed service URL in the command line
When you hit the service URL, you should see your web page on the browser and the logs in the Cloud Logging Logs Explorer page
You can now access your REST APIs with the Cloud Run URLs generated.
5. Bootstrapping Spring Boot Java Client App (Reservation User Interface)
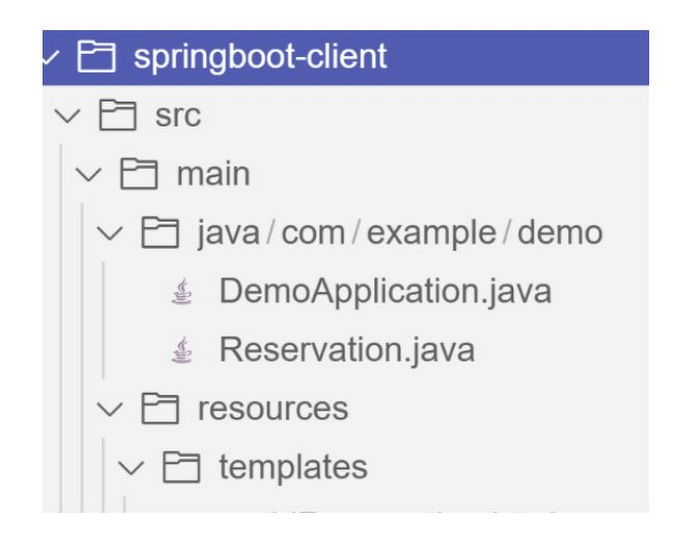
Similar to the Server Application for REST API, the Client Application in this Spring Boot framework has the following structure, once you clone the repo.
You can alternatively bootstrap your Client Application with the Cloud Shell Command:
$ curl https://start.spring.io/starter.tgz -d packaging=jar -d dependencies=cloud-gcp,web,lombok -d baseDir=springboot-client -d bootVersion=2.3.3.RELEASE | tar -xzvf -
The demo folder contains the DemoApplication class, Controller class and the Bean class in the locations below:
../springboot-client/src/main/java/com/example/demo/DemoApplication.java../springboot-client/src/main/java/com/example/demo/MyController.java../springboot-client/src/main/java/com/example/demo/Reservation.javaThe corresponding github source link:
https://github.com/AbiramiSukumaran/springboot-client/blob/main/src/main/java/com/example/demo/DemoApplication.java
https://github.com/AbiramiSukumaran/springboot-client/blob/main/src/main/java/com/example/demo/Reservation.java
- The MyController.java class contains the methods that invokes the REST APIs created in the Server Application, methods to route to the CRUD HTML pages and methods to perform Server side validations:
1. Method to invoke API that validates if that unit has an existing appointment for the dayvalidateId(Reservation newReservation)
2. Method to invoke API that validates if that hour has not been booked already by another unitvalidateSlot(Reservation newReservation)
3. Method to invoke API that retrieves a specific reservationcallReservationsByIdAPI(Reservation reservation)
4. Method that is invoked on show reservations call, to return showMessage HTML pageshowForm(Reservation reservation
5. Method that is invoked on search, to return the searchReservation HTML pagesearchForm(Reservation reservation)
6. Method that is invoked on home page, to return the HomePage HTML pagehomeForm(Reservation reservation)
7. CRUD invocation methods
sendForm(Reservation reservation)processForm(Reservation reservation)
editForm(Reservation reservation)
deleteForm(Reservation reservation)
Thymeleaf is a server-side Java template engine for both web and standalone environments. Its main goal is to bring elegant natural templates to your development workflow — HTML that can be correctly displayed in browsers and also work as static prototypes, allowing for better collaboration in development teams
The ../templates folder contains the Thymeleaf templates for the CRUD HTML pages (View Layer) in the location:
../springboot-client/src/main/resources/templates/
Github Source Link:
https://github.com/AbiramiSukumaran/springboot-client/tree/main/src/main/resources/templatesThis View Layer also contains the methods for Client side validations:
Validate non null fields
Validate input for correctness of data format for apt number, hour number, number of players
In addition to the pom.xml content in Server Application, we need to add the Thyme dependency for the Client Application
<dependency>
<groupId>org.springframework.boot</groupId>
<artifactId>spring-boot-starter-thymeleaf</artifactId>
</dependency>
The rest is the same as the Server Application, (Section C, point 2) in this list for the below steps:
Build & Run
./mvnw package./mvnw spring-boot:runContainerize without Docker using Jib
$ ./mvnw com.google.cloud.tools:jib-maven-plugin:3.1.1:build -Dimage=gcr.io/$GOOGLE_CLOUD_PROJECT/<<your-container-name>>Deploy in Cloud Run
gcloud run deploy <<application>> --image gcr.io/$GOOGLE_CLOUD_PROJECT/<<container>> --platform managed --region us-central1 --allow-unauthenticated --update-env-vars DBHOST=$DB_HOST
Watch the logs as your app is shipped to the cloud! When the deployment is complete, you should see the URL for the client app
Open the URL and play CRUD with your application. This video demonstrates creating a Badminton slot reservation, searching for an existing reservation, editing an existing reservation and deleting an existing reservation with selective Client side and Server side validations:

Conclusion
Cloud Spanner is a great option for teams that are looking for a fully-managed relational database that can easily scale as their usage grows. Now with the Granular Instance Compute Capacity called “Processing Units” or PUs, you can run workloads on Spanner at as low as 1/10th the cost of regular instances, equating to approximately $65/month. Check out all the features and sample use cases that Spanner provides, including the PostgreSQL interface if you are familiar with PostgreSQL syntax.
Before you go…
I hope you enjoyed this little experiment with Cloud Spanner on Spring Boot with Dockerless Containers deployed on Cloud Run. I have deliberately left out the below validations from the exercise for you to practice:
What if you want to prevent new reservations from being created when the slots are filled?
What if you want to extend the application to ask for singles / doubles choices and to team them up accordingly?
The below references can come in handy for your implementation:
https://codelabs.developers.google.com/codelabs/cloud-spanner-first-db#0
https://codelabs.developers.google.com/codelabs/cloud-spring-spanner#0
https://codelabs.developers.google.com/codelabs/cloud-kotlin-jib-cloud-run#4
https://codelabs.developers.google.com/codelabs/cloud-run-hello#4
Also, I would love to hear ideas and feedback from you on LinkedIn.