5 best practices for Compute Engine cost optimization
Akshay Kumbhar
Professional Services, Technical Account Manager
Amber Yadron
Professional Services, Technical Account Manager
When customers migrate to Google Cloud Platform (GCP), their first step is often to adopt Compute Engine, which makes it easy to procure and set up virtual machines (VMs) in the cloud that provide large amounts of computing power. Launched in 2012, Compute Engine offers multiple machine types, many innovative features, and is available in 20 regions and 61 zones!
Compute Engine’s predefined and custom machine types make it easy to choose VMs closest to your on-premises infrastructure, accelerating the workload migration process cost effectively. Cloud allows you the pricing advantage of ‘pay as you go’ and also provides significant savings as you use more compute with Sustained Use Discounts.
As Technical Account Managers, we work with large enterprise customers to analyze their monthly spend and recommend optimization opportunities. In this blog, we will share the top recommendations that we’ve developed based on our collective experience working with GCP customers.
Getting ready to save
Before you get started, be sure to familiarize yourself with the VM instance pricing page—required reading for anyone who needs to understand the Compute Engine billing model and resource-based pricing. In addition to those topics, you’ll also find information about the various Compute Engine machine types, committed use discounts and how to view your usage, among other things.
Another important step to gain visibility into your Compute Engine cost is using Billing reports in the Google Cloud Console and customizing your views based on filtering and grouping by projects, labels and more. From there you can export Compute Engine usage details to BigQuery for more granular analysis. This allows you to query the datastore to understand your project’s vCPU usage trends and how many vCPUs can be reclaimed. If you have defined thresholds for the number of cores per project, usage trends can help you spot anomalies and take proactive actions. These actions could be rightsizing the VMs or reclaiming idle VMs.
Now, with these things under your belt, let’s go over the five ways you can optimize your Compute Engine resources that we believe will give you the most immediate benefit.
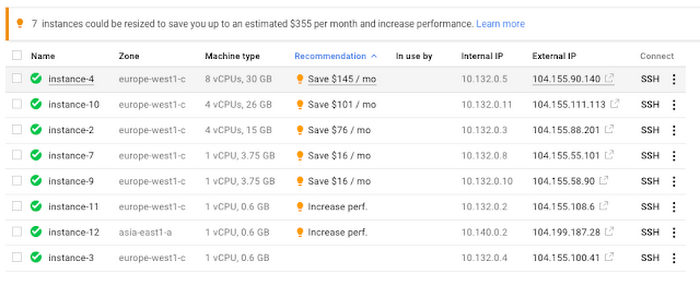
1. Apply Compute Engine rightsizing recommendations
Compute Engine’s rightsizing recommendations feature provides machine type recommendations that are generated automatically based on system metrics gathered by Stackdriver Monitoring over the past eight days. Use these recommendations to resize your instance's machine type to more efficiently use the instance's resources. It also recommends custom machine types when appropropriate. Compute Engine makes viewing, resizing and other actions easier right from the Cloud Console as shown below.
Recently, we expanded Compute Engine rightsizing capabilities from just individual instances to managed instance groups as well. Check out the documentation for more details.
For more precise recommendations, you can install the Stackdriver Monitoring agent which collects additional disk, CPU, network, and process metrics from your VM instances to better estimate your resource requirements. You can also leverage the Recommender API for managing recommendations at scale.
2. Purchase commitments
Our customers have diverse workloads running on Google Cloud with differing availability requirements. Many customers follow a 70/30 rule when it comes to managing their VM fleet—they have constant year-round usage of ~70%, and a seasonal burst of ~30% during holidays or special events.
If this sounds like you, you are probably provisioning resources for peak capacity. However, after migrating to Google Cloud, you can baseline your usage and take advantage of deeper discounts for Compute workloads. Committed Use Discounts are ideal if you have a predictable steady-state workload as you can purchase a one or three year commitment in exchange for a substantial discount on your VM usage.
We recently released a Committed Use Discount analysis report in the Cloud Console that helps you understand and analyze the effectiveness of the commitments you’ve purchased. In addition to this, large enterprise customers can work with their Technical Account Managers who can help manage their commitment purchases and work proactively with them to increase Committed Use Discount coverage and utilization to maximize their savings.
3. Automate cost optimizations
The best way to make sure that your team is always following cost-optimization best practices is to automate them, reducing manual intervention.
Automation is greatly simplified using a label—a key-value pair applied to various Google Cloud services. For example, you could label instances that only developers use during business hours with “env: development.” You could then use Cloud Scheduler to schedule a serverless Cloud Function to shut them down over the weekend or after business hours and then restart them when needed. Here is an architecture diagram and code samples that you can use to do this yourself.
Using Cloud Functions to automate the cleanup of other Compute Engine resources can also save you a lot of time and money. For example, customers often forget about unattached (orphaned) persistent disk, or unused IP addresses. These accrue costs, even if they are not attached to a virtual machine instance. VMs with the “deletion rule” option set to “keep disk” retain persistent disks even after the VM is deleted. That’s great if you need to save the data on that disk for a later time, but those orphaned persistent disks can add up quickly and are often forgotten! There is a Google Cloud Solutions article that describes the architecture and sample code for using Cloud Functions, Cloud Scheduler, and Stackdriver to automatically look for these orphaned disks, take a snapshot of them, and remove them. This solution can be used as a blueprint for other cost automations such as cleaning up unused IP addresses, or stopping idle VMs.
4. Use preemptible VMs
If you have workloads that are fault tolerant, like HPC, big data, media transcoding, CI/CD pipelines or stateless web applications, using preemptible VMs to batch-process them can provide massive cost savings. In fact, customer Descartes Labs reduced their analysis costs by more than 70% by using preemptible VMs to process satellite imagery and help businesses and governments predict global food supplies.
Preemptible VMs are short lived— they can only run a maximum of 24 hours, and they may be shut down before the 24 hour mark as well. A 30-second preemption notice is sent to the instance when a VM needs to be reclaimed, and you can use a shutdown script to clean up in that 30-second period. Be sure to fully review the full list of stipulations when considering preemptible VMs for your workload. All machine types are available as preemptible VMs, and you can launch one simply by adding “-preemptible” to the gcloud command line or selecting the option from the Cloud Console.
Using preemptible VMs in your architecture is a great way to scale compute at a discounted rate, but you need to be sure that the workload can handle the potential interruptions if the VM needs to be reclaimed. One way to handle this is to ensure your application is checkpointing as it processes data, i.e., that it’s writing to storage outside the VM itself, like Google Cloud Storage or a database. As an example, we have sample code for using a shutdown script to write a checkpoint file into a Cloud Storage bucket. For web applications behind a load balancer, consider using the 30-second preemption notice to drain connections to that VM so the traffic can be shifted to another VM. Some customers also choose to automate the shutdown of preemptible VMs on a rolling basis before the 24-hour period is over, to avoid having multiple VMs shut down at the same time if they were launched together.
5. Try autoscaling
Another great way to save on costs is to run only as much capacity as you need, when you need it. As we mentioned earlier, typically around 70% of capacity is needed for steady-state usage, but when you need extra capacity, it’s critical to have it available. In an on-prem environment, you need to purchase that extra capacity ahead of time. In the cloud, you can leverage autoscaling to automatically flex to increased capacity only when you need it.
Compute Engine managed instance groups are what give you this autoscaling capability in Google Cloud. You can scale up gracefully to handle an increase in traffic, and then automatically scale down again when the need for instances is lowered (downscaling). You can scale based on CPU utilization, HTTP load balancing capacity, or Stackdriver Monitoring metrics. This gives you the flexibility to scale based on what matters most to your application.
High costs do not compute
As we’ve shown above, there are many ways to optimize your Compute Engine costs. Monitoring your environment and understanding your usage patterns is key to understanding the best options to start with, taking the time to model your baseline costs up front. Then, there are a wide variety of strategies to implement depending on your workload and current operating model.
For more on cost management, check out our cost management video playlist. And for more tips and tricks on saving money on other GCP services, check out our blog posts on Cloud Storage, Networking and BigQuery cost optimization strategies. We have additional blog posts coming soon, so stay tuned!