How to aggregate data for BigQuery using Apache Airflow
Tahir Fayyaz
Sales Engineer
Users of Google BigQuery, the cloud-native data warehouse service from Google Cloud Platform (GCP), have access to an ever-expanding range of public datasets for exploration. Some of these datasets are quite large, however, so connecting to them directly from a dashboard created in Google Data Studio or other tools can cause undesirable latency (or costs if you have exceeded your free trial or tier). For that reason, many users prefer to aggregate that data into a smaller table for their dashboard, instead.
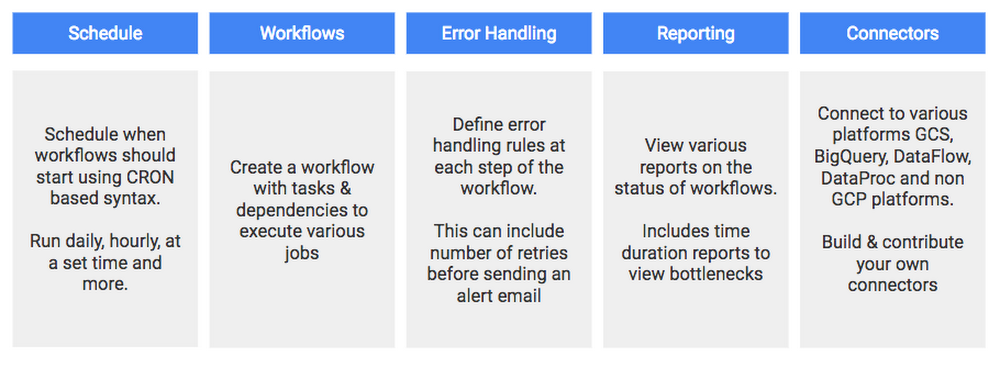
Although using cron jobs or DIY scripting are options for that task, using the popular Apache Airflow workflow management framework (currently incubating at Apache) is much more efficient. Airflow, which was invented and open sourced by Airbnb data engineers, lets you programmatically create, schedule and monitor workflows using simple Python syntax. Here are some key reasons why most people will prefer Airflow over manual methods for building and managing data pipelines:
To demonstrate, in this post I’ll explain how to create a pipeline for aggregating daily stats about Github repos by pulling data from the public datasets for Hacker News and Github and pushing them into a new joint table every day. We'll then use the final table to power this GitHub on Hacker News trends dashboard created using Google Data Studio.
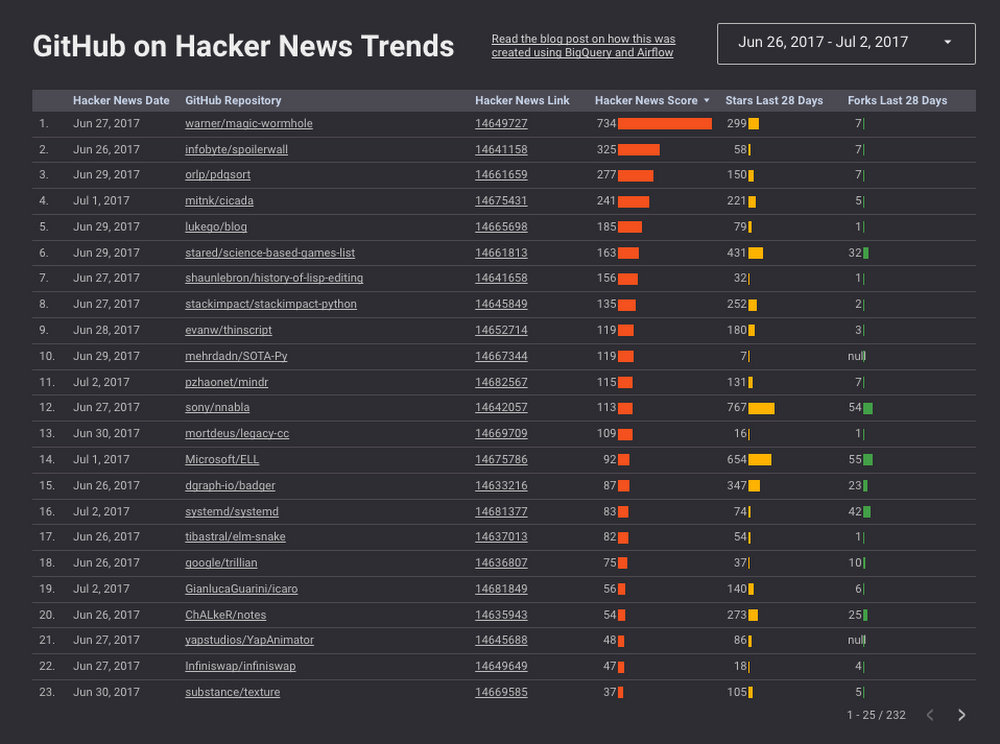
This same method can be used for aggregating any of the BigQuery public datasets of your choosing.
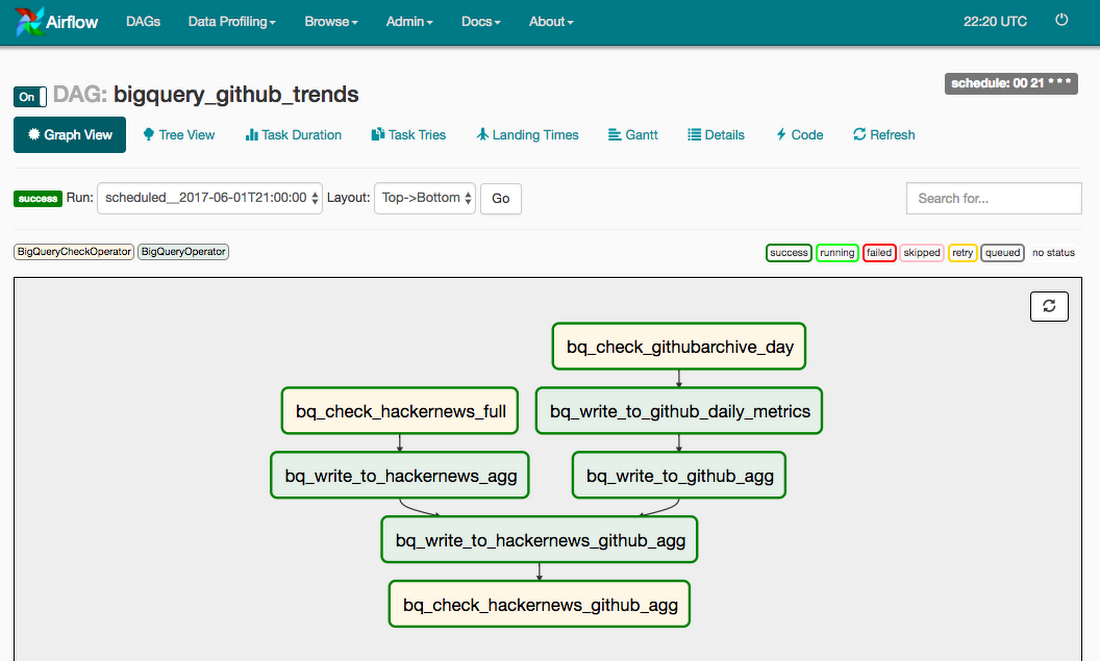
Our final pipeline will look like this in the Airflow.
Setting up Airflow
The quickest way to get started and test the pipeline in this post is to set up Airflow locally (make sure you have the gcloud SDK installed, first).You can install Airflow and the extra packages required for GCP using
Basics of Airflow
Airflows let you build workflows based on directed acyclic graphs (DAGs), which mathematically model a sequence of multiple tasks. Each task has a specific job to do in your DAG and is controlled through an operator.There are multiple operators available for GCP (GCP support in Airflow is very good), but in this example, we'll be using only the following ones:
- BigQuery Check Operator: Runs an SQL query and if 1 or more rows are returned or the row returned is not one of the following (0, null), then the task is successful
- BigQuery Operator: Runs an SQL query and writes the results in a new table or table partition
{{ ds }} or {{ ds_nodash }} if you want the date without any dashes. They are many other ways of using macros that we'll make use of also.Once you've defined your tasks you can set dependencies so that certain tasks only run once another task has successfully completed. For example, to ensure that task number 3 only runs after two independent tasks have completed, you would define an upstream dependency as:
Building the Airflow DAG
First, import required libraries and Airflow operators into a file named bigquery_github_trends_v1.py which should be saved in your dags folder:Now let’s define our default DAG arguments. The start date for the DAG, for example, is very important as it allows the DAG to do a backfill from the date you define. (In our example we want to start from June 2, 2017.) You can override these arguments for each task if required:
We then set our schedule interval using cron syntax, which means our DAG will run once a day at 21:00 (9pm). Airflow assumes that your system is using UTC (GMT) and this cannot be changed. Therefore the schedule you set will use UTC.
An important note is that the DAG will run at the end of the day after 23:59, effectively the next day. Therefore, as we have set the start date following in our default_args as datetime(2017, 6, 02) the DAG for date 2017-06-02 will run at 21:00 on June 3, 2017 but the macro {{ ds }}, which we'll use in our queries below to set a dynamic date, will still equal 2017-06-02.
We also make use of {{ yesterday_ds }} which will equal 2017-06-01. We're using yesterday because we need to wait a full day for all of the data to be available in BigQuery for the public datasets we're using.
Finally we create our DAG object and define a dag_id and apply the default args and the schedule interval.
Tasks to check Github and Hackernews tables and data exist
To begin, we'll check that the tables and the data we want to use is available for the day before (yesterday) on the day that the DAG runs.Task 1 will check that the github archive data has a dated table created for that date
Task 2 will check that the hacker news table contains data for that date.
Note: For the BigQuery check operators we must use Legacy SQL (see open issue) but for our main queries we can use Standard SQL.
Test the tasks
Airflow allows you to easily test each task individually using the syntax:To test the 2 tasks we created earlier we simply need to run the following 2 commands:
Create our new partitioned tables
We'll be writing data into new tables with our tasks below so first we must create all our partitioned tables using the bq cli with the following command:Task to aggregate github events to daily metric table
As we'll be creating metrics for the past day, past 7 days and past 28 days in a later step we want to avoid having to scan all the raw data for the previous dates. Therefore we'll first create a partitioned table, which holds all the aggregated metrics for the github events we're interested in.We then use the BigQueryOperator to run our query and write the results to the relevant dated partition.
Run a Backfill for bq_write_to_github_daily_metrics task
Our final table will have a start date of June 1st 2017. However as you'll see in the next Github aggregate query, we need data from the previous 28 days from thegithub_trends.github_daily_metrics table to create our previous_28_days and previous_7_days metrics. To do this, we'll run a backfill for all of May 2017 just for this specific task. Airflow has the cli command airflow backfill which allows us to do this easily using the syntax.We'll run the cmd as follows, which run the dag and any downstream dags from May 2, 2017 to June 1, 2017. Notice our end date needs to be 2017-06-02.
You can then visit the Airflow interface and see the backfill running for the dates you defined.
Tasks to aggregate Github and Hackernews data
Next, we'll aggregate the Github data and Hackernews data and write the data to two separate aggregate tables.Write to Github aggregate table
Write to Hacknernews aggregate table
Task to join the aggregate tables
In this query, we'll look at the date link that was shared on Github and how many stars and forks it had in the last 1 day, last 7 days and last 28 days. As we have aggregated the previous tables daily, we no longer need to scan the full Github and Hackernews tables.
Task to check the data was written to final table
Our final query will check that the data for the date of the dag run was written successfully to our hackernews_github_agg table.Set our dependencies for each task
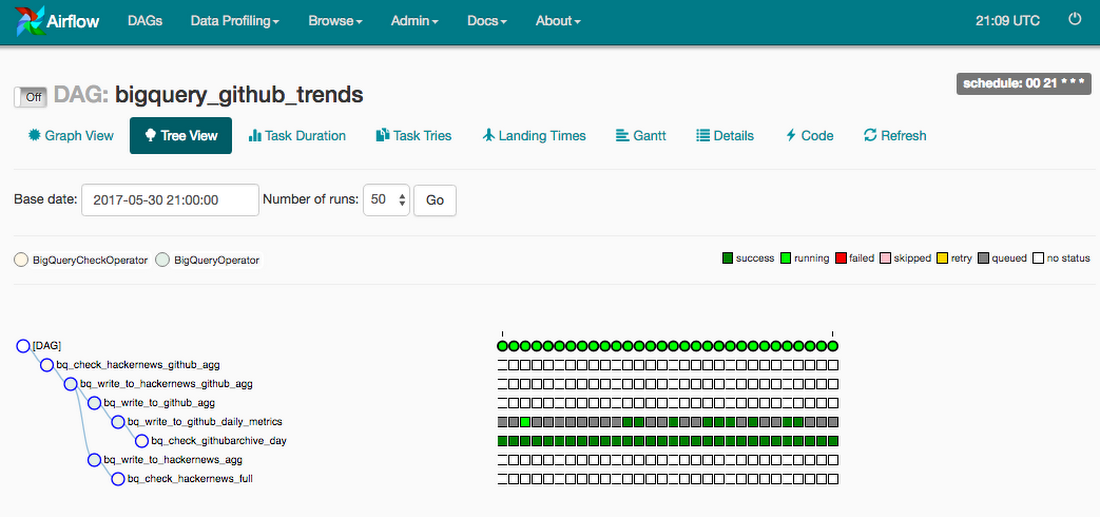
We can now define when each task should run after another by setting upstream dependencies. These set of rules are what generate our DAG tree shown earlier in the post.Turn on the DAG
Now that the DAG is complete we can turn it on in the Airflow UI, and it will run from the start date we defined and will continue to run daily to ensure our dashboard is always up to date. You can then monitor the progress to check there are no issues causing any of the tasks to fail.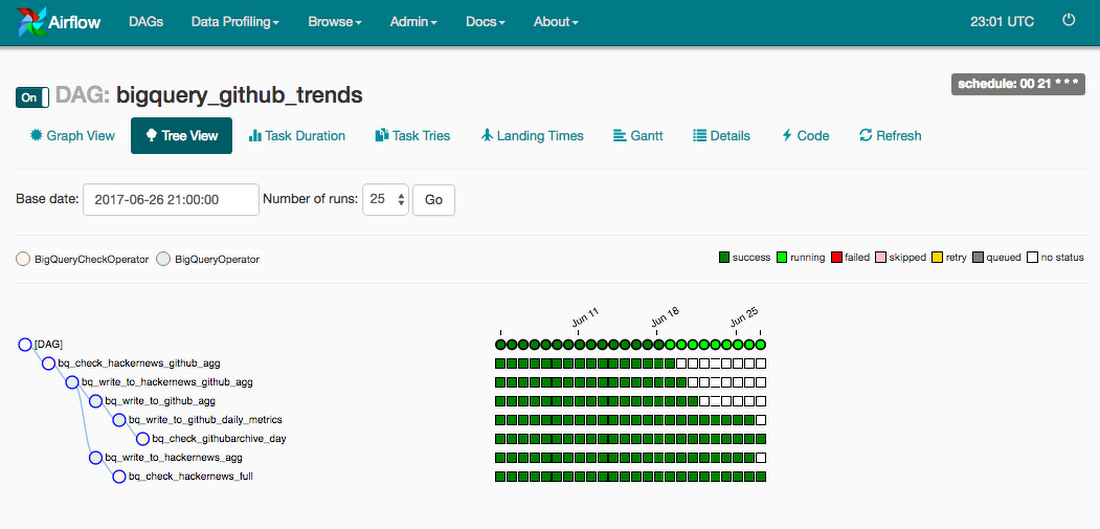
Dealing with task failures
If any of the tasks fail, they'll be highlighted in red in the DAG graph and tree view. You can also set-up the DAG to send an email and/or a function to be called in the default_args.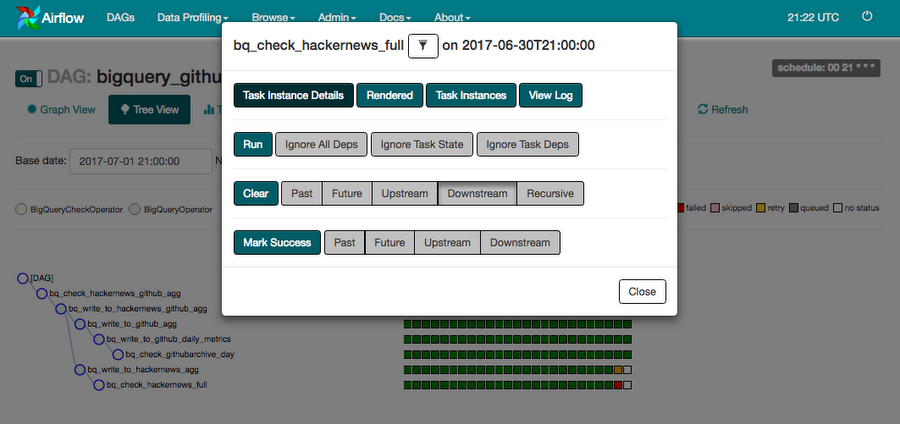
You can then choose to deal with the task that failed in various ways in the Airflow UI. By clicking on the task node highlighted in red we are presented with a screen of options.
This error occurred due to the table arriving late in the table we were checking so we can click on clear downstream and the task will run again and will now pass as the data is now in the table.
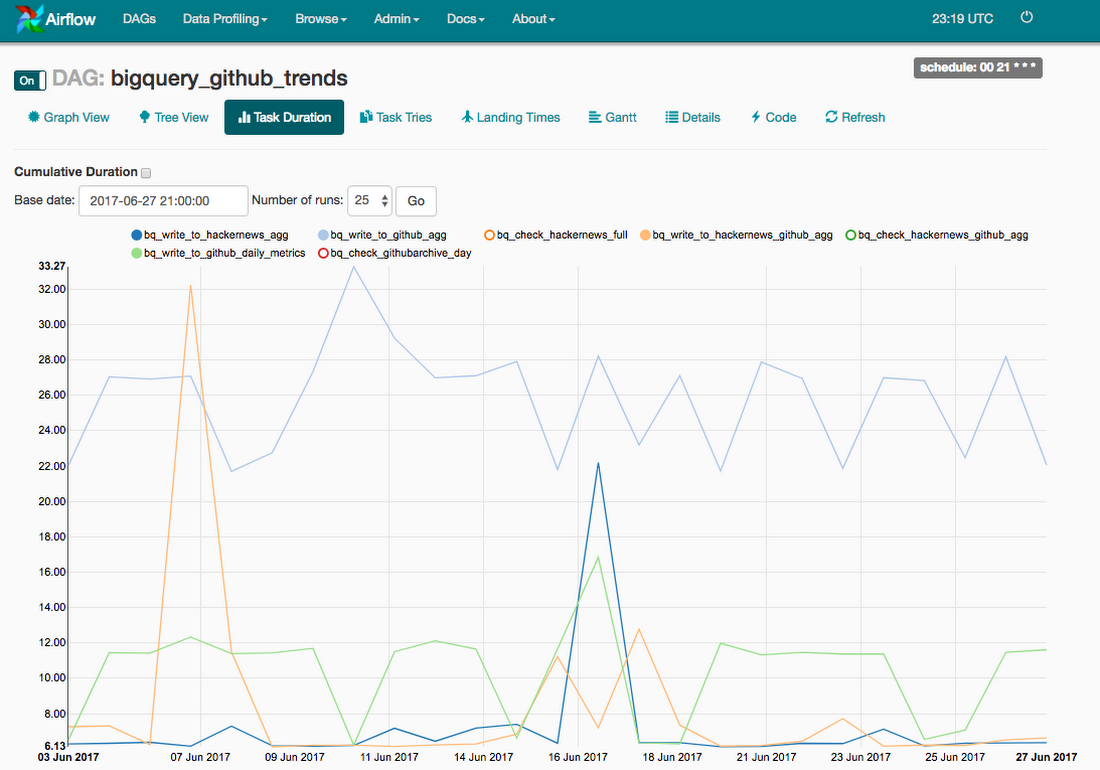
See reports for your DAG runs
Airflow has a few great reports that allow you to check the performance of your pipeline over time, and these can be used to see where there might be bottlenecks and therefore make improvements.The following task duration report is useful to see if the duration time for each task is steady. We can see there are some days it takes longer than expected but these are recurring issues in this example.
Our final Airflow DAG
Here’s the final result saved as a file named bigquery_github_trends_v1.py available to re-use on GitHub.Next steps
You should now have all the info you need to aggregate BigQuery public datasets in interesting ways that feed your dashboard more efficiently.A lot of inspiration for these queries were taken from the examples shared by Felipe Hoffa for Hacker News and Github Archive.
For more examples DAGs see how others have used Airflow for GCP.
There are a few open source examples for setting up Apache Airflow on GCP once you go into production, including: