Analizar paquetes de Go automáticamente
Aprende a habilitar el análisis automático, a enviar una imagen de contenedor a Artifact Registry y a ver una lista de las vulnerabilidades encontradas en la imagen.
Artifact Analysis busca vulnerabilidades cada vez que se envía una imagen a Artifact Registry. Los administradores de la plataforma y los desarrolladores de aplicaciones pueden usar esta función de análisis automático para identificar riesgos en su canalización de entrega de software.
En esta guía de inicio rápido se usa un paquete sencillo disponible públicamente para mostrar un tipo de análisis de paquetes. De forma predeterminada, Artifact Analysis busca vulnerabilidades en varios tipos de paquetes una vez que habilitas la API de análisis. Entre los tipos de paquetes admitidos se incluyen OS, Go, Java (Maven), Python y Node.js (npm).
Antes de empezar
- Sign in to your Google Cloud account. If you're new to Google Cloud, create an account to evaluate how our products perform in real-world scenarios. New customers also get $300 in free credits to run, test, and deploy workloads.
-
Install the Google Cloud CLI.
-
Si utilizas un proveedor de identidades (IdP) externo, primero debes iniciar sesión en la CLI de gcloud con tu identidad federada.
-
Para inicializar gcloud CLI, ejecuta el siguiente comando:
gcloud init -
Create or select a Google Cloud project.
Roles required to select or create a project
- Select a project: Selecting a project doesn't require a specific IAM role—you can select any project that you've been granted a role on.
-
Create a project: To create a project, you need the Project Creator
(
roles/resourcemanager.projectCreator), which contains theresourcemanager.projects.createpermission. Learn how to grant roles.
-
Create a Google Cloud project:
gcloud projects create PROJECT_ID
Replace
PROJECT_IDwith a name for the Google Cloud project you are creating. -
Select the Google Cloud project that you created:
gcloud config set project PROJECT_ID
Replace
PROJECT_IDwith your Google Cloud project name.
-
Verify that billing is enabled for your Google Cloud project.
-
Enable the Artifact Registry and Container Scanning APIs:
Roles required to enable APIs
To enable APIs, you need the Service Usage Admin IAM role (
roles/serviceusage.serviceUsageAdmin), which contains theserviceusage.services.enablepermission. Learn how to grant roles.gcloud services enable containerscanning.googleapis.com
artifactregistry.googleapis.com -
Install the Google Cloud CLI.
-
Si utilizas un proveedor de identidades (IdP) externo, primero debes iniciar sesión en la CLI de gcloud con tu identidad federada.
-
Para inicializar gcloud CLI, ejecuta el siguiente comando:
gcloud init -
Create or select a Google Cloud project.
Roles required to select or create a project
- Select a project: Selecting a project doesn't require a specific IAM role—you can select any project that you've been granted a role on.
-
Create a project: To create a project, you need the Project Creator
(
roles/resourcemanager.projectCreator), which contains theresourcemanager.projects.createpermission. Learn how to grant roles.
-
Create a Google Cloud project:
gcloud projects create PROJECT_ID
Replace
PROJECT_IDwith a name for the Google Cloud project you are creating. -
Select the Google Cloud project that you created:
gcloud config set project PROJECT_ID
Replace
PROJECT_IDwith your Google Cloud project name.
-
Verify that billing is enabled for your Google Cloud project.
-
Enable the Artifact Registry and Container Scanning APIs:
Roles required to enable APIs
To enable APIs, you need the Service Usage Admin IAM role (
roles/serviceusage.serviceUsageAdmin), which contains theserviceusage.services.enablepermission. Learn how to grant roles.gcloud services enable containerscanning.googleapis.com
artifactregistry.googleapis.com Abre la página Repositorios en la consola de Google Cloud .
Haz clic en Crear repositorio.
En la página Create Repository (Crear repositorio), introduce los siguientes ajustes:
- Nombre:
quickstart-docker-repo - Formato: Docker
- Modo: Estándar
- Tipo de ubicación: región
- Región:
us-central1
- Nombre:
Haz clic en Crear.
Cambia al directorio en el que quieras guardar la imagen del contenedor.
Copia una imagen en tu directorio local. Por ejemplo, puedes usar Docker para extraer la imagen de Go más reciente de Docker Hub.
docker pull golang:1.17.6-alpine- PROJECT es tu Google Cloud
ID de proyecto.
Si el ID de tu proyecto contiene dos puntos (
:), consulta Proyectos con ámbito de dominio. us-central1es la región del repositorio de Artifact Registry.docker.pkg.deves el nombre de host de los repositorios de Docker.quickstart-imagees el nombre de la imagen que quieres usar en el repositorio. El nombre de la imagen puede ser diferente del nombre de la imagen local.tag1es una etiqueta que vas a añadir a la imagen Docker. Si no has especificado ninguna etiqueta, Docker aplicará la etiqueta predeterminadalatest.Obtén la lista de repositorios.
En la lista de repositorios, haz clic en uno.
En la lista de imágenes, haz clic en el nombre de una imagen.
Los totales de vulnerabilidades de cada digest de imagen se muestran en la columna Vulnerabilidades.

Para ver la lista de vulnerabilidades de una imagen, haga clic en el enlace de la columna Vulnerabilidades.
En la sección Resultados del análisis se muestra un resumen de los tipos de paquetes analizados, el número total de vulnerabilidades, las vulnerabilidades con correcciones disponibles, las vulnerabilidades sin correcciones y la gravedad efectiva.
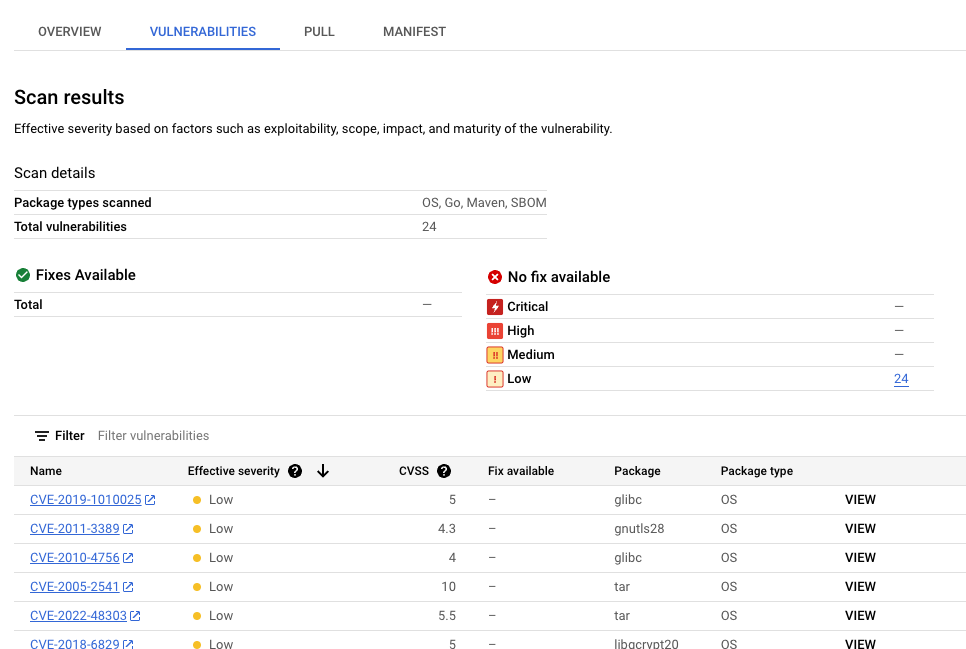
En la tabla de vulnerabilidades se indica el nombre de la lista Common Vulnerabilities and Exposures (CVE) de cada vulnerabilidad detectada, la gravedad efectiva, la puntuación del sistema Common Vulnerability Scoring System (CVSS), las correcciones (si están disponibles), el nombre del paquete que contiene la vulnerabilidad y el tipo de paquete.
La consolaGoogle Cloud muestra hasta 1200 vulnerabilidades por página en esta tabla. Puedes filtrar y ordenar estos archivos para consultar un archivo, un directorio, una capa o un tipo de archivo específico por extensión de archivo.
Para obtener información sobre una CVE específica, haz clic en su nombre.
Para ver los detalles de la vulnerabilidad, como el número de versión y la ubicación afectada, en la fila con el nombre de la vulnerabilidad, haz clic en Ver o en Ver corregido. El texto del enlace es Ver para las vulnerabilidades sin corrección y Ver corregidas para las vulnerabilidades en las que se ha aplicado una corrección.
En Artifact Registry, abre la lista de repositorios.
En la página Repositorios, haz clic en un repositorio.
En la página Repository Details (Detalles del repositorio), haz clic en una imagen.
En la lista de versiones de la imagen, haz clic en un resumen de la imagen.
En la página de detalles del resumen de la imagen, haga clic en la pestaña Vulnerabilidades.
Cuando hay metadatos basados en capas disponibles, Análisis de artefactos muestra una lista de capas seleccionables en la barra Capa:

Para ver la lista de capas, haz clic en el menú desplegable de capas.
Se abrirá una lista desplegable con una lista numerada de capas. La capa 0 representa la capa inferior, y cada capa siguiente se basa en la capa anterior. Solo se muestran las capas en las que se han encontrado vulnerabilidades.

En cada capa, Análisis de artefactos muestra el comando de Docker que se ha usado para crearla y el número de vulnerabilidades encontradas en ella.
Para obtener más información sobre las vulnerabilidades de una capa específica, selecciona una capa de la lista de capas.
La tabla de vulnerabilidades se actualiza para mostrar solo las vulnerabilidades encontradas en la capa seleccionada. Puedes aplicar más filtros o investigar vulnerabilidades específicas.
Haga clic en VER o VER CORRECCIÓN junto a una vulnerabilidad para ver información más detallada sobre ella.
En el panel lateral Detalles de la vulnerabilidad se muestran las ubicaciones de los archivos en los que los paquetes tienen vulnerabilidades.
En la tabla Ubicación de los archivos, coloca el cursor sobre el signo de interrogación para abrir los metadatos de la capa adicional.
En un cuadro de diálogo se muestra el índice de la capa, el comando de compilación de la capa, el digest de la capa y la imagen base en la que puedes corregir la vulnerabilidad.
Crear un repositorio de Docker en Artifact Registry
Crea un repositorio de Docker para almacenar la imagen de muestra de esta guía de inicio rápido.
Verás la página Repositorios. Tu repositorio quickstart-docker-repo se añade a la lista de repositorios.
Configurar la autenticación
Para poder enviar o extraer imágenes con Artifact Registry, debes configurar Docker para que use Google Cloud CLI y autentique las solicitudes a Artifact Registry.
En Cloud Shell o en tu shell local, configura la autenticación para los repositorios de Docker de la región us-central1:
gcloud auth configure-docker us-central1-docker.pkg.dev
Obtener un paquete
Etiqueta tu paquete con un nombre de repositorio
Cuando quieras enviar un paquete a Artifact Registry, debes configurar el comando docker push para enviar la imagen a una ubicación específica.
Ejecuta el siguiente comando para etiquetar la imagen como quickstart-image:tag1:
docker tag golang:1.17.6-alpine \
us-central1-docker.pkg.dev/PROJECT/quickstart-docker-repo/quickstart-image:tag1
Donde:
Enviar la imagen a Artifact Registry
Artifact Analysis analiza automáticamente los paquetes Go nuevos cuando se suben a Artifact Registry.
Para enviar tu imagen a tu repositorio de Docker en Artifact Registry, ejecuta el siguiente comando:
docker push us-central1-docker.pkg.dev/PROJECT/quickstart-docker-repo/quickstart-image:tag1
Sustituye PROJECT por el Google Cloud
ID de tu proyecto.
Si el ID de tu proyecto contiene dos puntos (:), consulta Proyectos con ámbito de dominio.
Ver los resultados del análisis de vulnerabilidades
Para ver las vulnerabilidades de una imagen, sigue estos pasos:
Ver las vulnerabilidades de una capa específica
Artifact Analysis proporciona metadatos específicos de las capas para ayudarte a identificar qué paquete contiene vulnerabilidades y qué comando de compilación de Docker introdujo esa capa.
Para ver los metadatos de vulnerabilidades basados en capas en la consola, sigue estos pasos: Google Cloud
Limpieza
Para evitar que se apliquen cargos en tu Google Cloud cuenta por los recursos utilizados en esta página, elimina el Google Cloud proyecto con los recursos.
Si has creado un proyecto para esta guía, ahora puedes eliminarlo.Delete a Google Cloud project:
gcloud projects delete PROJECT_ID