OS パッケージを自動的にスキャンする

このドキュメントでは、Container Scanning API を有効にして、Artifact Registry にイメージを push し、イメージで見つかった脆弱性の一覧を表示する方法について説明します。

Artifact Analysis は、Artifact Registry のコンテナ イメージの脆弱性情報を提供します。メタデータはメモとして保存されます。イメージに関連付けられたメモの各インスタンスが検出されるたびにオカレンスが作成されます。詳細については、概要料金のドキュメントをご覧ください。

始める前に

  1. Sign in to your Google Cloud account. If you're new to Google Cloud, create an account to evaluate how our products perform in real-world scenarios. New customers also get $300 in free credits to run, test, and deploy workloads.
  2. In the Google Cloud console, on the project selector page, select or create a Google Cloud project.

    Go to project selector

  3. Verify that billing is enabled for your Google Cloud project.

  4. Enable the Artifact Registry and Container Scanning APIs.

    Enable the APIs

  5. Install the Google Cloud CLI.

  6. If you're using an external identity provider (IdP), you must first sign in to the gcloud CLI with your federated identity.

  7. To initialize the gcloud CLI, run the following command:

    gcloud init
  8. In the Google Cloud console, on the project selector page, select or create a Google Cloud project.

    Go to project selector

  9. Verify that billing is enabled for your Google Cloud project.

  10. Enable the Artifact Registry and Container Scanning APIs.

    Enable the APIs

  11. Install the Google Cloud CLI.

  12. If you're using an external identity provider (IdP), you must first sign in to the gcloud CLI with your federated identity.

  13. To initialize the gcloud CLI, run the following command:

    gcloud init
  14. Artifact Registry に Docker リポジトリを作成し、コンテナ イメージをリポジトリに push します。Artifact Registry に習熟されていない場合は、Docker のクイックスタートをご覧ください。

この API を有効にすると、Artifact Registry で言語パッケージのスキャンも有効になります。サポートされているパッケージ タイプをご覧ください。

イメージの脆弱性を表示する

Artifact Analysis は、Artifact Registry にアップロードされた新しいイメージをスキャンします。このスキャンにより、コンテナ内のシステム パッケージに関する情報が抽出されます。

レジストリ内のイメージの脆弱性オカレンスを表示するには、 Google Cloud コンソール、Google Cloud CLI、または Container Analysis API を使用します。イメージに脆弱性が存在する場合、その詳細を確認できます。

Artifact Analysis は、過去 30 日間に push または pull されたイメージのメタデータのみを更新します。30 日を過ぎると、メタデータは更新されなくなり、結果は古くなります。また、Artifact Analysis は 90 日以上前のメタデータをアーカイブします。このメタデータは、 Google Cloud コンソール、gcloud、API を使用して取得することはできません。古いメタデータまたはアーカイブされたメタデータを含むイメージを再スキャンするには、そのイメージを pull します。メタデータの更新には、最長で 24 時間ほどかかることがあります。

Google Cloud コンソールで発生を確認する

イメージの脆弱性を表示するには:

  1. リポジトリのリストを取得します。

    [リポジトリ] ページを開く

  2. リポジトリ リストで、リポジトリをクリックします。

  3. イメージのリストで、イメージ名をクリックします。

    各イメージ ダイジェストの脆弱性の総数が、[脆弱性] 列に表示されます。

    脆弱性のあるスキャンされた画像

  4. イメージで検出された脆弱性の一覧を表示するには、[脆弱性] 列のリンクをクリックします。

    [スキャン結果] セクションには、スキャンされたパッケージ タイプ、脆弱性の合計数、修正プログラムが利用可能な脆弱性、修正プログラムがない脆弱性、有効な重大度の概要が表示されます。

    脆弱性、修正、有効な重大度を一覧表示するスキャン結果ページ

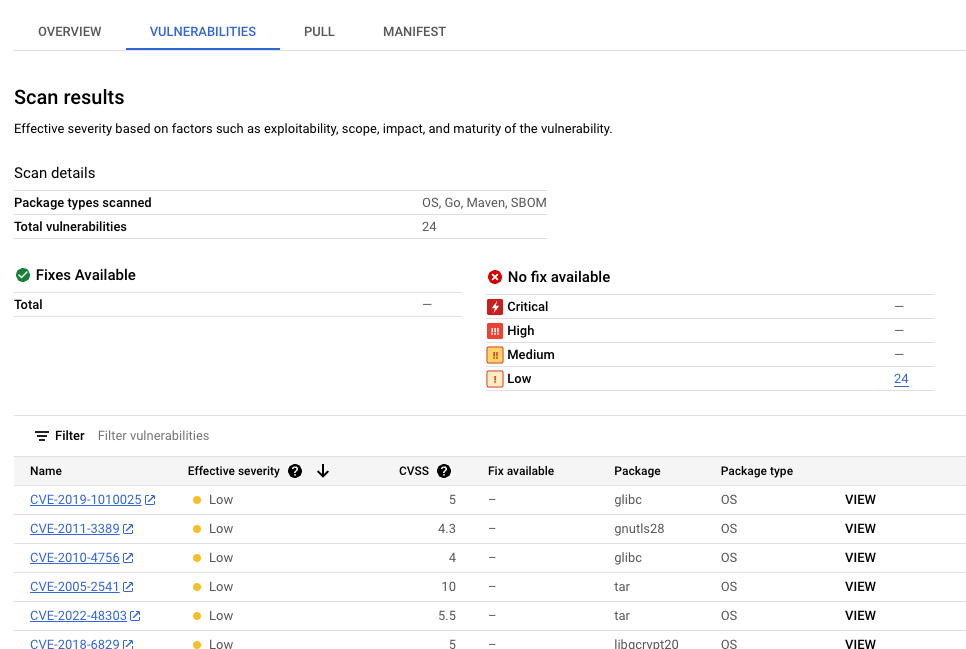
    脆弱性の表には、検出された各脆弱性の共通脆弱性識別子(CVE)名、有効な重大度、共通脆弱性スコアリング システム(CVSS)スコア、修正(利用可能な場合)、脆弱性を含むパッケージの名前、パッケージ タイプが一覧表示されます。これらのファイルをフィルタして並べ替え、ファイル拡張子で特定のファイル、ディレクトリ、ファイルタイプを確認できます。 Google Cloud コンソールには、この表に 1 ページあたり最大 1,200 件の脆弱性が表示されます。

  5. 特定の CVE の詳細については、CVE 名をクリックします。

  6. バージョン番号や影響を受ける場所などの脆弱性発生の詳細を表示するには、脆弱性の名前を含む行で [表示] または [修正済みを表示] をクリックします。修正プログラムのない脆弱性のリンクテキストは [表示]、修正プログラムが適用されている脆弱性のリンクテキストは [修正済みを表示] です。

gcloud を使用してオカレンスを表示する

Artifact Registry のイメージのオカレンスを表示するには、gcloud artifacts docker images list コマンドを実行します。

gcloud artifacts docker images list --show-occurrences \
    LOCATION-docker.pkg.dev/PROJECT_ID/REPOSITORY/IMAGE_ID

ここで

  • LOCATION は、リポジトリのリージョンまたはマルチリージョンのロケーションです。
  • PROJECT_ID は Google Cloud コンソールのプロジェクト ID です。
  • REPOSITORY は、イメージが保存されるリポジトリの名前です。
  • IMAGE_ID は、リポジトリ内のイメージの名前です。このコマンドではイメージタグを指定できません。

デフォルトでは、このコマンドは最新の 10 個のイメージを返します。表示する画像の数を変更するには、--show-occurrences-from フラグを使用します。たとえば、次のコマンドは最新の 25 個のイメージを返します。

gcloud artifacts docker images list --show-occurrences-from=25 \
    us-central1-docker.pkg.dev/my-project/my-repo/my-image

出力は次のようになります。

画像出力の例

  {
      "name": "projects/my-project/locations/us-central1/occurrences/22d3edfb-34f2-4d3f-be08-fd90c549f010",
      "resource": {
        "uri": "https://us-central1-docker.pkg.dev/my-project/my-repo/golang-nginx@sha256:5b54ef20748417ccdb0b87afedf98c44e699e2f59bd6cv48cbdc1ca2e72c80e3"
      },
      "noteName": "projects/my-project/locations/us-central1/notes/CVE-2005-2541",
      "kind": "VULNERABILITY",
      "createTime": "2025-01-21T15:57:01.238832Z",
      "updateTime": "2025-01-21T15:57:01.238832Z",
      "vulnerability": {
        "severity": "CRITICAL",
        "cvssScore": 10,
        "packageIssue": [
          {
            "affectedLocation": {
              "cpeUri": "cpe:/o:debian:debian_linux:12",
              "package": "tar",
              "version": {
                "name": "1.34+dfsg",
                "revision": "1.2+deb12u1",
                "kind": "NORMAL"
              }
            },
            "fixedLocation": {
              "cpeUri": "cpe:/o:debian:debian_linux:12",
              "package": "tar",
              "version": {
                "kind": "MAXIMUM"
              }
            },
            "packageType": "OS",
            "effectiveSeverity": "LOW",
            "file_location": [
                {
                "file_path": "/var/lib/dpkg/status",
                "layerDetails": {
                  "index": 0,
                  "diffID": "sha256:123",
                  "buildCommand": "FROM golang:example_sha256",
                  "BaseImages": [
                    {
                      "name": "library/golang",
                    },
                  ],
                },
              },
            ],
          }
        ],
        "shortDescription": "CVE-2005-2541",
        "longDescription": "NIST vectors: AV:N/AC:L/Au:N/C:C/I:C/A:C",
        "relatedUrls": [
          {
            "url": "https://security-tracker.debian.org/tracker/CVE-2005-2541",
            "label": "More Info"
          }
        ],
        "effectiveSeverity": "LOW",
        "cvssVersion": "CVSS_VERSION_2",
        "cvssV2": {
          "baseScore": 10,
          "attackVector": "ATTACK_VECTOR_NETWORK",
          "attackComplexity": "ATTACK_COMPLEXITY_LOW",
          "authentication": "AUTHENTICATION_NONE",
          "confidentialityImpact": "IMPACT_COMPLETE",
          "integrityImpact": "IMPACT_COMPLETE",
          "availabilityImpact": "IMPACT_COMPLETE"
        }
      }
    }
  

イメージタグの脆弱性を表示する

イメージタグの脆弱性を表示するには、次のいずれかのコマンドを入力します。

gcloud artifacts docker images describe \
    LOCATION-docker.pkg.dev/PROJECT_ID/REPOSITORY/IMAGE_ID:TAG \
    --show-package-vulnerability

または

gcloud artifacts docker images describe \
    LOCATION-docker.pkg.dev/PROJECT_ID/REPOSITORY/IMAGE_ID@sha256:HASH \
    --show-package-vulnerability

ここで

  • LOCATION は、リポジトリのリージョンまたはマルチリージョンのロケーションです。
  • PROJECT_ID は Google Cloud コンソールのプロジェクト ID です。
  • REPOSITORY は、イメージが保存されるリポジトリの名前です。
  • IMAGE_ID は、リポジトリ内のイメージの名前です。
  • TAG は、情報を取得するイメージのタグです。
  • HASH は、イメージのダイジェストです。

Artifact Analysis は、packageType を含む結果を返します。

脆弱性オカレンスをフィルタする

脆弱性オカレンスをフィルタするには、--occurrence-filter パラメータを使用します。

gcloud artifacts docker images list --show-occurrences \
    LOCATION-docker.pkg.dev/PROJECT_ID/REPOSITORY/IMAGE_ID \
    --occurrence-filter=FILTER_EXPRESSION

ここで

  • LOCATION は、リポジトリのリージョンまたはマルチリージョンのロケーションです。
  • PROJECT_ID は Google Cloud コンソールのプロジェクト ID です。
  • REPOSITORY は、イメージが保存されるリポジトリの名前です。
  • IMAGE_ID は、リポジトリ内のイメージの名前です。
  • FILTER_EXPRESSION は、脆弱性オカレンスのフィルタで説明されている形式のサンプル フィルタ式です。

特定のレイヤの脆弱性を表示する

layerDetails フィールドを使用すると、脆弱なパッケージを導入した特定のレイヤを特定し、そのレイヤに関する追加情報を表示できます。たとえば、次の画像に対する layerDetails 出力を考えてみましょう。

  "layerDetails": {
    "index": 0,
    "diffID": "sha256:123",
    "buildCommand": "FROM golang:example_sha256",
    "BaseImages": [
      {
        "name": "library/golang",
      },
    ],
  }

出力には、コンテナ イメージのレイヤ インデックスが 0 で、レイヤ ハッシュが sha256:123 であることが示されています。このレイヤのビルドに使用される Docker ビルドコマンドは FROM golang:example_sha256 です。このレイヤは library/golang ベースイメージにもあります。

API またはコードを使用してオカレンスを表示する

イメージのオカレンスを表示するには、次の形式で URL を使用してイメージを指定します。

LOCATION-docker.pkg.dev/PROJECT_ID/REPOSITORY/IMAGE_ID

API

cURL の使用

プロジェクトのオカレンスのリストを取得するには:

 curl -X GET -H "Content-Type: application/json" -H \
    "Authorization: Bearer $(gcloud auth print-access-token)" \
    https://containeranalysis.googleapis.com/v1/projects/PROJECT_ID/occurrences

プロジェクトの脆弱性の概要を取得するには:

 curl -X GET -H "Content-Type: application/json" -H \
    "Authorization: Bearer $(gcloud auth print-access-token)" \
    https://containeranalysis.googleapis.com/v1/projects/PROJECT_ID/occurrences:vulnerabilitySummary

特定のオカレンスの詳細を取得するには:

 curl -X GET -H "Content-Type: application/json" -H \
    "Authorization: Bearer $(gcloud auth print-access-token)" \
    https://containeranalysis.googleapis.com/v1/projects/PROJECT_ID/occurrences/OCCURRENCE_ID

Java

Artifact Analysis のクライアント ライブラリをインストールして使用する方法については、Artifact Analysis クライアント ライブラリをご覧ください。詳細については、Artifact Analysis Java API リファレンス ドキュメントをご覧ください。

Artifact Analysis に対する認証を行うには、アプリケーションのデフォルト認証情報を設定します。詳細については、ローカル開発環境の認証の設定をご覧ください。

import com.google.cloud.devtools.containeranalysis.v1.ContainerAnalysisClient;
import io.grafeas.v1.GrafeasClient;
import io.grafeas.v1.Occurrence;
import io.grafeas.v1.ProjectName;
import java.io.IOException;
import java.lang.InterruptedException;

public class OccurrencesForImage {
  // Retrieves all the Occurrences associated with a specified image
  // Here, all Occurrences are simply printed and counted
  public static int getOccurrencesForImage(String resourceUrl, String projectId)
      throws IOException, InterruptedException {
    // String resourceUrl = "https://gcr.io/project/image@sha256:123";
    // String projectId = "my-project-id";
    final String projectName = ProjectName.format(projectId);
    final String filterStr = String.format("resourceUrl=\"%s\"", resourceUrl);

    // Initialize client that will be used to send requests. After completing all of your requests, 
    // call the "close" method on the client to safely clean up any remaining background resources.
    GrafeasClient client = ContainerAnalysisClient.create().getGrafeasClient();
    int i = 0;
    for (Occurrence o : client.listOccurrences(projectName, filterStr).iterateAll()) {
      // Write custom code to process each Occurrence here
      System.out.println(o.getName());
      i = i + 1;
    }
    return i;
  }
}

Go

Artifact Analysis のクライアント ライブラリをインストールして使用する方法については、Artifact Analysis クライアント ライブラリをご覧ください。詳細については、Artifact Analysis Go API リファレンス ドキュメントをご覧ください。

Artifact Analysis に対する認証を行うには、アプリケーションのデフォルト認証情報を設定します。詳細については、ローカル開発環境の認証の設定をご覧ください。


import (
	"context"
	"fmt"
	"io"

	containeranalysis "cloud.google.com/go/containeranalysis/apiv1"
	"google.golang.org/api/iterator"
	grafeaspb "google.golang.org/genproto/googleapis/grafeas/v1"
)

// getOccurrencesForImage retrieves all the Occurrences associated with a specified image.
// Here, all Occurrences are simply printed and counted.
func getOccurrencesForImage(w io.Writer, resourceURL, projectID string) (int, error) {
	// Use this style of URL when you use Google Container Registry.
	// resourceURL := "https://gcr.io/my-project/my-repo/my-image"
	// Use this style of URL when you use Google Artifact Registry.
	// resourceURL := "https://LOCATION-docker.pkg.dev/my-project/my-repo/my-image"
	ctx := context.Background()
	client, err := containeranalysis.NewClient(ctx)
	if err != nil {
		return -1, fmt.Errorf("NewClient: %w", err)
	}
	defer client.Close()

	req := &grafeaspb.ListOccurrencesRequest{
		Parent: fmt.Sprintf("projects/%s", projectID),
		Filter: fmt.Sprintf("resourceUrl=%q", resourceURL),
	}
	it := client.GetGrafeasClient().ListOccurrences(ctx, req)
	count := 0
	for {
		occ, err := it.Next()
		if err == iterator.Done {
			break
		}
		if err != nil {
			return -1, fmt.Errorf("occurrence iteration error: %w", err)
		}
		// Write custom code to process each Occurrence here.
		fmt.Fprintln(w, occ)
		count = count + 1
	}
	return count, nil
}

Node.js

Artifact Analysis のクライアント ライブラリをインストールして使用する方法については、Artifact Analysis クライアント ライブラリをご覧ください。詳細については、Artifact Analysis Node.js API リファレンス ドキュメントをご覧ください。

Artifact Analysis に対する認証を行うには、アプリケーションのデフォルト認証情報を設定します。詳細については、ローカル開発環境の認証の設定をご覧ください。

/**
 * TODO(developer): Uncomment these variables before running the sample
 */
// const projectId = 'your-project-id', // Your GCP Project ID
// If you are using Google Container Registry
// const imageUrl = 'https://gcr.io/my-project/my-repo/my-image@sha256:123' // Image to attach metadata to
// If you are using Google Artifact Registry
// const imageUrl = 'https://LOCATION-docker.pkg.dev/my-project/my-repo/my-image@sha256:123' // Image to attach metadata to

// Import the library and create a client
const {ContainerAnalysisClient} = require('@google-cloud/containeranalysis');
const client = new ContainerAnalysisClient();

const formattedParent = client.getGrafeasClient().projectPath(projectId);

// Retrieves all the Occurrences associated with a specified image
const [occurrences] = await client.getGrafeasClient().listOccurrences({
  parent: formattedParent,
  filter: `resourceUrl = "${imageUrl}"`,
});

if (occurrences.length) {
  console.log(`Occurrences for ${imageUrl}`);
  occurrences.forEach(occurrence => {
    console.log(`${occurrence.name}:`);
  });
} else {
  console.log('No occurrences found.');
}

Ruby

Artifact Analysis のクライアント ライブラリをインストールして使用する方法については、Artifact Analysis クライアント ライブラリをご覧ください。詳細については、Artifact Analysis Ruby API リファレンス ドキュメントをご覧ください。

Artifact Analysis に対する認証を行うには、アプリケーションのデフォルト認証情報を設定します。詳細については、ローカル開発環境の認証の設定をご覧ください。

# resource_url = "The URL of the resource associated with the occurrence."
#                # e.g. https://gcr.io/project/image@sha256:123"
# project_id   = "The Google Cloud project ID of the occurrences to retrieve"

require "google/cloud/container_analysis"

# Initialize the client
client = Google::Cloud::ContainerAnalysis.container_analysis.grafeas_client

parent = client.project_path project: project_id
filter = "resourceUrl = \"#{resource_url}\""
count = 0
client.list_occurrences(parent: parent, filter: filter).each do |occurrence|
  # Process occurrence here
  puts occurrence
  count += 1
end
puts "Found #{count} occurrences"

Python

Artifact Analysis のクライアント ライブラリをインストールして使用する方法については、Artifact Analysis クライアント ライブラリをご覧ください。詳細については、Artifact Analysis Python API リファレンス ドキュメントをご覧ください。

Artifact Analysis に対する認証を行うには、アプリケーションのデフォルト認証情報を設定します。詳細については、ローカル開発環境の認証の設定をご覧ください。

from google.cloud.devtools import containeranalysis_v1


def get_occurrences_for_image(resource_url: str, project_id: str) -> int:
    """Retrieves all the occurrences associated with a specified image.
    Here, all occurrences are simply printed and counted."""
    # resource_url = 'https://gcr.io/my-project/my-image@sha256:123'
    # project_id = 'my-gcp-project'

    filter_str = f'resourceUrl="{resource_url}"'
    client = containeranalysis_v1.ContainerAnalysisClient()
    grafeas_client = client.get_grafeas_client()
    project_name = f"projects/{project_id}"

    response = grafeas_client.list_occurrences(parent=project_name, filter=filter_str)
    count = 0
    for o in response:
        # do something with the retrieved occurrence
        # in this sample, we will simply count each one
        count += 1
    return count

Cloud Build で検出結果を表示する

Cloud Build を使用している場合は、 Google Cloud コンソールの [セキュリティ分析情報] サイドパネルでイメージの脆弱性を確認することもできます。

[セキュリティ分析情報] サイドパネルには、Artifact Registry に保存されているアーティファクトのビルド セキュリティ情報の概要が表示されます。サイドパネルの詳細と、Cloud Build を使用してソフトウェア サプライ チェーンを保護する方法については、ビルドのセキュリティ分析情報を表示するをご覧ください。

オカレンスをフィルタする

gcloud コマンドや Artifact Analysis API のフィルタ文字列を使用して、表示する前にオカレンスを絞り込むことができます。以降では、サポートされている検索フィルタについて説明します。

検出オカレンスを表示する

イメージが Artifact Registry に最初に push されるときに、Artifact Registry はコンテナ イメージの初期スキャンに関する情報を含む検出オカレンスを作成します。

イメージの検出オカレンスを取得するには、次のフィルタ式を使用します。

kind="DISCOVERY" AND resourceUrl="RESOURCE_URL"

ここで、RESOURCE_URL の形式は次のとおりです。

LOCATION-docker.pkg.dev/PROJECT_ID/REPOSITORY/IMAGE_ID

gcloud

イメージの検出オカレンスを表示する:

この場合、コマンドで式を直接使用しませんが、同じ情報が引数として渡されます。

Artifact Registry:

gcloud artifacts docker images list --show-occurrences \
--occurrence-filter='kind="DISCOVERY"' --format=json \
LOCATION-docker.pkg.dev/PROJECT_ID/REPOSITORY/IMAGE_ID

API

検出オカレンスを取得するには、次のようにフィルタ式を URL エンコード型にして、GET リクエストに埋め込む必要があります。

GET https://containeranalysis.googleapis.com/v1/projects/PROJECT_ID/occurrences?filter=kind%3D%22DISCOVERY%22%20AND%20resourceUrl%3D%22ENCODED_RESOURCE_URL%22

詳細については、projects.occurrences.get API エンドポイントをご覧ください。

Java

Artifact Analysis のクライアント ライブラリをインストールして使用する方法については、Artifact Analysis クライアント ライブラリをご覧ください。詳細については、Artifact Analysis Java API リファレンス ドキュメントをご覧ください。

Artifact Analysis に対する認証を行うには、アプリケーションのデフォルト認証情報を設定します。詳細については、ローカル開発環境の認証の設定をご覧ください。

import com.google.cloud.devtools.containeranalysis.v1.ContainerAnalysisClient;
import io.grafeas.v1.GrafeasClient;
import io.grafeas.v1.Occurrence;
import io.grafeas.v1.ProjectName;
import java.io.IOException;
import java.lang.InterruptedException;

public class GetDiscoveryInfo {
  // Retrieves and prints the Discovery Occurrence created for a specified image
  // The Discovery Occurrence contains information about the initial scan on the image
  public static void getDiscoveryInfo(String resourceUrl, String projectId) 
      throws IOException, InterruptedException {
    // String resourceUrl = "https://gcr.io/project/image@sha256:123";
    // String projectId = "my-project-id";
    String filterStr = "kind=\"DISCOVERY\" AND resourceUrl=\"" + resourceUrl + "\"";
    final String projectName = ProjectName.format(projectId);

    // Initialize client that will be used to send requests. After completing all of your requests, 
    // call the "close" method on the client to safely clean up any remaining background resources.
    GrafeasClient client = ContainerAnalysisClient.create().getGrafeasClient();
    for (Occurrence o : client.listOccurrences(projectName, filterStr).iterateAll()) {
      System.out.println(o);
    }
  }
}

Go

Artifact Analysis のクライアント ライブラリをインストールして使用する方法については、Artifact Analysis クライアント ライブラリをご覧ください。詳細については、Artifact Analysis Go API リファレンス ドキュメントをご覧ください。

Artifact Analysis に対する認証を行うには、アプリケーションのデフォルト認証情報を設定します。詳細については、ローカル開発環境の認証の設定をご覧ください。


import (
	"context"
	"fmt"
	"io"

	containeranalysis "cloud.google.com/go/containeranalysis/apiv1"
	"google.golang.org/api/iterator"
	grafeaspb "google.golang.org/genproto/googleapis/grafeas/v1"
)

// getDiscoveryInfo retrieves and prints the Discovery Occurrence created for a specified image.
// The Discovery Occurrence contains information about the initial scan on the image.
func getDiscoveryInfo(w io.Writer, resourceURL, projectID string) error {
	// Use this style of URL when you use Google Container Registry.
	// resourceURL := "https://gcr.io/my-project/my-repo/my-image"
	// Use this style of URL when you use Google Artifact Registry.
	// resourceURL := "https://LOCATION-docker.pkg.dev/my-project/my-repo/my-image"
	ctx := context.Background()
	client, err := containeranalysis.NewClient(ctx)
	if err != nil {
		return fmt.Errorf("NewClient: %w", err)
	}
	defer client.Close()

	req := &grafeaspb.ListOccurrencesRequest{
		Parent: fmt.Sprintf("projects/%s", projectID),
		Filter: fmt.Sprintf(`kind="DISCOVERY" AND resourceUrl=%q`, resourceURL),
	}
	it := client.GetGrafeasClient().ListOccurrences(ctx, req)
	for {
		occ, err := it.Next()
		if err == iterator.Done {
			break
		}
		if err != nil {
			return fmt.Errorf("occurrence iteration error: %w", err)
		}
		fmt.Fprintln(w, occ)
	}
	return nil
}

Node.js

Artifact Analysis のクライアント ライブラリをインストールして使用する方法については、Artifact Analysis クライアント ライブラリをご覧ください。詳細については、Artifact Analysis Node.js API リファレンス ドキュメントをご覧ください。

Artifact Analysis に対する認証を行うには、アプリケーションのデフォルト認証情報を設定します。詳細については、ローカル開発環境の認証の設定をご覧ください。

/**
 * TODO(developer): Uncomment these variables before running the sample
 */
// const projectId = 'your-project-id', // Your GCP Project ID
// If you are using Google Container Registry
// const imageUrl = 'https://gcr.io/my-project/my-repo/my-image:123' // Image to attach metadata to
// If you are using Google Artifact Registry
// const imageUrl = 'https://LOCATION-docker.pkg.dev/my-project/my-repo/my-image:123' // Image to attach metadata to

// Import the library and create a client
const {ContainerAnalysisClient} = require('@google-cloud/containeranalysis');
const client = new ContainerAnalysisClient();

const formattedParent = client.getGrafeasClient().projectPath(projectId);
// Retrieves and prints the Discovery Occurrence created for a specified image
// The Discovery Occurrence contains information about the initial scan on the image
const [occurrences] = await client.getGrafeasClient().listOccurrences({
  parent: formattedParent,
  filter: `kind = "DISCOVERY" AND resourceUrl = "${imageUrl}"`,
});

if (occurrences.length > 0) {
  console.log(`Discovery Occurrences for ${imageUrl}`);
  occurrences.forEach(occurrence => {
    console.log(`${occurrence.name}:`);
  });
} else {
  console.log('No occurrences found.');
}

Ruby

Artifact Analysis のクライアント ライブラリをインストールして使用する方法については、Artifact Analysis クライアント ライブラリをご覧ください。詳細については、Artifact Analysis Ruby API リファレンス ドキュメントをご覧ください。

Artifact Analysis に対する認証を行うには、アプリケーションのデフォルト認証情報を設定します。詳細については、ローカル開発環境の認証の設定をご覧ください。

# resource_url = "The URL of the resource associated with the occurrence."
#                # e.g. https://gcr.io/project/image@sha256:123
# project_id   = "The Google Cloud project ID of the occurrences to retrieve"

require "google/cloud/container_analysis"

# Initialize the client
client = Google::Cloud::ContainerAnalysis.container_analysis.grafeas_client

parent = client.project_path project: project_id
filter = "kind = \"DISCOVERY\" AND resourceUrl = \"#{resource_url}\""
client.list_occurrences(parent: parent, filter: filter).each do |occurrence|
  # Process discovery occurrence here
  puts occurrence
end

Python

Artifact Analysis のクライアント ライブラリをインストールして使用する方法については、Artifact Analysis クライアント ライブラリをご覧ください。詳細については、Artifact Analysis Python API リファレンス ドキュメントをご覧ください。

Artifact Analysis に対する認証を行うには、アプリケーションのデフォルト認証情報を設定します。詳細については、ローカル開発環境の認証の設定をご覧ください。

from google.cloud.devtools import containeranalysis_v1


def get_discovery_info(resource_url: str, project_id: str) -> None:
    """Retrieves and prints the discovery occurrence created for a specified
    image. The discovery occurrence contains information about the initial
    scan on the image."""
    # resource_url = 'https://gcr.io/my-project/my-image@sha256:123'
    # project_id = 'my-gcp-project'

    filter_str = f'kind="DISCOVERY" AND resourceUrl="{resource_url}"'
    client = containeranalysis_v1.ContainerAnalysisClient()
    grafeas_client = client.get_grafeas_client()
    project_name = f"projects/{project_id}"
    response = grafeas_client.list_occurrences(parent=project_name, filter_=filter_str)
    for occ in response:
        print(occ)

脆弱性オカレンスを表示する

特定のイメージの脆弱性オカレンスを表示するには、次のフィルタ式を使用してクエリを作成します。

kind="VULNERABILITY" AND resourceUrl="RESOURCE_URL"

ここで、RESOURCE_URL の形式は次のとおりです。

LOCATION-docker.pkg.dev/PROJECT_ID/REPOSITORY/IMAGE_ID

gcloud

この場合、コマンドで式を直接使用しませんが、同じ情報が引数として渡されます。

Artifact Registry

gcloud artifacts docker images list --show-occurrences \
--occurrence-filter='kind="VULNERABILITY"' --format=json \
LOCATION-docker.pkg.dev/PROJECT_ID/REPOSITORY/IMAGE_ID

API

次のように、リソース URL を URL エンコード型にして、GET リクエストに埋め込む必要があります。

GET https://containeranalysis.googleapis.com/v1/projects/PROJECT_ID/occurrences?filter=kind%3D%22VULNERABILITY%22%20AND%20resourceUrl%3D%22ENCODED_RESOURCE_URL%22

詳細については、projects.occurrences.get API エンドポイントをご覧ください。

Java

Artifact Analysis のクライアント ライブラリをインストールして使用する方法については、Artifact Analysis クライアント ライブラリをご覧ください。詳細については、Artifact Analysis Java API リファレンス ドキュメントをご覧ください。

Artifact Analysis に対する認証を行うには、アプリケーションのデフォルト認証情報を設定します。詳細については、ローカル開発環境の認証の設定をご覧ください。

import com.google.cloud.devtools.containeranalysis.v1.ContainerAnalysisClient;
import io.grafeas.v1.GrafeasClient;
import io.grafeas.v1.Occurrence;
import io.grafeas.v1.ProjectName;
import java.io.IOException;
import java.util.LinkedList;
import java.util.List;

public class VulnerabilityOccurrencesForImage {
  // Retrieve a list of vulnerability occurrences assoviated with a resource
  public static List<Occurrence> findVulnerabilityOccurrencesForImage(String resourceUrl, 
      String projectId) throws IOException {
    // String resourceUrl = "https://gcr.io/project/image@sha256:123";
    // String projectId = "my-project-id";
    final String projectName = ProjectName.format(projectId);
    String filterStr = String.format("kind=\"VULNERABILITY\" AND resourceUrl=\"%s\"", resourceUrl);

    // Initialize client that will be used to send requests. After completing all of your requests, 
    // call the "close" method on the client to safely clean up any remaining background resources.
    GrafeasClient client = ContainerAnalysisClient.create().getGrafeasClient();
    LinkedList<Occurrence> vulnerabilitylist = new LinkedList<Occurrence>();
    for (Occurrence o : client.listOccurrences(projectName, filterStr).iterateAll()) {
      vulnerabilitylist.add(o);
    }
    return vulnerabilitylist;
  }
}

Go

Artifact Analysis のクライアント ライブラリをインストールして使用する方法については、Artifact Analysis クライアント ライブラリをご覧ください。詳細については、Artifact Analysis Go API リファレンス ドキュメントをご覧ください。

Artifact Analysis に対する認証を行うには、アプリケーションのデフォルト認証情報を設定します。詳細については、ローカル開発環境の認証の設定をご覧ください。


import (
	"context"
	"fmt"

	containeranalysis "cloud.google.com/go/containeranalysis/apiv1"
	"google.golang.org/api/iterator"
	grafeaspb "google.golang.org/genproto/googleapis/grafeas/v1"
)

// findVulnerabilityOccurrencesForImage retrieves all vulnerability Occurrences associated with a resource.
func findVulnerabilityOccurrencesForImage(resourceURL, projectID string) ([]*grafeaspb.Occurrence, error) {
	// Use this style of URL when you use Google Container Registry.
	// resourceURL := "https://gcr.io/my-project/my-repo/my-image"
	// Use this style of URL when you use Google Artifact Registry.
	// resourceURL := "https://LOCATION-docker.pkg.dev/my-project/my-repo/my-image"
	ctx := context.Background()
	client, err := containeranalysis.NewClient(ctx)
	if err != nil {
		return nil, fmt.Errorf("NewClient: %w", err)
	}
	defer client.Close()

	req := &grafeaspb.ListOccurrencesRequest{
		Parent: fmt.Sprintf("projects/%s", projectID),
		Filter: fmt.Sprintf("resourceUrl = %q kind = %q", resourceURL, "VULNERABILITY"),
	}

	var occurrenceList []*grafeaspb.Occurrence
	it := client.GetGrafeasClient().ListOccurrences(ctx, req)
	for {
		occ, err := it.Next()
		if err == iterator.Done {
			break
		}
		if err != nil {
			return nil, fmt.Errorf("occurrence iteration error: %w", err)
		}
		occurrenceList = append(occurrenceList, occ)
	}

	return occurrenceList, nil
}

Node.js

Artifact Analysis のクライアント ライブラリをインストールして使用する方法については、Artifact Analysis クライアント ライブラリをご覧ください。詳細については、Artifact Analysis Node.js API リファレンス ドキュメントをご覧ください。

Artifact Analysis に対する認証を行うには、アプリケーションのデフォルト認証情報を設定します。詳細については、ローカル開発環境の認証の設定をご覧ください。

/**
 * TODO(developer): Uncomment these variables before running the sample
 */
// const projectId = 'your-project-id', // Your GCP Project ID
// If you are using Google Container Registry
// const imageUrl = 'https://gcr.io/my-project/my-repo/my-image:123' // Image to attach metadata to
// If you are using Google Artifact Registry
// const imageUrl = 'https://LOCATION-docker.pkg.dev/my-project/my-repo/my-image:123' // Image to attach metadata to

// Import the library and create a client
const {ContainerAnalysisClient} = require('@google-cloud/containeranalysis');
const client = new ContainerAnalysisClient();

const formattedParent = client.getGrafeasClient().projectPath(projectId);

// Retrieve a list of vulnerability occurrences assoviated with a resource
const [occurrences] = await client.getGrafeasClient().listOccurrences({
  parent: formattedParent,
  filter: `kind = "VULNERABILITY" AND resourceUrl = "${imageUrl}"`,
});

if (occurrences.length) {
  console.log(`All Vulnerabilities for ${imageUrl}`);
  occurrences.forEach(occurrence => {
    console.log(`${occurrence.name}:`);
  });
} else {
  console.log('No occurrences found.');
}

Ruby

Artifact Analysis のクライアント ライブラリをインストールして使用する方法については、Artifact Analysis クライアント ライブラリをご覧ください。詳細については、Artifact Analysis Ruby API リファレンス ドキュメントをご覧ください。

Artifact Analysis に対する認証を行うには、アプリケーションのデフォルト認証情報を設定します。詳細については、ローカル開発環境の認証の設定をご覧ください。

# resource_url = "The URL of the resource associated with the occurrence
#                e.g. https://gcr.io/project/image@sha256:123"
# project_id   = "The Google Cloud project ID of the vulnerabilities to find"

require "google/cloud/container_analysis"

# Initialize the client
client = Google::Cloud::ContainerAnalysis.container_analysis.grafeas_client

parent = client.project_path project: project_id
filter = "resourceUrl = \"#{resource_url}\" AND kind = \"VULNERABILITY\""
client.list_occurrences parent: parent, filter: filter

Python

Artifact Analysis のクライアント ライブラリをインストールして使用する方法については、Artifact Analysis クライアント ライブラリをご覧ください。詳細については、Artifact Analysis Python API リファレンス ドキュメントをご覧ください。

Artifact Analysis に対する認証を行うには、アプリケーションのデフォルト認証情報を設定します。詳細については、ローカル開発環境の認証の設定をご覧ください。

from typing import List

from google.cloud.devtools import containeranalysis_v1
from grafeas.grafeas_v1 import types


def find_vulnerabilities_for_image(
    resource_url: str, project_id: str
) -> List[types.grafeas.Occurrence]:
    """ "Retrieves all vulnerability occurrences associated with a resource."""
    # resource_url = 'https://gcr.io/my-project/my-image@sha256:123'
    # project_id = 'my-gcp-project'

    client = containeranalysis_v1.ContainerAnalysisClient()
    grafeas_client = client.get_grafeas_client()
    project_name = f"projects/{project_id}"

    filter_str = 'kind="VULNERABILITY" AND resourceUrl="{}"'.format(resource_url)
    return list(grafeas_client.list_occurrences(parent=project_name, filter=filter_str))

特定の種類のオカレンスを表示する

前の 2 つの例では、フィルタ式の違いは kind の値だけですが、これによりオカレンスの種類を識別します。このフィールドを使用して、オカレンスのリストを特定の種類(脆弱性やデプロイメントなど)に限定します。

特定のイメージのオカレンスを取得するには、このフィルタ式を使用します。

kind="NOTE_KIND" AND resourceUrl="RESOURCE_URL"

ここで

  • NOTE_KIND はメモの種類です。
    • たとえば、検出オカレンスを表示するには、DISCOVERY を使用します。検出オカレンスは、イメージが最初に Artifact Registry に push されたときに作成されます。
    • 脆弱性オカレンスを表示するには、VULNERABILITY を使用します。
  • RESOURCE_URL は、イメージ https://HOSTNAME/PROJECT_ID/IMAGE_ID@sha256:HASH の完全な URL です。

複数のイメージを対象に特定の種類のオカレンスを取得するには、次のフィルタ式を使用します。

kind="NOTE_KIND" AND has_prefix(resourceUrl, "RESOURCE_URL_PREFIX")

ここで

  • RESOURCE_URL_PREFIX は、イメージの URL 接頭辞です。
    • 1 つのイメージのすべてのバージョンを表示する場合: https://HOSTNAME/PROJECT_ID/IMAGE_ID@
    • プロジェクト内のすべてのイメージを表示する場合: https://HOSTNAME/PROJECT_ID/

特定のメモに関連付けられている画像を表示する

特定のメモ ID に関連付けられているリソースのリストを取得できます。たとえば、特定の CVE の脆弱性を含むイメージを一覧表示できます。

プロジェクト内で特定のメモに関連付けられているすべてのイメージを一覧表示するには、次のフィルタ式を使用します。

noteProjectId="PROVIDER_PROJECT_ID" AND noteId="NOTE_ID"

特定のイメージのメモを確認するには、次のフィルタ式を使用します。

resourceUrl="RESOURCE_URL" AND noteProjectId="PROVIDER_PROJECT_ID" \
    AND noteId="NOTE_ID"

ここで

  • PROVIDER_PROJECT_ID は、プロバイダ プロジェクトの ID です。たとえば、goog-vulnz はデフォルトの脆弱性分析を提供します。
  • NOTE_ID はメモの ID です。多くの場合、セキュリティ関連のメモは CVE-2019-12345 という形式になります。
  • RESOURCE_URL は、イメージ https://HOSTNAME/PROJECT_ID/IMAGE_ID@sha256:HASH の完全な URL です。

たとえば、Google による分析で CVE-2017-16231 のオカレンスがあるすべてのイメージを確認するには、次のフィルタ式を使用します。

noteProjectId="goog-vulnz" AND noteId="CVE-2017-16231"

次のステップ