Before you run a Neural Architecture Search job to search for an optimal model, define your proxy task. Stage1-search uses a much smaller representation of a complete model training which typically finishes within two hours. This representation is called a proxy task and it reduces the search cost significantly. Each trial during the search trains a model using the proxy-task settings.
The following sections describe what is involved in applying proxy task design:
- Approaches to creating a proxy task.
- Requirements of a good proxy task.
- How to use the three proxy task design tools to find the optimal proxy task, which lowers search-cost and while maintaining the quality of the search.
Approaches to creating a proxy task
There are three common approaches to creating a proxy task, which include the following:
- Use fewer training steps.
- Use a sub-sampled training dataset.
- Use a scaled-down model.
Use fewer training steps
The simplest way of creating a proxy task is to reduce the number of training steps for your trainer, and report a score back to the controller based on this partial training.
Use a subsampled training dataset
This section describes the use of a subsampled training dataset for both an architecture search and an augmentation policy search.
Architecture search
A proxy-task can be created by using a subsampled training dataset during the architecture search. However, when subsampling follow these guidelines:
- Shuffle the data randomly between shards.
- If the training data is unbalanced, then subsample to balance it.
Augmentation policy search using auto-augment
Skip this section if you are not running an augmentation only search and are only running the regular architecture search. Use auto-augment to search for augmentation policy. It is desirable to subsample the training data and run a full training than to reduce the number of training steps. Running full training with heavy augmentation keeps the scores more stable. Also, use the reduced training data to keep the search cost lower.
Proxy task based on scaled-down model
You can also scale down the model relative to the baseline model to create a proxy task. This can also be useful when you want to separate block-design-search from scaling-search.
However, when you scale down the model and want to use a latency constraint, use a tighter latency constraint for the scaled-down model. Hint: You can scale down the baseline model and measure its latency to set this tighter latency constraint.
For the scaled-down model, you can also reduce the amount of augmentation and regularization compared to the original baseline model.
Examples of a scaled-down model
For computer-vision tasks where you train on images, there are three common ways to scale down a model:
- Reducing model-width: A number of channels.
- Reducing model-depth: A number of layers and block repeats.
- Reducing training image size slightly (so that it doesn't eliminate features) or cropping training images if allowed by your task.
Suggested read: EfficientNet paper provides great insights about model scaling for computer vision tasks. It also explains how all three ways of scaling are related to each other.
Spinenet search is another example of model scaling used with Neural Architecture Search. For stage-1 search it scales down the number of channels and the image-size.
Proxy task based on a combination
The approaches work independently and can be combined together in different degrees to create a proxy task.
Requirements of a good proxy task
A proxy task must meet certain requirements before it can give a stable reward back to the controller and maintain the quality of the search.
Rank correlation between stage-1 search and stage-2 full-training
When using a proxy task for Neural Architecture Search, a key assumption for a successful search is that if model-A performs better than model-B during stage-1 proxy-task training, then the model-A performs better than model-B for the stage-2 full training. To validate this assumption, you must evaluate the rank correlation between the stage-1 search and stage-2 full training rewards on ~10-20 models in your search space. These models are called correlation-candidate-models.
The figure below shows an example of a poor correlation (correlation-score = -0.03), which makes this proxy task a bad candidate for a search:
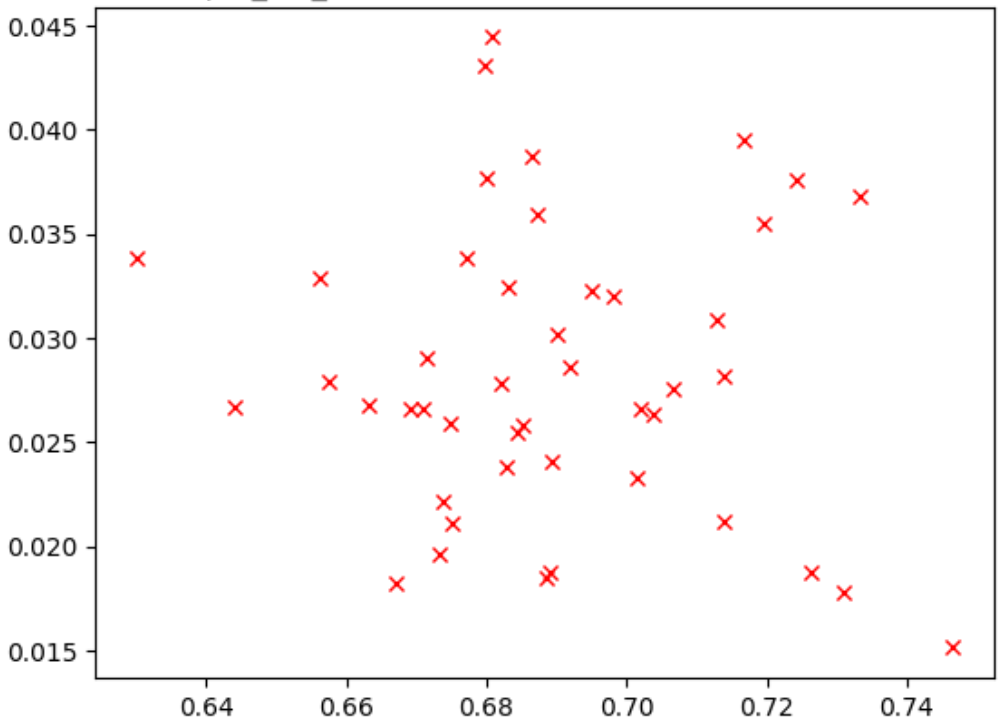
Each point in the plot represents a correlation-candidate model.
The x-axis represents the stage-2 full-training scores for the models
and y-axis represents the stage-1 proxy-task scores for the same models.
Observe the highest point. This model
gave the highest proxy-task score (y-axis) but performs poorly during
stage-2 full-training (x-axis) compared to other models. In contrast,
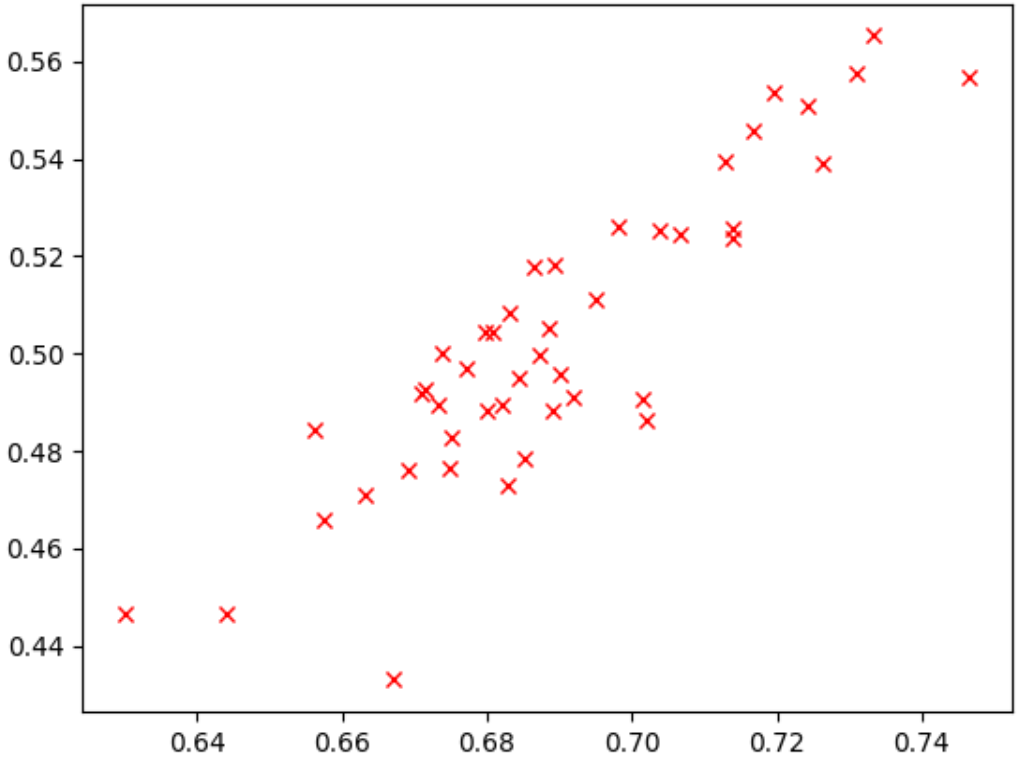
the figure below shows an example of a good correlation
(correlation-score = 0.67) which makes this
proxy task a good candidate for a search:
If your search involves a latency constraint, verify a good correlation for latency-values as well.
Note that the correlation-candidate-models' rewards have a good range and a decent sampling of the rewards range. If not, you can't evaluate the rank correlation. For example, if all the correlation-candidate models' stage-1 rewards are centered around just two values: 0.9 and 0.1, then this doesn't give enough sampling variation.
Variance check
Another requirement of a proxy task is that it shouldn't have a large variation in accuracy or its latency score when repeated multiple times for the same model without any changes. If this happens, then it gives a noisy signal back to the controller. A tool to measure this variance is provided.
Examples are provided to mitigate large variance
during training. One way is to use cosine decay as the learning-rate
schedule. The following plot compares three learning-rate strategies:
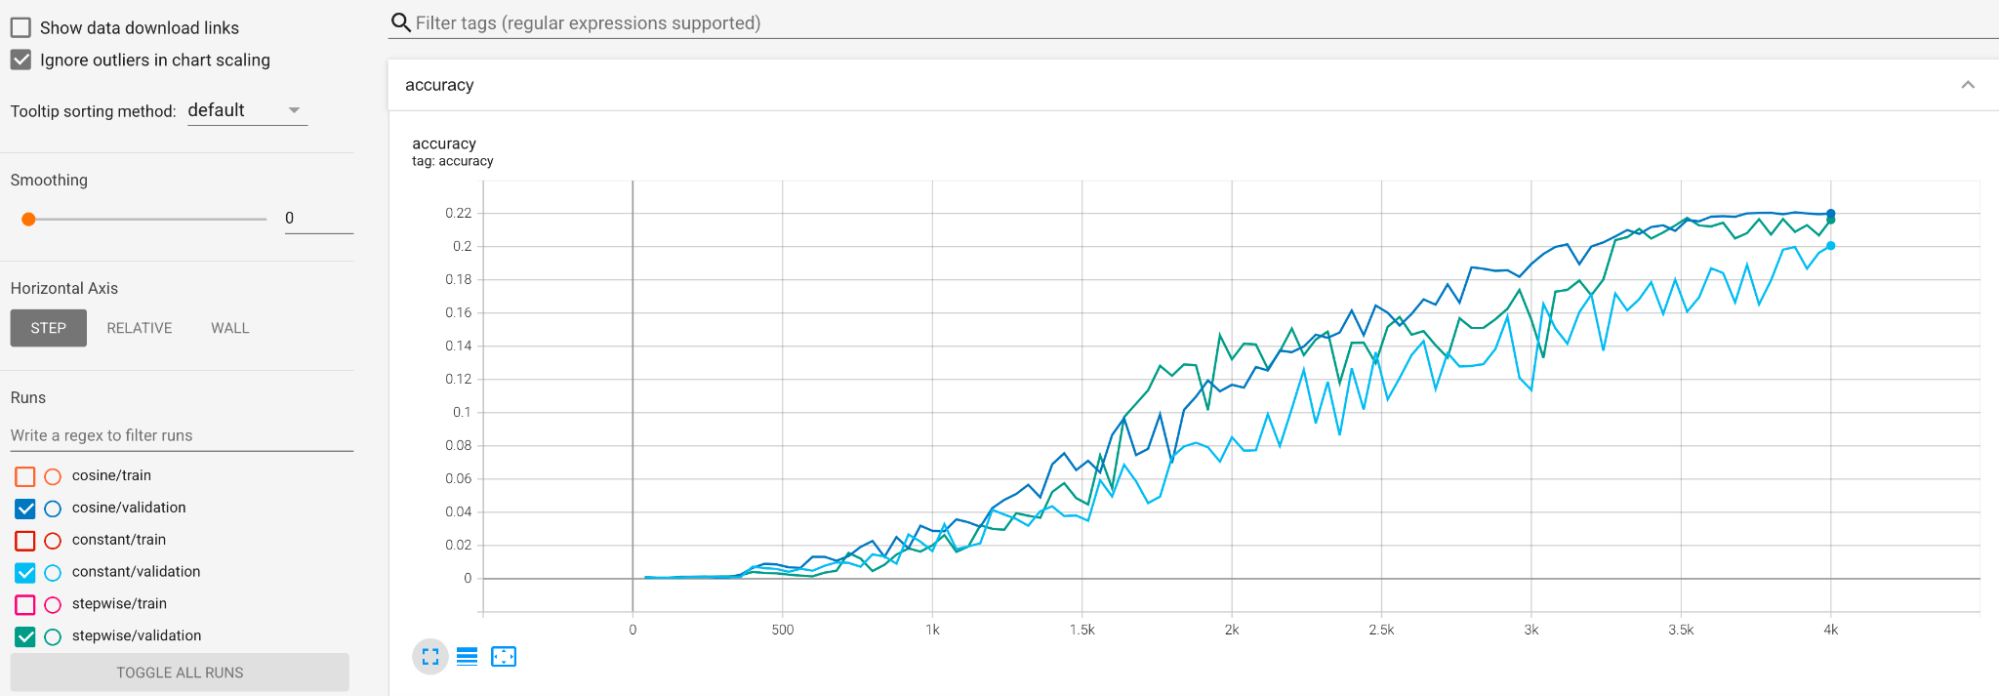
The lowest plot corresponds to a constant learning rate. When the score jumps around at the end of the training, then a small change in the choice of the reduced number of training steps can cause a big change in the final proxy-task reward. To make the proxy-task reward more stable, it is better to use a cosine-learning rate decay as shown by the corresponding validation scores in the highest plot. Note how the highest plot becomes smoother towards the end of the training. The middle plot shows the score corresponding to the stepwise learning-rate decay. It is better than the constant rate but still not as smooth as the cosine decay and also requires manual tuning.
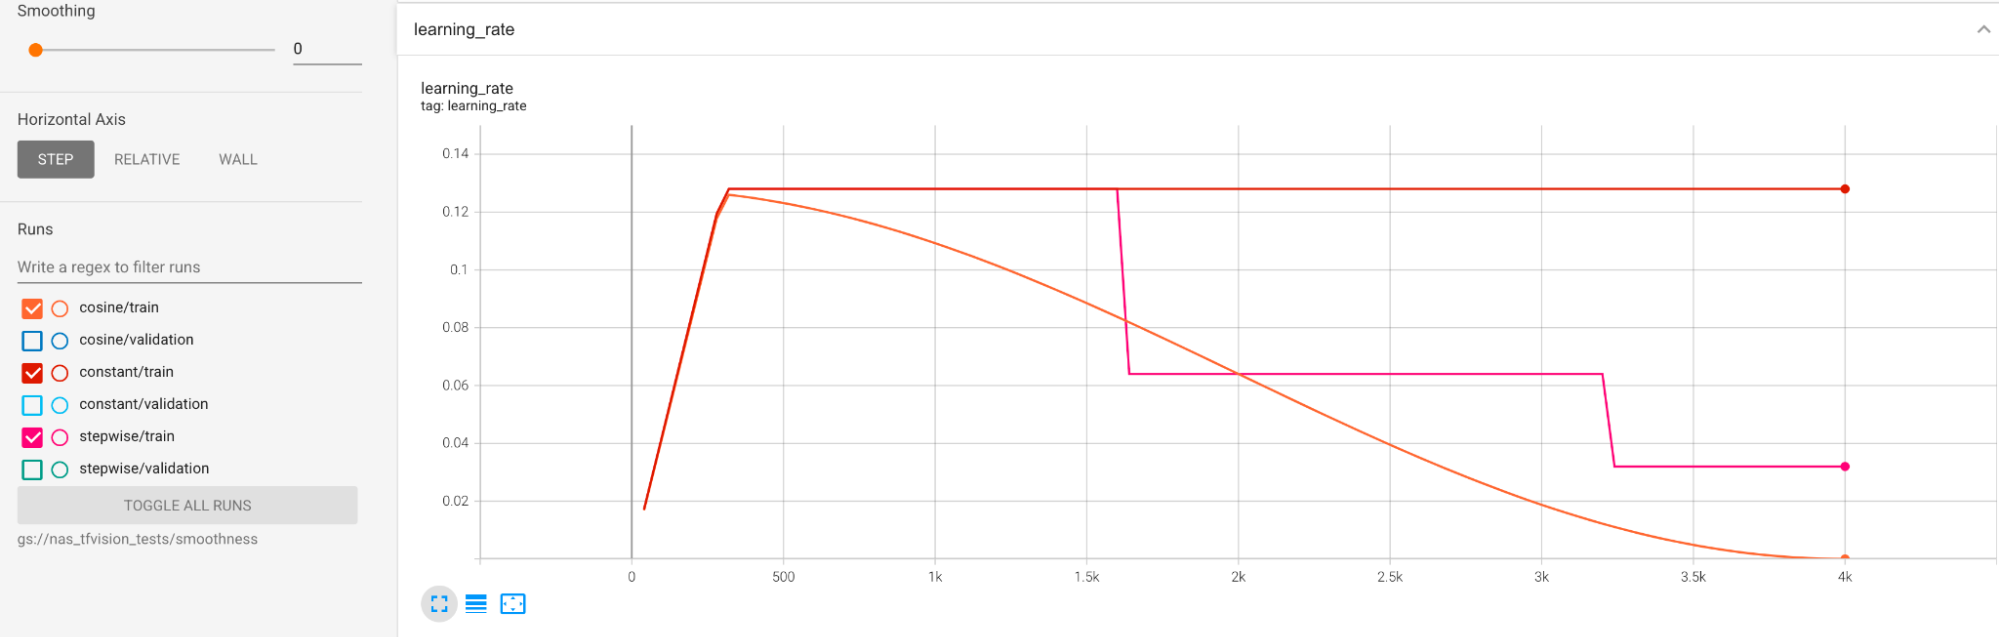
The learning rate schedules are shown below:
Additional smoothing
If you are using heavy augmentation, then your validation curve might not become smooth enough with the cosine decay. Use of heavy augmentation indicates lack of training data. In this case, use of Neural Architecture Search isn't recommended, and we suggest using augmentation-search instead.
If heavy augmentation isn't the cause and you have already tried cosine decay but you still want to achieve more smoothness, then use the exponential-moving-average for TensorFlow-2 or stochastic-weighted-averaging for PyTorch. Please refer to this code pointer for an example using exponential moving average optimizer with TensorFlow 2, and to this stochastic weighted averaging example for PyTorch.
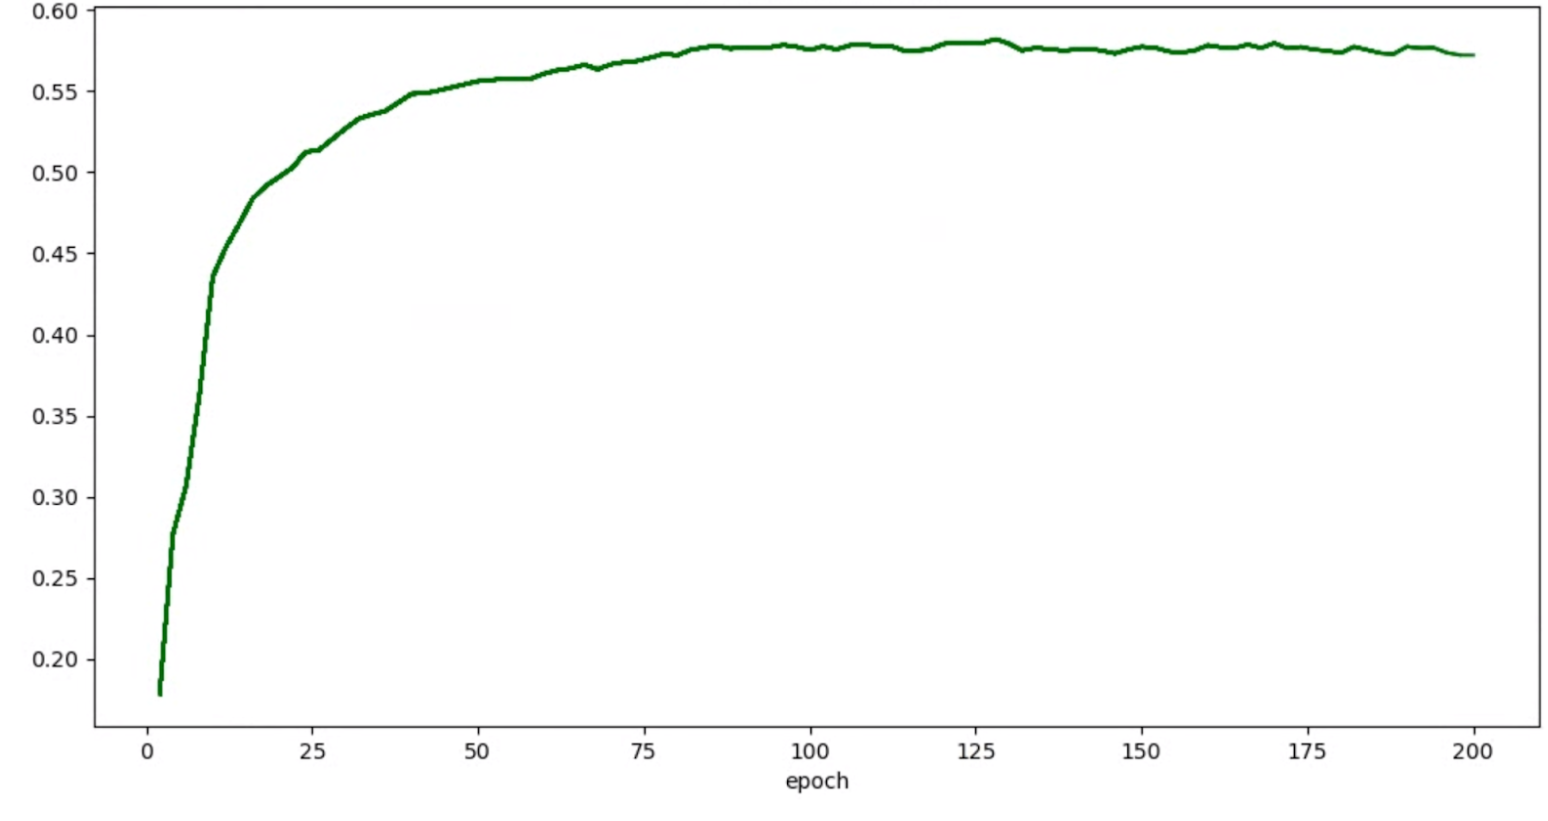
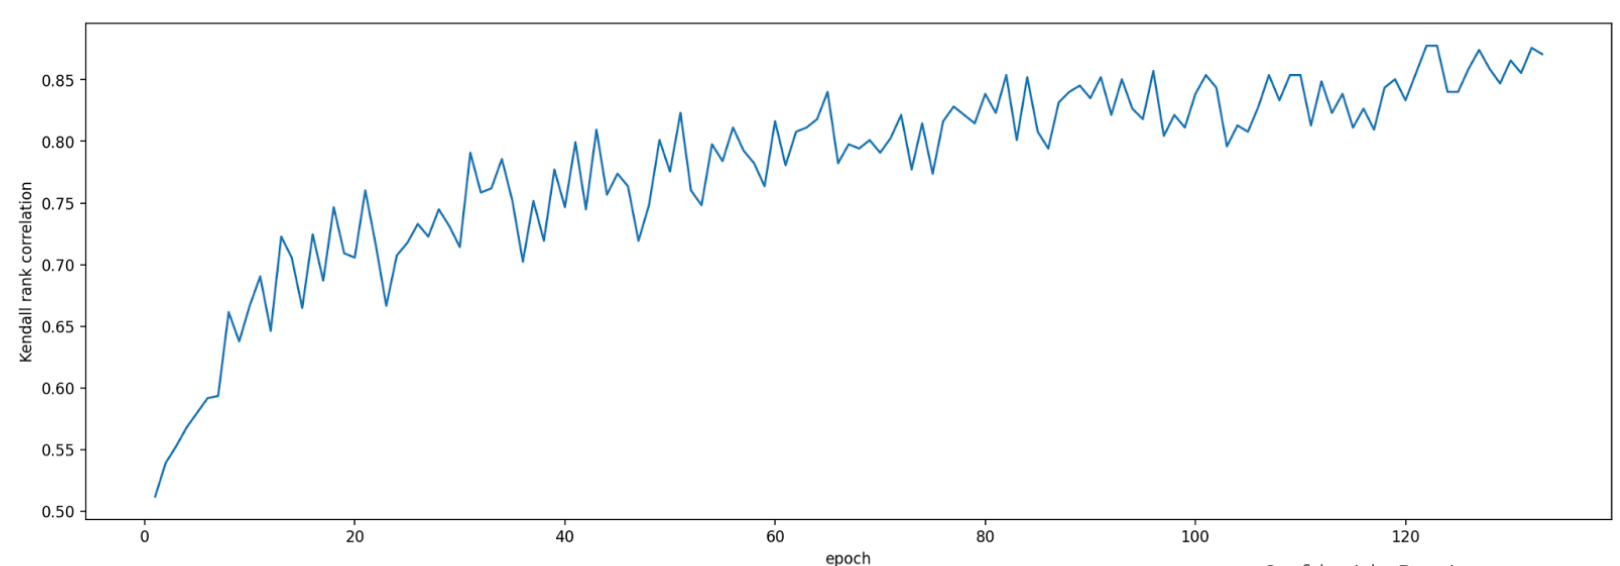
If your accuracy/epoch graphs for trials look like this:
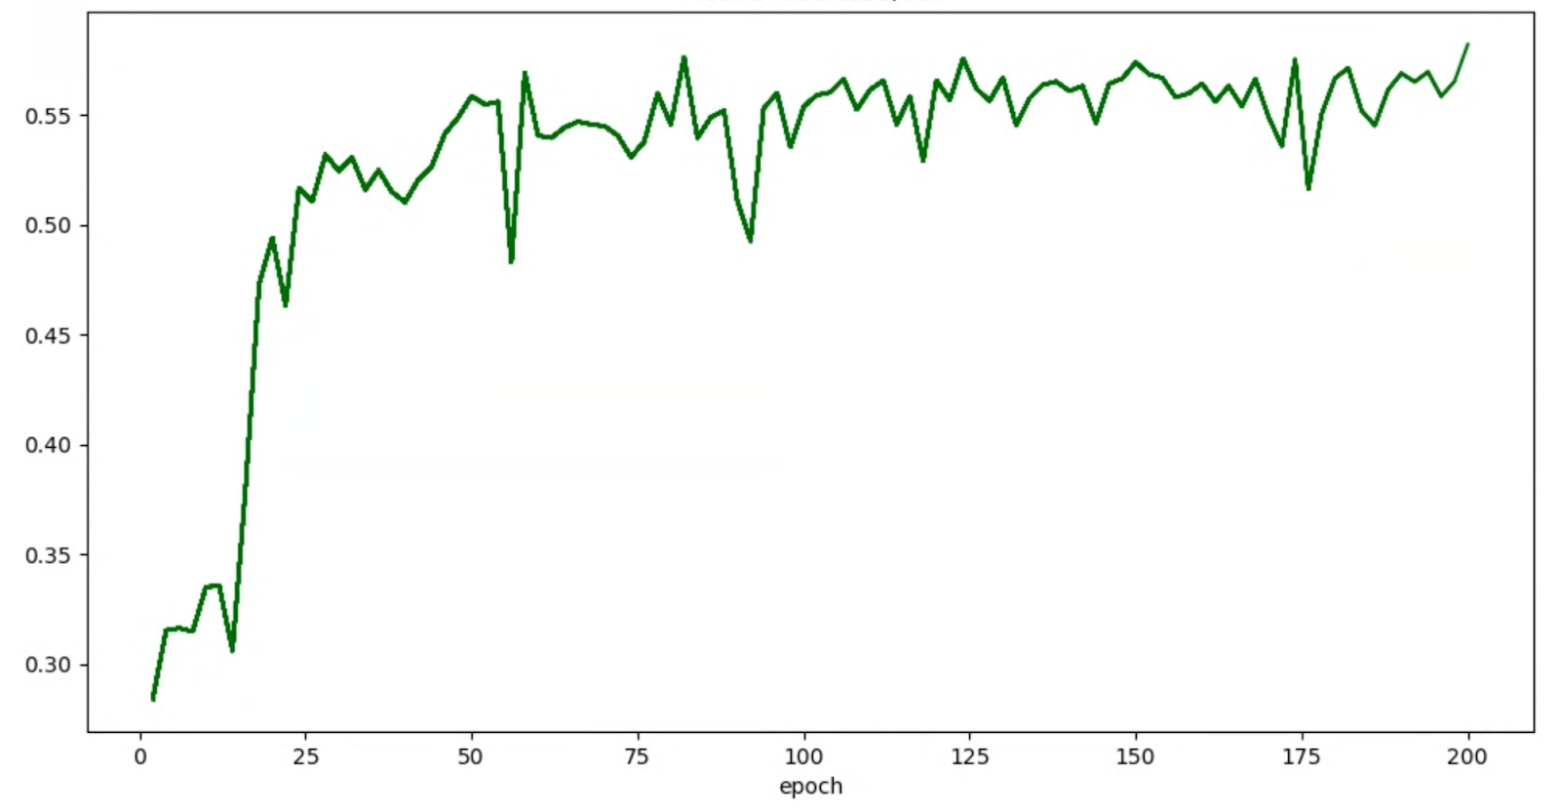
then you can apply smoothing techniques mentioned above (such as stochastic weighted averaging or using exponential moving average) to get a more consistent graph like:
Out-of-memory (OOM) and learning rate related errors
The architecture search space can generate models much larger than your baseline. You might have tuned the batch size for your baseline model, but this setting might fail when larger models get sampled during the search resulting in OOM errors. In this case, you need to reduce your batch size.
The other kind of error that shows up is a NaN (not-a-number) error. You should either reduce the initial learning rate or add gradient clipping.
As mentioned in tutorial-2, if more than 20% of your search-space models are returning invalid scores, then you don't run the full search. Our proxy-task design tools provide a way to assess the failure rate.
Proxy-task design tools
The preceding sections talk about the principles of proxy-task design. This section provides three proxy-task design tools to automatically find the optimal proxy task based on the different design-approaches and which meets all the requirements.
Required code changes
You need to first modify your trainer code slightly
so that it can interact with
the proxy-task design tools during an iterative process.
The tf_vision/train_lib.py
shows an example. You need to first
import our library:
from google.cloud.visionsolutions.nas.proxy_task import proxy_task_utils
Before a training cycle begins in your training loop, check if you need to stop training early, because the proxy-task design tool wants you to use our library:
if proxy_task_utils.get_stop_training(
    model_dir,
    end_training_cycle_step=<last-training-step-idx done so far>,
    total_training_steps=<total-training-steps>):
  break
After each training-cycle in the training-loop completes, update the new accuracy score, the training cycle begin-and-end step, training cycle time in seconds, and the total training steps.
proxy_task_utils.update_trial_training_accuracy_metric(
      model_dir=model_dir,
      accuracy=<latest accuracy value>,
      begin_training_cycle_step=<beginning training step for this cycle>,
      end_training_cycle_step=<end training step for this cycle>,
      training_cycle_time_in_secs=<training cycle time (excluding validation)>,
      total_training_steps=<total-training-steps>)
Note that the training-cycle time shouldn't include time for validation score evaluation. Make sure that your trainer computes validation scores frequently (evaluation-frequency) so that you have enough sampling of your validation curve. if you are using latency constraint, update the latency metric after you compute latency:
proxy_task_utils.update_trial_training_latency_metric(
          model_dir=model_dir,
          latency=<measured_latency>)
The model-selection tool requires
loading of previous checkpoint for successive iteration.
To enable reuse of a previous checkpoint, add a flag to your trainer
as shown in tf_vision/cloud_search_main.py:
parser.add_argument(
      "--retrain_use_search_job_checkpoint",
      type=cloud_nas_utils.str_2_bool,
      default=False,
      help="True to use previous NAS search job checkpoint."
  )
Load this checkpoint before you train your model:
if FLAGS.retrain_use_search_job_checkpoint:
    prev_checkpoint_dir = cloud_nas_utils.get_retrain_search_job_model_dir(
        retrain_search_job_trials=FLAGS.retrain_search_job_trials,
        retrain_search_job_dir=FLAGS.retrain_search_job_dir)
    logging.info("Setting checkpoint to %s.", prev_checkpoint_dir)
    # Now set your checkpoint using 'prev_checkpoint_dir'.
You also need the metric-id corresponding to accuracy and latency values
reported by your trainer. If your trainer reward
(which is sometimes a combination of accuracy and latency) is different
from the accuracy, then make sure that you also
report back accuracy-only metric using other_metrics from your trainer.
For example, the following example shows accuracy-only and latency metrics
reported by our prebuilt trainer:

Variance measurement
After you have modified your trainer code, the first step is to measure variance for your trainer. For the variance measurement, modify your baseline training config for the following:
- lower the training steps to run for only approximately one hour with just one or two GPUs. We need a small sample of full training.
- use cosine decay learning rate and set its steps to be same as these reduced steps so that the learning rate becomes almost zero towards the end.
The variance measurement tool samples one model from the search space, makes sure that this model can start training without giving OOM or NAN errors, runs five copies of this model with the your settings for approximately one hour, and then reports the training-score variance and smoothness. The total cost to run this tool is approximately same as running five models with the your settings for approximately one hour.
Launch the variance-measurement job by running the following command (you need a service account):
DATE="$(date '+%Y%m%d_%H%M%S')"
project_id=<your project-id>
# You can choose any unique docker id below.
trainer_docker_id=${USER}_trainer_${DATE}
trainer_docker_file=<path to your trainer dockerfile>
region=<your job region such as 'us-central1'>
search_space_module=<path to your search space module>
accelerator_type="NVIDIA_TESLA_V100"
num_gpus=2
# Your bucket should be for your project and in the same region as the job.
root_output_dir=<gs://your-bucket>

####### Variance measurement related parameters ######
proxy_task_variance_measurement_docker_id=${USER}_variance_measurement_${DATE}
# Use the service account that you set-up for your project.
service_account=<your service account>
job_name=<your job name>
############################################################

python3 vertex_nas_cli.py build \
--project_id=${project_id} \
--region=${region} \
--trainer_docker_id=${trainer_docker_id} \
--trainer_docker_file=${trainer_docker_file} \
--proxy_task_variance_measurement_docker_id=${proxy_task_variance_measurement_docker_id}

# The command below passes 'dummy' arguments for the training docker.
# You need to modify them for your own docker.
python3 vertex_nas_cli.py measure_proxy_task_variance \
--proxy_task_variance_measurement_docker_id=${proxy_task_variance_measurement_docker_id} \
--project_id=${project_id} \
--service_account=${service_account} \
--region=${region} \
--trainer_docker_id=${trainer_docker_id} \
--job_name=${job_name} \
--search_space_module=${search_space_module} \
--accelerator_type=${accelerator_type} \
--num_gpus=${num_gpus} \
--root_output_dir=${root_output_dir} \
--search_docker_flags \
dummy_trainer_flag1="dummy_trainer_val"
Once you launch this variance-measurement job, you will get a job-link. The
job-name should begin with prefix Variance_Measurement. An example job UI
is shown below:
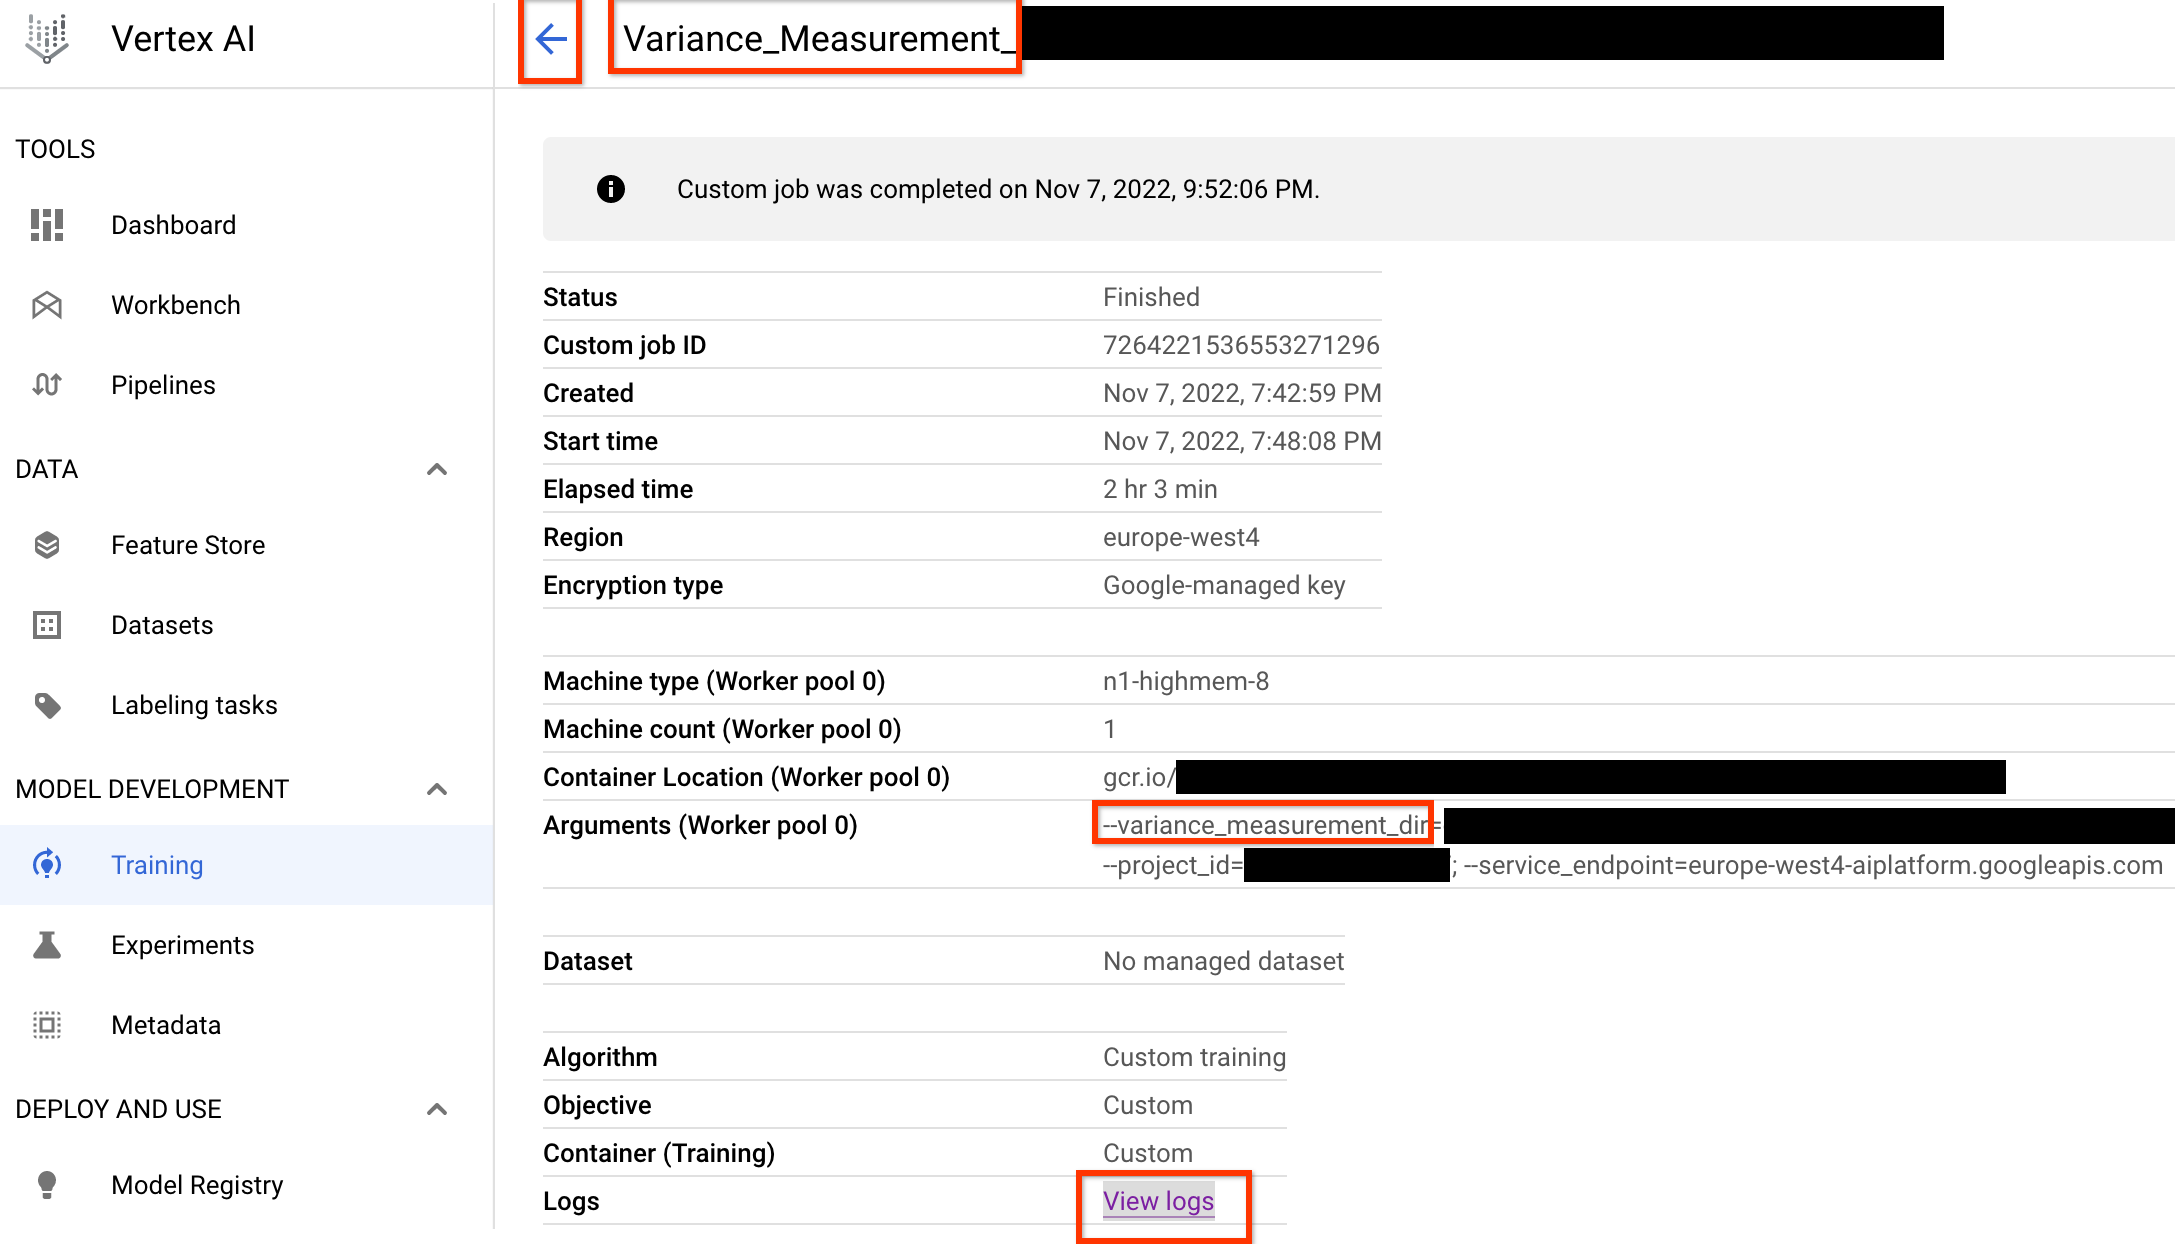
The variance_measurement_dir will contain all the outputs, and you
can check the logs by clicking View logs link.
This job by default uses one CPU on cloud to run in the background
as a custom job and then launches and manages child
NAS jobs.
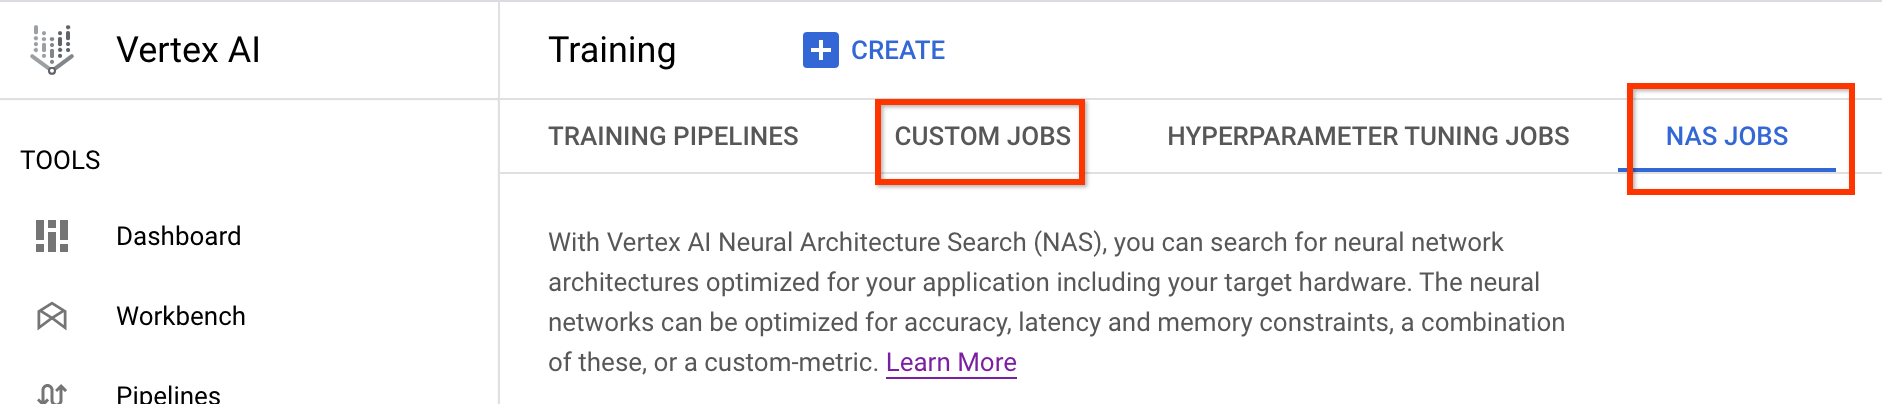
Under NAS jobs, you will see a job named
Find_workable_model_<your job name>. This job will sample your
search space to find one model, which doesn't generate any error. Once
such a model is found, the variance-measurement job launches
another NAS job <your job name>, which runs five copies of this model
for the number of training steps you set earlier. Once the training for
these models is done, the variance-measurement job measures its
score variance and smoothness and report these in its logs:
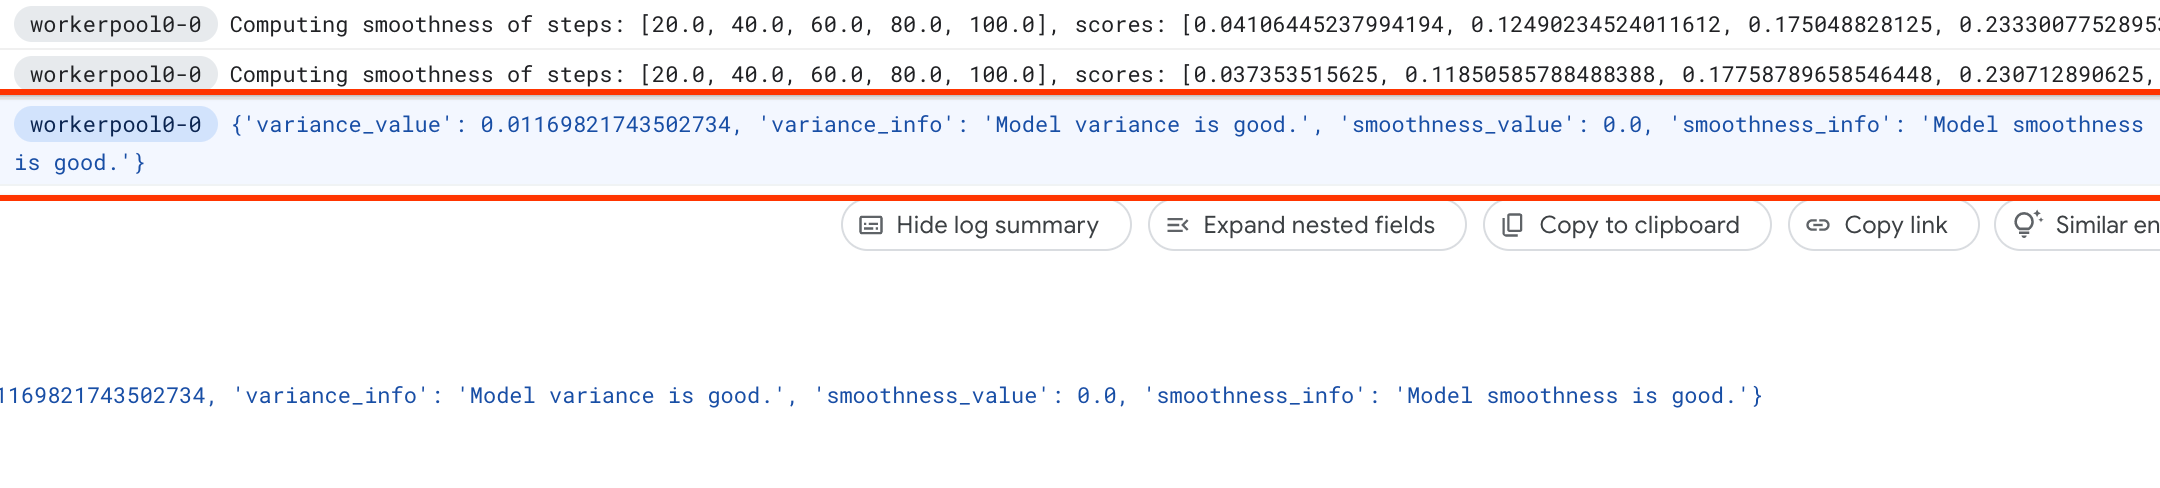
If the variance is high, then you can explore techniques listed here.
Model selection
Once you have verified that your trainer doesn't have a high variance, the next steps are:
- to find ~10 correlation-candidate-models
- compute their full-training scores which will act as a reference when you compute proxy-task correlation scores for different proxy task options later.
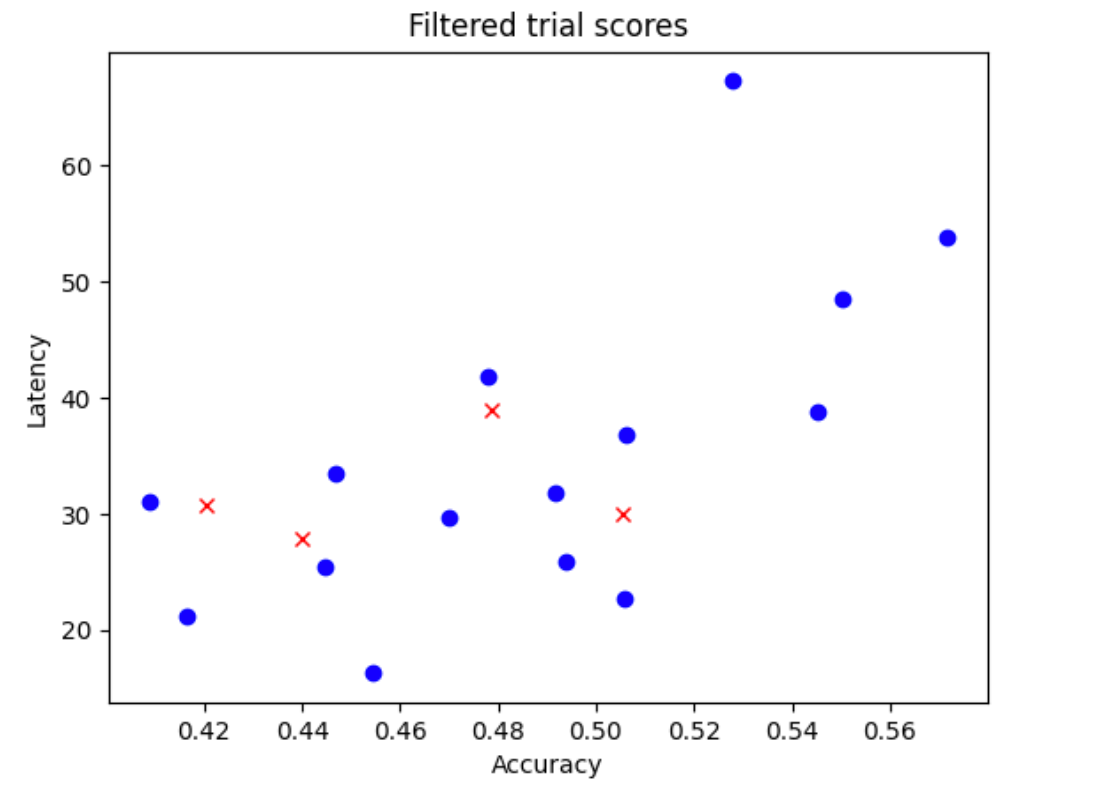
Our tool automatically and efficiently finds these correlation-candidate models and ensures they have a good score distribution for both accuracy and latency so that the future correlation computation has a good base. For this, the tool does the following:
- Randomly samples
N_beginmodels from your search space. For the example here, let us assumeN_begin = 30. The tool trains them for 1/30th of full-training time. - Reject five out of 30 models, which don't add more to the distribution of accuracy and latency. The following figure shows this as an example. The rejected models are shown as red points:
- Train the selected 25 models for 1/25th of full training time and then reject five more models based on scores so far. Note that the training of the 25 models is continued from their previous checkpoint.
- Repeat this process until only
Nmodels with a good distribution are left. - Train these last
Nmodels to completion.
The default setting for N_begin is 30 and can be found as START_NUM_MODELS
in the proxy_task/proxy_task_model_selection_lib_constants.py file.
The default setting for N is 10 and can be found as FINAL_NUM_MODELS
in the proxy_task/proxy_task_model_selection_lib_constants.py file.
The additional cost of this model-selection process is calculated as follows:
= (30*1/30 + 25*1/25 + 20*1/20 + 15*1/15 + 10*(remaining-training-time-fraction)) * full-training-time
= (4 + 10*(0.81)) * full-training-time
~= 12 * full-training-time
However, stay above the N=10 setting. The proxy-task search tool
later runs these N models in parallel. Therefore, ensure
that you have enough GPU quota for this. For example, if your
proxy-task uses two GPUs for one model, then you should have
a quota of at least 2*N GPUs.
For the model-selection job, use the same dataset partition as the stage-2 full-training job, and use the same trainer configuration for your baseline full-training.
Now you are ready to launch the model-selection job by running the following command (you need a service account):
DATE="$(date '+%Y%m%d_%H%M%S')"
project_id=<your project-id>
# You can choose any unique docker id below.
trainer_docker_id=${USER}_trainer_${DATE}
trainer_docker_file=<path to your trainer dockerfile>
latency_calculator_docker_id=${USER}_model_selection_${DATE}
latency_calculator_docker_file=${USER}_latency_${DATE}
region=<your job region such as 'us-central1'>
search_space_module=<path to your search space module>
accelerator_type="NVIDIA_TESLA_V100"
num_gpus=2
# Your bucket should be for your project and in the same region as the job.
root_output_dir=<gs://your-bucket>
# Your latency computation device.
target_device_type="CPU"

####### Proxy task model-selection related parameters ######
proxy_task_model_selection_docker_id=${USER}_model_selection_${DATE}
# Use the service account that you set-up for your project.
service_account=<your service account>
job_name=<your job name>
# The value below depends on your accelerator quota. By default
# the model-selection job runs 30 trials. However, depending on
# your quota, you can choose to only run 10 trials in parallel at a time.
# However, lowering this number can increase the overall runtime for the job.
max_parallel_nas_trial=<num parallel trials>
# The value below is the 'metric-id' corresponding to the accuracy ONLY
# metric reported by your trainer. Note that this metric may
# be different from the 'reward'.
accuracy_metric_id=<set accuracy metric id used by your trainer>
latency_metric_id=<set latency metric id used by your trainer>
############################################################

python3 vertex_nas_cli.py build \
--project_id=${project_id} \
--region=${region} \
--trainer_docker_id=${trainer_docker_id} \
--trainer_docker_file=${trainer_docker_file} \
--latency_calculator_docker_id=${latency_calculator_docker_id} \
--latency_calculator_docker_file=${latency_calculator_docker_file} \
--proxy_task_model_selection_docker_id=${proxy_task_model_selection_docker_id}

# The command below passes 'dummy' arguments for trainer-docker
# and latency-docker. You need to modify them for your own docker.
python3 vertex_nas_cli.py select_proxy_task_models \
--service_account=${service_account} \
--proxy_task_model_selection_docker_id=${proxy_task_model_selection_docker_id} \
--project_id=${project_id} \
--region=${region} \
--trainer_docker_id=${trainer_docker_id} \
--job_name=${job_name} \
--max_parallel_nas_trial=${max_parallel_nas_trial} \
--accuracy_metric_id=${accuracy_metric_id} \
--latency_metric_id=${latency_metric_id} \
--search_space_module=${search_space_module} \
--accelerator_type=${accelerator_type} \
--num_gpus=${num_gpus} \
--root_output_dir=${root_output_dir} \
--latency_calculator_docker_id=${latency_calculator_docker_id} \
--latency_docker_flags \
dummy_latency_flag1="dummy_latency_val" \
--target_device_type=${target_device_type} \
--search_docker_flags \
dummy_trainer_flag1="dummy_trainer_val"
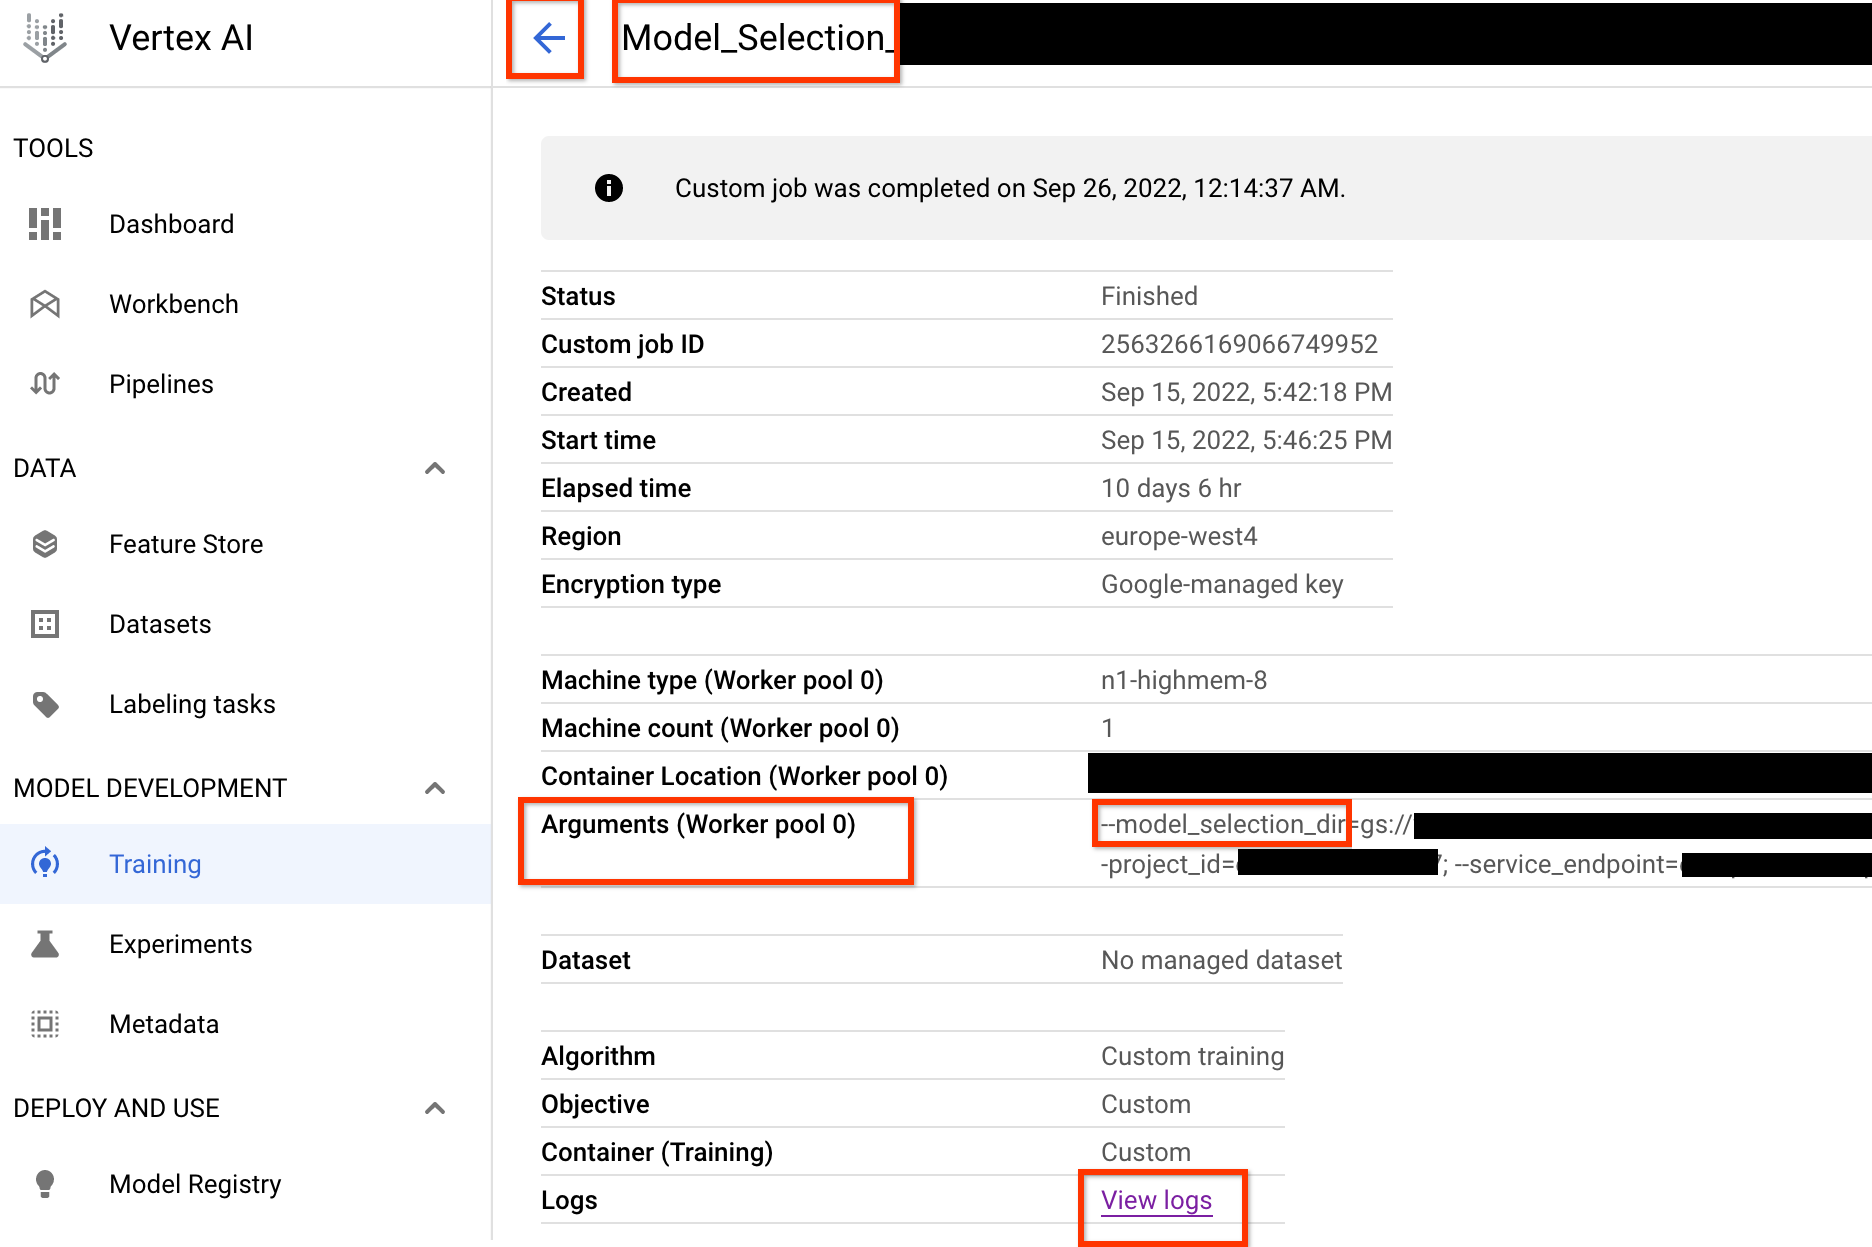
Once you launch this model-selection controller job, a job link is received. The
job-name begins with prefix Model_Selection_. An example job UI
is shown below:
The model_selection_dir contains all of the outputs. Check the logs
by clicking View logs link.
This model-selection controller job by default uses
one CPU on Google Cloud to run in the background
as a custom job and then launches and manages child
NAS jobs for each iteration of the model-selection.
Each child NAS job
has a name such as <your_job_name>_iter_3 (except for iteration 0).
Only one iteration runs at a time. At every iteration, the number of
models (number of trials) reduces and the training duration
increases. At the end of every iteration, each NAS job saves out
gs://<job-output-dir>/search/filtered_trial_scores.png file
which visually shows which models were rejected at this iteration.
You can also run the following command:
gsutil cat gs://<path to 'model_selection_dir'>/MODEL_SELECTION_STATE.json
which shows you a summary of the iterations and current state of the model-selection controller job, the job name, and links for each iteration:
{
  "start_num_models": 30,
  "final_num_models": 10,
  "num_models_to_remove_per_iter": 5,
  "accuracy_metric_id": "top_1_accuracy_without_latency",
  "latency_metric_id": "latency_milli_seconds",
  "iterations": [
    {
      "num_trials": 30,
      "trials_to_retrain": [
        "27",
        "16",
        ...,
        "14"
      ],
      "search_job_name": "projects/123456/locations/europe-west4/nasJobs/2111217356469436416",
      "search_job_link": "https://console.cloud.google.com/vertex-ai/locations/europe-west4/training/2111217356469436416/cpu?project=my-project",
      "latency_calculator_job_name": "projects/123456/locations/europe-west4/customJobs/6909239809479278592",
      "latency_calculator_job_link": "https://console.cloud.google.com/vertex-ai/locations/europe-west4/training/6909239809479278592/cpu?project=my-project",
      "desired_training_step_pct": 2.0
    },
    ...,
    {
      "num_trials": 15,
      "trials_to_retrain": [
        "14",
        ...,
        "5"
      ],
      "search_job_name": "projects/123456/locations/europe-west4/nasJobs/7045544066951413760",
      "search_job_link": "https://console.cloud.google.com/vertex-ai/locations/europe-west4/training/7045544066951413760/cpu?project=my-project",
      "latency_calculator_job_name": "projects/123456/locations/europe-west4/customJobs/2790768318993137664",
      "latency_calculator_job_link": "https://console.cloud.google.com/vertex-ai/locations/europe-west4/training/2790768318993137664/cpu?project=my-project",
      "desired_training_step_pct": 28.57936507936508
    },
    {
      "num_trials": 10,
      "trials_to_retrain": [],
      "search_job_name": "projects/123456/locations/europe-west4/nasJobs/2742864796394192896",
      "search_job_link": "https://console.cloud.google.com/vertex-ai/locations/europe-west4/training/2742864796394192896/cpu?project=my-project",
      "latency_calculator_job_name": "projects/123456/locations/europe-west4/customJobs/1490864099985195008",
      "latency_calculator_job_link": "https://console.cloud.google.com/vertex-ai/locations/europe-west4/training/1490864099985195008/cpu?project=my-project",
      "desired_training_step_pct": 101.0
    }
  ]
}
The last iteration has the final number of reference models with good score distribution. These models and their scores are used for the proxy-task search in the next step. If the final accuracy and latency score range for the reference models look better or close to your existing baseline model, which gives a good early indication about your search space. If the final accuracy and latency score range is significantly worse than the baseline, then revisit your search space.
Note that if more than 20% of your trials in the first iteration fail, then cancel your model-selection job and identify the root cause of failures. This might be an issue with your search space or your batch size and learning rate settings.
Using on-premises latency device for model selection
To use on-premises latency device for model selection, run the
select_proxy_task_models command without the latency docker and
the latency-docker flags, because you don't want to launch the latency docker
on Google Cloud. Next, use the run_latency_calculator_local command described in
Tutorial 4
to launch the on-premises latency calculator job. Instead of passing
--search_job_id flag, pass the --controller_job_id flag with
the numeric model-selection job-id that you get after running the
select_proxy_task_models command.
Resuming model selection controller job
The following situations require you to resume the model selection controller job:
- The parent model selection controller job dies (rare case).
- You accidentally cancel the model selection controller job.
First, don't cancel the child NAS iteration job (NAS tab)
if it's already running. Then to resume
the parent model selection controller job,
run the select_proxy_task_models command as before, but this time pass the
--previous_model_selection_dir flag, and set it to the
output directory for the previous model selection controller job. The
resumed model selection controller job load its previous state
from the directory and continues working as before.
Proxy-task search
After finding the correlation-candidate models and their full-training scores, the next step is to use these to evaluate correlation scores for different proxy-task choices, and choose the optimal proxy-task. Our proxy-task search tool can automatically find a proxy task, which offers the following:
- The lowest NAS search-cost.
- Meets a minimum correlation requirement threshold after providing it with a proxy-task search space definition.
Recall, there are three common dimensions to search for an optimal proxy task, which include:
- Reduced number of training steps.
- Reduced amount of training data.
- Reduced model scale.
You can create a discrete proxy-task search space by sampling these dimensions as shown here:
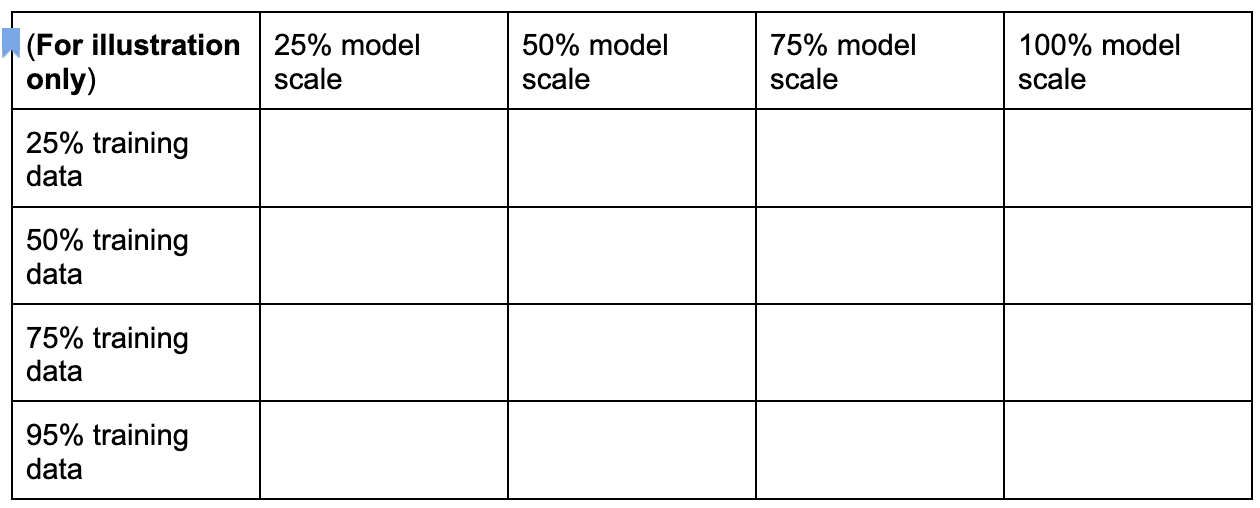
The percentage numbers above are only set as an approximate suggestion
and example. In practice, you can pick any discrete choice.
Note that we haven't included the training-steps dimension in the
above search space. This is because the proxy-task search tool
figures out the optimal training step given a proxy-task choice.
Consider a proxy-task choice of
[50% training data, 25% model scale]. Set the
number of training steps to the same amount as for full baseline training.
When evaluating this proxy task, the proxy task search tool
launches training for the correlation-candidate models, monitors their
current accuracy scores, and continuously computes
the rank-correlation score
(using the past full-training scores for the reference models):
Thus, the proxy-task search tool can stop the proxy-task training once the desired correlation (such as 0.65) is obtained or can also stop early if the search-cost quota (such as 3 hours limit per proxy-task) is exceeded. Therefore, you don't need to search explicitly over the training steps. The proxy task search tool evaluates each proxy task from your discrete search space as a grid search and provides you the best option.
What follows is a MnasNet proxy-task search space definition example
mnasnet_proxy_task_config_generator,
defined in proxy_task/proxy_task_search_spaces.py file,
to demonstrate how you can define your own search space:
# MNasnet training-data size choices.
MNASNET_TRAINING_DATA_PCT_LIST = [25, 50, 75, 95]

# Training data path regex pattern.
_TRAINING_DATA_PATH_REGEX = r"gs://.*/.*"


def update_mnasnet_proxy_training_data(
    baseline_docker_args_map: Dict[str, Any],
    training_data_pct: int) -> Optional[Dict[str, Any]]:
  """Updates MNasnet baseline docker to use a certain training_data_pct."""
  proxy_task_docker_args_map = copy.deepcopy(baseline_docker_args_map)
  # Imagenet training data path looks like:
  # gs://<path to imagenet data>/train-00[0-7]??-of-01024.
  if not re.match(_TRAINING_DATA_PATH_REGEX,
                  baseline_docker_args_map["training_data_path"]):
    raise ValueError(
        "Training data path %s does not match the desired pattern." %
        baseline_docker_args_map["training_data_path"])

  root_path, _ = baseline_docker_args_map["training_data_path"].rsplit("/", 1)
  if training_data_% == 25:
    proxy_task_docker_args_map["training_data_path"] = os.path.join(
        root_path, "train-00[0-1][0-4]?-of-01024*")
  elif training_data_% == 50:
    proxy_task_docker_args_map["training_data_path"] = os.path.join(
        root_path, "train-00[0-4]??-of-01024*")
  elif training_data_% == 75:
    proxy_task_docker_args_map["training_data_path"] = os.path.join(
        root_path, "train-00[0-6][0-4]?-of-01024*")
  elif training_data_% == 95:
    proxy_task_docker_args_map["training_data_path"] = os.path.join(
        root_path, "train-00[0-8][0-4]?-of-01024*")
  else:
    logging.warning("Mnasnet training_data_% %d is not supported.",
                    training_data_pct)
    return None
  proxy_task_docker_args_map["validation_data_path"] = os.path.join(
      root_path, "train-009[0-4]?-of-01024")
  return proxy_task_docker_args_map


def mnasnet_proxy_task_config_generator(
    baseline_docker_args_map: Dict[str, Any]
) -> List[proxy_task_utils.ProxyTaskConfig]:
  """Returns a list of proxy-task configs to be evaluated for MNasnet.

  Args:
    baseline_docker_args_map: A set of baseline training-docker arguments in
      the form of a dictionary of {'key', val}. The different proxy-task
      configs to try can be built by modifying this baseline.

  Returns:
    A list of proxy-task configs to be evaluated for this
    proxy-task search space.
  """
  proxy_task_config_list = []
  # NOTE: Will not search over model-scale for MNasnet.
  for training_data_% in MNASNET_TRAINING_DATA_PCT_LIST:
    proxy_task_docker_args_map = update_mnasnet_proxy_training_data(
        baseline_docker_args_map=baseline_docker_args_map,
        training_data_pct=training_data_pct)
    if not proxy_task_docker_args_map:
      continue
    proxy_task_name = "mnasnet_proxy_training_data_pct_{}".format(
        training_data_pct)
    proxy_task_config_list.append(
        proxy_task_utils.ProxyTaskConfig(
            name=proxy_task_name, docker_args_map=proxy_task_docker_args_map))
  return proxy_task_config_list
In this example, we create a simple search space over training-data-percent
25, 50, 75, and 95 (Note that 100 percent training data is
not used for stage1-search).
The mnasnet_proxy_task_config_generator function takes a
common baseline template of training docker args and
then modifies these args for each desired
proxy-task training data size. It then returns a list
of proxy-task-config which is
later processed by the proxy-task search tool one-by-one
in the same order. Each proxy-task config
has a name and docker_args_map, which is a key-value map for the
proxy-task docker arguments.
You are free to implement your own search-space definition as per your own requirements, and design your own proxy task search spaces even for more than the two dimensions of reduced training data or reduced model scale. However, it isn't advisable to explicitly search over training steps because it will involves wasted repeated compute. Let the proxy-task search tool handle this dimension for you.
For your first proxy-task search you can try
reducing only the training data (just like the MnasNet example)
and skip reduced model-scale because model-scaling can involve
multiple parameters over image-size, num-filters, or num-blocks.
In most cases the reduced training-data (and the implicit search over
reduced training steps) is sufficient to find a good proxy-task.
Set the number of training steps
to the number used in full-baseline training.
There are differences between stage-2 full training and stage-1
proxy-task training configurations. For proxy task,
you should reduce the batch-size compared
to the full-baseline training config to use only 2 GPUs or 4 GPUs.
Typically, full training uses 4 GPUs, 8 GPUs, or more, but the
proxy task uses only 2 GPUs or 4 GPUs.
Another difference is the
training and validation split.
Here is an example of changes
for MnasNet config going from 4 GPUs for stage-2 full training to
2 GPUs and a different validation split for proxy task search:

Launch the proxy-task search controller job by running the following command (you need a service account):
DATE="$(date '+%Y%m%d_%H%M%S')"
project_id=<your project-id>
# You can choose any unique docker id below.
trainer_docker_id=${USER}_trainer_${DATE}
trainer_docker_file=<path to your trainer dockerfile>
latency_calculator_docker_id=${USER}_model_selection_${DATE}
latency_calculator_docker_file=${USER}_latency_${DATE}
region=<your job region such as 'us-central1'>
search_space_module=<path to your NAS job search space module>
accelerator_type="NVIDIA_TESLA_V100"
num_gpus=2
# Your bucket should be for your project and in the same region as the job.
root_output_dir=<gs://your-bucket>
# Your latency computation device.
target_device_type="CPU"

####### Proxy task search related parameters ######
proxy_task_search_controller_docker_id=${USER}_proxy_task_search_${DATE}
job_name=<your job name>
# Path to your proxy task search space definition. For ex:
# 'proxy_task.proxy_task_search_spaces.mnasnet_proxy_task_config_generator'
proxy_task_config_generator_module=<path to your proxy task config generator module>
# The previous model-slection job provides the candidate-correlation-models
# and their scores.
proxy_task_model_selection_job_id=<Numeric job id of your previous model-selection>
# During proxy-task search, the proxy-task training is stopped
# when the following correlation score is achieved.
desired_accuracy_correlation=0.65
# During proxy-task search, the proxy-task training is stopped
# if the runtime exceeds this limit: 4 hrs.
training_time_hrs_limit=4
# The proxy-task is marked a good candidate only if the latency
# correlation is also above the required threshold.
# Note: This won't be used if you do not have a latency job.
desired_latency_correlation=0.65
# Early stop a proxy-task evaluation if you already have a better candidate.
# If False, evaluate all proxy-taask candidates.
early_stop_proxy_task_if_not_best=False
# Use the service account that you set-up for your project.
service_account=<your service account>
###################################################


python3 vertex_nas_cli.py build \
--project_id=${project_id} \
--region=${region} \
--trainer_docker_id=${trainer_docker_id} \
--trainer_docker_file=${trainer_docker_file} \
--latency_calculator_docker_id=${latency_calculator_docker_id} \
--latency_calculator_docker_file=${latency_calculator_docker_file} \
--proxy_task_search_controller_docker_id=${proxy_task_search_controller_docker_id}

# The command below passes 'dummy' arguments for trainer-docker
# and latency-docker. You need to modify them for your own docker.
python3 vertex_nas_cli.py search_proxy_task \
--service_account=${service_account} \
--proxy_task_search_controller_docker_id=${proxy_task_search_controller_docker_id} \
--proxy_task_config_generator_module=${proxy_task_config_generator_module} \
--proxy_task_model_selection_job_id=${proxy_task_model_selection_job_id} \
--proxy_task_model_selection_job_region=${region} \
--desired_accuracy_correlation={$desired_accuracy_correlation}\
--training_time_hrs_limit=${training_time_hrs_limit} \
--desired_latency_correlation=${desired_latency_correlation} \
--early_stop_proxy_task_if_not_best=${early_stop_proxy_task_if_not_best} \
--project_id=${project_id} \
--region=${region} \
--trainer_docker_id=${trainer_docker_id} \
--job_name=${job_name} \
--search_space_module=${search_space_module} \
--accelerator_type=${accelerator_type} \
--num_gpus=${num_gpus} \
--root_output_dir=${root_output_dir} \
--latency_calculator_docker_id=${latency_calculator_docker_id} \
--latency_docker_flags \
dummy_latency_flag1="dummy_latency_val" \
--target_device_type=${target_device_type} \
--search_docker_flags \
dummy_trainer_flag1="dummy_trainer_val"
After you launch this proxy-task search controller job,
a job link is received. The
job name begins with prefix Search_controller_. An example job UI
is shown below:
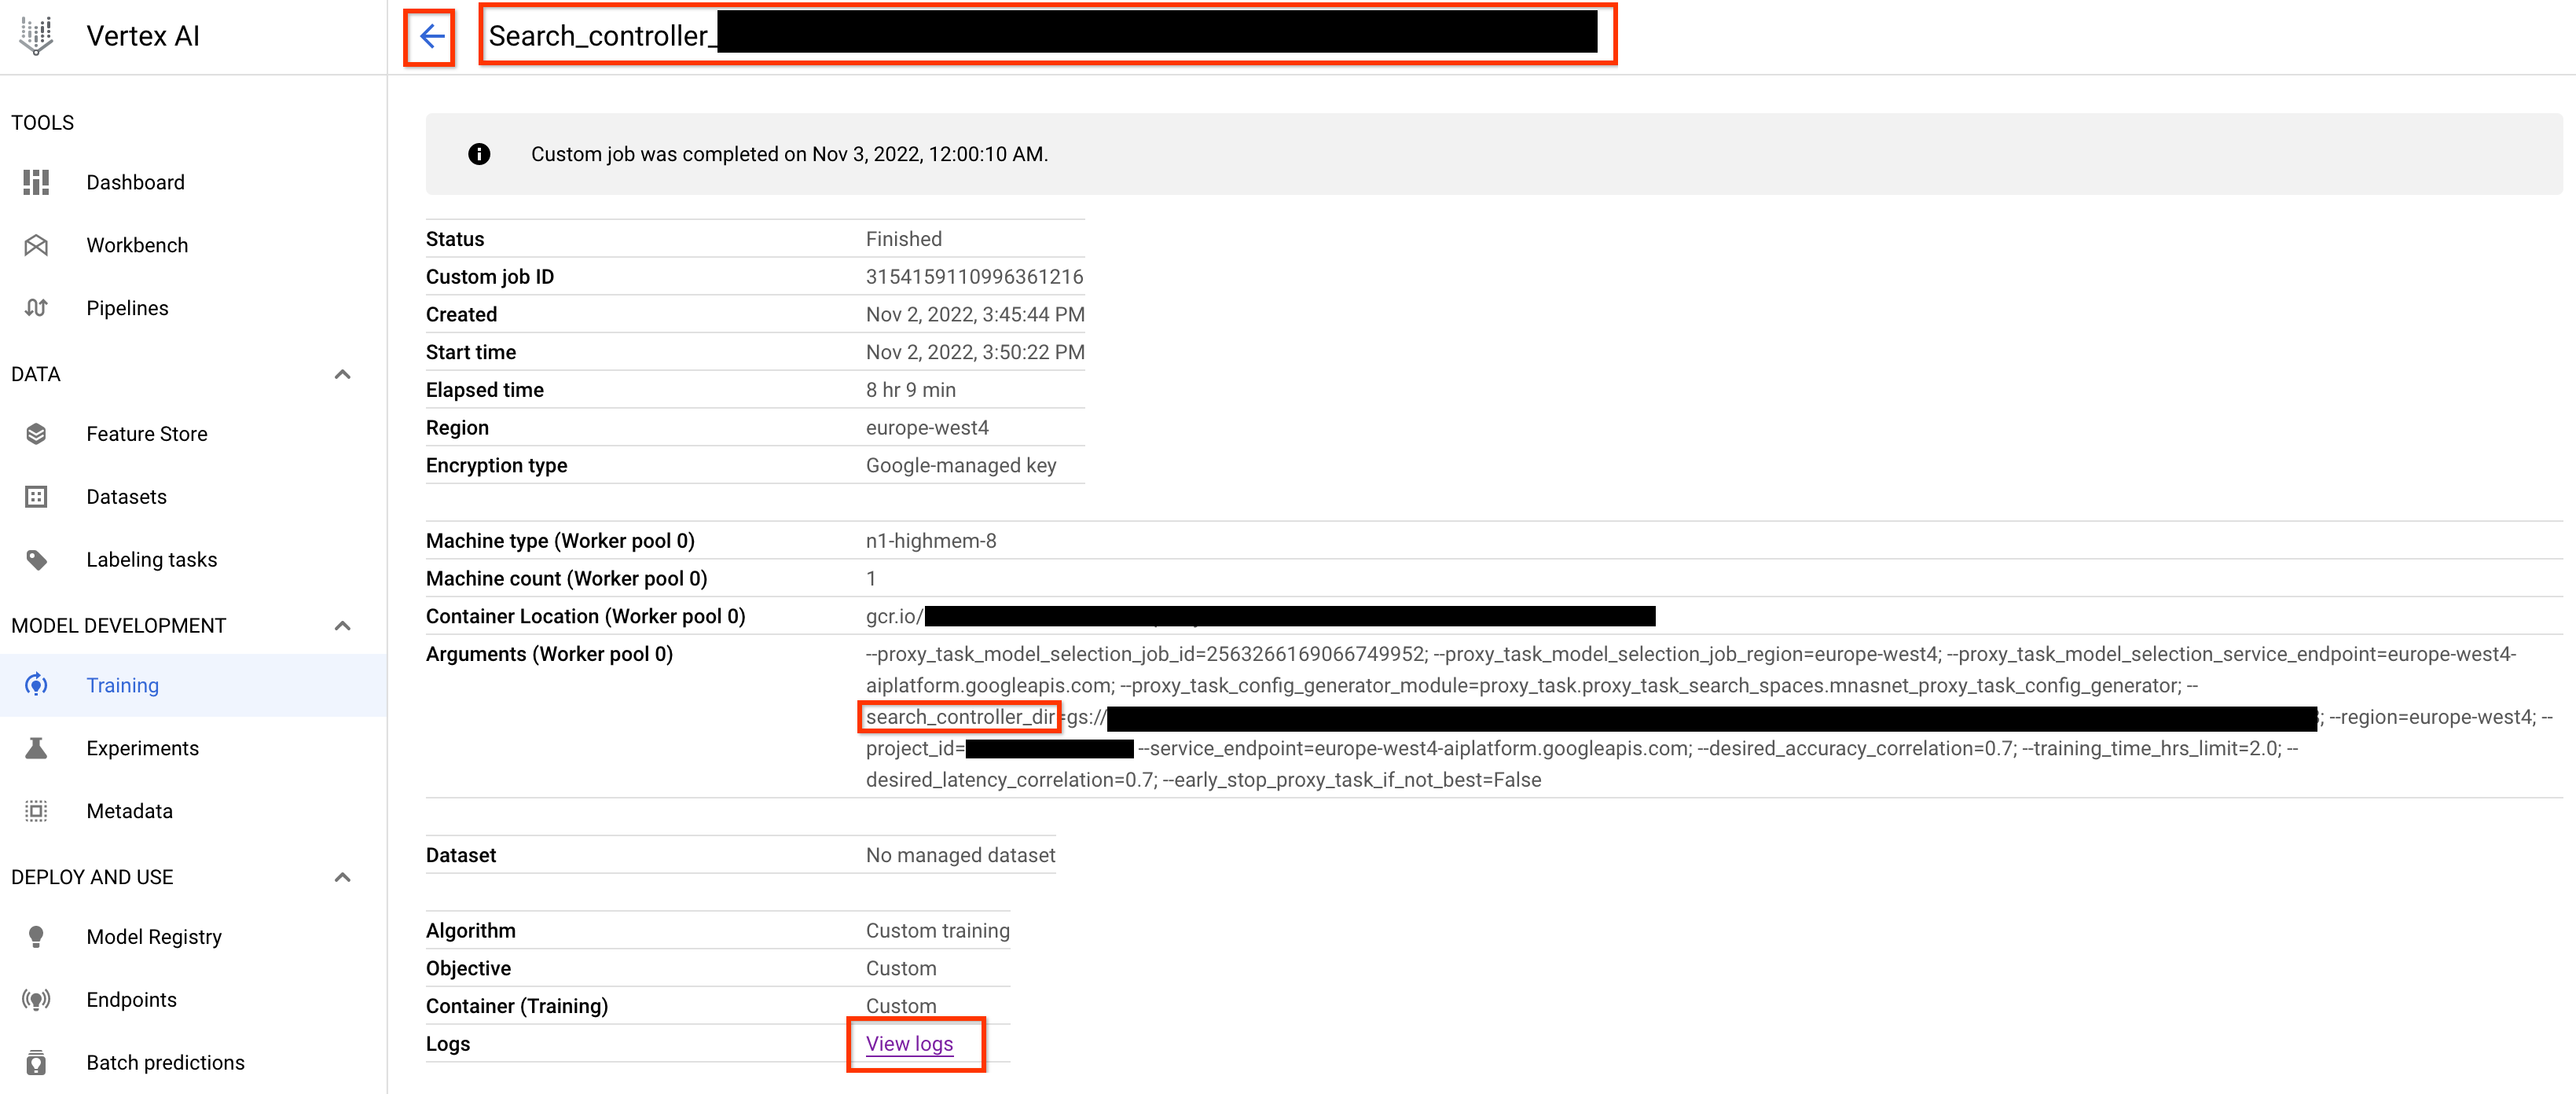
The search_controller_dir will contain all of the outputs and you
can check the logs by clicking View logs link.
This job by default uses one CPU on cloud to run in the background
as a custom job and then launches and manages child
NAS jobs for each proxy-task evaluation.
Each proxy-task NAS job
has a name such as ProxyTask_<your-job-name>_<proxy-task-name>
where <proxy-task-name> is what your
proxy-task config generator module provides for each proxy-task. Only
one proxy-task evaluation runs at a time.
You can also run the following command:
gsutil cat gs://<path to 'search_controller_dir'>/SEARCH_CONTROLLER_STATE.json
This command shows a summary of all the proxy-task evaluations and the current state of the search-controller job, job name, and links for each evaluation:
{
  "proxy_tasks_map": {
    "mnasnet_proxy_training_data_pct_25": {
      "proxy_task_stats": {
        "training_steps": [
          1249,
          2499,
          ...,
          18749
        ],
        "accuracy_correlation_over_step": [
          -0.06666666666666667,
          -0.6,
          ...,
          0.7857142857142856
        ],
        "accuracy_correlation_p_value_over_step": [
          0.8618005952380953,
          0.016666115520282188,
          ...,
          0.005505952380952381
        ],
        "median_accuracy_over_step": [
          0.011478611268103123,
          0.04956454783678055,
          ...,
          0.32932570576667786
        ],
        "median_training_time_hrs_over_step": [
          0.11611097933475001,
          0.22913257125276987,
          ...,
          1.6682701704073444
        ],
        "latency_correlation": 0.9555555555555554,
        "latency_correlation_p_value": 5.5114638447971785e-06,
        "stopping_state": "Met desired correlation",
        "posted_stop_trials_message": true,
        "final_training_time_in_hours": 1.6675102778428197,
        "final_training_steps": 18512
      },
      "proxy_task_name": "mnasnet_proxy_training_data_pct_25",
      "search_job_name": "projects/123456/locations/europe-west4/nasJobs/4173661476642357248",
      "search_job_link": "https://console.cloud.google.com/vertex-ai/locations/europe-west4/training/4173661476642357248/cpu?project=my-project",
      "latency_calculator_job_name": "projects/123456/locations/europe-west4/customJobs/8785347495069745152",
      "latency_calculator_job_link": "https://console.cloud.google.com/vertex-ai/locations/europe-west4/training/8785347495069745152/cpu?project=my-project"
    },
    ...,
    "mnasnet_proxy_training_data_pct_95": {
      "proxy_task_stats": {
        "training_steps": [
          1249,
          ...,
          18749
        ],
        "accuracy_correlation_over_step": [
          -0.3333333333333333,
          ...,
          0.7857142857142856,
          -5.0
        ],
        "accuracy_correlation_p_value_over_step": [
          0.21637345679012346,
          ...,
          0.005505952380952381,
          -5.0
        ],
        "median_accuracy_over_step": [
          0.01120645459741354,
          ...,
          0.38238024711608887,
          -1.0
        ],
        "median_training_time_hrs_over_step": [
          0.11385884770307843,
          ...,
          1.5466042930547819,
          -1.0
        ],
        "latency_correlation": 0.9555555555555554,
        "latency_correlation_p_value": 5.5114638447971785e-06,
        "stopping_state": "Met desired correlation",
        "posted_stop_trials_message": true,
        "final_training_time_in_hours": 1.533235285929564,
        "final_training_steps": 17108
      },
      "proxy_task_name": "mnasnet_proxy_training_data_pct_95",
      "search_job_name": "projects/123456/locations/europe-west4/nasJobs/2341822328209408000",
      "search_job_link": "https://console.cloud.google.com/vertex-ai/locations/europe-west4/training/2341822328209408000/cpu?project=my-project",
      "latency_calculator_job_name": "projects/123456/locations/europe-west4/customJobs/7575005095213924352",
      "latency_calculator_job_link": "https://console.cloud.google.com/vertex-ai/locations/europe-west4/training/7575005095213924352/cpu?project=my-project"
    }
  },
  "best_proxy_task_name": "mnasnet_proxy_training_data_pct_75"
}
The proxy_tasks_map stores output for each proxy-task
evaluation and best_proxy_task_name records the best proxy task
for the search. Each proxy-task entry has additional data such as
proxy_task_stats, which records the progress of the
accuracy correlation, its p-values, median accuracy,
and median-training time over training steps. It also records the
latency-related correlation if applicable and records the reason for
stopping this job (such as exceeded training-time limit) and
the training step at which it stops. You can also view these statistics
as plots by copying the contents of the search_controller_dir to
your local folder by running the following command:
gsutil -m cp gs://<path to 'search_controller_dir'>/* /your/local/dir
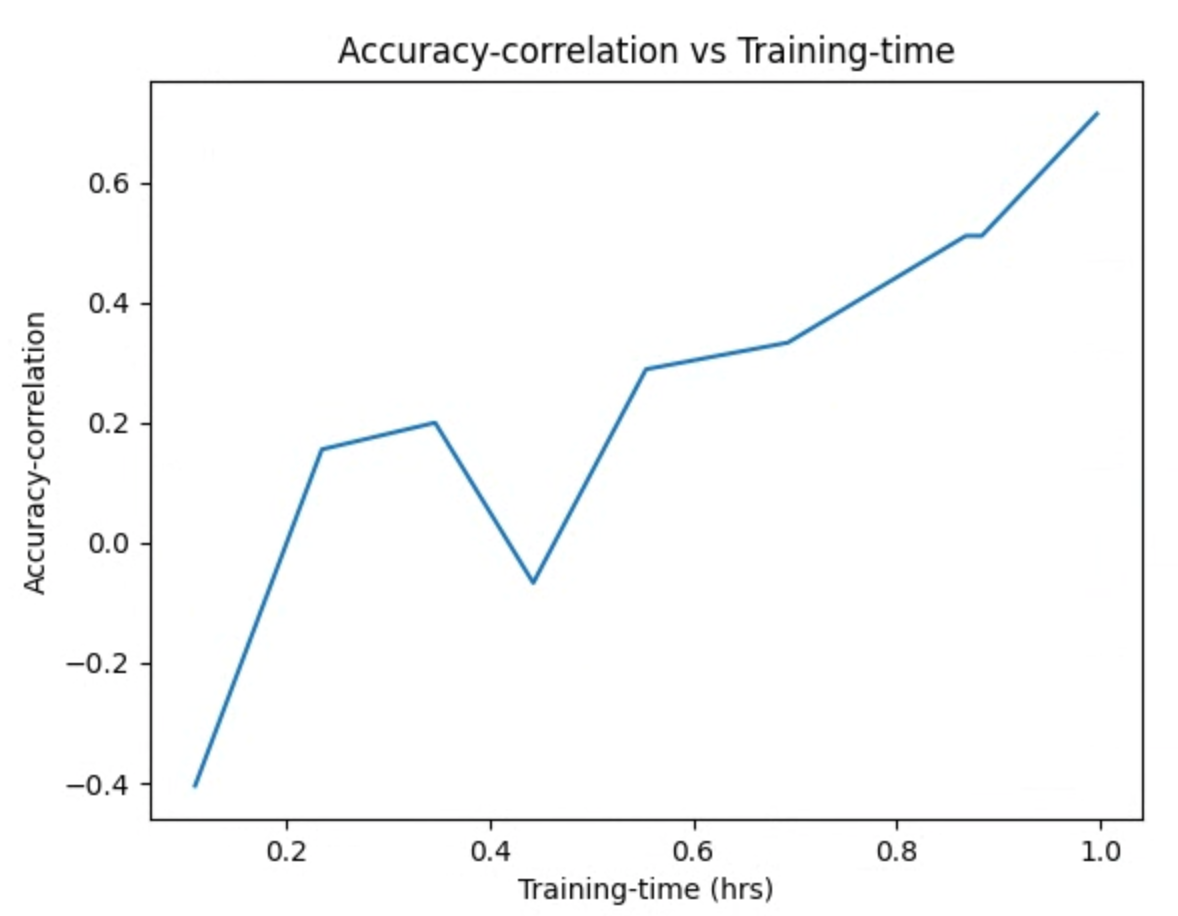
and inspect the plot images. For example, the following plot shows the accuracy correlation vs training time for the best proxy-task:
Your search is complete, and you have found the best proxy-task config, you must do the following:
- Set the number of training steps to the
final_training_stepsof the winner proxy task. - Set the cosine-decay steps the same as the
final_training_stepsso that the learning rate almost becomes zero towards the end. - [Optional] Do one validation score evaluation at the end of the training, which saves multiple evaluation costs.
Using on-premises latency device for proxy-task search
To use on-premises latency device for proxy-task search, run the
search_proxy_task command without the latency docker and
the latency-docker flags, because you don't want to launch the latency docker
on Google Cloud. Next, use the run_latency_calculator_local command described in
Tutorial 4
to launch the on-premises latency calculator job. Instead of passing
--search_job_id flag, pass the --controller_job_id flag with
the numeric proxy-task-search job-id that you get after running the
search_proxy_task command.
Resuming proxy-task search controller job
The following situations require you to resume the proxy-task search controller job:
- The parent proxy-task search controller job dies (rare case).
- You accidentally cancel the proxy-task search controller job.
- You want to extend your proxy-task search space later (even after many days).
First, don't cancel the child NAS iteration job (NAS tab)
if it's already running. Then to resume
the parent proxy-task search controller job,
run the search_proxy_task command as before, but this time pass the
--previous_proxy_task_search_dir flag, and set it to the
output directory for the previous proxy-task search controller job. The
resumed proxy-task search controller job loads its previous state
from the directory and continues working as before.
Final checks
Two final checks for your proxy task include reward range and saving data for post-search analysis.
Reward range
The reward reported to the controller should be in the range [1e-3, 10]. If this isn't true then you can artificially scale the reward to achieve this target.
Save data for post-search analysis
Your proxy task code should save any additional metrics and data
to the cloud storage location, which might be helpful to
analyze your search space later. Our Neural Architecture Search platform
only supports up to five floating-point other_metrics to be recorded.
Any additional metrics should be saved to the cloud storage
location for later analysis.