This guide shows how to run a Vertex AI Neural Architecture Search job by using Google's prebuilt search spaces and prebuilt trainer code based on TF-vision for MnasNet and SpineNet. Refer to the MnasNet classification notebook and SpineNet object detection notebook for end-to-end examples.
Data preparation for prebuilt trainer
Neural Architecture Search prebuilt trainer requires your data to be
in TFRecord format, containing
tf.train.Examples. The tf.train.Examples must include the following fields:
'image/encoded': tf.FixedLenFeature(tf.string)
'image/height': tf.FixedLenFeature(tf.int64)
'image/width': tf.FixedLenFeature(tf.int64)

# For image classification only.
'image/class/label': tf.FixedLenFeature(tf.int64)

# For object detection only.
'image/object/bbox/xmin': tf.VarLenFeature(tf.float32)
'image/object/bbox/xmax': tf.VarLenFeature(tf.float32)
'image/object/bbox/ymin': tf.VarLenFeature(tf.float32)
'image/object/bbox/ymax': tf.VarLenFeature(tf.float32)
'image/object/class/label': tf.VarLenFeature(tf.int64)
You can follow instructions for ImageNet data preparation here.
To convert your custom data, use the parsing script that is included with the sample code and utilities you downloaded. To customize the data parsing, modify the tf_vision/dataloaders/*_input.py files.
Learn more about
TFRecord and tf.train.Example.
Define experiment environment variables
Prior to running your experiments, you will need to define several environment variables including:
- TRAINER_DOCKER_ID:
${USER}_nas_experiment(recommended format) Cloud Storage locations of your training and validation datasets the experiment will use. For example (CoCo for detection):
gs://cloud-samples-data/ai-platform/built-in/image/coco/train*gs://cloud-samples-data/ai-platform/built-in/image/coco/val*
Cloud Storage location for the experiment output. Recommended format:
gs://${USER}_nas_experiment
REGION: A region which should be the same as your experiment output bucket region. For example:
us-central1.PARAM_OVERRIDE: a .yaml file overriding parameters of the prebuilt trainer. Neural Architecture Search provides some default configurations that you can use:
PROJECT_ID=PROJECT_ID
TRAINER_DOCKER_ID=TRAINER_DOCKER_ID
LATENCY_CALCULATOR_DOCKER_ID=LATENCY_CALCULATOR_DOCKER_ID
GCS_ROOT_DIR=OUTPUT_DIR
REGION=REGION
PARAM_OVERRIDE=tf_vision/configs/experiments/spinenet_search_gpu.yaml
TRAINING_DATA_PATH=gs://PATH_TO_TRAINING_DATA
VALIDATION_DATA_PATH=gs://PATH_TO_VALIDATION_DATA
You might want to select and/or modify the override file that matches your training requirements. Consider the following:
- You can set
--accelerator_typeto choose from GPU or CPU. To run only a few epoches for fast testing using CPU, you may set the Flag--accelerator_type=""and use the configuration filetf_vision/test_files/fast_nas_detection_spinenet_search_for_testing.yaml. - Number of epochs
- Training runtime
- Hyperparameters such as learning rate
For a list of all parameters to control the training jobs, see
tf_vision/configs/. The following are the key parameters:
task:
  train_data:
    global_batch_size: 80
  validation_data:
    global_batch_size: 16
  init_checkpoint: null
trainer:
  train_steps: 16634
  steps_per_loop: 1386
  optimizer_config:
    learning_rate:
      cosine:
        initial_learning_rate: 0.16
        decay_steps: 16634
      type: 'cosine'
    warmup:
      type: 'linear'
      linear:
        warmup_learning_rate: 0.0067
        warmup_steps: 1386
Create a Cloud Storage bucket for Neural Architecture Search to store your job outputs (i.e. checkpoints):
gsutil mkdir $GCS_ROOT_DIR
Build a trainer container and latency calculator container
The following command will build a trainer image in Google Cloud with the
following URI:
gcr.io/PROJECT_ID/TRAINER_DOCKER_ID which will be used in the Neural Architecture Search job in the
next step.
python3 vertex_nas_cli.py build \
--project_id=PROJECT_ID \
--trainer_docker_id=TRAINER_DOCKER_ID \
--latency_calculator_docker_id=LATENCY_CALCULATOR_DOCKER_ID \
--trainer_docker_file=tf_vision/nas_multi_trial.Dockerfile \
--latency_calculator_docker_file=tf_vision/latency_computation_using_saved_model.Dockerfile
To change the search space and reward, update them in your Python file and then rebuild the docker image.
Test the trainer locally
Since launching a job in Google Cloud service takes several minutes, it may be more
convenient to test the trainer docker locally, for example, validating the TFRecord
format. Use spinenet search space as an example, you can run the search job
locally (the model will be randomly sampled):
# Define the local job output dir.
JOB_DIR="/tmp/iod_${search_space}"

python3 vertex_nas_cli.py search_in_local \
--project_id=PROJECT_ID \
--trainer_docker_id=TRAINER_DOCKER_ID \
--prebuilt_search_space=spinenet \
--use_prebuilt_trainer=True \
--local_output_dir=${JOB_DIR} \
--search_docker_flags \
params_override="tf_vision/test_files/fast_nas_detection_spinenet_search_for_testing.yaml" \
training_data_path=TEST_COCO_TF_RECORD \
validation_data_path=TEST_COCO_TF_RECORD \
model=retinanet
The training_data_path and validation_data_path are the
paths to your TFRecords.
Launch a stage-1 search followed by a stage-2 training job on Google Cloud
You should refer to the MnasNet classification notebook and SpineNet object detection notebook for end-to-end examples.
You can set the flag
--max_parallel_nas_trialand--max_nas_trialto customize. Neural Architecture Search will startmax_parallel_nas_trialtrials in parallel and finish aftermax_nas_trialtrials.If the flag
--target_device_latency_msis set, a separatelatency calculatorjob will be launched with accelerator specified by flag--target_device_type.The Neural Architecture Search Controller will provide each trial with a suggestion for a new architecture candidate through the FLAG
--nas_params_str.Each trial will build a graph based on the value of the FLAG
nas_params_strand start a training job. Each trial also saves its value to a json file (atos.path.join(nas_job_dir, str(trial_id), "nas_params_str.json")).
Reward with a latency constraint
The MnasNet classification notebook shows an example of a cloud-cpu device-based latency-constrained search.
To search models with latency constraint, the trainer can report reward as a function of both accuracy and latency.
In the shared source code, the reward is calculated as follows:
def compute_reward(target_latency, accuracy, inference_latency, weight=0.07):
  """Compute reward from accuracy and latency."""
  speed_ratio = target_latency / inference_latency
  return accuracy * (speed_ratio**weight)
You can use other variants of the reward calculation on page 3
of the mnasnet paper.
target_device_typespecifies the target device type that is supported in Google Cloud, such as,NVIDIA_TESLA_P100.use_prebuilt_latency_calculatoruses our prebuilt latency-calculatortf_vision/latency_computation_using_saved_model.py.target_device_latency_msspecifies the target device latency.
For information about how to customize the latency calculation function,
see tf_vision/latency_computation_using_saved_model.py.
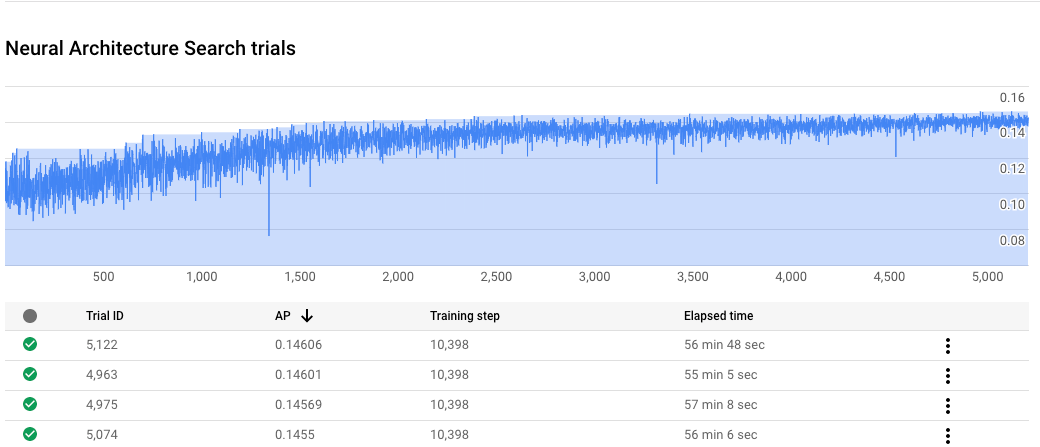
Monitor your Neural Architecture Search job progress
In the Google Cloud console, on the job page, the chart shows the reward vs. trial number
while the table shows the rewards for each trial. You can find the top
trials with the highest reward.
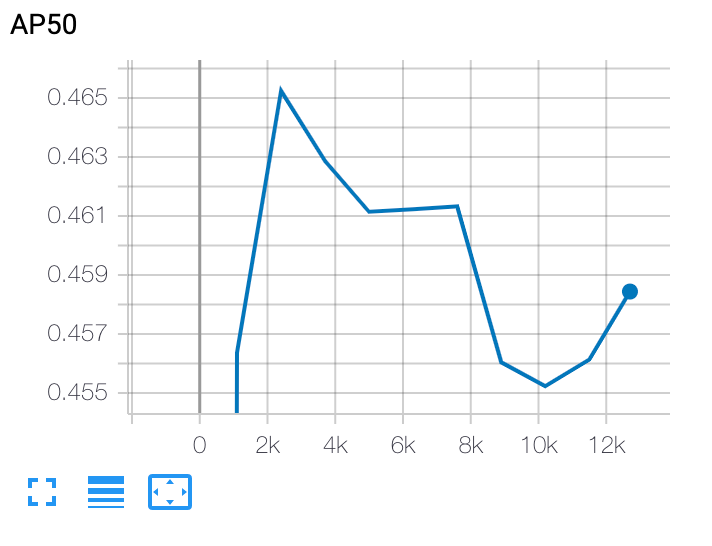
Plot a stage-2 training curve
After stage-2 training, you use either Cloud Shell or Google Cloud
TensorBoard to plot
the training curve by pointing it to the job directory:
Deploy a selected model
To create a SavedModel, you can use the
export_saved_model.py
script with
params_override=${GCS_ROOT_DIR}/${TRIAL_ID}/params.yaml.