Cloud Data Loss Prevention (Cloud DLP) ora fa parte di Sensitive Data Protection. Il nome dell'API rimane invariato: API Cloud Data Loss Prevention (API DLP). Per informazioni sui servizi che compongono Sensitive Data Protection, consulta la panoramica di Sensitive Data Protection.
Gestire gli infoType tramite la console Google Cloud
Mantieni tutto organizzato con le raccolte
Salva e classifica i contenuti in base alle tue preferenze.
Questa pagina descrive come aggiungere e modificare i tipi di informazioni nella configurazione dell'ispezione tramite la console Google Cloud .
Quando utilizzi Sensitive Data Protection per ispezionare o
profilare i dati, utilizzi una configurazione di ispezione per
specificare i tipi di informazioni (infoTypes)
che vuoi cercare. Le seguenti operazioni di Sensitive Data Protection nella
consoleGoogle Cloud ti consentono di impostare la configurazione dell'ispezione:
Queste operazioni nella console Google Cloud hanno una sezione InfoTypes,
dove puoi selezionare gli infoType, modificare le impostazioni degli infoType
integrati e aggiungere infoType personalizzati. Il passaggio che contiene la sezione InfoTypes
varia a seconda dell'operazione che stai eseguendo. La
tabella seguente mostra il passaggio del flusso di lavoro pertinente per ogni operazione.
Operazione
Passaggio pertinente
Creazione di un modello di ispezione
Configura il rilevamento
Creazione di un job di ispezione o di un trigger di job
Configura il rilevamento
Creazione di una configurazione di scansione di rilevamento
Seleziona modello di ispezione
Seleziona infoType integrati
Nella sezione InfoType, fai clic su Gestisci infoType.
Per restringere la selezione degli infoType, applica i filtri nel campo Filtro. Seleziona un nome di proprietà in base al quale filtrare e
inserisci un valore della proprietà. Ad esempio, per filtrare tutti gli infoType correlati
all'Australia, imposta il nome della proprietà su Località. Per il valore della proprietà,
seleziona o digita Australia.
Se conosci il nome infoType, puoi anche digitarlo direttamente nel campo
Filtro.
Per visualizzare tutti i tag di categoria per un infoType, fai clic su
expand_moreMostra/Nascondi contenuti cella per quell'infoType.
Per nascondere o mostrare le colonne, fai clic su view_column
Opzioni di visualizzazione delle colonne e seleziona i nomi delle colonne
che vuoi visualizzare.
Seleziona gli infoType da includere nella configurazione dell'ispezione.
Fai clic su Fine.
Modificare le impostazioni di un infoType integrato
Quando imposti gli infoType da includere nella configurazione dell'ispezione, puoi anche modificare le impostazioni di uno o più di questi infoType. Puoi modificare il livello di sensibilità e, per alcuni infoType,
la versione dell'infoType.
Seleziona gli infoType integrati che vuoi includere
nella configurazione dell'ispezione, inclusi quelli che non
devi modificare. Non fare clic su Fine.
Fai clic su Modifica infoType selezionati.
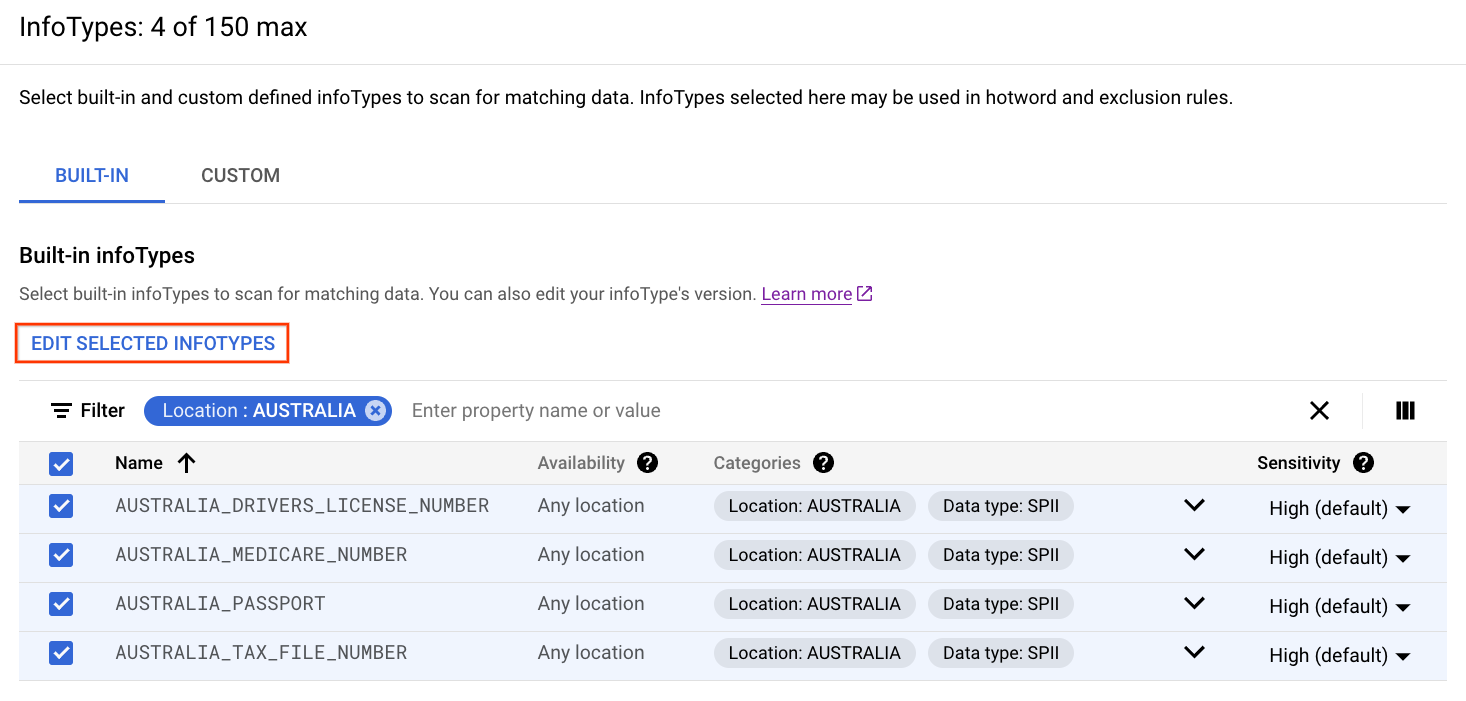
Per ogni infoType che vuoi modificare, utilizza gli elenchi a discesa per selezionare
un livello di sensibilità o una versione del rilevatore.
Fai clic su Conferma.
Fai clic su Fine.
Aggiungere infoType personalizzati
Questa sezione descrive come aggiungere un tipo di infoType personalizzato in base a un insieme di dati sottostante. I dati sottostanti possono essere uno dei seguenti:
Un elenco di parole o frasi che fornisci inline nella configurazione dell'ispezione.
Un elenco di parole o frasi che memorizzi in un file di testo in Cloud Storage.
Un lungo elenco di parole o frasi che memorizzi in un file di testo di grandi dimensioni in
Cloud Storage o in una colonna di BigQuery.
Per questo tipo, devi prima creare un infoType archiviato
che rimandi al dizionario personalizzato di grandi dimensioni, prima di eseguire questa attività.
Un'espressione regolare che fornisci inline nella configurazione dell'ispezione.
La possibilità di riutilizzare il nuovo infoType personalizzato dipende dall'operazione che
stavi eseguendo quando l'hai creato:
Se crei un infoType personalizzato durante la creazione di un job di ispezione o di un trigger di job, l'infoType personalizzato è disponibile solo per quel job o trigger di job.
Se crei un infoType personalizzato durante la creazione di un modello di ispezione, l'infoType personalizzato è disponibile per qualsiasi operazione che utilizza il modello di ispezione.
Se crei un infoType personalizzato durante la configurazione della profilazione, Sensitive Data Protection crea un nuovo modello di ispezione dalla configurazione dell'ispezione. L'infoType personalizzato è disponibile per qualsiasi operazione che
utilizza il nuovo modello di ispezione.
Per aggiungere un rilevatore di infoType personalizzato:
Nella sezione InfoType, fai clic su Gestisci infoType.
Nella scheda Personalizzato, fai clic su Aggiungi infoType personalizzato.
In Tipo, scegli il tipo di rilevatore di infoType personalizzato che vuoi creare:
Parole o frasi:corrispondenza con una o più parole o frasi che inserisci nel campo. Puoi inserire fino a 128 KB di dati, che corrispondono a
migliaia di voci.
Quando selezioni questo tipo, viene visualizzato il campo Elenco di parole o frasi.
Inserisci la parola o la frase che vuoi che Sensitive Data Protection corrisponda. Per
corrispondere a più parole o frasi, premi Enter dopo ogni voce. Per saperne di più, consulta Creazione di un rilevatore di dizionari personalizzato normale.
Percorso del dizionario:corrispondenze con parole o frasi archiviate in un file di testo in Cloud Storage. Utilizza questo tipo di infoType personalizzato quando hai centinaia
di migliaia di parole o frasi da cercare. Questo approccio è utile anche se l'elenco contiene termini sensibili e non vuoi memorizzarli inline nella configurazione dell'ispezione.
Quando selezioni questo tipo, viene visualizzato il campo Posizione del dizionario.
Inserisci o cerca il percorso Cloud Storage in cui è archiviato il file del dizionario. Per saperne di più, vedi
Creazione di un rilevatore di dizionari personalizzato normale.
Espressione regolare:corrisponde ai contenuti in base a un'espressione regolare.
Quando selezioni questo tipo, viene visualizzato il campo Regex. Inserisci un pattern di espressione regolare per trovare corrispondenze con parole e frasi. Per saperne di più,
consulta la
sintassi delle espressioni regolari supportata.
Tipo di infoType memorizzato:corrispondenze con parole o frasi che memorizzi in un file di testo di grandi dimensioni in Cloud Storage o in una singola colonna in BigQuery.
Questa opzione aggiunge un rilevatore di dizionari personalizzato di grandi dimensioni. Utilizza questo tipo di
infoType personalizzato se devi cercare milioni di parole o frasi.
Per questo tipo, devi aver già creato un infoType archiviato
che rimandi al dizionario personalizzato di grandi dimensioni sottostante.
Quando selezioni questo tipo, viene visualizzato il campo Nome infoType archiviato.
Inserisci il nome completo della risorsa dell'infoType archiviato.
Per InfoType, inserisci un nome per l'infoType personalizzato da creare.
Se stai creando un infoType personalizzato di tipo infoType archiviato,
inserisci un nome diverso da quello dell'infoType archiviato
sottostante.
Per Probabilità, seleziona il livello di probabilità predefinito che vuoi assegnare a tutti i risultati che corrispondono a questo infoType personalizzato. Puoi perfezionare ulteriormente
il livello di probabilità dei singoli risultati utilizzando le
regole hotword.
Se non specifichi un valore predefinito, il livello di probabilità predefinito viene impostato su VERY_LIKELY. Per saperne di più, consulta
Probabilità di corrispondenza.
Per Sensibilità, seleziona il livello di sensibilità che vuoi assegnare a
tutti i risultati che corrispondono a questo infoType personalizzato. Se non specifichi un valore,
i livelli di sensibilità di questi risultati vengono impostati su HIGH.
I punteggi di sensibilità vengono utilizzati nei profili dei dati. Durante
la profilazione dei dati, Sensitive Data Protection utilizza i punteggi di sensibilità degli infoType per
calcolare il livello di sensibilità.
Fai clic su Fine.
(Facoltativo) Per aggiungere un altro InfoType personalizzato, fai di nuovo clic su Aggiungi InfoType personalizzato.
[[["Facile da capire","easyToUnderstand","thumb-up"],["Il problema è stato risolto","solvedMyProblem","thumb-up"],["Altra","otherUp","thumb-up"]],[["Difficile da capire","hardToUnderstand","thumb-down"],["Informazioni o codice di esempio errati","incorrectInformationOrSampleCode","thumb-down"],["Mancano le informazioni o gli esempi di cui ho bisogno","missingTheInformationSamplesINeed","thumb-down"],["Problema di traduzione","translationIssue","thumb-down"],["Altra","otherDown","thumb-down"]],["Ultimo aggiornamento 2025-09-04 UTC."],[],[],null,["# Manage infoTypes through the Google Cloud console\n\nThis page describes how to add and edit infoTypes in your inspection\nconfiguration through the Google Cloud console.\n\nWhen you use Sensitive Data Protection to [inspect](/sensitive-data-protection/docs/inspecting-storage) or\n[profile](/sensitive-data-protection/docs/data-profiles) data, you use an inspection configuration to\nspecify the information types ([*infoTypes*](/sensitive-data-protection/docs/concepts-infotypes))\nthat you want to scan for. The following Sensitive Data Protection operations in the\nGoogle Cloud console let you set your inspection configuration:\n\n- [Creating or editing an inspection template](/sensitive-data-protection/docs/creating-templates-inspect)\n- [Creating an inspection job or job trigger](/sensitive-data-protection/docs/creating-job-triggers)\n- [Creating a discovery scan configuration](/sensitive-data-protection/docs/profile-org-folder)\n\nThese operations in the Google Cloud console have an **InfoTypes** section,\nwhere you can select infoTypes, edit the settings of built-in\ninfoTypes, and add custom infoTypes. The step that contains the **InfoTypes**\nsection differs depending on the operation that you're performing. The\nfollowing table shows the relevant workflow step for each operation.\n\nSelect built-in infoTypes\n-------------------------\n\n1. In the **InfoTypes** section, click **Manage infoTypes**.\n2. To narrow the selection of infoTypes, apply filters in the **Filter**\n field. Select a property name to filter on and\n enter a property value. For example, to filter for all infoTypes related to\n Australia, set the property name to **Location** . For the property value,\n select or type **Australia**.\n\n If you know the infoType name, you can also type it directly in the\n **Filter** field.\n3. To view all category tags for an infoType, click expand_more **Toggle full cell content** for that infoType.\n\n4. To hide or unhide columns, click view_column **Column display options**, and select the names of the columns\n that you want to display.\n\n5. Select the infoTypes that you want to include in your inspection\n configuration.\n\n | **Tip:** If your scan results don't need to show the specific infoTypes that were detected, then consider selecting general infoTypes in your configuration. When you select a specific infoType covered by a general infoType, Sensitive Data Protection suggests the general infoType that you can use instead. To accept the recommended replacements, click **Apply\n | recommendations** . For information about the benefits of using general infoTypes, see [General and specific infoType\n | detectors](/sensitive-data-protection/docs/concepts-infotypes#general-specific-infotypes).\n6. Click **Done**.\n\nEdit the settings of a built-in infoType\n----------------------------------------\n\nAs you set the infoTypes that you want to include in your inspection\nconfiguration, you can additionally edit the settings of one or more of those\ninfoTypes. You can edit the sensitivity level and, for some infoTypes,\nthe infoType version.\n\n1. [Select the built-in infoTypes](#select-infotypes) that you want to include in your inspection configuration, including the infoTypes that you don't need to edit. Don't click **Done**.\n2. Click **Edit selected infoTypes**.\n\n [](/static/sensitive-data-protection/docs/images/edit-selected-infotypes_2x.png)\n3. For each infoType that you want to edit, use the drop-down lists to select\n a sensitivity level or a detector version.\n\n4. Click **Confirm**.\n\n5. Click **Done**.\n\nAdd custom infoTypes\n--------------------\n\nThis section describes how to add a custom infoType based on an\nunderlying set of data. The underlying data can be any of the following:\n\n- A list of words or phrases that you provide inline in the inspection configuration.\n- A list of words or phrases that you store in a text file in Cloud Storage.\n- A large list of words or phrases that you store in a large text file in\n Cloud Storage or a column in BigQuery.\n\n For this type, you must first [create a stored infoType](/sensitive-data-protection/docs/creating-stored-infotypes#create)\n that points to the large custom dictionary, before performing this task.\n- A regular expression that you provide inline in the inspection\n configuration.\n\nWhether you can reuse the new custom infoType depends on which operation you\nwere performing when you created the custom infoType:\n\n- If you create a custom infoType while creating an inspection job or job\n trigger, the custom infoType is available to only that job or job trigger.\n\n- If you create a custom infoType while creating an inspection template,\n the custom infoType is available to any operation that uses the inspection\n template.\n\n- If you create a custom infoType while configuring profiling,\n Sensitive Data Protection creates a new inspection template from your inspection\n configuration. The custom infoType is available to any operation that\n uses that new inspection template.\n\nFor more information about custom infoTypes, see [Custom infoType\ndetectors](/sensitive-data-protection/docs/creating-custom-infotypes).\n\nTo add a custom infoType detector, do the following:\n\n1. In the **InfoTypes** section, click **Manage infoTypes**.\n2. On the **Custom** tab, click **Add custom infoType**.\n3. For **Type**, choose the type of custom infoType detector that you want to\n create:\n\n - **Words or phrases:** Matches on one or more words or phrases that you\n enter into the field. You can enter up to 128 KB of data, which equates to\n thousands of entries.\n\n When you select this type, the **List of words or phrases** field appears.\n Enter the word or phrase that you want Sensitive Data Protection to match on. To\n match on multiple words or phrases, press `Enter` after each entry. For\n more information, see [Creating a regular custom dictionary\n detector](/sensitive-data-protection/docs/creating-custom-infotypes-dictionary).\n - **Dictionary path:** Matches on words or phrases that you store in a text\n file in Cloud Storage. Use this custom infoType when you have hundreds\n of thousands of words or phrases to search for. This approach is also\n useful if your list contains sensitive terms and you don't want to store\n them inline in the inspection configuration.\n\n When you select this type, the **Dictionary location** field appears.\n Enter or browse to the Cloud Storage path where the dictionary file is\n stored. For more information, see\n [Creating a regular custom dictionary detector](/sensitive-data-protection/docs/creating-custom-infotypes-dictionary).\n - **Regex:** Matches content based on a regular expression.\n\n When you select this type, the **Regex** field appears. Enter a regular\n expression pattern to match words and phrases. For more information,\n see the\n [supported regular expression syntax](https://github.com/google/re2/wiki/Syntax).\n - **Stored infoType:** Matches on words or phrases that you store in a large\n text file in Cloud Storage or a single column in\n BigQuery.\n\n This option adds a large custom dictionary detector. Use this kind of\n custom infoType if you have millions of words or phrases to search for.\n\n For this type, you must have already [created a stored infoType](/sensitive-data-protection/docs/creating-stored-infotypes#create)\n that points to the underlying large custom dictionary.\n\n When you select this type, the **Stored infoType name** field appears.\n Enter the full resource name of the stored infoType.\n4. For **InfoType**, enter a name for the custom infoType to be created.\n\n If you're creating a custom infoType that is of type **Stored infoType**,\n enter a name that is different from the name of the underlying stored\n infoType.\n5. For **Likelihood** , select the default likelihood level that you want to\n assign to all findings that match this custom infoType. You can further\n fine-tune the likelihood level of individual findings by using\n [hotword rules](/sensitive-data-protection/docs/creating-custom-infotypes-likelihood).\n If you don't specify a default value, the default likelihood level is set\n to `VERY_LIKELY`. For more information, see\n [Match likelihood](/sensitive-data-protection/docs/likelihood).\n\n6. For **Sensitivity** , select the sensitivity level that you want to assign to\n all findings that match this custom infoType. If you don't specify a value,\n the sensitivity levels of those findings are set to `HIGH`.\n\n\n Sensitivity scores are used in [data profiles](/sensitive-data-protection/docs/data-profiles). When\n profiling your data, Sensitive Data Protection uses the sensitivity scores of the infoTypes to\n [calculate the sensitivity level](/sensitive-data-protection/docs/sensitivity-risk-calculation).\n\n\n7. Click **Done**.\n\n8. Optional: To add another custom infoType, click **Add custom infoType**\n again.\n\n9. Click **Done**.\n\nWhat's next\n-----------\n\n- Refer to a list of [built-in infoType detectors](/sensitive-data-protection/docs/infotypes-reference).\n- Learn more about [custom infoType detectors](/sensitive-data-protection/docs/creating-custom-infotypes).\n- Learn how to [create a regular custom dictionary detector through the DLP API](/sensitive-data-protection/docs/creating-custom-infotypes-dictionary).\n- Learn how to [create a large custom dictionary detector through the DLP API](/sensitive-data-protection/docs/creating-stored-infotypes).\n- Learn how to [create a custom regular expression detector through the DLP API](/sensitive-data-protection/docs/creating-custom-infotypes-regex)."]]