Panduan ini mengasumsikan bahwa Anda memiliki cluster yang dibuat dengan Google Distributed Cloud yang berjalan di lingkungan OpenStack dengan penyiapan yang mirip dengan yang dijelaskan dalam panduan Men-deploy cluster bare metal di OpenStack. Ikuti panduan tersebut terlebih dahulu sebelum mencoba
langkah-langkah ini.
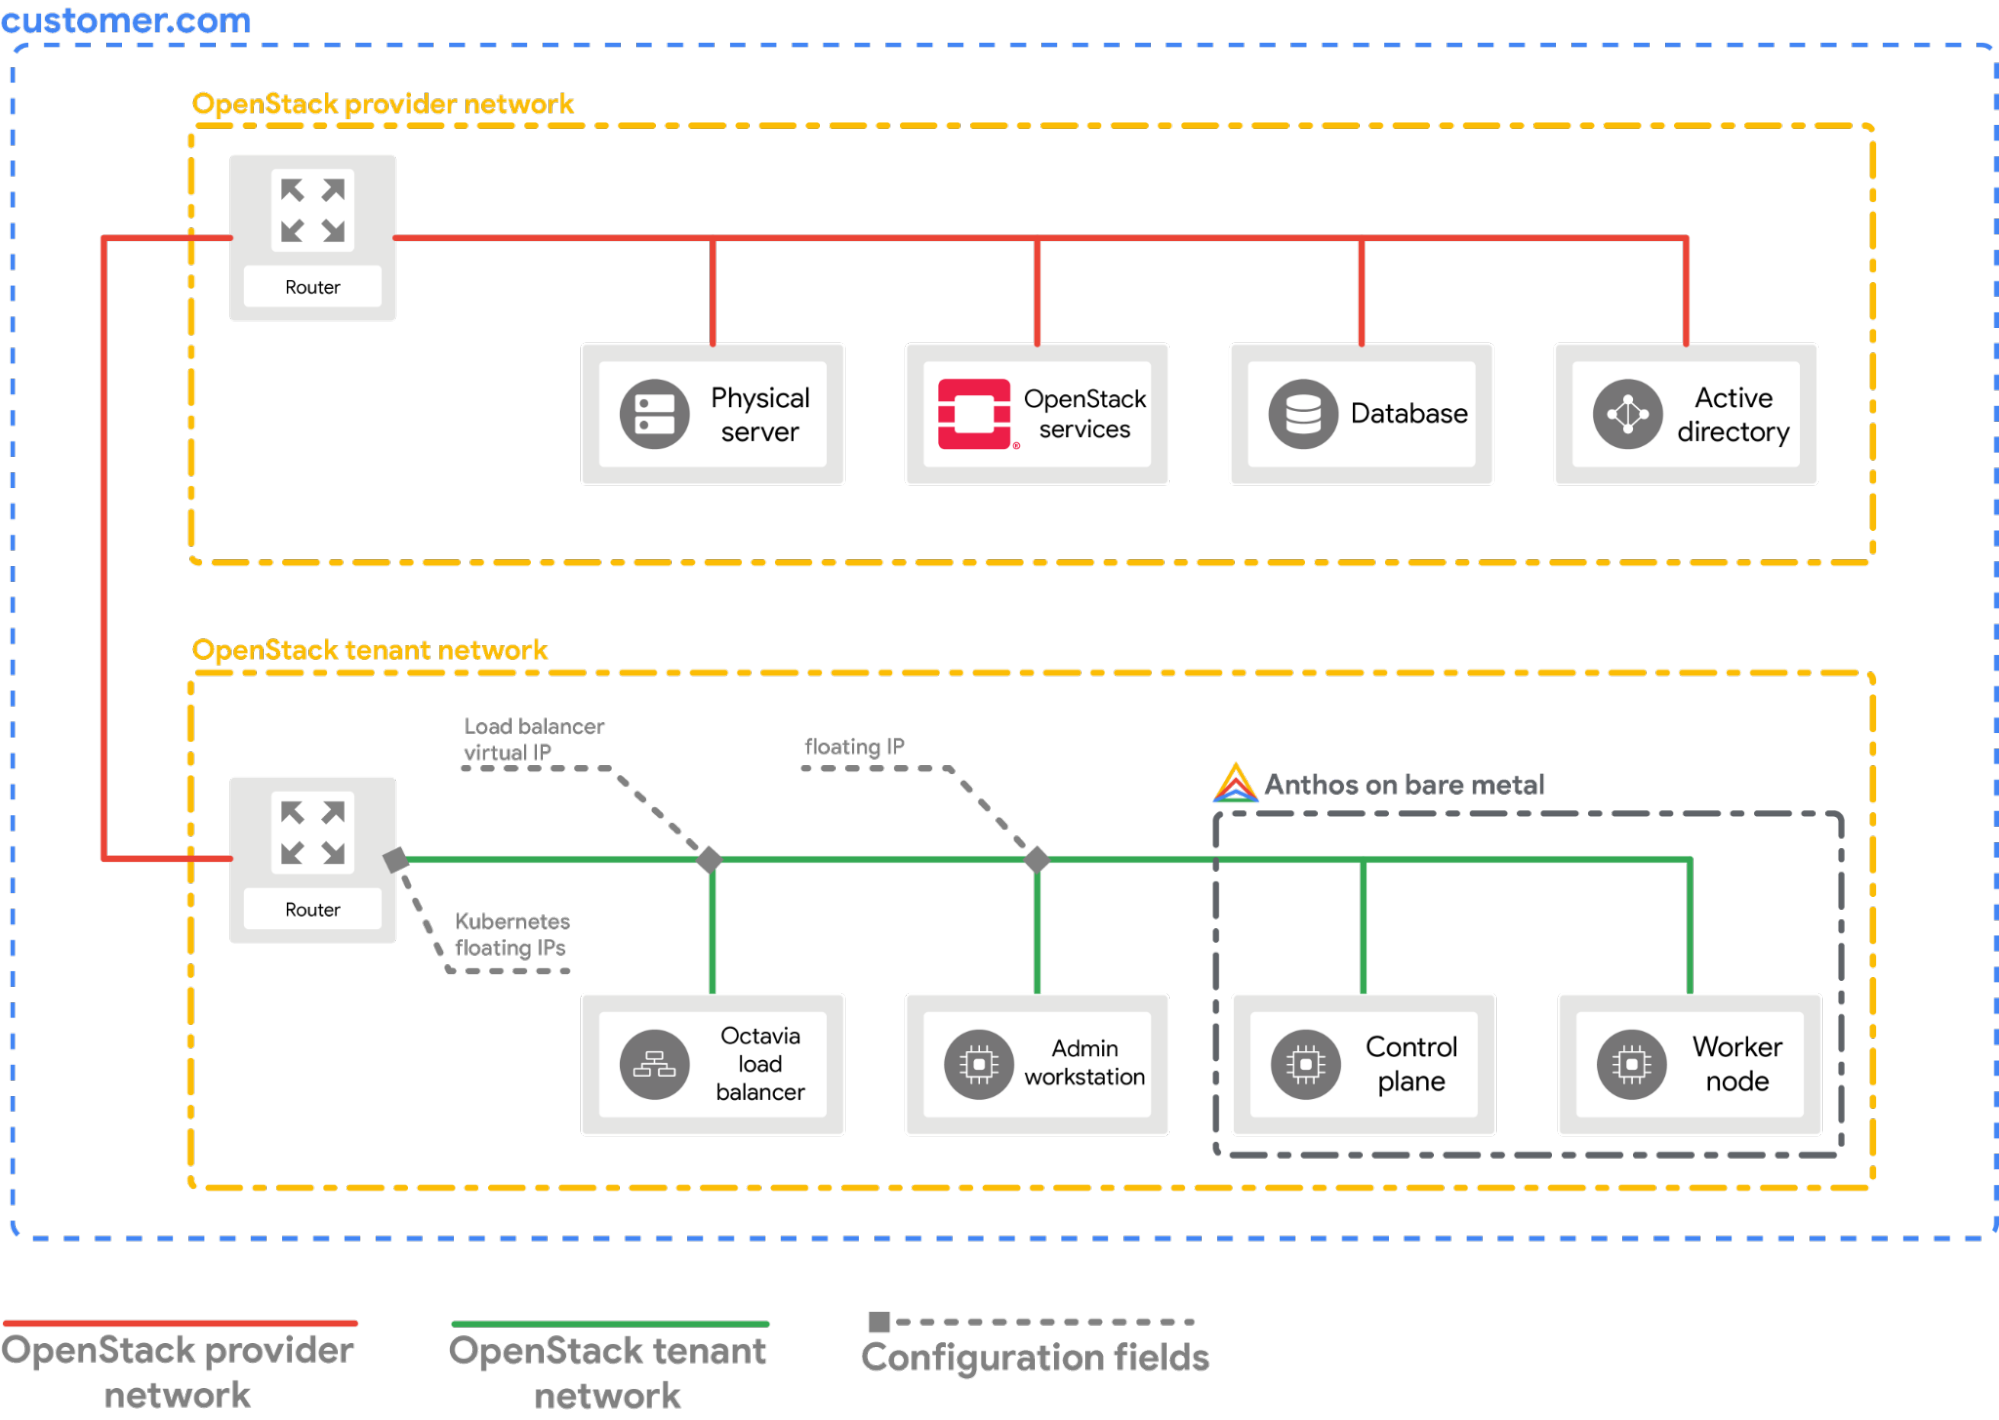
Mengonfigurasi penyedia
Bagian berikut mengasumsikan bahwa Anda memulai dari jendela terminal di
workstation lokal.
Sumber file konfigurasi klien OpenStack (openrc). Anda dapat mendownloadnya
dari OpenStack WebUI.
sourcePATH_TO_OPENRC_FILE/openrc
Buat file konfigurasi untuk Penyedia Cloud Kubernetes OpenStack.
cat > cloud.conf << EOF
[Global]
auth-url=${OS_AUTH_URL}
username=${OS_USERNAME}
password=${OS_PASSWORD}
region=RegionOne
tenant-name=admin
domain-id=default
# this is for using a self-signed cert if your using a CA then comment this line
# and point to the CA certificate using the "ca-file" arg
tls-Insecure=true
[LoadBalancer]
use-octavia=true
# this is generally the public network on OpenStack
floating-network-id=PUBLIC_NETWORK_ID
# this should be private network subnet where vip is allocated for the ABM nodes
subnet-id=ABM_NETWORK_SUBNET_ID
[BlockStorage]
bs-version=v2
EOF
Ganti kode berikut:
OS_AUTH_URL, OS_USERNAME,
OS_PASSWORD: Variabel ini seharusnya sudah ditetapkan
di lingkungan dengan me-source file openrc. Dengan demikian, data tersebut akan
otomatis diambil.
PUBLIC_NETWORK_ID: Ini adalah jaringan yang dapat diakses publik
dalam deployment OpenStack Anda tempat Alamat IP floating
dialokasikan. Dari jaringan ini, LoadBalancer IPs untuk
layanan Kubernetes akan ditetapkan. Anda dapat menggunakan
perintah satu baris
untuk mengambil IP ini dari lingkungan OpenStack.
ABM_NETWORK_SUBNET_ID: Ini adalah subnet di jaringan pribadi dalam deployment OpenStack Anda tempat IP dialokasikan untuk VM yang menjalankan software khusus Google Distributed Cloud. Anda dapat menggunakan perintah yang mirip dengan Mendapatkan ID jaringan publik di OpenStack untuk mengambil IP ini dari lingkungan OpenStack.
Ambil alamat IP floating publik dari VM abm-ws.
exportOPENSTACK_IPS=$(openstackfloatingiplist--tags=abm_ws_floatingip-fjson)exportFLOATING_IP=$(jq-c'.[]."Floating IP Address"' <<< $OPENSTACK_IPS|tr-d'"')
Salin file cloud.conf ke VM abm-ws di OpenStack.
scp./cloud.confubuntu@$FLOATING_IP:~
Gunakan SSH untuk terhubung dengan aman ke VM abm-ws dan login sebagai pengguna root.
Pengguna root seperti yang dikonfigurasi oleh skrip Terraform adalah abm.
sshubuntu@$FLOATING_IP
sudo-uabm-i
Salin file cloud.conf ke direktori $HOME pengguna root.
cp/home/ubuntu/cloud.conf$HOME
Buat Kubernetes Secret dengan konfigurasi.
# make sure the kubectl client is pointing towards your clusterexportKUBECONFIG=~/bmctl-workspace/CLUSTER_NAME/CLUSTER_NAME-kubeconfig
# store the provider configurations as a Kubernetes secret
kubectlcreatesecret-nkube-systemgenericcloud-config--from-file=cloud.conf
Instal Penyedia Cloud OpenStack untuk Kubernetes.
# create the necessary roles for the OpenStack provider
kubectlapply-fhttps://raw.githubusercontent.com/kubernetes/cloud-provider-openstack/master/manifests/controller-manager/cloud-controller-manager-roles.yaml
# create the required role-bindings for the OpenStack provider
kubectlapply-fhttps://raw.githubusercontent.com/kubernetes/cloud-provider-openstack/master/manifests/controller-manager/cloud-controller-manager-role-bindings.yaml
# create the OpenStack controller manager
kubectlapply-fhttps://raw.githubusercontent.com/kubernetes/cloud-provider-openstack/master/manifests/controller-manager/openstack-cloud-controller-manager-ds.yaml
# wait for the external IP to be assigned
kubectlgetserviceapi-server-lb
NAMETYPECLUSTER-IPEXTERNAL-IPPORT(S)AGE
api-server-lbLoadBalancer10.203.77.215172.29.249.15980:32378/TCP4m12s
Aplikasi Tempat Penjualan yang diakses menggunakan EXTERNAL-IP.
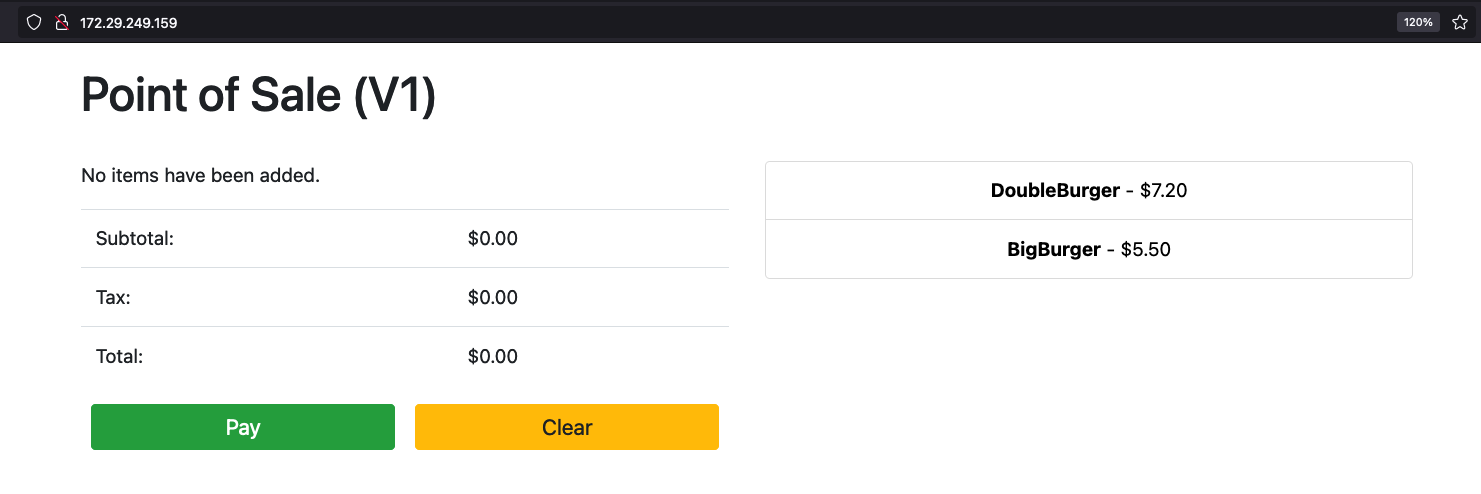
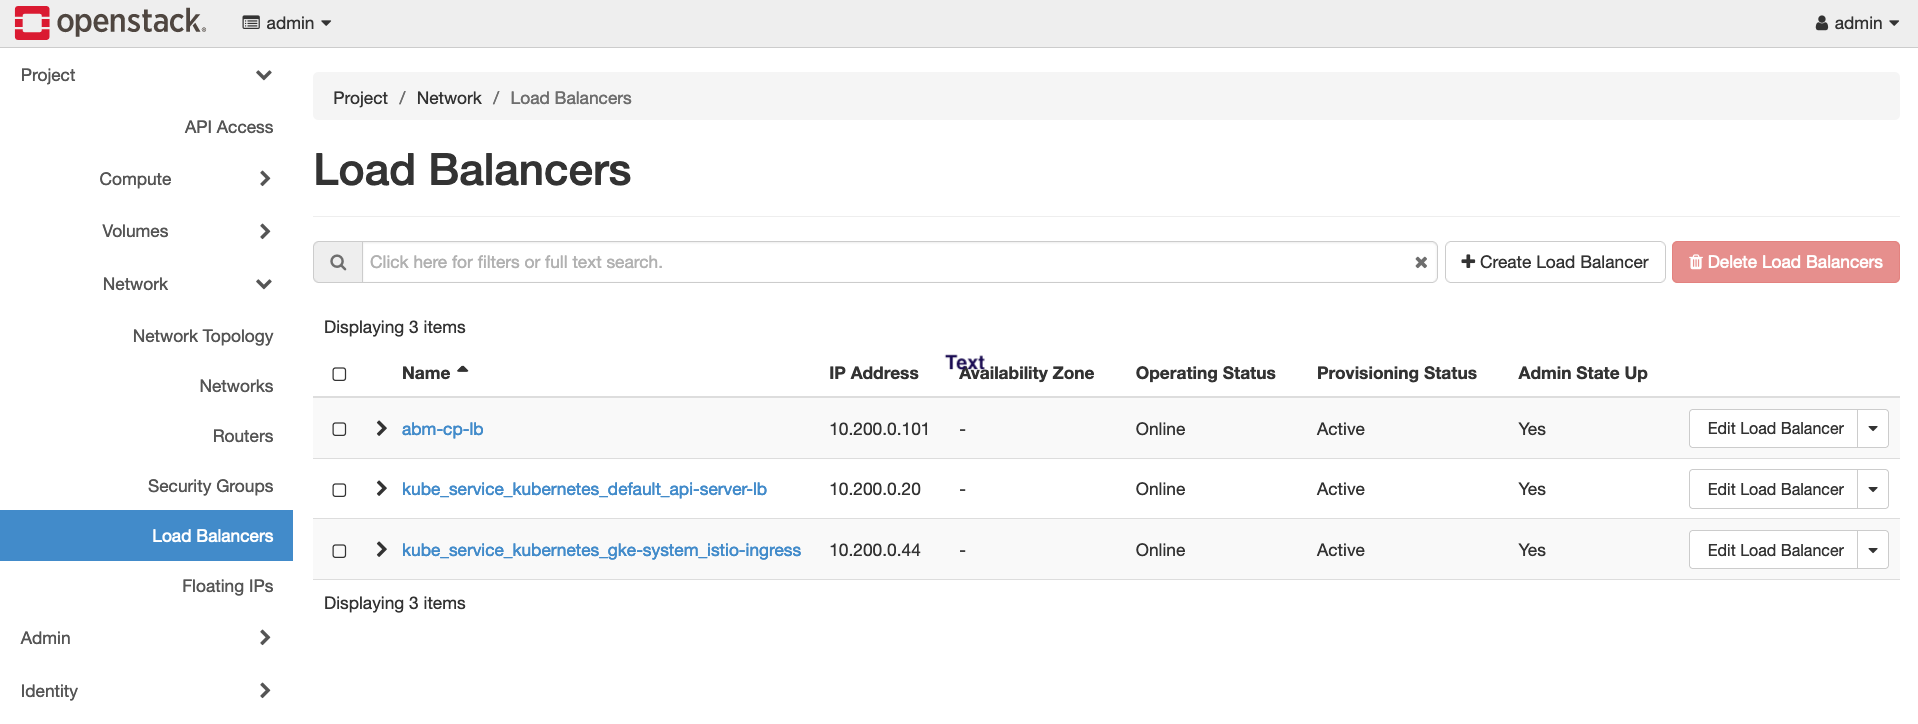
Anda dapat melihat OpenStack Load Balancer baru yang dibuat di OpenStack dengan
mengunjungi OpenStack WebUI.
[[["Mudah dipahami","easyToUnderstand","thumb-up"],["Memecahkan masalah saya","solvedMyProblem","thumb-up"],["Lainnya","otherUp","thumb-up"]],[["Sulit dipahami","hardToUnderstand","thumb-down"],["Informasi atau kode contoh salah","incorrectInformationOrSampleCode","thumb-down"],["Informasi/contoh yang saya butuhkan tidak ada","missingTheInformationSamplesINeed","thumb-down"],["Masalah terjemahan","translationIssue","thumb-down"],["Lainnya","otherDown","thumb-down"]],["Terakhir diperbarui pada 2025-09-01 UTC."],[],[],null,["This guide explains how to configure the\n[OpenStack Cloud Provider for Kubernetes](https://github.com/kubernetes/cloud-provider-openstack)\nin your bare metal cluster. The OpenStack Cloud Provider must be\nconfigured to expose Kubernetes Services using the\n[OpenStack LBaaS](https://docs.openstack.org/mitaka/networking-guide/config-lbaas.html).\n\nPrerequisites\n\nThis guide assumes that you have a cluster created with Google Distributed Cloud\nrunning in your OpenStack environment with a setup\nsimilar to what is explained in the [Deploy a bare metal cluster on\nOpenStack](/kubernetes-engine/distributed-cloud/bare-metal/docs/installing/openstack-abm-install) guide. Follow that guide first before trying\nthese steps.\n\n| **Warning:** All the commands that follow assume that the environment for Google Distributed Cloud in OpenStack was setup using this [Terraform script](https://github.com/GoogleCloudPlatform/anthos-samples/tree/master/anthos-bm-openstack-terraform#terraform-example-to-create-openstack-vms-for-anthos). Therefore, the names, such as VM name, Network name, and Root user, used in the commands are what is used by the Terraform script. Adjust the commands according to your setup if you configured the OpenStack environment manually.\n\nConfigure the provider\n\nThe following section assumes that you are starting from a terminal window in\nyour local workstation.\n\n1. Source the OpenStack client configuration (`openrc`) file. You can download\n it from the OpenStack WebUI.\n\n source \u003cvar translate=\"no\"\u003ePATH_TO_OPENRC_FILE\u003c/var\u003e/openrc\n\n2. Create the configuration file for the OpenStack Kubernetes Cloud Provider.\n\n cat \u003e cloud.conf \u003c\u003c EOF\n [Global]\n auth-url=${OS_AUTH_URL}\n username=${OS_USERNAME}\n password=${OS_PASSWORD}\n region=RegionOne\n tenant-name=admin\n domain-id=default\n # this is for using a self-signed cert if your using a CA then comment this line\n # and point to the CA certificate using the \"ca-file\" arg\n tls-Insecure=true \n\n [LoadBalancer]\n use-octavia=true\n # this is generally the public network on OpenStack\n floating-network-id=\u003cvar translate=\"no\"\u003ePUBLIC_NETWORK_ID\u003c/var\u003e\n # this should be private network subnet where vip is allocated for the ABM nodes\n subnet-id=\u003cvar translate=\"no\"\u003eABM_NETWORK_SUBNET_ID\u003c/var\u003e\n\n [BlockStorage]\n bs-version=v2\n EOF\n\n Replace the following:\n - \u003cvar translate=\"no\"\u003e\u003ccode translate=\"no\" dir=\"ltr\"\u003eOS_AUTH_URL\u003c/code\u003e\u003c/var\u003e, \u003cvar translate=\"no\"\u003e\u003ccode translate=\"no\" dir=\"ltr\"\u003eOS_USERNAME\u003c/code\u003e\u003c/var\u003e, \u003cvar translate=\"no\"\u003e\u003ccode translate=\"no\" dir=\"ltr\"\u003eOS_PASSWORD\u003c/code\u003e\u003c/var\u003e: These variables should be already set in the environment by source-ing the `openrc` file. Thus, they will be automatically picked up.\n - \u003cvar translate=\"no\"\u003e\u003ccode translate=\"no\" dir=\"ltr\"\u003ePUBLIC_NETWORK_ID\u003c/code\u003e\u003c/var\u003e: This is the publicly accessible network in your OpenStack deployment from which **Floating IP addresses** are allocated. It is from this network the `LoadBalancer IPs` for the Kubernetes services will be assigned. You can use a [one-line command](https://github.com/GoogleCloudPlatform/anthos-samples/blob/master/anthos-bm-openstack-terraform/docs/openstack_cloud_provider.md#4-get-the-id-of-the-public-network-in-openstack) to fetch this IP from your OpenStack environment.\n - \u003cvar translate=\"no\"\u003e\u003ccode translate=\"no\" dir=\"ltr\"\u003eABM_NETWORK_SUBNET_ID\u003c/code\u003e\u003c/var\u003e: This is the subnet on the private network in your OpenStack deployment from which IPs are allocated for the VMs running Google Distributed Cloud software-only. You can use a command similar to [Get the ID of the public network in OpenStack](https://github.com/GoogleCloudPlatform/anthos-samples/blob/master/anthos-bm-openstack-terraform/docs/openstack_cloud_provider.md#5-get-the-id-of-the-subnetwork-connecting-the-anthos-on-bare-metal-vms-in-openstack) to fetch this IP from your OpenStack environment.\n\n | **Note:** Edit the `cloud.conf` file to meet your needs and environment. What is shown here is only an example. For more information about all configuration parameters, see the [OpenStack Cloud Provider docs](https://github.com/kubernetes/cloud-provider-openstack/blob/master/docs/openstack-cloud-controller-manager/using-openstack-cloud-controller-manager.md#config-openstack-cloud-controller-manager).\n3. Fetch the **public floating IP address** of the `abm-ws` VM.\n\n export OPENSTACK_IPS=$(openstack floating ip list --tags=abm_ws_floatingip -f json)\n export FLOATING_IP=$(jq -c '.[].\"Floating IP Address\"' \u003c\u003c\u003c $OPENSTACK_IPS | tr -d '\"')\n\n4. Copy the `cloud.conf` file into the `abm-ws` VM in OpenStack.\n\n scp ./cloud.conf ubuntu@$FLOATING_IP:~\n\n | **Note:** If you have public key authentication configured for your VM use the `\"-o IdentitiesOnly=yes -i \u003cPATH_TO_KEY\u003e\"` flags with the SCP/SSH commands.\n5. Use SSH to connect securely to the `abm-ws` VM and sign in as a `root` user.\n\n The `root` user as configured by the\n [Terraform scripts](https://github.com/GoogleCloudPlatform/anthos-samples/tree/master/anthos-bm-openstack-terraform#terraform-example-to-create-openstack-vms-for-anthos)\n is `abm`. \n\n ssh ubuntu@$FLOATING_IP\n sudo -u abm -i\n\n6. Copy the `cloud.conf` files into the `$HOME` directory of the `root` user.\n\n cp /home/ubuntu/cloud.conf $HOME\n\n7. Create a `Kubernetes Secret` with the configuration.\n\n # make sure the kubectl client is pointing towards your cluster\n export KUBECONFIG=~/bmctl-workspace/\u003cvar translate=\"no\"\u003eCLUSTER_NAME\u003c/var\u003e/\u003cvar translate=\"no\"\u003eCLUSTER_NAME\u003c/var\u003e-kubeconfig\n\n # store the provider configurations as a Kubernetes secret\n kubectl create secret -n kube-system generic cloud-config --from-file=cloud.conf\n\n8. Install the OpenStack Cloud Provider for Kubernetes.\n\n # create the necessary roles for the OpenStack provider\n kubectl apply -f https://raw.githubusercontent.com/kubernetes/cloud-provider-openstack/master/manifests/controller-manager/cloud-controller-manager-roles.yaml\n\n # create the required role-bindings for the OpenStack provider\n kubectl apply -f https://raw.githubusercontent.com/kubernetes/cloud-provider-openstack/master/manifests/controller-manager/cloud-controller-manager-role-bindings.yaml\n\n # create the OpenStack controller manager\n kubectl apply -f https://raw.githubusercontent.com/kubernetes/cloud-provider-openstack/master/manifests/controller-manager/openstack-cloud-controller-manager-ds.yaml\n\nValidate the OpenStack integration\n\n1. Deploy the sample\n [Point-Of-Sales application](https://github.com/GoogleCloudPlatform/point-of-sale).\n\n kubectl apply -f https://raw.githubusercontent.com/GoogleCloudPlatform/anthos-samples/master/anthos-bm-openstack-terraform/resources/point-of-sales.yaml\n\n2. Verify if the application pods are running.\n\n kubectl get pods\n\n Expected output: \n\n NAME READY STATUS RESTARTS AGE\n api-server-7db4777f7f-zflk5 1/1 Running 0 74s\n inventory-58c6fb5568-dqk2x 1/1 Running 0 74s\n payments-68d5d65d5c-5mjl6 1/1 Running 0 74s\n\n3. Exposed the application through a service of type `LoadBalancer`.\n\n kubectl apply -f https://raw.githubusercontent.com/GoogleCloudPlatform/anthos-samples/master/anthos-bm-openstack-terraform/resources/point-of-sales-service.yaml\n\n4. Try accessing the service from a browser.\n\n # wait for the external IP to be assigned\n kubectl get service api-server-lb\n\n NAME TYPE CLUSTER-IP EXTERNAL-IP PORT(S) AGE\n api-server-lb LoadBalancer 10.203.77.215 172.29.249.159 80:32378/TCP 4m12s\n\n Point-Of-Sales application accessed using the `EXTERNAL-IP`.\n\n You can notice a new **OpenStack Load Balancer** being created in OpenStack by\n visiting the OpenStack WebUI."]]