預計完成時間:4 天
可操作元件擁有者:硬體
技能設定檔:部署工程師
如要重設在 Google Distributed Cloud (GDC) 實體隔離環境中執行的裝置和系統,請完成下列工作。
6.1. 目錄
- 重設程序總覽
- HPE 伺服器重設
- NetApp StorageGRID 重設
- 重設 NetApp ONTAP
- Thales HSM 重設
- 重設 Palo Alto 防火牆
- 重設 Cisco 交換器
- 其他資源
6.2. 先決條件和安全注意事項
6.2.1. 必要存取權
- 實體存取權:可存取 DC 機房,並使用故障排除車設備
- 網路存取權:管理介面連線或控制台存取權
- 憑證:所有系統的管理員存取權
- 備份:完整備份所有密鑰和設定資料
6.2.2. 安全檢查清單
- [ ] 基礎架構的實體存取權
- [ ] Break-glass 密碼已離線安全儲存
- [ ] 基礎架構備份 (如有需要)
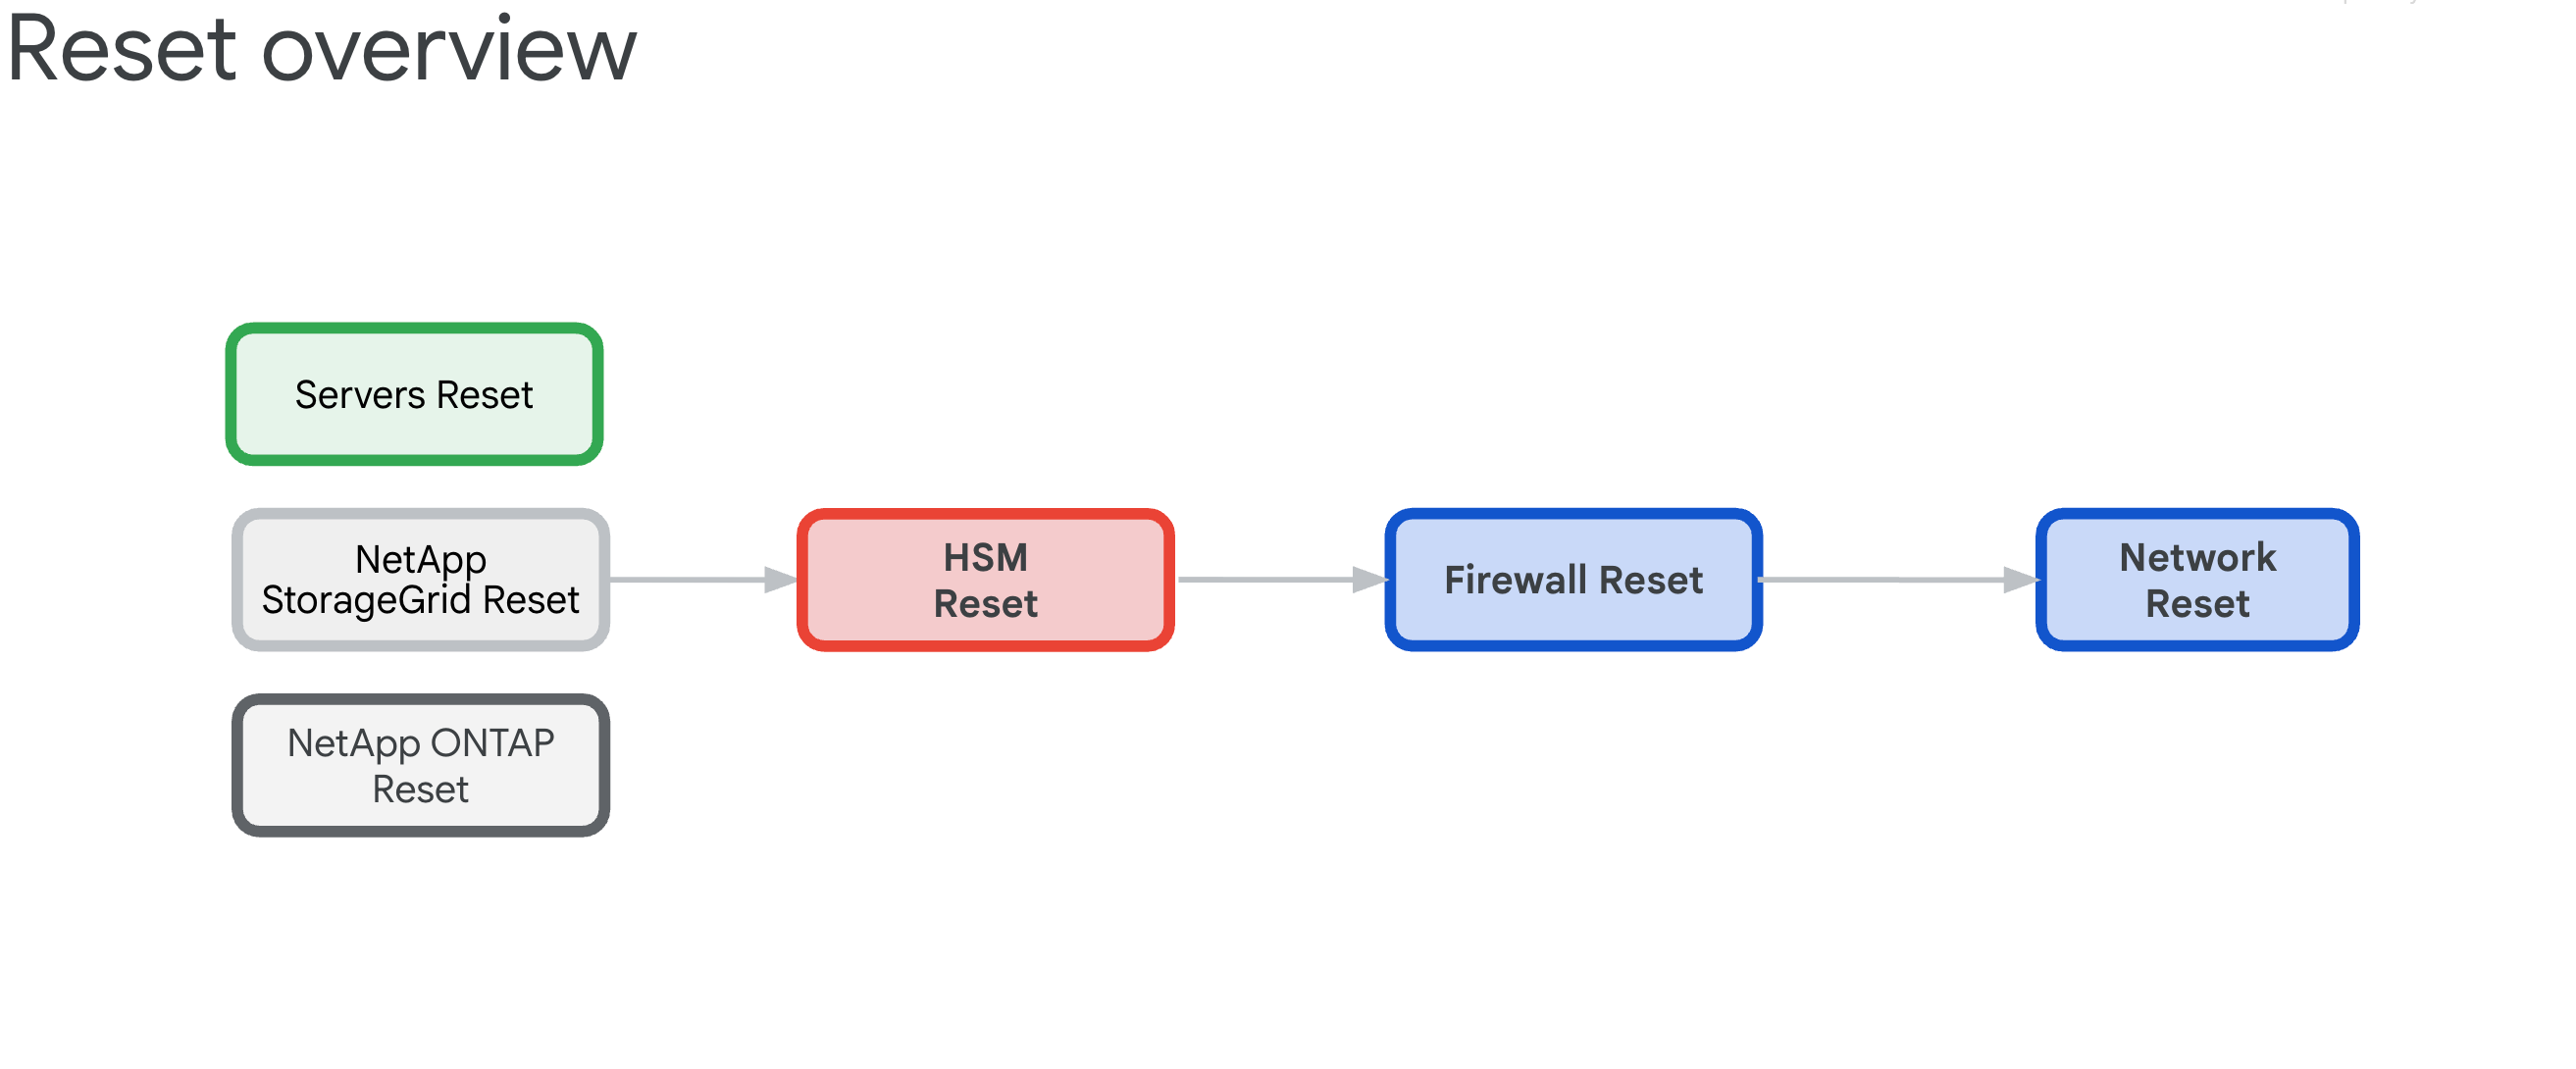
6.3. 重設程序總覽
現有 GDC 儲存格區域的重設程序,目的是要解除所有硬體設備的任何依附元件,然後還原至其結構狀態。
6.3.1. 基礎架構依附元件
這些元件具有下列相互依附關係,決定重設順序:
- 伺服器、NetApp ONTAP 和 NetApp StorageGrid 依賴 Thales HSM 裝置,因為這些裝置提供 ILO、磁碟、租戶和儲存空間的加密金鑰。
- Thales HSM 設備依賴 IDP/周邊防火牆和 Cisco 交換器連線。
- IDP/邊界防火牆依賴 Cisco 交換器網路基礎架構。
- Cisco 交換器應做為最後的資源重設,因為重設後連線會中斷。
6.3.2. 重設順序 (重大)
請確實按照以下順序進行,以免系統鎖定:
- HPE 伺服器 - 先移除 HSM 依附元件
- NetApp StorageGRID - 清除加密並重設節點
- NetApp ONTAP - 停用 HSM 並重設叢集
- Thales HSM - 恢復原廠設定並清除信任根
- 防火牆 - 恢復原廠設定
- Cisco 交換器 - 重設最後一個 (會中斷連線)
6.4. Hewlett Packard Enterprise 安全清除
有三種重設作業可供選擇,每種都是清除 iLO 金鑰管理員設定的替代方法。主要目標是移除對硬體安全模組 (HSM) 的依附元件。
一般來說,只要將 ILO 恢復原廠設定,即可清除 KMS 設定,然後在下次啟動時,伺服器啟動程序會初始化伺服器設定 BIOS 參數、清除磁碟,並重新初始化伺服器。
本節說明如何執行三種清除作業:
這些清除指令碼會使用名為 example.csv 的 CSV 檔案範例。
繼續操作前,請準備下列 CSV 檔案:
    root@example-bootstrapper:/home/ubuntu/md# cat example.csv
    ip,passd
    10.251.248.62,XXXXXXXX
    10.251.248.64,XXXXXXXX
    10.251.248.66,XXXXXXXX
    10.251.248.68,XXXXXXXX
    10.251.248.70,XXXXXXXX
    10.251.248.72,XXXXXXXX
    10.251.248.74,XXXXXXXX
    10.251.248.76,XXXXXXXX
6.4.1. iLO 恢復原廠設定
完成一般 iLO 恢復原廠設定:
建立名為
serversreset.py的檔案,並加入下列 Python 指令碼:import csv import argparse import requests import urllib3 import json urllib3.disable_warnings() PARSER = argparse.ArgumentParser(prog='serversreset.py', \ description='reset ilo to factory settings') PARSER.add_argument('-csv', '--file', help='choose the csv file', type=str) ARGS = vars(PARSER.parse_args()) headers = {'content-type': 'application/json'} payload = {'ResetType': 'Default'} url = '/redfish/v1/Managers/1/Actions/Oem/Hpe/HpeiLO.ResetToFactoryDefaults/' with open(ARGS['file'], encoding="utf8", mode='r') as csv_file: CSV_READER = csv.DictReader(csv_file) for row in CSV_READER: try: system = requests.post('https://'+row['ip']+url,data=json.dumps(payload),headers=headers,verify=False,auth=('administrator',row['passd'])) systemData = system.json() print(systemData) except Exception as err: print(err)執行下列指令,並將
example.csv替換為 CSV 檔案:python3 serversreset.py -csv example.csv輸出內容應如下所示:
{'error': {'code': 'iLO.0.10.ExtendedInfo', 'message': 'See @Message.ExtendedInfo for more information.', '@Message.ExtendedInfo': [{'MessageId': 'iLO.2.15.ResetInProgress'}]}}
{'error': {'code': 'iLO.0.10.ExtendedInfo', 'message': 'See @Message.ExtendedInfo for more information.', '@Message.ExtendedInfo': [{'MessageId': 'iLO.2.15.ResetInProgress'}]}}
{'error': {'code': 'iLO.0.10.ExtendedInfo', 'message': 'See @Message.ExtendedInfo for more information.', '@Message.ExtendedInfo': [{'MessageId': 'iLO.2.15.ResetInProgress'}]}}
6.4.2. 其他手動 iLO 步驟
使用 iLO UI 手動重設 iLO:
依序選取「iLO」>「Administration」>「Key Manager」 >「Delete Settings」。
在 BIOS 控制台中,依序選取「System Utilities」>「System Configuration」>「Embedded Raid」>「Administration」>「Reset To Default」。
將介面設為僅透過 LOM1 進行網路開機。所有 GPU 節點都「沒有」LOM1 卡,而是 Intel 卡。
將 iLO 網路設為 DHCP。
6.4.3. 重設 BIOS
請按照下列步驟重設 BIOS:
建立名為
biosreset.py的檔案,並加入下列 Python 指令碼:import csv import argparse import requests import urllib3 import json urllib3.disable_warnings() PARSER = argparse.ArgumentParser(prog='biosreset.py', \ description='reset BIOS to factory settings') PARSER.add_argument('-csv', '--file', help='choose the csv file', type=str) ARGS = vars(PARSER.parse_args()) headers = {'content-type': 'application/json'} payload = {} with open(ARGS['file'], encoding="utf8", mode='r') as csv_file: CSV_READER = csv.DictReader(csv_file) for row in CSV_READER: try: system = requests.post('https://'+row['ip']+'/redfish/v1/systems/1/bios/Actions/Bios.ResetBios/',data=json.dumps(payload),headers=headers,verify=False,auth=('administrator',row['passd'])) systemData = system.json() print(systemData) except Exception as err: print(err)執行下列指令,並將
example.csv替換為 CSV 檔案:python3 biosreset.py -csv example.csv輸出內容應如下所示:
{'error': {'code': 'iLO.0.10.ExtendedInfo', 'message': 'See @Message.ExtendedInfo for more information.', '@Message.ExtendedInfo': [{'MessageId': 'iLO.2.15.SystemResetRequired'}]}}執行指令後,伺服器會處於開機狀態。您必須執行下列指令碼,才能關閉所有伺服器:
import csv
import argparse
import requests
import urllib3
import json
urllib3.disable_warnings()
PARSER = argparse.ArgumentParser(prog='power-ilo.py', \
    description='power off server')
PARSER.add_argument('-csv', '--file', help='choose the csv file', type=str)
ARGS = vars(PARSER.parse_args())
headers = {'content-type': 'application/json'}
payload = {'ResetType': 'PushPowerButton'}
with open(ARGS['file'], encoding="utf8", mode='r') as csv_file:
    CSV_READER = csv.DictReader(csv_file)
    for row in CSV_READER:
        try:
            system = requests.post(
                'https://' + row['ip'] +
                '/redfish/v1/systems/1/Actions/ComputerSystem.Reset/',
                data=json.dumps(payload),
                headers=headers,
                verify=False,
                auth=('administrator', row['passd']))
            systemData = system.json()
            if 'Success' in systemData['error']['@Message.ExtendedInfo'][0][
                    'MessageId']:
                print(f"ilo with ip {row['ip']} succeeded")
                #print(systemData)
            else:
                print(f"ilo with ip {row['ip']} failed")
                print(systemData)
        except Exception as err:
            print(err)
手動關閉伺服器電源:
python3 power-ilo.py -csv ~/servers.csv- (選用) 如要檢查狀態,請使用下列指令碼:
import csv
import argparse
import requests
import urllib3
import json
urllib3.disable_warnings()
PARSER = argparse.ArgumentParser(prog='ilostatus.py', \
description='check power status of server')
PARSER.add_argument('-csv', '--file', help='choose the csv file', type=str)
ARGS = vars(PARSER.parse_args())
headers = {'content-type': 'application/json'}
with open(ARGS['file'], encoding="utf8", mode='r') as csv_file:
    CSV_READER = csv.DictReader(csv_file)
    for row in CSV_READER:
      try:
        system = requests.get('https://'+row['ip']+'/redfish/v1/Systems/1',headers=headers,verify=False,auth=('administrator',row['passd']))
        systemData = system.json()
        print(f"ilo with ip {row['ip']} has power status of {systemData['PowerState']}")
        if 'Success' in systemData['error']['@Message.ExtendedInfo'][0]['MessageId']:
            print(f"ilo with ip {row['ip']} succeeded")
            print(systemData)
        else:
            print(f"ilo with ip {row['ip']} failed")
            print(systemData)
      except Exception as err:
        pass
執行下列指令:
python3 ilostatus.py -csv ~/servers.csv輸出內容應如下所示:
ilo with ip 172.22.112.96 has power status of Off
ilo with ip 172.22.112.97 has power status of Off
ilo with ip 172.22.112.98 has power status of Off
ilo with ip 172.22.112.100 has power status of Off
ilo with ip 172.22.112.101 has power status of Off
ilo with ip 172.22.112.102 has power status of Off
6.4.4. 安全清除
在伺服器 POST 畫面中按下 F10 鍵。這會啟動智慧佈建。
啟動「Intelligent Provisioning」後,按一下「First Time Setup Wizard」(首次設定精靈) 後方的向下箭頭,略過精靈。
略過精靈提示,然後按一下「是」。
按一下「執行維護作業」。
按一下「One Button Secure Erase」(一鍵安全清除)。
系統顯示訊息,指出您的權限不足。按一下「登入」,然後輸入管理員憑證。
按一下 [完成]。
按一下「提交」。
確認要執行安全清除,然後輸入 ERASE。
按一下「清除」。
按一下 [Yes] (是) 加以確認。
在「工作佇列」部分中,按一下「立即啟動」。
在 2 分鐘內按照提示點選「確定」。
電腦會重新啟動,請等待約 10 到 15 分鐘,期間請勿觸碰任何裝置。
安全清除完成後,請在 POST 啟動期間按一下 F9,返回 BIOS。
依序前往「Embedded Applications」>「Integrated Management Log (IML)」>「View IML」>「OK」。 系統會顯示「One-button secure erase completed」(一鍵安全清除完成) 訊息:

建立名為
serversreset.py的檔案,並加入下列 Python 指令碼:import csv import argparse import requests import urllib3 import json urllib3.disable_warnings() PARSER = argparse.ArgumentParser(prog='secureerase.py', \ description='reset ilo to factory settings') PARSER.add_argument('-csv', '--file', help='choose the csv file', type=str) ARGS = vars(PARSER.parse_args()) headers = {'content-type': 'application/json'} payload = {'SystemROMAndiLOErase': True , 'UserDataErase': True} with open(ARGS['file'], encoding="utf8", mode='r') as csv_file: CSV_READER = csv.DictReader(csv_file) for row in CSV_READER: try: system = requests.post('https://'+row['ip']+'/redfish/v1/Systems/1/Actions/Oem/Hpe/HpeComputerSystemExt.SecureSystemErase/',data=json.dumps(payload),headers=headers,verify=False,auth=('administrator',row['passd'])) systemData = system.json() print(systemData) except Exception as err: print(err)執行下列指令,並將
example.csv替換為 CSV 檔案:python serversreset.py -csv example.csv執行指令後,伺服器會處於關機狀態。您必須手動開啟伺服器電源。
6.5. 重設 NetApp StorageGRID 裝置
6.5.1. 必要條件
重設 NetApp StorageGRID 裝置前,請務必詳閱下列事項: - 如果系統已啟用節點加密和/或磁碟機加密,請按照「停用 HSM 網站加密」一文中的步驟操作。 否則,請繼續重設 StorageGRID 系統。
6.5.2. 在 Storage Controller 節點上停用 StorageGRID HSM 網站加密
如要取得儲存空間控制器節點的 IP (每個儲存空間節點有兩個 IP),請執行下列指令:
$ kubectl get objectstoragestoragenodes -n gpc-system -o custom-columns="NAME:metadata.name,COMPUTE_NODEA_IP:.spec.network.controllerAManagementIP,COMPUTE_NODEB_IP:.spec.network.controllerBManagementIP"
NAME           COMPUTE_NODEA_IP    COMPUTE_NODEB_IP
ak-ac-objs01   172.22.210.166/24   172.22.210.167/24
ak-ac-objs02   172.22.210.170/24   172.22.210.171/24
ak-ac-objs03   172.22.210.174/24   172.22.210.175/24
如果 StorageGRID 系統先前已啟用 HSM,則必須先移除加密功能,才能恢復原廠設定。請針對每個儲存節點執行這些步驟,然後再重設裝置。否則磁碟和系統可能會遭到鎖定。
登入 Object Storage 網站,然後前往側欄中的節點清單。
按一下儲存空間節點的名稱。
前往「SANtricity System Manager」分頁。
依序前往「設定」 >「系統」 >「安全金鑰管理」。

選取「停用外部金鑰管理」,然後輸入密碼片語,即可下載備份金鑰。
6.5.3. StorageGRID 管理節點和 Storage Compute 節點恢復原廠設定
如要取得管理節點的 IP,請按照下列步驟操作:
$ kubectl get objectstorageadminnodes -n gpc-system
NAME              SITE NAME       MANAGEMENT IP       READY   AGE
ak-ac-objsadm01   ak-obj-site-1   172.22.210.160/24   True    12d
ak-ac-objsadm02   ak-obj-site-1   172.22.210.162/24   True    12d
如要取得 Storage Compute 節點的 IP,請執行下列指令:
$ kubectl get objectstoragestoragenodes -n gpc-system
NAME           SITE NAME       MANAGEMENT IP       READY   AGE
ak-ac-objs01   ak-obj-site-1   172.22.210.164/24   True    12d
ak-ac-objs02   ak-obj-site-1   172.22.210.168/24   True    12d
ak-ac-objs03   ak-obj-site-1   172.22.210.172/24   True    12d
如要將 StorageGRID 裝置恢復原廠設定,您必須為網站中的每個節點 (儲存和管理節點) 完成下列步驟:
擷取每個節點的管理 IP。您可以從 cell.yaml 取得,方法是尋找
ObjectStorageStorageNode和ObjectStorageAdminNode。您也可以在根管理叢集的節點資源中找到這些資訊。擷取密碼,並使用 SSH 連線至節點:
如果節點未安裝 StorageGRID,請分別使用
admin/bycast或root/netapp1!做為使用者名稱和密碼。如果 ssh 無法運作,請使用 SSH 通訊埠 8022。如果節點已安裝 StorageGRID,但未設定網站,請分別使用
admin/bycast或root/bycast做為使用者名稱和密碼。如果已設定網站,且節點屬於該網站:
擷取佈建通關密語。這項資訊會儲存在名為
grid-secret的密鑰中,您可以在 cell.yaml 檔案中找到該密鑰。您也可以選擇執行下列指令。請務必使用 Base64 解碼密碼:echo $(kubectl get secret -n gpc-system grid-secret -ojsonpath="{.data.grid-management-provisioning-password}" | base64 -d)在 Object Storage Site UI 中,依序前往「Maintenance」 >「System」 >「Recovery package」,輸入佈建密碼片語後即可下載復原套件。

下載完成後,請解壓縮 tar 檔案。這會包含另一個 tarball:
GIDXXXXX_REV1_SAID.zip。解壓縮該 tarball,找出Passwords.txt檔案。請使用Password進行 SSH 和根存取,並忽略SSH Access Password。範例檔案:
Password Data for Grid ID: 546285, Revision: 1
Revision Prepared on: 2022-06-13 20:49:56 +0000

Server "root" and "admin" Account Passwords
Server Name            Password          SSH Access Password
____________________________________________________________
alatl14-gpcstgeadm01   <removed>     <removed>
alatl14-gpcstgeadm02   <removed>     <removed>
alatl14-gpcstgecn01    <removed>     n/a
alatl14-gpcstgecn02    <removed>     n/a
alatl14-gpcstgecn03    <removed>     n/a
開啟節點的序列埠主控台,或使用 SSH 連線至節點:
ssh -o ProxyCommand=None -o StrictHostKeyChecking=no \
-o UserKnownHostsFile=/dev/null admin@<node-management-ip>
輸入登入憑證。如要取得 sudo 權限,請輸入
su -,然後輸入在第二個步驟中取得的根密碼。輸入
sgareinstall指令,然後按下y鍵,繼續重設裝置。如果裝置已啟用加密功能,重設完成後,請按照這些步驟刪除磁碟集區和 SSD 快取。
6.5.4. 刪除儲存空間控制器的節點上的磁碟集區和 SSD 快取
如要取得儲存空間控制器節點的 IP (每個儲存空間節點有兩個 IP),請執行下列指令:
$ kubectl get objectstoragestoragenodes -n gpc-system -o custom-columns="NAME:metadata.name,COMPUTE_NODEA_IP:.spec.network.controllerAManagementIP,COMPUTE_NODEB_IP:.spec.network.controllerBManagementIP"
NAME           COMPUTE_NODEA_IP    COMPUTE_NODEB_IP
ak-ac-objs01   172.22.210.166/24   172.22.210.167/24
ak-ac-objs02   172.22.210.170/24   172.22.210.171/24
ak-ac-objs03   172.22.210.174/24   172.22.210.175/24
如果裝置已啟用加密功能,且節點已按照上一節的步驟重設,則必須刪除磁碟集區,並清除磁碟機。您必須先完成這項操作,才能重新啟動網站,以便建立新的磁碟集區。請針對網站中的每個儲存空間節點 (e2860 儲存空間控制器) 執行下列步驟 (也稱為 controllerAManagementIP):
開啟網路瀏覽器並前往
https://<storage-node-controller-ip>:8443,然後輸入憑證。如果無法存取 SANtricity 憑證,請按照這些步驟操作。依序前往「儲存空間」>「集區和磁碟區群組」。
刪除 SSD 快取:
選取要醒目顯示的 SSD 快取。
選取「Uncommon Tasks」(不常見的工作) 下拉式選單,然後按一下「Delete」(刪除)。

刪除磁碟集區:
選取磁碟集區,將其反白顯示。
選取「Uncommon Tasks」(不常見的工作) 下拉式選單,然後按一下「Delete」(刪除)。

請嘗試建立新的磁碟集區。系統會顯示對話方塊,指出無法建立磁碟,並要求清除磁碟機。

由於未指派的啟用安全防護磁碟機無法用於建立集區,因此您必須先刪除這些磁碟機。按一下「是 - 讓我選取要清除的磁碟機」單選按鈕,然後選取要清除的所有磁碟機。確認清除作業,然後按一下「確定」。請勿繼續建立新集區。
按照「移除節點加密」一節中提供的步驟操作。
6.5.5. 移除 StorageGRID 管理節點和 Storage Compute 節點的節點加密
如要取得管理節點的 IP,請按照下列步驟操作:
$ kubectl get objectstorageadminnodes -n gpc-system
NAME              SITE NAME       MANAGEMENT IP       READY   AGE
ak-ac-objsadm01   ak-obj-site-1   172.22.210.160/24   True    12d
ak-ac-objsadm02   ak-obj-site-1   172.22.210.162/24   True    12d
如要取得 Storage Compute 節點的 IP,請執行下列指令:
$ kr get objectstoragestoragenodes -n gpc-system
NAME           SITE NAME       MANAGEMENT IP       READY   AGE
ak-ac-objs01   ak-obj-site-1   172.22.210.164/24   True    12d
ak-ac-objs02   ak-obj-site-1   172.22.210.168/24   True    12d
ak-ac-objs03   ak-obj-site-1   172.22.210.172/24   True    12d
如果裝置已啟用加密功能,且節點已按照這些步驟重設,磁碟集區和 SSD 快取也已按照這些步驟刪除,請在每個節點上執行下列步驟,移除節點加密:
前往 StorageGRID 設備安裝程式 UI。
依序前往「Configure Hardware」>「Node Encryption」。
按一下「清除 KMS 金鑰並刪除資料」。

清除作業觸發後,控制器會重新啟動,這項作業大約需要 15 分鐘。
6.5.6. 重新安裝 StorageGRID
手動重新啟動每個節點。
開啟節點的序列埠控制台,擷取 GRUB 開機載入程式選單,然後選取「StorageGRID Appliance: Force StorageGRID reinstall」(StorageGRID 裝置:強制重新安裝 StorageGRID)。

6.5.7. 取得 SANtricity 憑證
開啟任一 SANtricity 控制器的序列主控台。
使用下列憑證登入:
- 使用者名稱:
spri - 密碼:
SPRIentry
- 使用者名稱:
登入後,您會看到類似下方的選單:
Service Interface Main Menu
==============================
1)Display IP Configuration
2)Change IP Configuration
3)Reset Storage Array Administrator Password
4)Display 7-segment LED codes
5)Disable SAML
6)Unlock remote admin account
Q)Quit Menu
Enter Selection: 3
Are you sure that you want to reset the Storage Array Password ? (Y/N): Y
Storage Array Password reset successful
登入 SANtricity 控制器,即可重設密碼。
6.6. 重設 NetApp ONTAP 裝置
6.6.1. 必要條件
重設 NetApp ONTAP 裝置前,請務必詳閱下列事項:
如果系統先前已啟用硬體安全模組 (HSM),則必須先按照「停用硬體安全模組」一文中的步驟操作,才能重設 ONTAP 系統。
這項作業會刪除所有 CipherTrust Manager 資料,包括但不限於金鑰、備份、備份金鑰和系統記錄。
請確認您已備份所有資料和備份金鑰,且備份內容有效。
如果可以使用內嵌 HSM,這項作業不會重設 HSM。
選用:強烈建議您在這項作業完成後重新初始化內嵌 HSM,將其設定為信任根。
如果使用遠端 PIN 碼輸入裝置 (PED),交易完成後必須重新連線。
這項作業最多可能需要 15 分鐘才能完成。請務必設定備援電源。
6.6.2. 停用硬體安全模組
如果先前是使用 HSM 啟用系統,請先執行下列步驟,再重設 ONTAP 系統。否則磁碟和系統可能會遭到鎖定。在 ONTAP 叢集上執行下列指令:
將權限層級設為進階:
set -privilege advanced列出磁碟使用的資料金鑰和聯邦資訊處理標準 (FIPS) 驗證金鑰:
storage encryption disk show針對系統中的每個磁碟,將節點的資料和 FIPS 驗證金鑰 ID 設回預設 MSID 0x0:
storage encryption disk modify -disk * -fips-key-id 0x0
storage encryption disk modify -disk * -data-key-id 0x0
使用下列指令確認作業是否成功:
storage encryption disk show-status重複執行
show-status指令,直到收到Disks Begun == Disks Done為止。這表示作業已完成。cluster1:: storage encryption disk show-status FIPS Latest Start Execution Disks Disks Disks Node Support Request Timestamp Time (sec) Begun Done Successful ------- ------- -------- ------------------ ---------- ------ ------ ---------- cluster1 true modify 1/18/2022 15:29:38 3 14 5 5 1 entry was displayed.移除外部金鑰管理工具設定:
如果 HSM 連線已啟動,請直接前往步驟 f。如果 HSM 連線中斷,請前往步驟 b。
cluster1::> security key-manager external show-status執行
set -priv diag,進入diag模式。執行下列指令,顯示所有磁碟區加密金鑰。
debug smdb table kmip_external_key_cache_mdb_v2 show。收集
vserver-id屬性。針對所有金鑰伺服器執行下列指令,刪除金鑰:
debug smdb table kmip_external_key_cache_mdb_v2 delete -vserver-id <vserver-id> -key-id * -key-server <key-server endpoint>。使用 ONTAP 使用者介面刪除所有磁碟區,或從控制台手動刪除磁碟區。
如果是從控制台刪除,您必須忽略節點的根磁碟區。這些通常會命名為
vol0,並以其中一個節點做為vserver。一般來說,凡是以節點做為vserver的磁碟區,都不允許刪除,也不應刪除。如果無法透過 UI 刪除上一個步驟中的
vol0以外的其他磁碟區,請嘗試使用 CLI:cluster1::> vol offline -volume volume_to_be_deleted -vserver vserve-id cluster1::> vol delete -volume volume_to_be_deleted -vserver vserver-id如要透過 UI 登入儲存空間叢集,請使用下列指令從密鑰取得使用者名稱和密碼,並將 CELL_ID 替換為您要安裝的儲存空間叢集專屬 ID:
kubectl get secret -n gpc-system ontap-CELL_ID-stge-clus-01-credential -o jsonpath='{.data.netapp_username}' | base64 --decode kubectl get secret -n gpc-system ontap-CELL_ID-stge-clus-01-credential -o jsonpath='{.data.netapp_password}' | base64 --decode然後前往「磁碟區」,選取所有磁碟區,然後按一下「刪除」。您必須為每個網頁重複執行多次。 注意:如果系統顯示無法刪除磁碟區的錯誤,請放心忽略。詳情請參閱 NetApp 知識庫。
ag-stge-clus-01::*> vol show
Vserver   Volume       Aggregate    State      Type       Size  Available Used%
--------- ------------ ------------ ---------- ---- ---------- ---------- -----
ag-ad-stge01-01 vol0   aggr0_ag_ad_stge01_01 online RW 151.3GB    84.97GB   40%
ag-ad-stge01-02 vol0   aggr0_ag_ad_stge01_02 online RW 151.3GB    86.69GB   39%
ag-ad-stge02-01 vol0   aggr0_ag_ad_stge02_01 online RW 151.3GB    83.62GB   41%
ag-ad-stge02-02 vol0   aggr0_ag_ad_stge02_02 online RW 151.3GB    85.97GB   40%
ag-ad-stge03-01 vol0   aggr0_ag_ad_stge03_01 online RW 151.3GB    89.19GB   37%
ag-ad-stge03-02 vol0   aggr0_ag_ad_stge03_02 online RW 151.3GB    88.74GB   38%
刪除所有磁碟區後,請執行下列指令來清除復原佇列:
recovery-queue purge-all -vserver <vserver>。執行下列指令,刪除外部金鑰管理員:
clusterl::> security key-manager external remove-servers -vserver
<CLUSTER_NAME> -key-servers <IP1:PORT,IP2:PORT,...>
。 完成這個步驟後,您可能會收到下列錯誤訊息:Error: command failed: The key server at "172.22.112.192" contains authentication keys that are currently in use and not available from any other configured key server.這個錯誤表示有剩餘的金鑰。如要刪除其餘金鑰,請按照下列步驟操作:
如要列出其餘金鑰,請執行下列指令:
security key-manager key query輸出結果會與下列範例相似:
               Node: ag-ad-stge01-01
            Vserver: ag-stge-clus-01
        Key Manager: 172.22.112.192:5696
   Key Manager Type: KMIP
 Key Manager Policy: -
Key Tag                               Key Type Encryption   Restored
------------------------------------  -------- ------------ --------
ag-ad-stge01-01                       NSE-AK   AES-256      true
    Key ID: 00000000000000000200000000000100454007f1854b3e3f5c90756bc5cfa6cc0000000000000000
請記下先前輸出內容中的「金鑰 ID」值。使用
security key-manager key delete -key-id指令 + 金鑰 ID 值,刪除其餘金鑰:security key-manager key delete -key-id 00000000000000000200000000000100454007f1854b3e3f5c90756bc5cfa6cc0000000000000000重複步驟 i 和 j,刪除其餘金鑰。完成後,輸出內容會類似以下範例:
ag-stge-clus-01::*> security key-manager key query
No matching keys found.
6.6.3. 重設 ONTAP 節點
如要重設 ONTAP 節點,請按照下列步驟操作:
在系統提示中輸入
system node reboot指令,重新啟動節點並存取開機選單。注意:您可以放心忽略系統重新啟動警告。範例:
ag-stge-clus-01::> system reboot -node ag-ad-stge03-02
Warning: Are you sure you want to reboot node "ag-ad-stge03-02"? {y|n}: y
Error: Could not migrate LIFs away from node: Failed to migrate one or more LIFs away from node "ag-ad-stge03-02". Use the "network interface show -curr-node ag-ad-stge03-02" command to
        identify LIFs that could not be migrated off that node. Use the "network interface migrate" command to manually migrate the LIFs off the node.
        Reissue the command with "-skip-lif-migration-before-reboot" to skip the migration and continue with takeover.
ag-stge-clus-01::> system reboot -node ag-ad-stge03-02 -skip-lif-migration-before-reboot
Warning: Are you sure you want to reboot node "ag-ad-stge03-02"? {y|n}: y
Connection to 172.22.115.134 closed.
ag-stge-clus-01::> system reboot -node ag-ad-stge02-02 Error: command failed: Taking node "ag-ad-stge02-02" out of service might result in a data service failure and client disruption for the entire cluster. If possible, bring an additional node online to improve the resiliency of the cluster and to ensure continuity of service. Verify the health of the node using the "cluster show" command, then try the command again, or provide "-ignore-quorum-warnings" to bypass this check. ag-stge-clus-01::> system reboot -node ag-ad-stge02-02 -ignore-quorum-warnings Warning: Are you sure you want to reboot node "ag-ad-stge02-02"? {y|n}: y Error: Could not migrate LIFs away from node: Failed to migrate one or more LIFs away from node "ag-ad-stge02-02". Use the "network interface show -curr-node ag-ad-stge02-02" command to identify LIFs that could not be migrated off that node. Use the "network interface migrate" command to manually migrate the LIFs off the node. Reissue the command with "-skip-lif-migration-before-reboot" to skip the migration and continue with takeover. ag-stge-clus-01::> system reboot -node ag-ad-stge02-02 -ignore-quorum-warnings -skip-lif-migration-before-reboot Warning: Are you sure you want to reboot node "ag-ad-stge02-02"? {y|n}: y Connection to 172.22.115.132 closed.如果位於
LOADER選單,請輸入boot_ontap以繼續重新啟動。在重新啟動程序中,系統提示時按下Ctrl-C即可顯示開機選單。 節點會顯示開機選單的下列選項:(1) Normal Boot. (2) Boot without /etc/rc. (3) Change password. (4) Clean configuration and initialize all disks. (5) Maintenance mode boot. (6) Update flash from backup config. (7) Install new software first. (8) Reboot node. (9) Configure Advanced Drive Partitioning Selection (1-9)?選取選項
(9) Configure Advanced Drive Partitioning。 節點會顯示下列選項:* Advanced Drive Partitioning Boot Menu Options * ************************************************* (9a) Destroy aggregates, unpartition all disks and remove their ownership information. (9b) Clean configuration and initialize node with partitioned disks. (9c) Clean configuration and initialize node with whole disks. (9d) Reboot the node. (9e) Return to main boot menu. (9f) Remove disk ownership.系統要求終止時,請選取選項
9a並輸入no。 節點會在9a後再次顯示下列選項:(9a) Unpartition all disks and remove their ownership information. (9b) Clean configuration and initialize node with partitioned disks. (9c) Clean configuration and initialize node with whole disks. (9d) Reboot the node. (9e) Return to main boot menu. ```在繼續操作之前,請先為叢集中的所有儲存空間節點執行
9a作業。針對每個節點執行選項
9b,然後輸入yes確認。(9a) Unpartition all disks and remove their ownership information. (9b) Clean configuration and initialize node with partitioned disks. (9c) Clean configuration and initialize node with whole disks. (9d) Reboot the node. (9e) Return to main boot menu.如果存在 HA 配對,系統會顯示以下訊息。請確認叢集中的所有節點都已完成步驟 9a,再對節點執行步驟 9b。
Selection (9a-9f)?: 9b
9b
Option (9a) MUST BE COMPLETED on BOTH nodes in an HA pair (and DR/DR-AUX partner nodes if applicable)
prior to starting option (9b).
Has option (9a) been completed on all the nodes (yes/no)? yes
yes
當畫面上顯示
Welcome to the cluster setup wizard訊息時,即表示重設完成。
6.7. 重設 Thales k570
如要重設 Thales k570,請先將 Ciphertrust Manager 恢復原廠設定,然後重設 Luna HSM。
6.7.1. 系統恢復原廠設定
為 HSM 憑證建立臨時工作目錄:
TMPPWDDIR=/run/user/$(id --user)/hsm
mkdir -p $TMPPWDDIR
chmod 700 $TMPPWDDIR
建立與 HSM 的 SSH 連線:
export ADMIN_SSH_SECRET_NAME=`kubectl get secrets -n hsm-system -o json | jq .items[].metadata.name | tr -d '"' | grep "ssh"`
kubectl get secret $ADMIN_SSH_SECRET_NAME \
--namespace=hsm-system \
--output jsonpath='{.data.ssh-privatekey}' \
| base64 --decode > $TMPPWDDIR/hsm-ssh-privatekey
chmod 0600 $TMPPWDDIR/hsm-ssh-privatekey
ssh -i $TMPPWDDIR/hsm-ssh-privatekey ksadmin@$HSM_MGMT_IP
如果無法使用乙太網路線,請使用序列埠線將電腦連線至控制台連接埠。在另一個分頁中執行下列指令,取得
ksadmin密碼。export KSADMIN_SECRET_NAME=`kubectl get secrets -n hsm-system -o json | jq .items[]metadata.name | tr -d '"' | grep "ksadmin"` kubectl get secret $KSADMIN_SECRET_NAME \ --namespace=hsm-system \ --output jsonpath='{.data.password}' \ | base64 --decode登入序列埠後,畫面會顯示登入提示。輸入使用者名稱
ksadmin,並貼上前一個指令產生的密碼。執行
factory-reset指令前:在此期間請勿重新啟動系統,因為重新連線需要多次重新啟動系統,且無法復原。
請務必備妥備用電源。
執行下列指令來恢復原廠設定:
sudo /opt/keysecure/ks_reset_to_factory.sh重設程序大約需要 10 分鐘才能完成。
6.7.2. 重設 Luna HSM
系統恢復原廠設定不會清除 HSM 中的信任根。執行下列指令,重設 Luna HSM:
在 CipherTrust Manager 主機中,透過 SSH 或序列主控台執行下列指令:
/usr/safenet/lunaclient/bin/lunacmlunacm:> hsm factoryReset從啟動程序刪除臨時工作目錄:
rm $TMPPWDDIR
6.8. 重設防火牆
如需將防火牆恢復原廠設定的操作說明,請參閱「防火牆恢復原廠設定」。
6.9. 重設 Cisco 交換器
請按照下列步驟重設 Cisco 交換器。請注意,這些指示也適用於儲存空間切換,例如 stgesw。
- 登入交換器。
寫入、清除及重新載入切換開關:
write erase
reload
如果先前已設定切換裝置,且有
cellcfg目錄可用,請改為按照預檢清理步驟操作。確認交換器處於自動佈建 (POAP) 狀態。
如果交換器已正確重設,使用控制台伺服器連線時,應該會看到下列提示:
Abort Power On Auto Provisioning [yes - continue with normal setup, skip - bypass password and basic configuration, no - continue with Power On Auto Provisioning] (yes/skip/no)[no]:
6.10. 重設程序相關的其他資源
如要進一步瞭解重設程序,請參閱下列資源:
https://docs.netapp.com/us-en/ontap/system-admin/manage-node-boot-menu-task.htmlhttps://docs.netapp.com/us-en/ontap/encryption-at-rest/return-seds-unprotected-mode-task.html