Google Cloud 콘솔을 사용하여 Deep Learning VM 인스턴스 만들기
이 페이지에서는 Google Cloud 콘솔에서 Google Cloud Marketplace를 사용하여 Deep Learning VM Image 인스턴스를 만드는 방법을 보여줍니다.
시작하기 전에
- Sign in to your Google Cloud account. If you're new to Google Cloud, create an account to evaluate how our products perform in real-world scenarios. New customers also get $300 in free credits to run, test, and deploy workloads.
-
In the Google Cloud console, on the project selector page, select or create a Google Cloud project.
Roles required to select or create a project
- Select a project: Selecting a project doesn't require a specific IAM role—you can select any project that you've been granted a role on.
-
Create a project: To create a project, you need the Project Creator
(
roles/resourcemanager.projectCreator), which contains theresourcemanager.projects.createpermission. Learn how to grant roles.
-
Verify that billing is enabled for your Google Cloud project.
-
In the Google Cloud console, on the project selector page, select or create a Google Cloud project.
Roles required to select or create a project
- Select a project: Selecting a project doesn't require a specific IAM role—you can select any project that you've been granted a role on.
-
Create a project: To create a project, you need the Project Creator
(
roles/resourcemanager.projectCreator), which contains theresourcemanager.projects.createpermission. Learn how to grant roles.
-
Verify that billing is enabled for your Google Cloud project.
새 인스턴스 만들기
Google Cloud 콘솔에서 Deep Learning VM Cloud Marketplace 페이지로 이동합니다.
시작하기를 클릭합니다. 프로젝트 선택 창이 표시되면 인스턴스를 만들 프로젝트를 선택합니다. Compute Engine VM을 처음 시작하는 경우에는 초기 API 구성 프로세스가 완료될 때까지 기다려야 합니다.
새 Deep Learning VM 배포 페이지에 배포 이름을 입력합니다. 이 이름은 가상 머신 이름의 루트가 됩니다. Compute Engine은 인스턴스 이름을 지정할 때 이 이름 끝에
-vm을 추가합니다.영역을 선택하거나 기본값을 유지합니다.
머신 유형에서 VM에 사용할 사양을 선택하거나 기본값을 유지합니다.
GPU에서 GPU 유형 및 GPU 수를 선택하거나 기본값을 유지합니다. GPU를 사용하지 않으려면 GPU 삭제 버튼을 클릭합니다.
SSH 대신 URL을 통해 JupyterLab에 액세스 사용 설정(베타)을 선택할 수 있습니다. 이 베타 기능을 사용 설정하면 URL을 사용하여 JupyterLab 인스턴스에 액세스할 수 있습니다. Google Cloud 프로젝트의 편집자 또는 소유자 역할이 있는 사용자 누구나 이 URL에 액세스할 수 있습니다. 이 기능은 미국, 유럽연합, 아시아에서만 작동합니다.
머신러닝 프레임워크를 선택하거나 기본값을 유지합니다.
배포를 클릭합니다.
이제 첫 번째 Deep Learning VM 인스턴스가 생성되었습니다. 인스턴스 배포 후 Google Cloud 콘솔에서 Deep Learning VM 인스턴스 및 기타 배포를 관리할 수 있는 Deployment Manager 페이지가 열립니다.
새 인스턴스 액세스
딥 러닝 VM 인스턴스는 생성 후 자동으로 시작됩니다. 액세스하려면 다음 안내를 따르세요.
Google Cloud 콘솔의 VM 인스턴스 페이지로 이동합니다.
이름 열에서 가상 머신 인스턴스 이름을 클릭합니다.
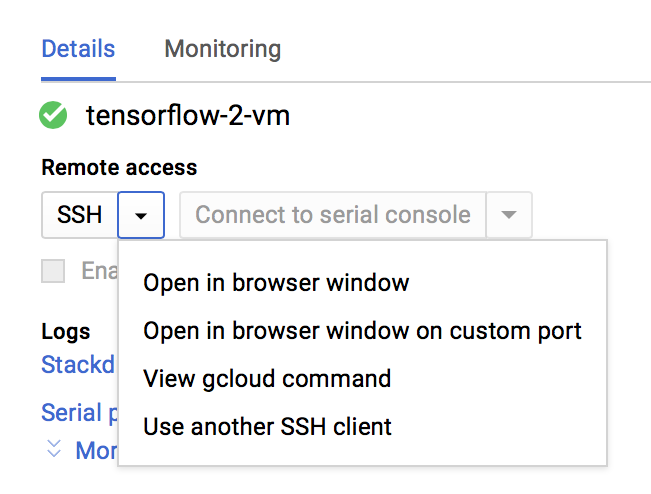
원격 액세스 섹션에서 첫 번째 드롭다운 목록을 클릭한 다음 인스턴스에 액세스하려는 방식을 선택합니다. 그래픽 사용자 인터페이스를 사용하여 대화식으로 액세스 또는 명령줄 인터페이스에서 액세스하도록 선택할 수 있습니다.
Compute Engine은 SSH 키를 전파하고 사용자를 만듭니다. 자세한 내용은 인스턴스에 연결을 참조하세요.
인스턴스 중지
Google Cloud 콘솔의 VM 인스턴스 페이지로 이동합니다.
Deep Learning VM 인스턴스 옆의 체크박스를 선택합니다.
중지를 클릭합니다.
인스턴스 시작
인스턴스 생성 후에는 인스턴스가 자동으로 시작됩니다. 중지된 인스턴스를 수동으로 시작하려면 다음 안내를 따르세요.
Google Cloud 콘솔의 VM 인스턴스 페이지로 이동합니다.
Deep Learning VM 인스턴스 옆의 체크박스를 선택합니다.
시작을 클릭합니다.
삭제
이 페이지에서 사용한 리소스 비용이 Google Cloud 계정에 청구되지 않도록 하려면 다음 단계를 수행합니다.
Google Cloud 콘솔에서 배포 페이지로 이동합니다.
Deep Learning VM 배포 옆의 체크박스를 선택합니다.
삭제를 클릭합니다.
다음 단계
- Google Cloud Marketplace에서 Deep Learning VM 인스턴스 만들기에서 이 프로세스에 대한 자세한 설명 읽어보기
- 이미지, 이미지 계열, 인스턴스에 대해 알아보기