使用 Google Cloud 控制台建立 Deep Learning VM 執行個體
本頁面說明如何使用 Google Cloud 控制台中的 Google Cloud Marketplace 建立 Deep Learning VM Images 執行個體。
事前準備
- Sign in to your Google Cloud account. If you're new to Google Cloud, create an account to evaluate how our products perform in real-world scenarios. New customers also get $300 in free credits to run, test, and deploy workloads.
-
In the Google Cloud console, on the project selector page, select or create a Google Cloud project.
Roles required to select or create a project
- Select a project: Selecting a project doesn't require a specific IAM role—you can select any project that you've been granted a role on.
-
Create a project: To create a project, you need the Project Creator
(
roles/resourcemanager.projectCreator), which contains theresourcemanager.projects.createpermission. Learn how to grant roles.
-
Verify that billing is enabled for your Google Cloud project.
-
In the Google Cloud console, on the project selector page, select or create a Google Cloud project.
Roles required to select or create a project
- Select a project: Selecting a project doesn't require a specific IAM role—you can select any project that you've been granted a role on.
-
Create a project: To create a project, you need the Project Creator
(
roles/resourcemanager.projectCreator), which contains theresourcemanager.projects.createpermission. Learn how to grant roles.
-
Verify that billing is enabled for your Google Cloud project.
建立新執行個體
前往 Google Cloud 控制台的「Deep Learning VM Cloud Marketplace」(深度學習 VM Cloud Marketplace) 頁面。
前往「Deep Learning VM Cloud Marketplace」(深度學習 VM Cloud Marketplace) 頁面
按一下「開始使用」。如果您看到專案選取視窗,請選擇您要在哪一個專案中建立執行個體。如果這是您第一次啟動 Compute Engine VM,請等待初始 API 設定程序完成。
在「New Deep Learning VM deployment」(新的深度學習 VM 部署作業) 頁面中,輸入「Deployment name」(部署作業名稱)。這會是您虛擬機器名稱的根。Compute Engine 在為執行個體命名時,會在這個名稱後方加上
-vm。選取「區域」,或保留預設值。
在「Machine type」(機器類型) 下方,選取 VM 的規格,或保留預設值。
在「GPU」下方,選取「GPU 類型」和「GPU 數量」,或保留預設值。 如不想使用 GPU,請按一下「刪除 GPU」按鈕。
您可以選取「Enable access to JupyterLab via URL instead of SSH (Beta)」(透過網址而非 SSH 存取 JupyterLab (Beta 版))。啟用這項 Beta 版功能後,您就能使用網址存取 JupyterLab 執行個體。 Google Cloud 專案中具有編輯者或擁有者角色的使用者都可存取這個網址。這項功能僅適用於美國、歐盟和亞洲。
選取機器學習架構,或保留預設值。
按一下 [Deploy] (部署)。
您剛剛建立了第一個深度學習 VM 執行個體。執行個體部署完成後, Google Cloud 控制台會開啟 Deployment Manager 頁面,您可以在當中管理深度學習 VM 執行個體和其他部署作業。
存取新執行個體
深度學習 VM 執行個體在建立完成後會自動啟動。如要存取該執行個體,請按照下列步驟操作:
前往 Google Cloud 控制台的「VM Instances」(VM 執行個體) 頁面。
在「Name」(名稱) 欄下方,按一下虛擬機器執行個體名稱。
在「Remote Access」(遠端存取) 部分中,按一下第一個下拉式清單,並選擇存取該執行個體的方式。您可以選擇透過圖形使用者介面或指令列來操作。
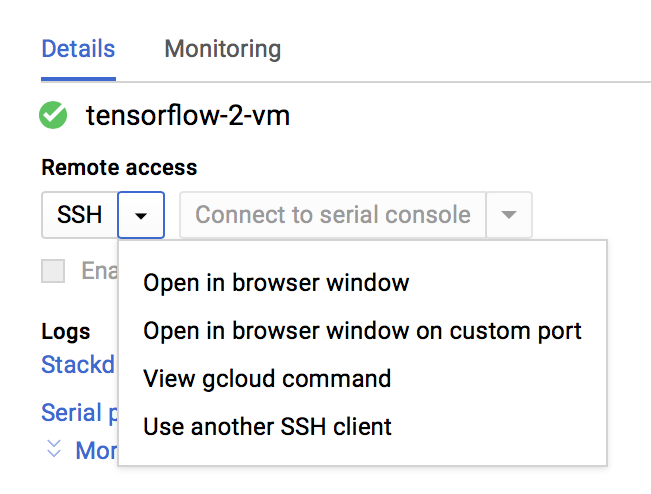
Compute Engine 會傳播您的 SSH 金鑰,並建立您的使用者。詳情請參閱連線至執行個體一文。
停止執行個體
前往 Google Cloud 控制台的「VM Instances」(VM 執行個體) 頁面。
勾選深度學習 VM 執行個體旁邊的核取方塊。
按一下 [Stop] (停止)。
啟動執行個體
執行個體建立完成後,就會自動啟動。如要在執行個體停止時手動啟動執行個體,請按照下列步驟操作:
前往 Google Cloud 控制台的「VM Instances」(VM 執行個體) 頁面。
勾選深度學習 VM 執行個體旁邊的核取方塊。
按一下 [Start] (啟動)。
清除所用資源
如要避免系統向您的 Google Cloud 帳戶收取本頁所用資源的費用,請按照下列步驟操作。
前往 Google Cloud 控制台的「Deployments」(部署作業) 頁面。
找出您要清除的深度學習 VM 部署項目,然後勾選旁邊的核取方塊。
按一下 [Delete] (刪除)。
後續步驟
- 請參閱透過 Google Cloud Marketplace 建立深度學習 VM 執行個體一文,深入瞭解這個流程。
- 進一步瞭解映像檔、映像檔系列和執行個體。