Mantieni tutto organizzato con le raccolte
Salva e classifica i contenuti in base alle tue preferenze.
Crea un'istanza Deep Learning VM utilizzando la console Google Cloud
Questa pagina mostra come creare un'istanza Deep Learning VM Images
utilizzando Google Cloud Marketplace nella console Google Cloud .
Prima di iniziare
Sign in to your Google Cloud account. If you're new to
Google Cloud,
create an account to evaluate how our products perform in
real-world scenarios. New customers also get $300 in free credits to
run, test, and deploy workloads.
In the Google Cloud console, on the project selector page,
select or create a Google Cloud project.
Fai clic su Inizia. Se visualizzi una finestra di selezione del progetto,
scegli il progetto in cui creare l'istanza. Se è la prima
volta che avvii una VM Compute Engine, devi attendere il completamento della procedura di configurazione iniziale dell'API.
Nella pagina Nuovo deployment di Deep Learning VM, inserisci un
nome del deployment. Questa sarà la radice del nome della macchina virtuale.
Quando assegni il nome all'istanza, Compute Engine aggiunge -vm a questo nome.
Seleziona una zona o mantieni l'impostazione predefinita.
In Tipo di macchina, seleziona le specifiche che vuoi per la tua VM o mantieni quelle predefinite.
In GPU, seleziona Tipo di GPU e Numero di GPU
oppure mantieni i valori predefiniti.
Se non vuoi utilizzare le GPU,
fai clic sul pulsante Elimina GPU.
Hai la possibilità di selezionare Attiva l'accesso a JupyterLab tramite URL
anziché SSH (beta). L'attivazione di questa funzionalità beta ti consente di accedere all'istanza di JupyterLab utilizzando un URL. Chiunque abbia il ruolo Editor o Proprietario nel tuo progetto Google Cloud può accedere a questo URL. Questa funzionalità
funziona solo negli Stati Uniti, nell'Unione Europea e in Asia.
Seleziona un framework di machine learning o mantieni l'impostazione predefinita.
Fai clic su Esegui il deployment.
Hai appena creato la tua prima istanza Deep Learning VM.
Dopo il deployment dell'istanza, la console Google Cloud apre
la pagina Deployment Manager
dove puoi gestire le
istanze VM Deep Learning e altri deployment.
Accedere alla nuova istanza
Una volta creata l'istanza Deep Learning VM, questa si avvia
automaticamente. Per accedervi:
Vai alla pagina Istanze VM nella console Google Cloud .
Nella colonna Nome,
fai clic sul nome dell'istanza della macchina virtuale.
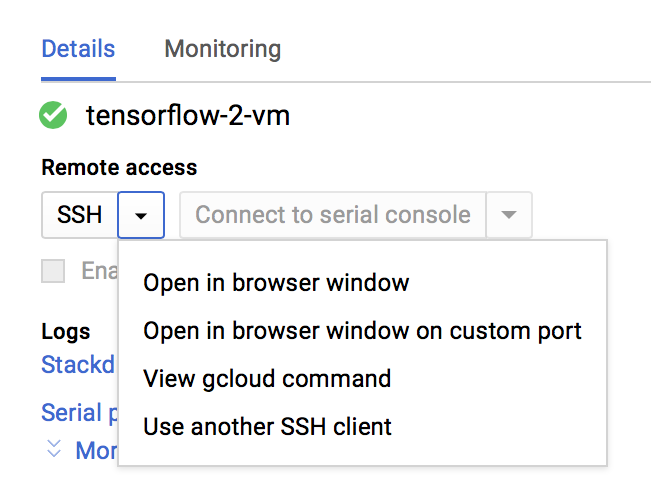
Nella sezione Accesso remoto, fai clic sul primo elenco a discesa e
scegli come accedere all'istanza. Puoi scegliere di interagire
con una GUI o dalla riga di comando.
Compute Engine propagherà le tue chiavi SSH e creerà il tuo utente. Per saperne di più, vedi Connessione alle istanze.
Arresta l'istanza
Vai alla pagina Istanze VM nella console Google Cloud .
[[["Facile da capire","easyToUnderstand","thumb-up"],["Il problema è stato risolto","solvedMyProblem","thumb-up"],["Altra","otherUp","thumb-up"]],[["Difficile da capire","hardToUnderstand","thumb-down"],["Informazioni o codice di esempio errati","incorrectInformationOrSampleCode","thumb-down"],["Mancano le informazioni o gli esempi di cui ho bisogno","missingTheInformationSamplesINeed","thumb-down"],["Problema di traduzione","translationIssue","thumb-down"],["Altra","otherDown","thumb-down"]],["Ultimo aggiornamento 2025-09-09 UTC."],[[["\u003cp\u003eThis guide outlines how to create a Deep Learning VM instance using the Google Cloud Marketplace within the Google Cloud console, starting with the "Get started" button.\u003c/p\u003e\n"],["\u003cp\u003eUsers can customize their VM by selecting a deployment name, zone, machine type, GPU type, number of GPUs, and a machine learning framework, or they can opt for default settings.\u003c/p\u003e\n"],["\u003cp\u003eAfter deployment, the VM can be accessed via the VM Instances page, where users can choose between interacting with a graphical user interface or on the command line.\u003c/p\u003e\n"],["\u003cp\u003eThe instance can be manually stopped and started from the VM Instances page, and finally, the deployment can be deleted to avoid incurring unnecessary charges.\u003c/p\u003e\n"],["\u003cp\u003eJupyterLab access via a URL is an available beta feature in select regions, granting access to users in the Editor or Owner role within your Google Cloud project.\u003c/p\u003e\n"]]],[],null,["# Quickstart: Create a Deep Learning VM instance by using the Google Cloud console\n\nCreate a Deep Learning VM instance by using the Google Cloud console\n====================================================================\n\nThis page shows you how to create a Deep Learning VM Images instance\nby using Google Cloud Marketplace in the Google Cloud console.\n\nBefore you begin\n----------------\n\n- Sign in to your Google Cloud account. If you're new to Google Cloud, [create an account](https://console.cloud.google.com/freetrial) to evaluate how our products perform in real-world scenarios. New customers also get $300 in free credits to run, test, and deploy workloads.\n- In the Google Cloud console, on the project selector page,\n select or create a Google Cloud project.\n\n | **Note**: If you don't plan to keep the resources that you create in this procedure, create a project instead of selecting an existing project. After you finish these steps, you can delete the project, removing all resources associated with the project.\n\n [Go to project selector](https://console.cloud.google.com/projectselector2/home/dashboard)\n-\n [Verify that billing is enabled for your Google Cloud project](/billing/docs/how-to/verify-billing-enabled#confirm_billing_is_enabled_on_a_project).\n\n- In the Google Cloud console, on the project selector page,\n select or create a Google Cloud project.\n\n | **Note**: If you don't plan to keep the resources that you create in this procedure, create a project instead of selecting an existing project. After you finish these steps, you can delete the project, removing all resources associated with the project.\n\n [Go to project selector](https://console.cloud.google.com/projectselector2/home/dashboard)\n-\n [Verify that billing is enabled for your Google Cloud project](/billing/docs/how-to/verify-billing-enabled#confirm_billing_is_enabled_on_a_project).\n\n| **Note:** This quickstart assumes that all settings will remain at their defaults. For more information about the VM options available to you, see [Choose an\n| Image](/deep-learning-vm/docs/images).\n\nCreate a new instance\n---------------------\n\n1. Go to the Deep Learning VM Cloud Marketplace page in\n the Google Cloud console.\n\n [Go to the Deep Learning VM Cloud Marketplace page](https://console.cloud.google.com/marketplace/details/click-to-deploy-images/deeplearning)\n2. Click **Get started**. If you see a project selection window,\n choose the project in which to create the instance. If this is the first\n time you've launched a Compute Engine VM, you must wait for the initial API\n configuration process to complete.\n\n3. On the **New Deep Learning VM deployment** page, enter a\n **Deployment name** . This will be the root of your virtual machine name.\n Compute Engine appends `-vm` to this name when naming your instance.\n\n4. Select a **Zone**, or keep the default.\n\n5. Under **Machine type**, select the specifications that you\n want for your VM, or keep the default.\n\n6. Under **GPUs** , select the **GPU type** and **Number of GPUs** ,\n or keep the default values.\n If you don't want to use GPUs,\n click the **Delete GPU** button.\n\n7. You have the option to select **Enable access to JupyterLab via URL\n instead of SSH (Beta)**. Enabling this Beta feature lets you\n access your JupyterLab\n instance using a URL. Anyone who is in the Editor or Owner role in your\n Google Cloud project can access this URL. This feature\n only works in the United States, the European Union, and Asia.\n\n8. Select a machine learning **Framework**, or keep the default.\n\n9. Click **Deploy**.\n\nYou've just created your first Deep Learning VM instance.\nAfter the instance is deployed, the Google Cloud console opens\nthe [Deployment Manager page](https://console.cloud.google.com/dm/deployments)\nwhere you can manage your\nDeep Learning VM instances and other deployments.\n\nAccess your new instance\n------------------------\n\nOnce you've created your Deep Learning VM instance, it starts\nautomatically. To access it:\n\n1. Go to the VM Instances page in the Google Cloud console.\n\n [Go to the VM\n Instances page](https://console.cloud.google.com/compute/instances)\n2. Under the **Name** column,\n click the name of your virtual machine instance.\n\n3. In the **Remote Access** section, click the first drop-down list and\n choose how you'd like to access the instance. You can choose to interact\n with a graphical user interface or on the command line.\n\n [](../images/dlvm-qs1.png)\n\n \u003cbr /\u003e\n\nCompute Engine will propagate your SSH keys and create your user. For more\ninformation, see [Connecting to\nInstances](/compute/docs/instances/connecting-to-instance).\n\nStop the instance\n-----------------\n\n1. Go to the VM Instances page in the Google Cloud console.\n\n [Go to the VM\n Instances page](https://console.cloud.google.com/compute/instances)\n2. Select the checkbox next to the Deep Learning VM instance.\n\n3. Click **Stop**.\n\nStart the instance\n------------------\n\nAfter an instance is created, the instance starts automatically. To start the instance\nmanually when it's stopped:\n\n1. Go to the VM Instances page in the Google Cloud console.\n\n [Go to the VM\n Instances page](https://console.cloud.google.com/compute/instances)\n2. Select the checkbox next to the Deep Learning VM instance.\n\n3. Click **Start**.\n\nClean up\n--------\n\n\nTo avoid incurring charges to your Google Cloud account for\nthe resources used on this page, follow these steps.\n\n1. Go to the Deployments page in the Google Cloud console.\n\n [Go to the\n Deployments page](https://console.cloud.google.com/dm/deployments)\n2. Select the checkbox next to the Deep Learning VM deployment.\n\n3. Click **Delete**.\n\nWhat's next\n-----------\n\n- Read a more in-depth description of this process in [Creating a\n Deep Learning VM instance from\n Google Cloud Marketplace](/deep-learning-vm/docs/cloud-marketplace).\n- Learn more about [Images, image families, and\n instances](/deep-learning-vm/docs/concepts-images)."]]