이 페이지에서는 프록시를 사용하여 Database Migration Service와 데이터 소스 간에 비공개 연결을 설정하는 방법을 알아봅니다. 데이터 소스는 Cloud SQL이거나 다른 Virtual Private Cloud (VPC) 또는 네트워크 외부에서 호스팅되는 소스일 수 있습니다. Google Cloud
비공개 연결은 VPC 네트워크와 Database Migration Service 비공개 네트워크 간의 비공개 전용 연결을 의미합니다. 즉, 다른 고객이 이 연결을 공유할 수 없습니다. 비공개 연결을 사용하면 Database Migration Service가 내부 IP 주소를 사용하여 리소스와 통신할 수 있습니다.
비공개 연결을 사용하여 Database Migration Service를 모든 소스에 연결할 수 있습니다. 하지만 서로 피어링된 VPC 네트워크만 서로 통신할 수 있습니다.
전환 피어링은 지원되지 않습니다. 소스가 다른 VPC에서 또는 네트워크 외부에서 호스팅되고 Google Cloud Database Migration Service가 피어링된 VPC 네트워크가 소스를 호스팅하는 VPC 또는 네트워크에 직접 연결되지 않았으면 역방향 프록시가 필요합니다.
리버스 프록시 설정
Database Migration Service VPC 네트워크가 VPC 네트워크와 피어링되었고 다른 VPC 네트워크에서 소스에 액세스할 수 있으면 Database Migration Service가 VPC 네트워크 피어링만 사용하여 소스와 통신할 수 없습니다. Database Migration Service와 소스 간의 연결을 설정하려면 역방향 프록시도 필요합니다.
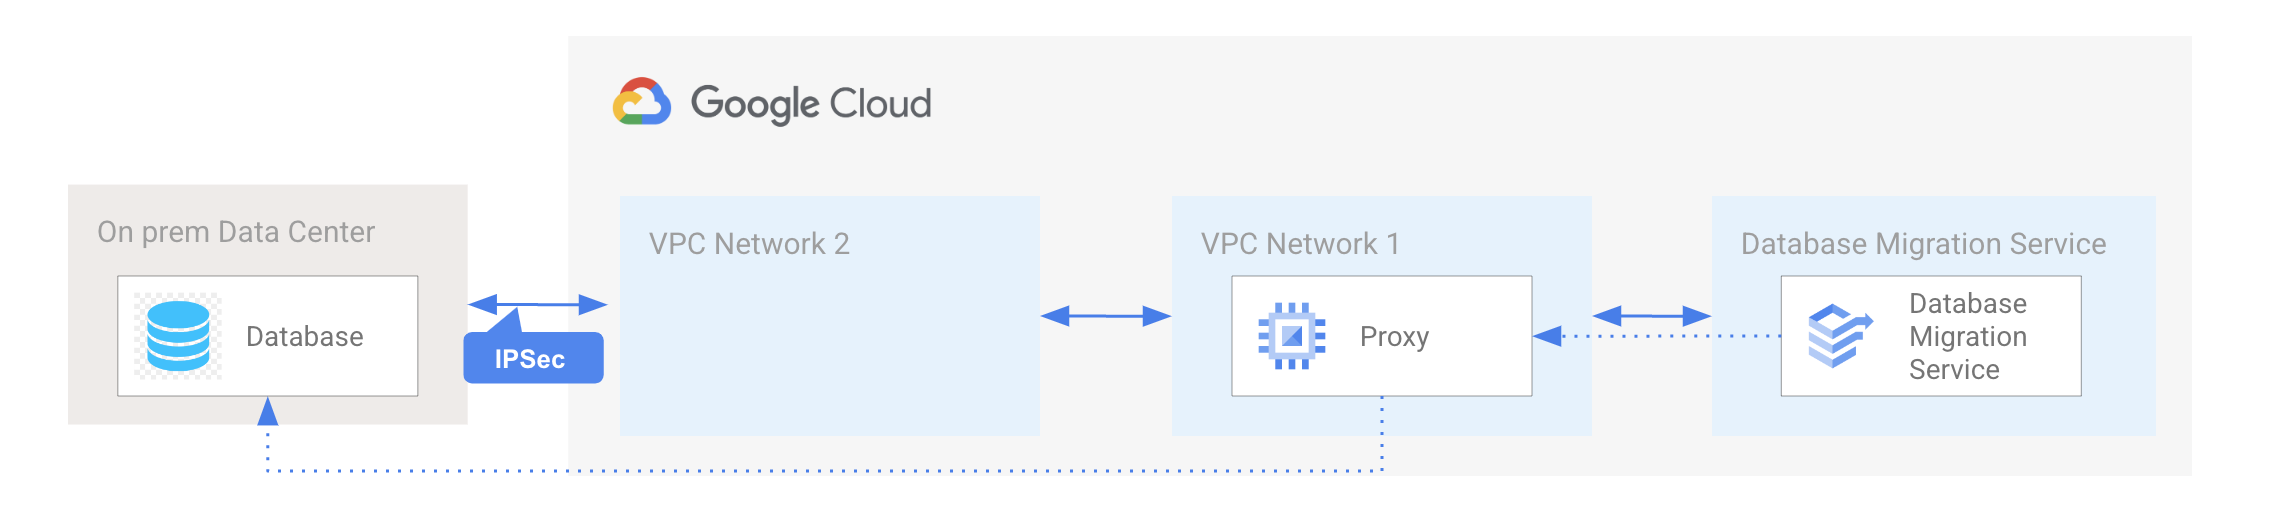
다음 다이어그램은 역방향 프록시를 사용하여 Database Migration Service와 네트워크 외부에 호스팅되는 소스 사이의 비공개 연결을 설정하는 방법을 보여줍니다. Google Cloud 이 다이어그램에서 VPC 네트워크 1은 VPC 네트워크이고 VPC 네트워크 2는 소스에 액세스할 수 있는 다른 VPC 네트워크입니다.
리버스 프록시를 사용하여 Database Migration Service와 Cloud SQL 간에 비공개 연결을 설정하려면 다음 단계를 따르세요.
Database Migration Service가 소스에 연결할 VPC 네트워크를 식별합니다.
이 VPC 네트워크에서 기본 Debian 또는 Ubuntu 이미지를 사용하여 VM을 만듭니다. 이 VM은 리버스 프록시를 호스팅합니다.
서브넷이 Database Migration Service와 동일한 리전에 있고 역방향 프록시가 트래픽을 소스로 전달하고 그 반대로는 전달하지 않는지 확인합니다.
VM에서 소스의 내부 IP 주소 및 포트로
ping또는telnet명령어를 실행하여 VM이 소스와 통신할 수 있는지 확인합니다.역방향 프록시와 SSH 연결을 설정하고 파일을 만들려면 다음 스크립트를 사용하세요.
#! /bin/bash

export DB_ADDR=SOURCE_PRIVATE_IP
export DB_PORT=DATABASE_PORT

# Enable the VM to receive packets whose destinations do
# not match any running process local to the VM
echo 1 > /proc/sys/net/ipv4/ip_forward

# Ask the Metadata server for the IP address of the VM nic0
# network interface:
md_url_prefix="http://169.254.169.254/computeMetadata/v1/instance"
vm_nic_ip="$(curl -H "Metadata-Flavor: Google" ${md_url_prefix}/network-interfaces/0/ip)"

# Clear any existing iptables NAT table entries (all chains):
iptables -t nat -F

# Create a NAT table entry in the prerouting chain, matching
# any packets with destination database port, changing the destination
# IP address of the packet to your source instance IP address:
iptables -t nat -A PREROUTING \
     -p tcp --dport $DB_PORT \
     -j DNAT \
     --to-destination $DB_ADDR

# Create a NAT table entry in the postrouting chain, matching
# any packets with destination database port, changing the source IP
# address of the packet to the NAT VM's primary internal IPv4 address:
iptables -t nat -A POSTROUTING \
     -p tcp --dport $DB_PORT \
     -j SNAT \
     --to-source $vm_nic_ip

# Save iptables configuration:
iptables-save
스크립트를 실행합니다.
Database Migration Service에서 비공개 연결 구성을 만들어 사용자의 VPC와 Database Migration Service VPC 사이의 VPC 피어링을 설정합니다.
Database Migration Service에서 연결 프로필을 만듭니다. 연결 세부정보로 프록시를 호스팅하는 VM의 내부 IP 주소와 포트를 입력합니다.
다음 단계
- 비공개 연결 구성 만들기 방법 알아보기
- Database Migration Service에서 연결 프로필을 만드는 방법을 알아보세요.