Mantenha tudo organizado com as coleções
Salve e categorize o conteúdo com base nas suas preferências.
Criar um experimento
Nesta página, mostramos como interagir com os experimentos da Vertex AI
usando o painel lateral no Colab Enterprise.
Para acessar os serviços e as APIs executando o código no
seu notebook do Colab Enterprise, use as
credenciais associadas à sua Conta do Google. Google Cloud Para saber mais, consulte
Acessar APIs e serviços do Google Cloud .
O painel lateral é outra maneira de interagir com os
Experimentos da Vertex AI sem sair da interface do
Colab Enterprise.
O painel lateral aparece à direita de um notebook aberto.
Antes de começar
Sign in to your Google Cloud account. If you're new to
Google Cloud,
create an account to evaluate how our products perform in
real-world scenarios. New customers also get $300 in free credits to
run, test, and deploy workloads.
In the Google Cloud console, on the project selector page,
select or create a Google Cloud project.
Para receber as permissões necessárias para usar o painel lateral em um bloco do Colab Enterprise, peça ao administrador para conceder a você os seguintes papéis do IAM no projeto:
O Vertex AI Experiments ajuda a rastrear e analisar diferentes arquiteturas de modelo, hiperparâmetros e ambientes de treinamento, permitindo que você acompanhe as etapas, entradas e saídas de uma execução de experimento.
Para saber mais, consulte Introdução aos
experimentos da Vertex AI.
Criar e ver um experimento
É possível criar e conferir os resultados de um experimento usando o painel lateral no Colab Enterprise.
No console do Google Cloud , acesse a página Meus notebooks do Colab Enterprise.
No menu Região, selecione a região que contém o notebook.
Clique no notebook que você quer abrir. Crie um notebook se ainda não tiver feito isso.
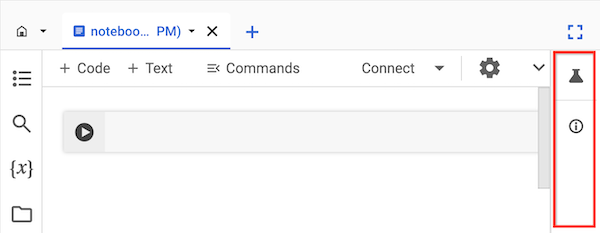
À direita do notebook, no painel lateral, clique no botão
Experimentos.
O painel lateral abre a guia Experimentos.
Clique no botão Inserir exemplo de código.
O Colab Enterprise adiciona células de código ao notebook para interagir com um experimento.
No notebook, encontre a célula de código que armazena valores de parâmetro.
Você vai usar esses parâmetros para interagir com os experimentos da Vertex AI.
Atualize os valores dos seguintes parâmetros:
PROJECT_ID: o ID do projeto em que o notebook está.
REGION: a região em que o notebook está.
BUCKET_URI: um URI de bucket do Cloud Storage, no formato gs://BUCKET_NAME.
Pode ser um bucket existente ou você pode criar um ao
executar o código. Esse bucket precisa estar no mesmo projeto e região
que o notebook do Colab Enterprise.
EXPERIMENT_NAME: o nome do experimento.
Se o experimento não existir, os Experimentos da Vertex AI
criarão um.
Se você precisar criar seu bucket do Cloud Storage, encontre e
remova o comentário da seguinte linha de código:
Execute as células de código que o painel lateral adicionou ao notebook.
Depois que a última célula de código for executada, clique no botão Ver experimento que aparece.
No painel lateral, clique na guia Execuções ou Detalhes para conferir informações sobre o experimento.
Para saber mais, consulte
Criar e
gerenciar execuções de experimentos.
[[["Fácil de entender","easyToUnderstand","thumb-up"],["Meu problema foi resolvido","solvedMyProblem","thumb-up"],["Outro","otherUp","thumb-up"]],[["Difícil de entender","hardToUnderstand","thumb-down"],["Informações incorretas ou exemplo de código","incorrectInformationOrSampleCode","thumb-down"],["Não contém as informações/amostras de que eu preciso","missingTheInformationSamplesINeed","thumb-down"],["Problema na tradução","translationIssue","thumb-down"],["Outro","otherDown","thumb-down"]],["Última atualização 2025-09-04 UTC."],[[["\u003cp\u003eThe Colab Enterprise side panel provides a way to interact with Vertex AI Experiments directly within the notebook interface.\u003c/p\u003e\n"],["\u003cp\u003eTo use the side panel, users must have the Colab Enterprise User and Vertex AI User IAM roles assigned to their project.\u003c/p\u003e\n"],["\u003cp\u003eVertex AI Experiments allows users to track and analyze various aspects of model development, such as architectures, hyperparameters, and training environments.\u003c/p\u003e\n"],["\u003cp\u003eCreating an experiment involves navigating to the Colab Enterprise My notebooks page, opening a notebook, and using the Experiments tab in the side panel to insert sample code.\u003c/p\u003e\n"],["\u003cp\u003eAfter running the code cells, users can view detailed information about their experiment runs within the side panel's Runs and Details tabs.\u003c/p\u003e\n"]]],[],null,["# Create an experiment\n====================\n\nThis page shows you how to interact with Vertex AI Experiments\nby using the side panel in Colab Enterprise.\n\nTo access Google Cloud services and APIs by running code in\nyour Colab Enterprise notebook, you can use the\ncredentials associated with your Google Account. To learn more, see\n[Access Google Cloud services and APIs](/colab/docs/run-code-adc).\n\nThe side panel is an additional way to interact with\nVertex AI Experiments without leaving the Colab Enterprise\ninterface.\n\nThe side panel appears to the right of an open notebook.\n\nBefore you begin\n----------------\n\n- Sign in to your Google Cloud account. If you're new to Google Cloud, [create an account](https://console.cloud.google.com/freetrial) to evaluate how our products perform in real-world scenarios. New customers also get $300 in free credits to run, test, and deploy workloads.\n- In the Google Cloud console, on the project selector page,\n select or create a Google Cloud project.\n\n | **Note**: If you don't plan to keep the resources that you create in this procedure, create a project instead of selecting an existing project. After you finish these steps, you can delete the project, removing all resources associated with the project.\n\n [Go to project selector](https://console.cloud.google.com/projectselector2/home/dashboard)\n-\n [Verify that billing is enabled for your Google Cloud project](/billing/docs/how-to/verify-billing-enabled#confirm_billing_is_enabled_on_a_project).\n\n-\n\n\n Enable the Vertex AI, Dataform, and Compute Engine APIs.\n\n\n [Enable the APIs](https://console.cloud.google.com/flows/enableapi?apiid=aiplatform.googleapis.com, dataform.googleapis.com, compute.googleapis.com&redirect=https://console.cloud.google.com)\n\n- In the Google Cloud console, on the project selector page,\n select or create a Google Cloud project.\n\n | **Note**: If you don't plan to keep the resources that you create in this procedure, create a project instead of selecting an existing project. After you finish these steps, you can delete the project, removing all resources associated with the project.\n\n [Go to project selector](https://console.cloud.google.com/projectselector2/home/dashboard)\n-\n [Verify that billing is enabled for your Google Cloud project](/billing/docs/how-to/verify-billing-enabled#confirm_billing_is_enabled_on_a_project).\n\n-\n\n\n Enable the Vertex AI, Dataform, and Compute Engine APIs.\n\n\n [Enable the APIs](https://console.cloud.google.com/flows/enableapi?apiid=aiplatform.googleapis.com, dataform.googleapis.com, compute.googleapis.com&redirect=https://console.cloud.google.com)\n\n### Required roles\n\n\nTo get the permissions that\nyou need to use the side panel in a Colab Enterprise notebook,\n\nask your administrator to grant you the\nfollowing IAM roles on the project:\n\n- [Colab Enterprise User](/iam/docs/roles-permissions/aiplatform#aiplatform.colabEnterpriseUser) (`roles/aiplatform.colabEnterpriseUser`)\n- [Vertex AI User](/iam/docs/roles-permissions/aiplatform#aiplatform.user) (`roles/aiplatform.user`)\n\n\nFor more information about granting roles, see [Manage access to projects, folders, and organizations](/iam/docs/granting-changing-revoking-access).\n\n\nYou might also be able to get\nthe required permissions through [custom\nroles](/iam/docs/creating-custom-roles) or other [predefined\nroles](/iam/docs/roles-overview#predefined).\n| One or more of the required roles includes the `dataform.repositories.list` permission. Users who are granted the `dataform.repositories.list` permission or the [Code Creator\n| (`roles/dataform.codeCreator`)](/iam/docs/understanding-roles#dataform.codeCreator) role in a project can list the names of code assets in that project by using the Dataform API or the Dataform command-line interface (CLI). Non-administrators using BigQuery Studio can only see code assets that they created or that were shared with them.\n\nVertex AI Experiments\n---------------------\n\nVertex AI Experiments helps you track and analyze different\nmodel architectures, hyperparameters, and training environments by\nletting you track the steps, inputs, and outputs of an experiment run.\nTo learn more, see [Introduction to\nVertex AI Experiments](/vertex-ai/docs/experiments/intro-vertex-ai-experiments).\n\nCreate and view an experiment\n-----------------------------\n\nYou can create and view the results of an experiment by using the\nside panel in Colab Enterprise.\n\n1. In the Google Cloud console, go to\n the Colab Enterprise **My notebooks** page.\n\n [Go to My notebooks](https://console.cloud.google.com/vertex-ai/colab/notebooks)\n2. In the **Region** menu, select the region that contains your notebook.\n\n3. Click the notebook that you want to open. If you haven't created a notebook yet,\n [create a notebook](/colab/docs/create-console-quickstart#create).\n\n4.\n To the right of your notebook, in the side panel, click the\n **Experiments** button.\n\n The side panel expands the **Experiments** tab.\n5. Click the **Insert sample code** button.\n\n\n Colab Enterprise adds code cells to your notebook for\n interacting with an experiment.\n6.\n In your notebook, find the code cell that stores parameter values.\n You'll use these parameters to interact with\n Vertex AI Experiments.\n\n7.\n Update the values for the following parameters:\n\n - \u003cvar translate=\"no\"\u003ePROJECT_ID\u003c/var\u003e: The ID of the project that your notebook is in.\n - \u003cvar translate=\"no\"\u003eREGION\u003c/var\u003e: The region that your notebook is in.\n - \u003cvar translate=\"no\"\u003eBUCKET_URI\u003c/var\u003e: A Cloud Storage bucket URI, in the format `gs://`\u003cvar translate=\"no\"\u003eBUCKET_NAME\u003c/var\u003e. This can be an existing bucket, or you can create it when you run the code. This bucket must be in the same project and region as your Colab Enterprise notebook.\n - \u003cvar translate=\"no\"\u003eEXPERIMENT_NAME\u003c/var\u003e: The name of your experiment. If your experiment doesn't exist, Vertex AI Experiments creates one.\n8.\n If you need to create your Cloud Storage bucket, find and\n uncomment the following line of code:\n\n ```\n # ! gcloud storage buckets create {BUCKET_URI} --location={REGION} --project={PROJECT_ID}\n ```\n9. Run the code cells that the side panel added to your notebook.\n\n10.\n After the last code cell runs, click the\n **View\n experiment** button that appears.\n\n11.\n In the side panel, click the **Runs** tab or\n **Details** tab to see information about your experiment.\n To learn more, see\n [Create and\n manage experiment runs](/vertex-ai/docs/experiments/create-manage-exp-run).\n\n | The side panel shows information about your experiment runs. You can create, manage, and delete runs by using [Vertex AI Experiments\n | in the Google Cloud console](https://console.cloud.google.com/vertex-ai/experiments) or through the Vertex AI API.\n\nWhat's next\n-----------\n\n- Learn more about\n [Vertex AI Experiments](/vertex-ai/docs/experiments/intro-vertex-ai-experiments).\n\n- To find a notebook that can help you get your project started quickly,\n see the [notebook gallery](https://console.cloud.google.com/vertex-ai/colab/notebook-gallery)."]]