Mantenha tudo organizado com as coleções
Salve e categorize o conteúdo com base nas suas preferências.
Criar um notebook usando o console Google Cloud
Saiba como criar um bloco do Colab Enterprise e executar o código dele em um ambiente de execução padrão usando o console Google Cloud .
Nesta página, também descrevemos como renomear, importar e excluir um notebook.
Para seguir as instruções detalhadas desta tarefa diretamente no console do
Google Cloud , clique em Orientação:
Sign in to your Google Cloud account. If you're new to
Google Cloud,
create an account to evaluate how our products perform in
real-world scenarios. New customers also get $300 in free credits to
run, test, and deploy workloads.
In the Google Cloud console, on the project selector page,
select or create a Google Cloud project.
Para receber as permissões necessárias
para criar um notebook do Colab Enterprise e executar o código do notebook em um ambiente de execução,
peça ao administrador para conceder a você o
papel de usuário do IAM do Colab Enterprise (roles/aiplatform.colabEnterpriseUser) no projeto.
Para mais informações sobre a concessão de papéis, consulte Gerenciar o acesso a projetos, pastas e organizações.
No menu Região, selecione a região em que você quer criar o notebook.
Clique em add_boxNovo notebook.
O Colab Enterprise cria e abre seu notebook.
Ao concluir as tarefas descritas neste documento, é possível evitar
o faturamento contínuo excluindo os recursos criados. Para mais informações, consulte
Limpeza.
Executar código no ambiente de execução padrão
Para executar o código de um bloco do Colab Enterprise
no ambiente de execução padrão, faça o seguinte:
No console do Google Cloud , acesse a página Meus notebooks do Colab Enterprise.
No menu Região, selecione a região que contém o notebook.
Clique no notebook que você quer abrir.
Mantenha o ponteiro do mouse sobre a célula de código que você quer executar e depois clique no botão Executar célula.
Se esta for a primeira vez que você se conecta a um ambiente de execução com
credenciais de usuário final ativadas, uma caixa de diálogo Fazer login vai aparecer.
Para conceder ao Colab Enterprise acesso às suas credenciais de usuário,
conclua as seguintes etapas:
Na caixa de diálogo Fazer login, clique na sua conta de usuário.
Selecione Ver, editar, configurar e excluir seus
dados do Google Cloud ... para conceder ao Colab Enterprise
acesso às suas credenciais de usuário.
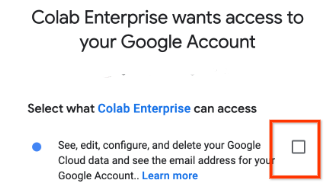
Clique em Continuar.
Após o início do ambiente de execução, o Colab Enterprise se conecta
a ele e executa o código na célula.
Renomear o notebook
Para renomear um bloco do Colab Enterprise:
No console do Google Cloud , acesse a página Meus notebooks do Colab Enterprise.
No menu Região, selecione a região em que você quer importar o notebook.
Clique em
uploadImportar.
Na caixa de diálogo Importar notebooks, selecione uma Origem da importação.
Se você selecionou:
Seu computador: navegue até um arquivo de notebook e selecione-o para importar.
Cloud Storage, navegue até um notebook e selecione-o
no Cloud Storage.
URL, insira o URL do arquivo de notebook a ser importado.
Para adicionar outro notebook, clique em
add_boxAdicionar
notebook.
Depois de adicionar os notebooks que você quer importar,
clique em Importar.
O Colab Enterprise importa seus arquivos de notebook.
Limpar
Para evitar cobranças na sua conta do Google Cloud pelos recursos
usados neste tutorial, exclua o projeto que os contém
ou mantenha o projeto e exclua os recursos individuais.
Excluir o projeto
In the Google Cloud console, go to the Manage resources page.
[[["Fácil de entender","easyToUnderstand","thumb-up"],["Meu problema foi resolvido","solvedMyProblem","thumb-up"],["Outro","otherUp","thumb-up"]],[["Difícil de entender","hardToUnderstand","thumb-down"],["Informações incorretas ou exemplo de código","incorrectInformationOrSampleCode","thumb-down"],["Não contém as informações/amostras de que eu preciso","missingTheInformationSamplesINeed","thumb-down"],["Problema na tradução","translationIssue","thumb-down"],["Outro","otherDown","thumb-down"]],["Última atualização 2025-09-04 UTC."],[[["\u003cp\u003eThis document guides users on how to create, rename, import, and delete Colab Enterprise notebooks using the Google Cloud console.\u003c/p\u003e\n"],["\u003cp\u003eUsers can run a notebook's code on a default runtime, which includes end-user credentials for easy interaction with Google Cloud services.\u003c/p\u003e\n"],["\u003cp\u003eTo get started, users need the Colab Enterprise User IAM role and can access the "My notebooks" page within the Google Cloud console.\u003c/p\u003e\n"],["\u003cp\u003eThe guide emphasizes resource management, offering options to either delete the entire project or individual notebooks to avoid continued billing.\u003c/p\u003e\n"],["\u003cp\u003eTo avoid resource charges, you can delete the project you used or delete the notebook you have created.\u003c/p\u003e\n"]]],[],null,["# Quickstart: Create a Colab Enterprise notebook by using the Google Cloud console\n\nCreate a notebook by using the Google Cloud console\n===================================================\n\nLearn how to create a Colab Enterprise notebook and run its code\non a default runtime by using the Google Cloud console.\nThis page also describes how to rename, import, and delete a notebook.\n\n*** ** * ** ***\n\nTo follow step-by-step guidance for this task directly in the\nGoogle Cloud console, click **Guide me**:\n\n[Guide me](https://console.cloud.google.com/freetrial?redirectPath=/?walkthrough_id=vertex-ai--colab--create-notebook)\n\n*** ** * ** ***\n\n\u003cbr /\u003e\n\nBefore you begin\n----------------\n\n- Sign in to your Google Cloud account. If you're new to Google Cloud, [create an account](https://console.cloud.google.com/freetrial) to evaluate how our products perform in real-world scenarios. New customers also get $300 in free credits to run, test, and deploy workloads.\n- In the Google Cloud console, on the project selector page,\n select or create a Google Cloud project.\n\n | **Note**: If you don't plan to keep the resources that you create in this procedure, create a project instead of selecting an existing project. After you finish these steps, you can delete the project, removing all resources associated with the project.\n\n [Go to project selector](https://console.cloud.google.com/projectselector2/home/dashboard)\n-\n [Verify that billing is enabled for your Google Cloud project](/billing/docs/how-to/verify-billing-enabled#confirm_billing_is_enabled_on_a_project).\n\n-\n\n\n Enable the Vertex AI, Dataform, and Compute Engine APIs.\n\n\n [Enable the APIs](https://console.cloud.google.com/flows/enableapi?apiid=aiplatform.googleapis.com, dataform.googleapis.com, compute.googleapis.com&redirect=https://console.cloud.google.com)\n\n- In the Google Cloud console, on the project selector page,\n select or create a Google Cloud project.\n\n | **Note**: If you don't plan to keep the resources that you create in this procedure, create a project instead of selecting an existing project. After you finish these steps, you can delete the project, removing all resources associated with the project.\n\n [Go to project selector](https://console.cloud.google.com/projectselector2/home/dashboard)\n-\n [Verify that billing is enabled for your Google Cloud project](/billing/docs/how-to/verify-billing-enabled#confirm_billing_is_enabled_on_a_project).\n\n-\n\n\n Enable the Vertex AI, Dataform, and Compute Engine APIs.\n\n\n [Enable the APIs](https://console.cloud.google.com/flows/enableapi?apiid=aiplatform.googleapis.com, dataform.googleapis.com, compute.googleapis.com&redirect=https://console.cloud.google.com)\n\n### Required roles\n\n\nTo get the permissions that\nyou need to create a Colab Enterprise notebook and run the notebook's code on a runtime,\n\nask your administrator to grant you the\n\n\nColab Enterprise User ([`roles/aiplatform.colabEnterpriseUser`](/vertex-ai/docs/general/access-control#aiplatform.colabEnterpriseUser))\nIAM role on the project.\n\n\nFor more information about granting roles, see [Manage access to projects, folders, and organizations](/iam/docs/granting-changing-revoking-access).\n\n\nYou might also be able to get\nthe required permissions through [custom\nroles](/iam/docs/creating-custom-roles) or other [predefined\nroles](/iam/docs/roles-overview#predefined).\n| One or more of the required roles includes the `dataform.repositories.list` permission. Users who are granted the `dataform.repositories.list` permission or the [Code Creator\n| (`roles/dataform.codeCreator`)](/iam/docs/understanding-roles#dataform.codeCreator) role in a project can list the names of code assets in that project by using the Dataform API or the Dataform command-line interface (CLI). Non-administrators using BigQuery Studio can only see code assets that they created or that were shared with them.\n\nCreate a notebook\n-----------------\n\nTo create a Colab Enterprise notebook by using the Google Cloud console:\n\n1. In the Google Cloud console, go to\n the Colab Enterprise **My notebooks** page.\n\n [Go to My notebooks](https://console.cloud.google.com/vertex-ai/colab/notebooks)\n2. In the **Region** menu, select the region where you want to\n create your notebook.\n\n3. Click add_box **New\n notebook**.\n\n Colab Enterprise creates and opens your notebook.\n\nWhen you finish the tasks that are described in this document, you can avoid\ncontinued billing by deleting the resources that you created. For more information, see\n[Clean up](#clean-up).\n\nRun code in the default runtime\n-------------------------------\n\nTo run a Colab Enterprise notebook's code\non the default runtime, do the following:\n\n1. In the Google Cloud console, go to\n the Colab Enterprise **My notebooks** page.\n\n [Go to My notebooks](https://console.cloud.google.com/vertex-ai/colab/notebooks)\n2. In the **Region** menu, select the region that contains your notebook.\n\n3. Click the notebook that you want to open.\n\n4. Hold the pointer over the code cell that you want to run,\n and then click the\n **Run cell** button.\n\n5. If this is your first time connecting to a runtime with\n end-user credentials enabled, a **Sign in** dialog appears.\n\n | The default runtime has end-user credentials enabled to make it easier to [run code that interacts\n | with Google Cloud](/colab/docs/run-code-adc).\n\n To grant Colab Enterprise access to your user credentials,\n complete the following steps:\n 1. In the **Sign in** dialog, click your user account.\n\n 2. Select **See, edit, configure, and delete your\n Google Cloud data...** to grant Colab Enterprise\n access to your user credentials.\n\n 3. Click **Continue**.\n\nAfter your runtime starts, Colab Enterprise connects\nto the runtime and runs the code in the cell.\n\nRename your notebook\n--------------------\n\nTo rename a Colab Enterprise notebook:\n\n1. In the Google Cloud console, go to\n the Colab Enterprise **My notebooks** page.\n\n [Go to My notebooks](https://console.cloud.google.com/vertex-ai/colab/notebooks)\n2. In the **Region** menu, select the region that contains your notebook.\n\n3. Next to the notebook that you want to rename, click the\n more_vert**Actions** menu,\n and then select **Rename**.\n\n4. In the **Rename notebook** dialog,\n change the name of the notebook, and then click **Rename**.\n\nImport a notebook\n-----------------\n\nTo import a notebook into Colab Enterprise:\n\n1. In the Google Cloud console, go to\n the Colab Enterprise **My notebooks** page.\n\n [Go to My notebooks](https://console.cloud.google.com/vertex-ai/colab/notebooks)\n2. In the **Region** menu, select the region where you want to\n import your notebook.\n\n3. Click\n upload **Import**.\n\n4. In the **Import notebooks** dialog, select an\n **Import source**.\n\n5. If you selected:\n\n - **Your computer**, navigate to and select a notebook file to import.\n - **Cloud Storage**, navigate to and select a notebook in Cloud Storage.\n - **URL**, enter the URL of the notebook file to import.\n\n | The notebook must be fewer than 20 MB.\n6. To add another notebook, click\n add_box **Add\n notebook**.\n\n7. After you've added the notebooks that you want to import,\n click **Import**.\n\n Colab Enterprise imports your notebook files.\n\nClean up\n--------\n\nTo avoid incurring charges to your Google Cloud account for the resources\nused in this tutorial, either delete the project that contains the resources,\nor keep the project and delete the individual resources. \n\n### Delete the project\n\n| **Caution** : Deleting a project has the following effects:\n|\n| - **Everything in the project is deleted.** If you used an existing project for the tasks in this document, when you delete it, you also delete any other work you've done in the project.\n| - **Custom project IDs are lost.** When you created this project, you might have created a custom project ID that you want to use in the future. To preserve the URLs that use the project ID, such as an `appspot.com` URL, delete selected resources inside the project instead of deleting the whole project.\n|\n|\n| If you plan to explore multiple architectures, tutorials, or quickstarts, reusing projects\n| can help you avoid exceeding project quota limits.\n1. In the Google Cloud console, go to the **Manage resources** page.\n\n [Go to Manage resources](https://console.cloud.google.com/iam-admin/projects)\n2. In the project list, select the project that you want to delete, and then click **Delete**.\n3. In the dialog, type the project ID, and then click **Shut down** to delete the project. \n\n### Delete your notebook\n\nTo delete a Colab Enterprise notebook:\n\n1. In the Google Cloud console, go to\n the Colab Enterprise **My notebooks** page.\n\n [Go to My notebooks](https://console.cloud.google.com/vertex-ai/colab/notebooks)\n2. In the **Region** menu, select the region that contains\n the notebook that you want to delete.\n\n3. Next to the notebook that you want to delete, click the\n more_vert**Actions** menu,\n and then select\n delete **Delete\n notebook**.\n\n4. In the **Delete notebook** dialog,\n click **Confirm**.\n\nWhat's next\n-----------\n\n- Read the [Introduction to\n Colab Enterprise](/colab/docs/introduction).\n\n- To find a notebook that can help you get your project started quickly,\n see the [notebook gallery](https://console.cloud.google.com/vertex-ai/colab/notebook-gallery)."]]