Mantieni tutto organizzato con le raccolte
Salva e classifica i contenuti in base alle tue preferenze.
Crea un notebook utilizzando la console Google Cloud
Crea un notebook Colab Enterprise ed esegui il codice in un runtime predefinito utilizzando la console Google Cloud .
Questa pagina descrive anche come rinominare, importare ed eliminare un blocco note.
Per seguire le indicazioni dettagliate per questa attività direttamente nella Google Cloud console, fai clic su Procedura guidata:
Sign in to your Google Cloud account. If you're new to
Google Cloud,
create an account to evaluate how our products perform in
real-world scenarios. New customers also get $300 in free credits to
run, test, and deploy workloads.
In the Google Cloud console, on the project selector page,
select or create a Google Cloud project.
Per ottenere le autorizzazioni
necessarie per creare un blocco note Colab Enterprise ed eseguire il codice del blocco note su un runtime,
chiedi all'amministratore di concederti il
ruolo IAM Colab Enterprise User (roles/aiplatform.colabEnterpriseUser) sul progetto.
Per saperne di più sulla concessione dei ruoli, consulta Gestisci l'accesso a progetti, cartelle e organizzazioni.
Nel menu Regione, seleziona la regione in cui vuoi
creare il notebook.
Fai clic su add_boxNuovo
notebook.
Colab Enterprise crea e apre il notebook.
Al termine delle attività descritte in questo documento, puoi evitare
l'addebito di ulteriori costi eliminando le risorse che hai creato. Per ulteriori informazioni, vedi
Pulizia.
Eseguire il codice nel runtime predefinito
Per eseguire il codice di un notebook Colab Enterprise
nel runtime predefinito:
Nella console Google Cloud , vai alla pagina
I miei blocchi note di Colab Enterprise.
Nel menu Regione, seleziona la regione che contiene il notebook.
Fai clic sul notebook che vuoi aprire.
Tieni il puntatore sopra la cella di codice da eseguire
e poi fai clic sul pulsante
Esegui cella.
Se è la prima volta che ti connetti a un runtime con
le credenziali dell'utente finale attive, viene visualizzata una finestra di dialogo Accedi.
Per concedere a Colab Enterprise l'accesso alle tue credenziali utente,
completa i seguenti passaggi:
Nella finestra di dialogo Accedi, fai clic sul tuo account utente.
Seleziona Visualizzare, modificare, configurare ed eliminare i tuoi
dati di Google Cloud … per concedere a Colab Enterprise
l'accesso alle tue credenziali utente.
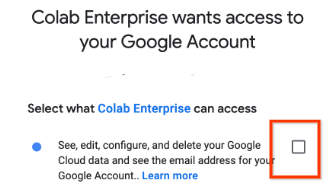
Fai clic su Continua.
Dopo l'avvio del runtime, Colab Enterprise si connette
al runtime ed esegue il codice nella cella.
Rinomina il notebook
Per rinominare un notebook Colab Enterprise:
Nella console Google Cloud , vai alla pagina
I miei blocchi note di Colab Enterprise.
Nel menu Regione, seleziona la regione in cui vuoi importare il notebook.
Fai clic su
uploadImporta.
Nella finestra di dialogo Importa notebook, seleziona un'origine dell'importazione.
Se hai selezionato:
Il tuo computer. Cerca e seleziona un file del blocco note
da importare.
Cloud Storage, individua e seleziona un blocco note
in Cloud Storage.
URL, inserisci l'URL del file del blocco note da importare.
Per aggiungere un altro notebook, fai clic su
add_boxAggiungi
notebook.
Dopo aver aggiunto i blocchi note da importare,
fai clic su Importa.
Colab Enterprise importa i file del notebook.
Esegui la pulizia
Per evitare che al tuo account Google Cloud vengano addebitati costi relativi alle risorse utilizzate in questo tutorial, elimina il progetto che contiene le risorse oppure mantieni il progetto ed elimina le singole risorse.
Elimina il progetto
In the Google Cloud console, go to the Manage resources page.
[[["Facile da capire","easyToUnderstand","thumb-up"],["Il problema è stato risolto","solvedMyProblem","thumb-up"],["Altra","otherUp","thumb-up"]],[["Difficile da capire","hardToUnderstand","thumb-down"],["Informazioni o codice di esempio errati","incorrectInformationOrSampleCode","thumb-down"],["Mancano le informazioni o gli esempi di cui ho bisogno","missingTheInformationSamplesINeed","thumb-down"],["Problema di traduzione","translationIssue","thumb-down"],["Altra","otherDown","thumb-down"]],["Ultimo aggiornamento 2025-09-04 UTC."],[[["\u003cp\u003eThis document guides users on how to create, rename, import, and delete Colab Enterprise notebooks using the Google Cloud console.\u003c/p\u003e\n"],["\u003cp\u003eUsers can run a notebook's code on a default runtime, which includes end-user credentials for easy interaction with Google Cloud services.\u003c/p\u003e\n"],["\u003cp\u003eTo get started, users need the Colab Enterprise User IAM role and can access the "My notebooks" page within the Google Cloud console.\u003c/p\u003e\n"],["\u003cp\u003eThe guide emphasizes resource management, offering options to either delete the entire project or individual notebooks to avoid continued billing.\u003c/p\u003e\n"],["\u003cp\u003eTo avoid resource charges, you can delete the project you used or delete the notebook you have created.\u003c/p\u003e\n"]]],[],null,["# Quickstart: Create a Colab Enterprise notebook by using the Google Cloud console\n\nCreate a notebook by using the Google Cloud console\n===================================================\n\nLearn how to create a Colab Enterprise notebook and run its code\non a default runtime by using the Google Cloud console.\nThis page also describes how to rename, import, and delete a notebook.\n\n*** ** * ** ***\n\nTo follow step-by-step guidance for this task directly in the\nGoogle Cloud console, click **Guide me**:\n\n[Guide me](https://console.cloud.google.com/freetrial?redirectPath=/?walkthrough_id=vertex-ai--colab--create-notebook)\n\n*** ** * ** ***\n\n\u003cbr /\u003e\n\nBefore you begin\n----------------\n\n- Sign in to your Google Cloud account. If you're new to Google Cloud, [create an account](https://console.cloud.google.com/freetrial) to evaluate how our products perform in real-world scenarios. New customers also get $300 in free credits to run, test, and deploy workloads.\n- In the Google Cloud console, on the project selector page,\n select or create a Google Cloud project.\n\n | **Note**: If you don't plan to keep the resources that you create in this procedure, create a project instead of selecting an existing project. After you finish these steps, you can delete the project, removing all resources associated with the project.\n\n [Go to project selector](https://console.cloud.google.com/projectselector2/home/dashboard)\n-\n [Verify that billing is enabled for your Google Cloud project](/billing/docs/how-to/verify-billing-enabled#confirm_billing_is_enabled_on_a_project).\n\n-\n\n\n Enable the Vertex AI, Dataform, and Compute Engine APIs.\n\n\n [Enable the APIs](https://console.cloud.google.com/flows/enableapi?apiid=aiplatform.googleapis.com, dataform.googleapis.com, compute.googleapis.com&redirect=https://console.cloud.google.com)\n\n- In the Google Cloud console, on the project selector page,\n select or create a Google Cloud project.\n\n | **Note**: If you don't plan to keep the resources that you create in this procedure, create a project instead of selecting an existing project. After you finish these steps, you can delete the project, removing all resources associated with the project.\n\n [Go to project selector](https://console.cloud.google.com/projectselector2/home/dashboard)\n-\n [Verify that billing is enabled for your Google Cloud project](/billing/docs/how-to/verify-billing-enabled#confirm_billing_is_enabled_on_a_project).\n\n-\n\n\n Enable the Vertex AI, Dataform, and Compute Engine APIs.\n\n\n [Enable the APIs](https://console.cloud.google.com/flows/enableapi?apiid=aiplatform.googleapis.com, dataform.googleapis.com, compute.googleapis.com&redirect=https://console.cloud.google.com)\n\n### Required roles\n\n\nTo get the permissions that\nyou need to create a Colab Enterprise notebook and run the notebook's code on a runtime,\n\nask your administrator to grant you the\n\n\nColab Enterprise User ([`roles/aiplatform.colabEnterpriseUser`](/vertex-ai/docs/general/access-control#aiplatform.colabEnterpriseUser))\nIAM role on the project.\n\n\nFor more information about granting roles, see [Manage access to projects, folders, and organizations](/iam/docs/granting-changing-revoking-access).\n\n\nYou might also be able to get\nthe required permissions through [custom\nroles](/iam/docs/creating-custom-roles) or other [predefined\nroles](/iam/docs/roles-overview#predefined).\n| One or more of the required roles includes the `dataform.repositories.list` permission. Users who are granted the `dataform.repositories.list` permission or the [Code Creator\n| (`roles/dataform.codeCreator`)](/iam/docs/understanding-roles#dataform.codeCreator) role in a project can list the names of code assets in that project by using the Dataform API or the Dataform command-line interface (CLI). Non-administrators using BigQuery Studio can only see code assets that they created or that were shared with them.\n\nCreate a notebook\n-----------------\n\nTo create a Colab Enterprise notebook by using the Google Cloud console:\n\n1. In the Google Cloud console, go to\n the Colab Enterprise **My notebooks** page.\n\n [Go to My notebooks](https://console.cloud.google.com/vertex-ai/colab/notebooks)\n2. In the **Region** menu, select the region where you want to\n create your notebook.\n\n3. Click add_box **New\n notebook**.\n\n Colab Enterprise creates and opens your notebook.\n\nWhen you finish the tasks that are described in this document, you can avoid\ncontinued billing by deleting the resources that you created. For more information, see\n[Clean up](#clean-up).\n\nRun code in the default runtime\n-------------------------------\n\nTo run a Colab Enterprise notebook's code\non the default runtime, do the following:\n\n1. In the Google Cloud console, go to\n the Colab Enterprise **My notebooks** page.\n\n [Go to My notebooks](https://console.cloud.google.com/vertex-ai/colab/notebooks)\n2. In the **Region** menu, select the region that contains your notebook.\n\n3. Click the notebook that you want to open.\n\n4. Hold the pointer over the code cell that you want to run,\n and then click the\n **Run cell** button.\n\n5. If this is your first time connecting to a runtime with\n end-user credentials enabled, a **Sign in** dialog appears.\n\n | The default runtime has end-user credentials enabled to make it easier to [run code that interacts\n | with Google Cloud](/colab/docs/run-code-adc).\n\n To grant Colab Enterprise access to your user credentials,\n complete the following steps:\n 1. In the **Sign in** dialog, click your user account.\n\n 2. Select **See, edit, configure, and delete your\n Google Cloud data...** to grant Colab Enterprise\n access to your user credentials.\n\n 3. Click **Continue**.\n\nAfter your runtime starts, Colab Enterprise connects\nto the runtime and runs the code in the cell.\n\nRename your notebook\n--------------------\n\nTo rename a Colab Enterprise notebook:\n\n1. In the Google Cloud console, go to\n the Colab Enterprise **My notebooks** page.\n\n [Go to My notebooks](https://console.cloud.google.com/vertex-ai/colab/notebooks)\n2. In the **Region** menu, select the region that contains your notebook.\n\n3. Next to the notebook that you want to rename, click the\n more_vert**Actions** menu,\n and then select **Rename**.\n\n4. In the **Rename notebook** dialog,\n change the name of the notebook, and then click **Rename**.\n\nImport a notebook\n-----------------\n\nTo import a notebook into Colab Enterprise:\n\n1. In the Google Cloud console, go to\n the Colab Enterprise **My notebooks** page.\n\n [Go to My notebooks](https://console.cloud.google.com/vertex-ai/colab/notebooks)\n2. In the **Region** menu, select the region where you want to\n import your notebook.\n\n3. Click\n upload **Import**.\n\n4. In the **Import notebooks** dialog, select an\n **Import source**.\n\n5. If you selected:\n\n - **Your computer**, navigate to and select a notebook file to import.\n - **Cloud Storage**, navigate to and select a notebook in Cloud Storage.\n - **URL**, enter the URL of the notebook file to import.\n\n | The notebook must be fewer than 20 MB.\n6. To add another notebook, click\n add_box **Add\n notebook**.\n\n7. After you've added the notebooks that you want to import,\n click **Import**.\n\n Colab Enterprise imports your notebook files.\n\nClean up\n--------\n\nTo avoid incurring charges to your Google Cloud account for the resources\nused in this tutorial, either delete the project that contains the resources,\nor keep the project and delete the individual resources. \n\n### Delete the project\n\n| **Caution** : Deleting a project has the following effects:\n|\n| - **Everything in the project is deleted.** If you used an existing project for the tasks in this document, when you delete it, you also delete any other work you've done in the project.\n| - **Custom project IDs are lost.** When you created this project, you might have created a custom project ID that you want to use in the future. To preserve the URLs that use the project ID, such as an `appspot.com` URL, delete selected resources inside the project instead of deleting the whole project.\n|\n|\n| If you plan to explore multiple architectures, tutorials, or quickstarts, reusing projects\n| can help you avoid exceeding project quota limits.\n1. In the Google Cloud console, go to the **Manage resources** page.\n\n [Go to Manage resources](https://console.cloud.google.com/iam-admin/projects)\n2. In the project list, select the project that you want to delete, and then click **Delete**.\n3. In the dialog, type the project ID, and then click **Shut down** to delete the project. \n\n### Delete your notebook\n\nTo delete a Colab Enterprise notebook:\n\n1. In the Google Cloud console, go to\n the Colab Enterprise **My notebooks** page.\n\n [Go to My notebooks](https://console.cloud.google.com/vertex-ai/colab/notebooks)\n2. In the **Region** menu, select the region that contains\n the notebook that you want to delete.\n\n3. Next to the notebook that you want to delete, click the\n more_vert**Actions** menu,\n and then select\n delete **Delete\n notebook**.\n\n4. In the **Delete notebook** dialog,\n click **Confirm**.\n\nWhat's next\n-----------\n\n- Read the [Introduction to\n Colab Enterprise](/colab/docs/introduction).\n\n- To find a notebook that can help you get your project started quickly,\n see the [notebook gallery](https://console.cloud.google.com/vertex-ai/colab/notebook-gallery)."]]