Restez organisé à l'aide des collections
Enregistrez et classez les contenus selon vos préférences.
Créer un notebook à l'aide de la console Google Cloud
Découvrez comment créer un notebook Colab Enterprise et exécuter son code sur un environnement d'exécution par défaut à l'aide de la console Google Cloud .
Cette page explique également comment renommer, importer et supprimer un notebook.
Pour obtenir des instructions détaillées sur cette tâche directement dans la console Google Cloud , cliquez sur Visite guidée :
Sign in to your Google Cloud account. If you're new to
Google Cloud,
create an account to evaluate how our products perform in
real-world scenarios. New customers also get $300 in free credits to
run, test, and deploy workloads.
In the Google Cloud console, on the project selector page,
select or create a Google Cloud project.
Pour obtenir les autorisations nécessaires pour créer un notebook Colab Enterprise et exécuter le code du notebook sur un environnement d'exécution, demandez à votre administrateur de vous accorder le rôle IAM Utilisateur Colab Enterprise (roles/aiplatform.colabEnterpriseUser) sur le projet.
Pour en savoir plus sur l'attribution de rôles, consultez la page Gérer l'accès aux projets, aux dossiers et aux organisations.
Dans le menu Région, sélectionnez la région dans laquelle vous souhaitez créer votre notebook.
Cliquez sur add_boxNouveau notebook.
Colab Enterprise crée et ouvre votre notebook.
Une fois que vous avez terminé les tâches décrites dans ce document, vous pouvez éviter de continuer à payer des frais en supprimant les ressources que vous avez créées. Pour en savoir plus, consultez la section Effectuer un nettoyage.
Exécuter du code dans l'environnement d'exécution par défaut
Pour exécuter le code d'un notebook Colab Enterprise sur l'environnement d'exécution par défaut, procédez comme suit:
Dans la console Google Cloud , accédez à la page Mes notebooks de Colab Enterprise.
Dans le menu Région, sélectionnez la région qui contient votre notebook.
Cliquez sur le notebook que vous souhaitez ouvrir.
Placez le pointeur de la souris sur la cellule de code que vous souhaitez exécuter, puis cliquez sur le bouton Exécuter la cellule.
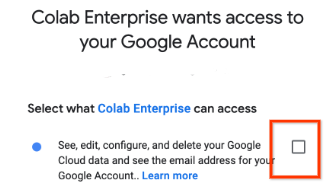
Si vous vous connectez pour la première fois à un environnement d'exécution avec les identifiants de l'utilisateur final activés, une boîte de dialogue Connexion s'affiche.
Pour autoriser Colab Enterprise à accéder à vos identifiants utilisateur, procédez comme suit:
Dans la boîte de dialogue Connexion, cliquez sur votre compte utilisateur.
Sélectionnez Afficher, modifier, configurer et supprimer vos données Google Cloud ... pour autoriser Colab Enterprise à accéder à vos identifiants utilisateur.
Cliquez sur Continuer.
Une fois l'environnement d'exécution démarré, Colab Enterprise se connecte à celui-ci et exécute le code de la cellule.
Renommer votre notebook
Pour renommer un notebook Colab Enterprise :
Dans la console Google Cloud , accédez à la page Mes notebooks de Colab Enterprise.
Dans le menu Région, sélectionnez la région dans laquelle vous souhaitez importer votre notebook.
Cliquez sur uploadImporter.
Dans la boîte de dialogue Importer des notebooks, sélectionnez une source d'importation.
Si vous avez sélectionné :
Sur votre ordinateur, accédez au fichier de notebook à importer et sélectionnez-le.
Cloud Storage : accédez à un notebook dans Cloud Storage et sélectionnez-le.
URL : saisissez l'URL du fichier notebook à importer.
Pour ajouter un autre notebook, cliquez sur add_boxAjouter un notebook.
Après avoir ajouté les notebooks que vous souhaitez importer, cliquez sur Importer.
Colab Enterprise importe vos fichiers de notebook.
Effectuer un nettoyage
Pour éviter que les ressources utilisées lors de ce tutoriel soient facturées sur votre compte Google Cloud , supprimez le projet contenant les ressources, ou conservez le projet et supprimez chaque ressource individuellement.
Supprimer le projet
In the Google Cloud console, go to the Manage resources page.
Pour trouver un notebook qui peut vous aider à démarrer rapidement votre projet, consultez la galerie de notebooks.
Sauf indication contraire, le contenu de cette page est régi par une licence Creative Commons Attribution 4.0, et les échantillons de code sont régis par une licence Apache 2.0. Pour en savoir plus, consultez les Règles du site Google Developers. Java est une marque déposée d'Oracle et/ou de ses sociétés affiliées.
Dernière mise à jour le 2025/09/04 (UTC).
[[["Facile à comprendre","easyToUnderstand","thumb-up"],["J'ai pu résoudre mon problème","solvedMyProblem","thumb-up"],["Autre","otherUp","thumb-up"]],[["Difficile à comprendre","hardToUnderstand","thumb-down"],["Informations ou exemple de code incorrects","incorrectInformationOrSampleCode","thumb-down"],["Il n'y a pas l'information/les exemples dont j'ai besoin","missingTheInformationSamplesINeed","thumb-down"],["Problème de traduction","translationIssue","thumb-down"],["Autre","otherDown","thumb-down"]],["Dernière mise à jour le 2025/09/04 (UTC)."],[[["\u003cp\u003eThis document guides users on how to create, rename, import, and delete Colab Enterprise notebooks using the Google Cloud console.\u003c/p\u003e\n"],["\u003cp\u003eUsers can run a notebook's code on a default runtime, which includes end-user credentials for easy interaction with Google Cloud services.\u003c/p\u003e\n"],["\u003cp\u003eTo get started, users need the Colab Enterprise User IAM role and can access the "My notebooks" page within the Google Cloud console.\u003c/p\u003e\n"],["\u003cp\u003eThe guide emphasizes resource management, offering options to either delete the entire project or individual notebooks to avoid continued billing.\u003c/p\u003e\n"],["\u003cp\u003eTo avoid resource charges, you can delete the project you used or delete the notebook you have created.\u003c/p\u003e\n"]]],[],null,["# Quickstart: Create a Colab Enterprise notebook by using the Google Cloud console\n\nCreate a notebook by using the Google Cloud console\n===================================================\n\nLearn how to create a Colab Enterprise notebook and run its code\non a default runtime by using the Google Cloud console.\nThis page also describes how to rename, import, and delete a notebook.\n\n*** ** * ** ***\n\nTo follow step-by-step guidance for this task directly in the\nGoogle Cloud console, click **Guide me**:\n\n[Guide me](https://console.cloud.google.com/freetrial?redirectPath=/?walkthrough_id=vertex-ai--colab--create-notebook)\n\n*** ** * ** ***\n\n\u003cbr /\u003e\n\nBefore you begin\n----------------\n\n- Sign in to your Google Cloud account. If you're new to Google Cloud, [create an account](https://console.cloud.google.com/freetrial) to evaluate how our products perform in real-world scenarios. New customers also get $300 in free credits to run, test, and deploy workloads.\n- In the Google Cloud console, on the project selector page,\n select or create a Google Cloud project.\n\n | **Note**: If you don't plan to keep the resources that you create in this procedure, create a project instead of selecting an existing project. After you finish these steps, you can delete the project, removing all resources associated with the project.\n\n [Go to project selector](https://console.cloud.google.com/projectselector2/home/dashboard)\n-\n [Verify that billing is enabled for your Google Cloud project](/billing/docs/how-to/verify-billing-enabled#confirm_billing_is_enabled_on_a_project).\n\n-\n\n\n Enable the Vertex AI, Dataform, and Compute Engine APIs.\n\n\n [Enable the APIs](https://console.cloud.google.com/flows/enableapi?apiid=aiplatform.googleapis.com, dataform.googleapis.com, compute.googleapis.com&redirect=https://console.cloud.google.com)\n\n- In the Google Cloud console, on the project selector page,\n select or create a Google Cloud project.\n\n | **Note**: If you don't plan to keep the resources that you create in this procedure, create a project instead of selecting an existing project. After you finish these steps, you can delete the project, removing all resources associated with the project.\n\n [Go to project selector](https://console.cloud.google.com/projectselector2/home/dashboard)\n-\n [Verify that billing is enabled for your Google Cloud project](/billing/docs/how-to/verify-billing-enabled#confirm_billing_is_enabled_on_a_project).\n\n-\n\n\n Enable the Vertex AI, Dataform, and Compute Engine APIs.\n\n\n [Enable the APIs](https://console.cloud.google.com/flows/enableapi?apiid=aiplatform.googleapis.com, dataform.googleapis.com, compute.googleapis.com&redirect=https://console.cloud.google.com)\n\n### Required roles\n\n\nTo get the permissions that\nyou need to create a Colab Enterprise notebook and run the notebook's code on a runtime,\n\nask your administrator to grant you the\n\n\nColab Enterprise User ([`roles/aiplatform.colabEnterpriseUser`](/vertex-ai/docs/general/access-control#aiplatform.colabEnterpriseUser))\nIAM role on the project.\n\n\nFor more information about granting roles, see [Manage access to projects, folders, and organizations](/iam/docs/granting-changing-revoking-access).\n\n\nYou might also be able to get\nthe required permissions through [custom\nroles](/iam/docs/creating-custom-roles) or other [predefined\nroles](/iam/docs/roles-overview#predefined).\n| One or more of the required roles includes the `dataform.repositories.list` permission. Users who are granted the `dataform.repositories.list` permission or the [Code Creator\n| (`roles/dataform.codeCreator`)](/iam/docs/understanding-roles#dataform.codeCreator) role in a project can list the names of code assets in that project by using the Dataform API or the Dataform command-line interface (CLI). Non-administrators using BigQuery Studio can only see code assets that they created or that were shared with them.\n\nCreate a notebook\n-----------------\n\nTo create a Colab Enterprise notebook by using the Google Cloud console:\n\n1. In the Google Cloud console, go to\n the Colab Enterprise **My notebooks** page.\n\n [Go to My notebooks](https://console.cloud.google.com/vertex-ai/colab/notebooks)\n2. In the **Region** menu, select the region where you want to\n create your notebook.\n\n3. Click add_box **New\n notebook**.\n\n Colab Enterprise creates and opens your notebook.\n\nWhen you finish the tasks that are described in this document, you can avoid\ncontinued billing by deleting the resources that you created. For more information, see\n[Clean up](#clean-up).\n\nRun code in the default runtime\n-------------------------------\n\nTo run a Colab Enterprise notebook's code\non the default runtime, do the following:\n\n1. In the Google Cloud console, go to\n the Colab Enterprise **My notebooks** page.\n\n [Go to My notebooks](https://console.cloud.google.com/vertex-ai/colab/notebooks)\n2. In the **Region** menu, select the region that contains your notebook.\n\n3. Click the notebook that you want to open.\n\n4. Hold the pointer over the code cell that you want to run,\n and then click the\n **Run cell** button.\n\n5. If this is your first time connecting to a runtime with\n end-user credentials enabled, a **Sign in** dialog appears.\n\n | The default runtime has end-user credentials enabled to make it easier to [run code that interacts\n | with Google Cloud](/colab/docs/run-code-adc).\n\n To grant Colab Enterprise access to your user credentials,\n complete the following steps:\n 1. In the **Sign in** dialog, click your user account.\n\n 2. Select **See, edit, configure, and delete your\n Google Cloud data...** to grant Colab Enterprise\n access to your user credentials.\n\n 3. Click **Continue**.\n\nAfter your runtime starts, Colab Enterprise connects\nto the runtime and runs the code in the cell.\n\nRename your notebook\n--------------------\n\nTo rename a Colab Enterprise notebook:\n\n1. In the Google Cloud console, go to\n the Colab Enterprise **My notebooks** page.\n\n [Go to My notebooks](https://console.cloud.google.com/vertex-ai/colab/notebooks)\n2. In the **Region** menu, select the region that contains your notebook.\n\n3. Next to the notebook that you want to rename, click the\n more_vert**Actions** menu,\n and then select **Rename**.\n\n4. In the **Rename notebook** dialog,\n change the name of the notebook, and then click **Rename**.\n\nImport a notebook\n-----------------\n\nTo import a notebook into Colab Enterprise:\n\n1. In the Google Cloud console, go to\n the Colab Enterprise **My notebooks** page.\n\n [Go to My notebooks](https://console.cloud.google.com/vertex-ai/colab/notebooks)\n2. In the **Region** menu, select the region where you want to\n import your notebook.\n\n3. Click\n upload **Import**.\n\n4. In the **Import notebooks** dialog, select an\n **Import source**.\n\n5. If you selected:\n\n - **Your computer**, navigate to and select a notebook file to import.\n - **Cloud Storage**, navigate to and select a notebook in Cloud Storage.\n - **URL**, enter the URL of the notebook file to import.\n\n | The notebook must be fewer than 20 MB.\n6. To add another notebook, click\n add_box **Add\n notebook**.\n\n7. After you've added the notebooks that you want to import,\n click **Import**.\n\n Colab Enterprise imports your notebook files.\n\nClean up\n--------\n\nTo avoid incurring charges to your Google Cloud account for the resources\nused in this tutorial, either delete the project that contains the resources,\nor keep the project and delete the individual resources. \n\n### Delete the project\n\n| **Caution** : Deleting a project has the following effects:\n|\n| - **Everything in the project is deleted.** If you used an existing project for the tasks in this document, when you delete it, you also delete any other work you've done in the project.\n| - **Custom project IDs are lost.** When you created this project, you might have created a custom project ID that you want to use in the future. To preserve the URLs that use the project ID, such as an `appspot.com` URL, delete selected resources inside the project instead of deleting the whole project.\n|\n|\n| If you plan to explore multiple architectures, tutorials, or quickstarts, reusing projects\n| can help you avoid exceeding project quota limits.\n1. In the Google Cloud console, go to the **Manage resources** page.\n\n [Go to Manage resources](https://console.cloud.google.com/iam-admin/projects)\n2. In the project list, select the project that you want to delete, and then click **Delete**.\n3. In the dialog, type the project ID, and then click **Shut down** to delete the project. \n\n### Delete your notebook\n\nTo delete a Colab Enterprise notebook:\n\n1. In the Google Cloud console, go to\n the Colab Enterprise **My notebooks** page.\n\n [Go to My notebooks](https://console.cloud.google.com/vertex-ai/colab/notebooks)\n2. In the **Region** menu, select the region that contains\n the notebook that you want to delete.\n\n3. Next to the notebook that you want to delete, click the\n more_vert**Actions** menu,\n and then select\n delete **Delete\n notebook**.\n\n4. In the **Delete notebook** dialog,\n click **Confirm**.\n\nWhat's next\n-----------\n\n- Read the [Introduction to\n Colab Enterprise](/colab/docs/introduction).\n\n- To find a notebook that can help you get your project started quickly,\n see the [notebook gallery](https://console.cloud.google.com/vertex-ai/colab/notebook-gallery)."]]