Mengelola library dan Cloud API di Cloud Code for IntelliJ
Tetap teratur dengan koleksi
Simpan dan kategorikan konten berdasarkan preferensi Anda.
Anda dapat mengakses produk dan layanan Google Cloud dari kode menggunakan
Cloud API. Cloud API ini mengekspos antarmuka REST JSON sederhana yang dapat Anda panggil melalui library klien.
Dokumen ini menjelaskan cara menjelajahi API yang tersedia, mengaktifkan Cloud API, dan menambahkan Library Klien Cloud ke project Anda, serta menyiapkan autentikasi bergantung pada kebutuhan pengembangan Anda.
Menjelajahi Cloud API
Untuk menjelajahi semua Google Cloud API yang tersedia di IDE Anda, ikuti langkah-langkah berikut:
Perluas hierarki Google Cloud APIs Explorer untuk melihat semua API yang tersedia.
Penjelajah mengelompokkan Cloud API menurut kategori. Anda juga dapat mencari
API tertentu menggunakan kotak penelusuran Search APIs.
Klik API untuk melihat detail selengkapnya, seperti statusnya, petunjuk penginstalan khusus bahasa untuk library klien yang sesuai, dan dokumentasi yang relevan.
Mengaktifkan Cloud API
Untuk mengaktifkan Cloud API dengan cepat untuk project menggunakan detail API, ikuti langkah-langkah berikut:
Di tampilan detail Cloud API, pilih project Google Cloud yang ingin Anda
aktifkan Cloud API-nya.
Klik tombol Enable API.
Setelah API diaktifkan, Anda akan melihat pesan yang mengonfirmasi perubahan ini.
Menambahkan Library Klien Cloud
Untuk menambahkan library ke project Anda di IntelliJ, ikuti langkah-langkah berikut:
Untuk project Java Maven
Pilih Tools > Cloud Code >
Cloud APIs.
Dialog Kelola Google Cloud API menampilkan library yang didukung.
Pilih jenis library pilihan Anda dari pilihan Library Klien Google Cloud (direkomendasikan) atau Library Java Spring Google Cloud.
Di menu drop-down Module,
pilih modul yang ingin Anda tambahi library.
Klik Add Maven Dependency
untuk menambahkan BOM dan library klien ke project Anda.
Dialog Add Google Cloud Libraries menampilkan library yang didukung.
Instal API menggunakan petunjuk penginstalan yang tercantum di
halaman detail API untuk bahasa pilihan Anda.
Menyiapkan autentikasi
Setelah mengaktifkan API yang diperlukan dan menambahkan library klien yang diperlukan, Anda perlu mengonfigurasi aplikasi agar berhasil diautentikasi. Konfigurasi Anda bergantung pada jenis pengembangan dan platform yang Anda gunakan.
Setelah Anda menyelesaikan langkah-langkah autentikasi yang relevan, aplikasi Anda dapat diautentikasi dan siap di-deploy.
Pengembangan jarak jauh dengan Secret Manager diaktifkan
Jika Anda mengembangkan dari jarak jauh, menggunakan akun layanan untuk autentikasi, dan aplikasi Anda menggunakan secret, Anda perlu menyelesaikan beberapa langkah lagi untuk menetapkan peran yang diperlukan untuk mengakses secret Secret Manager tertentu ke akun layanan Google Anda:
Buka panel Secret Manager dan pilih secret yang ingin Anda akses dalam kode.
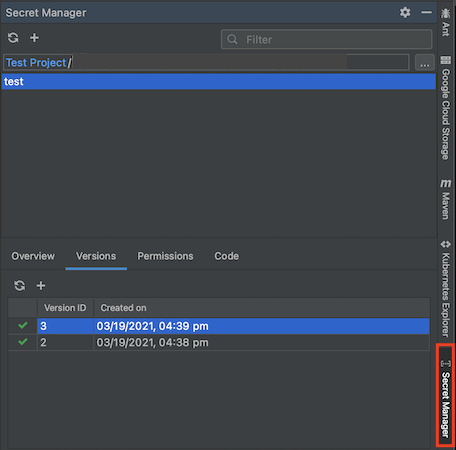
Beralihlah ke tab Izin, lalu konfigurasi izin rahasia Anda dengan mengklik editEdit Izin. Halaman konfigurasi Secret Manager untuk secret akan terbuka di browser web Anda.
Di Google Cloud konsol, klik Tampilkan Panel Info, lalu klik Tambahkan akun utama.
Tetapkan peran Secret Manager Secret Accessor ke akun layanan Anda.
Akun layanan Anda memiliki izin untuk mengakses secret ini.
Mendapatkan dukungan
Untuk mengirimkan masukan atau melaporkan masalah di IDE IntelliJ, buka
Tools > Cloud Code > Help / About > Submit
feedback or report an issue untuk melaporkan masalah di GitHub.
[[["Mudah dipahami","easyToUnderstand","thumb-up"],["Memecahkan masalah saya","solvedMyProblem","thumb-up"],["Lainnya","otherUp","thumb-up"]],[["Sulit dipahami","hardToUnderstand","thumb-down"],["Informasi atau kode contoh salah","incorrectInformationOrSampleCode","thumb-down"],["Informasi/contoh yang saya butuhkan tidak ada","missingTheInformationSamplesINeed","thumb-down"],["Masalah terjemahan","translationIssue","thumb-down"],["Lainnya","otherDown","thumb-down"]],["Terakhir diperbarui pada 2025-09-04 UTC."],[[["\u003cp\u003eGoogle Cloud APIs can be accessed via a JSON REST interface and client libraries, allowing developers to integrate Google Cloud products and services into their code.\u003c/p\u003e\n"],["\u003cp\u003eDevelopers can browse and enable Google Cloud APIs directly within their IDE using Cloud Code, which groups APIs by category and provides details on each API's status and documentation.\u003c/p\u003e\n"],["\u003cp\u003eCloud Code facilitates adding client libraries to projects, supporting both Google Cloud Client Library and Java Spring Google Cloud Library, and managing dependencies using the Google Cloud Java Bill of Materials (BOM).\u003c/p\u003e\n"],["\u003cp\u003eAuthentication setup for applications varies based on the development environment, such as local development with minikube or remote deployment on Google Kubernetes Engine or Cloud Run, often requiring Application Default Credentials (ADC) and sometimes service account configuration.\u003c/p\u003e\n"],["\u003cp\u003eFor remote development with Secret Manager, service accounts must be granted the "Secret Manager Secret Accessor" role to allow access to specific secrets, ensuring secure handling of sensitive information within applications.\u003c/p\u003e\n"]]],[],null,["# Manage Cloud APIs and libraries in Cloud Code for IntelliJ\n\nYou can access Google Cloud products and services from your code using\n[Cloud APIs](/apis/docs/overview). These Cloud APIs expose a simple JSON REST\ninterface that you can call via client libraries.\n\nThis document describes how to browse available APIs, enable Cloud APIs and\nadd Cloud Client Libraries to your project, and set up authentication depending\non your development needs.\n| **Note:** For projects that don't use both Java and Maven, Cloud Code does not add the Cloud Client Libraries to your build automatically, but does support the other features described here and provides build snippets for your build system.\n\nBrowsing Cloud APIs\n-------------------\n\nTo explore all available Google Cloud APIs in your IDE, follow these steps:\n\n1. Select **Tools** \\\u003e **Cloud Code** \\\u003e **Add Cloud Libraries and Manage Cloud APIs**.\n2. Expand the Google Cloud APIs explorer tree to view all available APIs. The explorer groups Cloud APIs by category. You can also look for a specific API using the Search APIs search bar.\n3. Click an API to view more details, such as its status, language-specific installation instructions for its corresponding client libraries, and relevant documentation.\n\n\u003cbr /\u003e\n\nEnabling Cloud APIs\n-------------------\n\nTo quickly enable Cloud APIs for a project using the API details, follow these steps:\n\n1. In the Cloud API details view, choose a Google Cloud project that you'd like to enable the Cloud API for.\n2. Click the **Enable API** button.\n\n\n Once the API has been enabled you'll see a message confirming this change.\n\n\u003cbr /\u003e\n\nAdding the Cloud Client Libraries\n---------------------------------\n\nTo add libraries to your project in IntelliJ, follow these steps: \n\n### For Java Maven projects\n\n1. Select **Tools** \\\u003e **Cloud Code** \\\u003e **Cloud APIs**.\n2. The **Manage Google Cloud APIs** dialog displays the supported libraries.\n3. Select your preferred library type from the choice of Google Cloud Client Library (recommended) or Java Spring Google Cloud Library.\n4. In the **Module** drop-down menu, select the module that you want to add the library to.\n| **Note:** **Google Cloud Java** solves version conflicts between libraries by adding the [Google Cloud Java Bill of Materials (BOM)](https://github.com/googleapis/google-cloud-java#version-management) to the `pom.xml` file of your projects.\n5. Click **Add Maven Dependency** to add BOM and client library to your project.\n\n### For all other projects\n\n1. Select **Tools** \\\u003e **Cloud Code** \\\u003e **Add Cloud Libraries and Manage Cloud APIs**.\n2. The **Add Google Cloud Libraries** dialog displays the supported libraries.\n3. Install the API using the installation instructions listed on the API details page for your preferred language. If you're developing a Java application, you need to also specify your library preference, Google Cloud Client Library (recommended) or Java Spring Google Cloud Library.\n\nSetting up authentication\n-------------------------\n\nAfter you've enabled the required APIs and added the necessary client libraries,\nyou need to configure your application in order for it to be successfully\nauthenticated. Your configuration depends on your type of development and\nthe platform you're running on.\n\nOnce you complete the relevant authentication steps, your application can\nauthenticate and is ready to be deployed.\n\n### Local development\n\n### minikube\n\n\n1. Ensure that you have Application Default Credentials (ADC) set by running `gcloud auth application-default login`. This lets minikube find your ADC to authenticate with.\n\n\u003cbr /\u003e\n\n### minikube\n\n\n1. Ensure that you have Application Default Credentials (ADC) set by running `gcloud auth application-default login`. This lets minikube find your ADC to authenticate with.\n2. Start minikube with `minikube start --addons gcp-auth`. This mounts your ADC in your pods. For a detailed minikube auth guide for Google Cloud, refer to the [minikube gcp-auth docs](https://minikube.sigs.k8s.io/docs/handbook/addons/gcp-auth/).\n\n\u003cbr /\u003e\n\n### Local Kubernetes cluster\n\n\n1. Ensure that you have Application Default Credentials (ADC) set by running `gcloud auth application-default login`.\n2. Mount your local `gcloud` directory in your Kubernetes pods by editing the deployment manifests, so that the Google Cloud client libraries can find your credentials. Kubernetes pod configuration example: \n\n apiVersion: v1\n kind: Pod\n metadata:\n name: my-app\n labels:\n name: my-app\n spec:\n containers:\n - name: my-app\n image: gcr.io/google-containers/busybox\n ports:\n - containerPort: 8080\n volumeMounts:\n - mountPath: /root/.config/gcloud\n name: gcloud-volume\n volumes:\n - name: gcloud-volume\n hostPath:\n path: /path/to/home/.config/gcloud\n\n\u003cbr /\u003e\n\n### Cloud Run\n\n\n1. Ensure that you have Application Default Credentials (ADC) set by running `gcloud auth application-default login`. This lets the Cloud Run local simulated environment find your ADC to authenticate with.\n\n\u003cbr /\u003e\n\n### Remote development\n\n### Google Kubernetes Engine\n\n\n1. [Configure your GKE cluster and application with Workload Identity](https://cloud.google.com/kubernetes-engine/docs/how-to/workload-identity) to authenticate Google Cloud services on GKE. This associates your Kubernetes service account with your Google service account.\n2. If the Google Cloud service you're trying to access requires additional roles, grant them for the Google service account you're using to develop your app. \n For a list of IAM role types and predefined roles you can grant to identities, see the [Understanding roles guide](https://cloud.google.com/iam/docs/understanding-roles). For steps to grant the roles, see [Granting, changing, and revoking access to resources](/iam/docs/granting-changing-revoking-access).\n3. Configure your Kubernetes Deployment to reference the Kubernetes service account by setting the `.spec.serviceAccountName` field in your Kubernetes Deployment YAML file. \n If you're working on an app created from a Cloud Code template, this file is located under the kubernetes-manifests folder.\n\n\u003cbr /\u003e\n\n### Cloud Run\n\n\n1. To create a new unique service account for deploying your Cloud Run application, on the Service Accounts page, select the project that your secret is stored in. [Go to the Service Accounts\n page](https://console.cloud.google.com/iam-admin/serviceaccounts)\n\n2. Click **Create service account**.\n3. In the **Create service account** dialog, enter a descriptive name for the service account.\n4. Change the **Service account ID** to a unique, recognizable value and then click **Create**.\n5. If the Google Cloud service you're trying to access requires additional roles, grant them, click **Continue** , and then click **Done**.\n6. To add your service account to your deploy configuration, navigate to your **Cloud Run: Deploy** run configuration, expand the **Advanced revision settings** section, and then specify your service account in the **Service Account** field. \n\n\u003cbr /\u003e\n\n### Cloud Run\n\n\n1. [Configure your GKE cluster and application with Workload Identity](https://cloud.google.com/kubernetes-engine/docs/how-to/workload-identity) to authenticate Google Cloud services on GKE. This associates your Kubernetes service account with your Google service account.\n2. If the Google Cloud service you're trying to access requires additional roles, grant them for the Google service account you're using to develop your app. \n The [Understanding roles guide](https://cloud.google.com/iam/docs/understanding-roles) describes IAM role types and lists available predefined roles you can grant to identities.\n3. To add your Kubernetes service account to your deploy configuration, navigate to your **Cloud Run: Deploy** run configuration, expand the **Advanced revision settings** section, and then specify your Kubernetes service account in the **Service\n Account** field. \n\n\u003cbr /\u003e\n\n### Remote development with Secret Manager enabled\n\nIf you're developing remotely, using a service account for authentication,\nand your application uses [secrets](/code/docs/intellij/secret-manager-ux), you\nneed to complete a few more steps to assign your Google service account\nthe role required to access a particular Secret Manager secret:\n\n1. Open the Secret Manager panel and select the secret you want to access in your\n code.\n\n2. Switch to the Permissions tab and then configure your secret's permissions\n by clicking edit\n **Edit Permission**. The Secret Manager configuration page for\n the secret opens in your web browser.\n\n3. In Google Cloud console, click **Show Info Panel** and then click **Add principal**.\n\n4. Assign your service account the **Secret Manager Secret Accessor** role.\n\n Your service account has permission to access this secret.\n\nGet support\n-----------\n\nTo submit feedback or report an issue in your IntelliJ IDE, go to **Tools** \\\u003e **Cloud Code** \\\u003e **Help / About** \\\u003e **Submit\nfeedback or report an issue** to report an issue on [GitHub](https://github.com/GoogleCloudPlatform/cloud-code-intellij/issues)."]]