Minimal Downtime Migrations to Cloud Spanner with HarbourBridge 2.0
Abirami Sukumaran
Developer Advocate, Google
Mohit Gulati
Senior Product Manager
Spanner is a fully managed, strongly consistent and highly available database providing up to 99.999% availability. It is also very easy to create your Spanner instance and point your application to it. But what if you want to migrate your schema and data from another database to Cloud Spanner? The common challenges with database migrations are ensuring high throughput of data transfer, and high availability of your application with minimal downtime, and all this needs to be enabled with a user-friendly migrations solution.
Today, we are excited to announce the launch of HarbourBridge 2.0 (Preview) - an easy to use open source migration tool, now with enhanced capabilities for schema and data migrations with minimal downtime.
This blog intends to demonstrate migration of schema and data for an application from MySQL to Spanner using HarbourBridge.
About HarbourBridge
HarbourBridge is an easy to use open source tool, which gives you highly detailed schema assessments and recommendations and allows you to perform migrations with minimal downtime. It just lets you point, click and trigger your schema and data migrations. It provides a unified interface for the migration wherein it gives users the flexibility to modify the generated spanner schema and run end to end migration from a single interface. It provides the capabilities of editing table details like columns, primary key, foreign key, indexes, etc and provides insights on the schema conversion performance along with highlighting important issues and suggestions.
What's new in HarbourBridge 2.0?
With this recent launch, you can now do the following:
Perform end to end minimal downtime terabyte scale data migrations
Get improved schema assessment and recommendations
Experience ease of access with gCloud Integration
We’ll experience the power of some of these cool new add-ons as we walk through the various application migration scenarios in this blog.
Types of Migration
Data migration with HarbourBridge is of 2 types:
Minimal Downtime
Migration with downtime
Minimal Downtime is for real time transactions and incremental updates in business critical applications to ensure there is business continuity and very minimal interruption.Migration with downtime is recommended only for POC’s/ test environment setups or applications which can take a few hours of downtime.
Connecting HarbourBridge to source
There are three ways to connect HarbourBridge to your source database:
Direct connection to Database - for minimal downtime and continuous data migration for a certain time period
Data dump - for a one time migration of the source database dump into Spanner
Session file - to load from a previous HarbourBridge session
Migration components of HarbourBridge
With HarbourBridge you can choose to migrate:
Schema-only
Data-only
Both Schema and Data
The below image shows how at a high level, the various components involved behind the scenes for data migration:
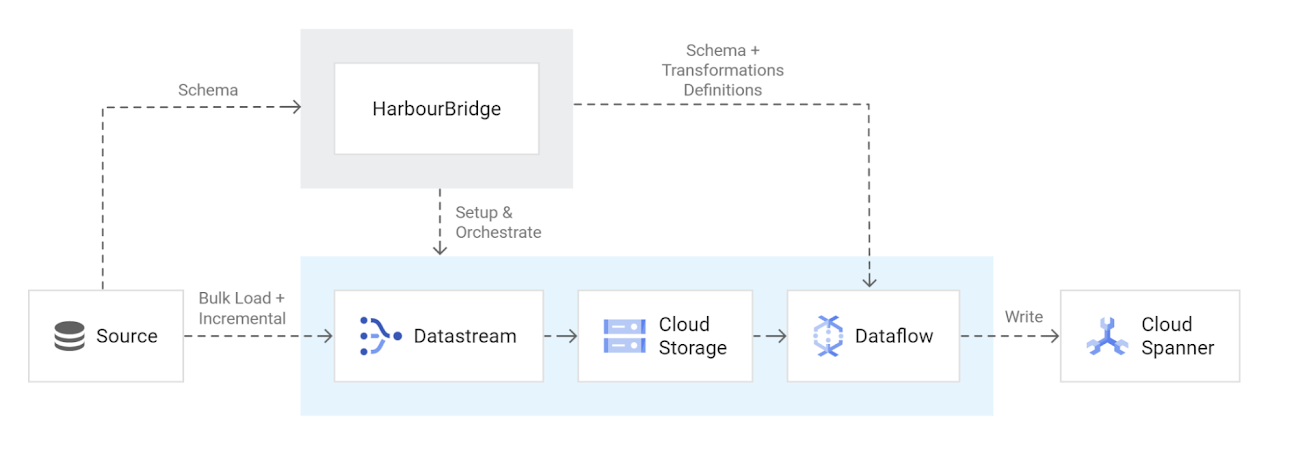

To manage a low-downtime migration, HarbourBridge orchestrates the following processes for you. You only have to set up connection profiles from the HarbourBridge UI on the migration page, everything else is handled by Harbour Bridge under the hood:
HarbourBridge sets up a Cloud Storage bucket to store incoming change events on the source database while the snapshot migration progresses
HarbourBridge sets up a datastream job to bulk load a snapshot of the data and stream incremental writes.
HarbourBridge sets up the Dataflow job to migrate the change events into Spanner, which empties the Cloud Storage bucket over time
Validate that most of the data has been copied over to Spanner, and then stop writing to the source database so that the remaining change events can be applied. This results in a short downtime while Spanner catches up to the source database. Afterward, the application can be cut over to use Spanner as the main database.
The application
The use case we have created to discuss to demonstrate this migration is an application that streams in live (near real-time) T20 cricket match data ball-by-ball and calculates the Duckworth Lewis Target Score (also known as the Par Score) for Team 2, second innings, in case the match is disrupted mid-innings due to rain or other circumstances. This is calculated using the famous Duckworth Lewis Stern (DLS) algorithm and gets updated for every ball in the second innings; that way we will always know what the winning target is, in case the match gets interrupted and is not continued thereafter. There are several scenarios in Cricket that use the DLS algorithm for determining the target or winning score.
MySQL Database
In this use case, we are using Cloud SQL for MySQL to house the ball by ball data being streamed-in. The DLS Target client application streams data into MySQL database tables, which will be migrated to Spanner.
Application Migration Architecture
In this migration, our source data is being sent in bulk and in streaming modes to the MySQL table which is the source of the Migration. Cloud Functions Java function simulates the ball by ball streaming and calculates the Duckworth Lewis Target Score, updates it to the baseline table. HarbourBridge reads from MySQL and writes (Schema and Data) into Cloud Spanner.
The below diagram represents the high level architectural overview of the migration process:
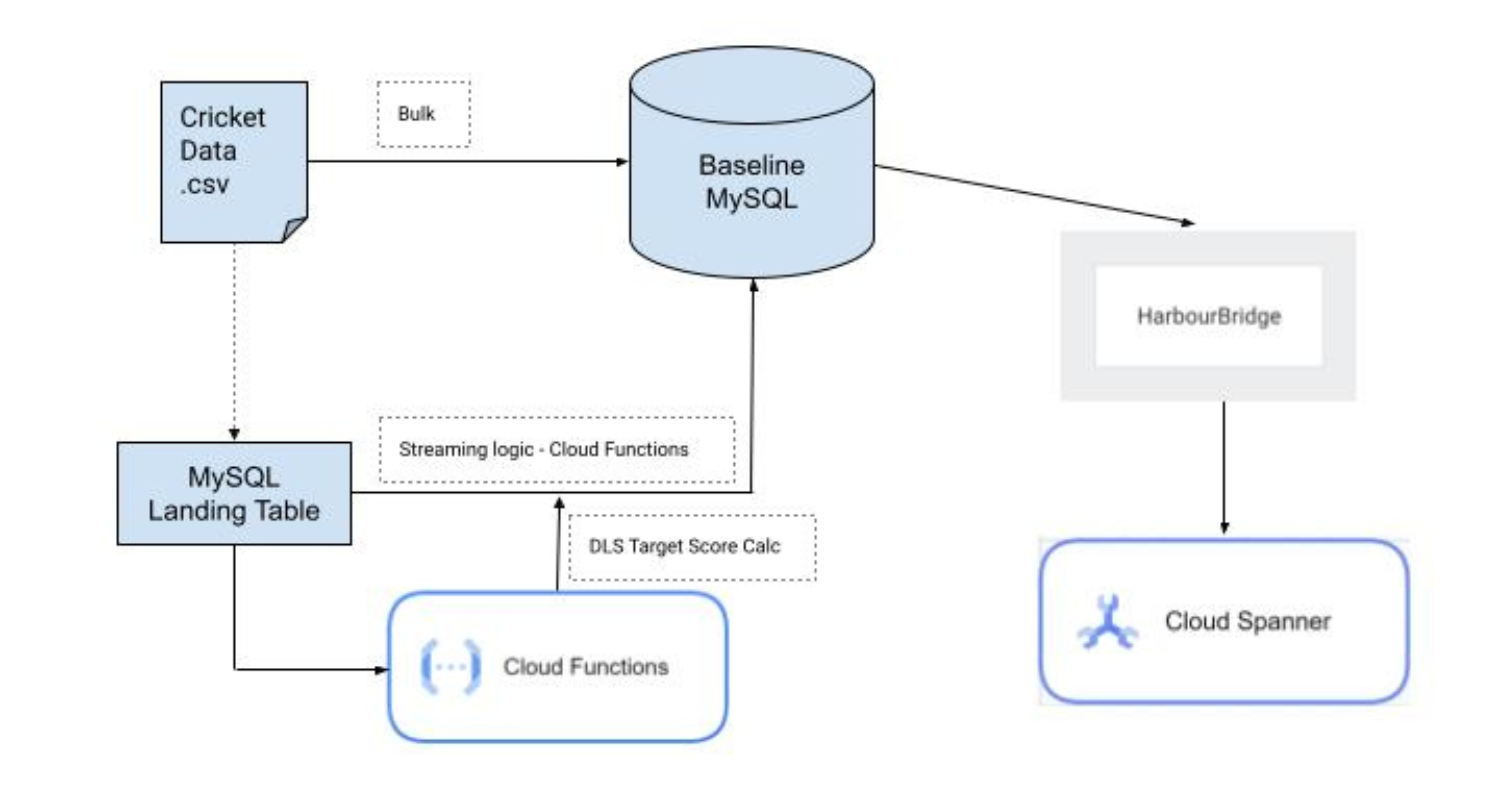

Note: In our case the streaming process is simulated with the data coming from a CSV into a landing table in MySQL which then streams match data by pushing row by row data to the baseline MySQL table. This is the table used for further updates and DLS Target calculations.
Migrating MySQL to Spanner with HarbourBridge
Set up HarbourBridge
Run the following 2 gCloud commands on Google Cloud Console Cloud Shell:
Install the HarbourBridge component of gCloud by running:
gcloud components install harbourbridgeStart the HarbourBridge UI by running:
gcloud alpha spanner migration web
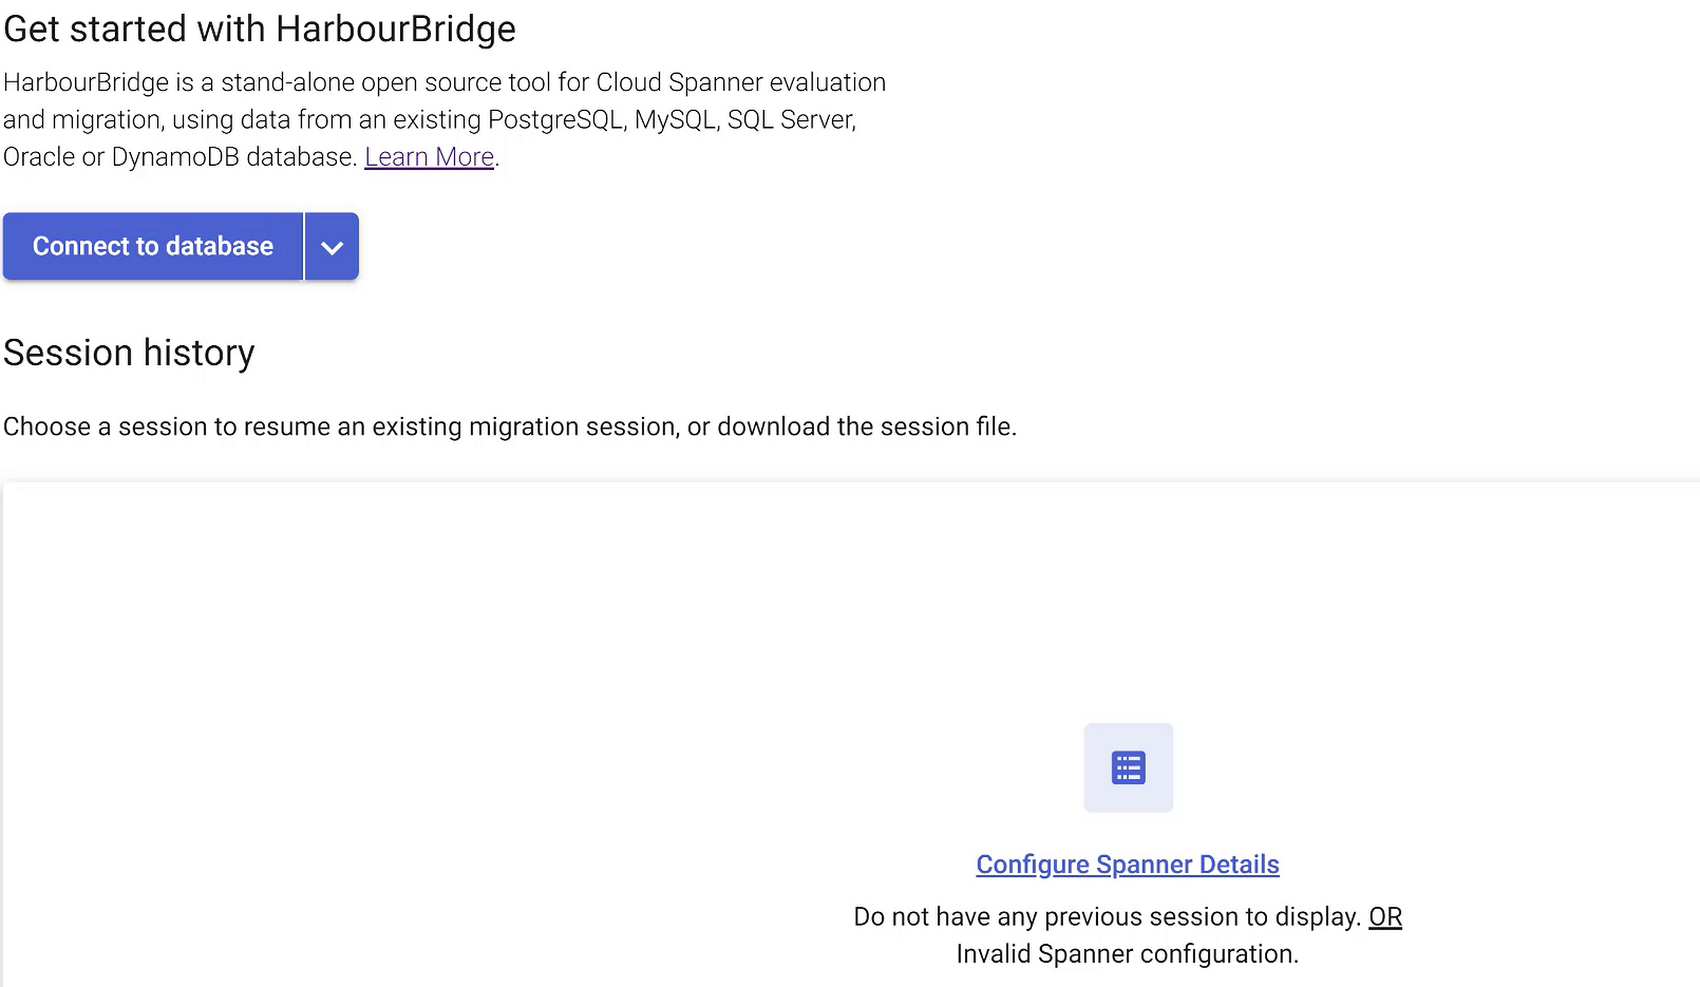
Your HarbourBridge application should be up and running:

Note:
Before proceeding with the migration, remember to enable the DataStream and Dataflow API from Google Cloud Console
Ensure you have Cloud SQL for MySQL or your own MySQL server created for the source and Spanner instance created for the target
Ensure all source database instance objects are created. For access to the DB DDLs, DMLs and the data CSV file refer to this git repo folder
For data validation (post-migration step) SELECT queries for both source and Spanner, refer to this git repo folder
Ensure Cloud Functions is created and deployed (for Streaming simulation and DLS Target score calculation). For the source code, refer to the git repo folder. You can learn how to deploy a Java function to Cloud Functions here
Also note that your proxy is set up and running when trying to connect to the source from HarbourBridge. If you are using Cloud SQL for MySQL, you can ensure that proxy is running by executing the following command in Cloud Shell:
./cloud_sql_proxy -instances=<<Project-id:Region:instance-name>>=tcp:<<3306>>
Connect to the source
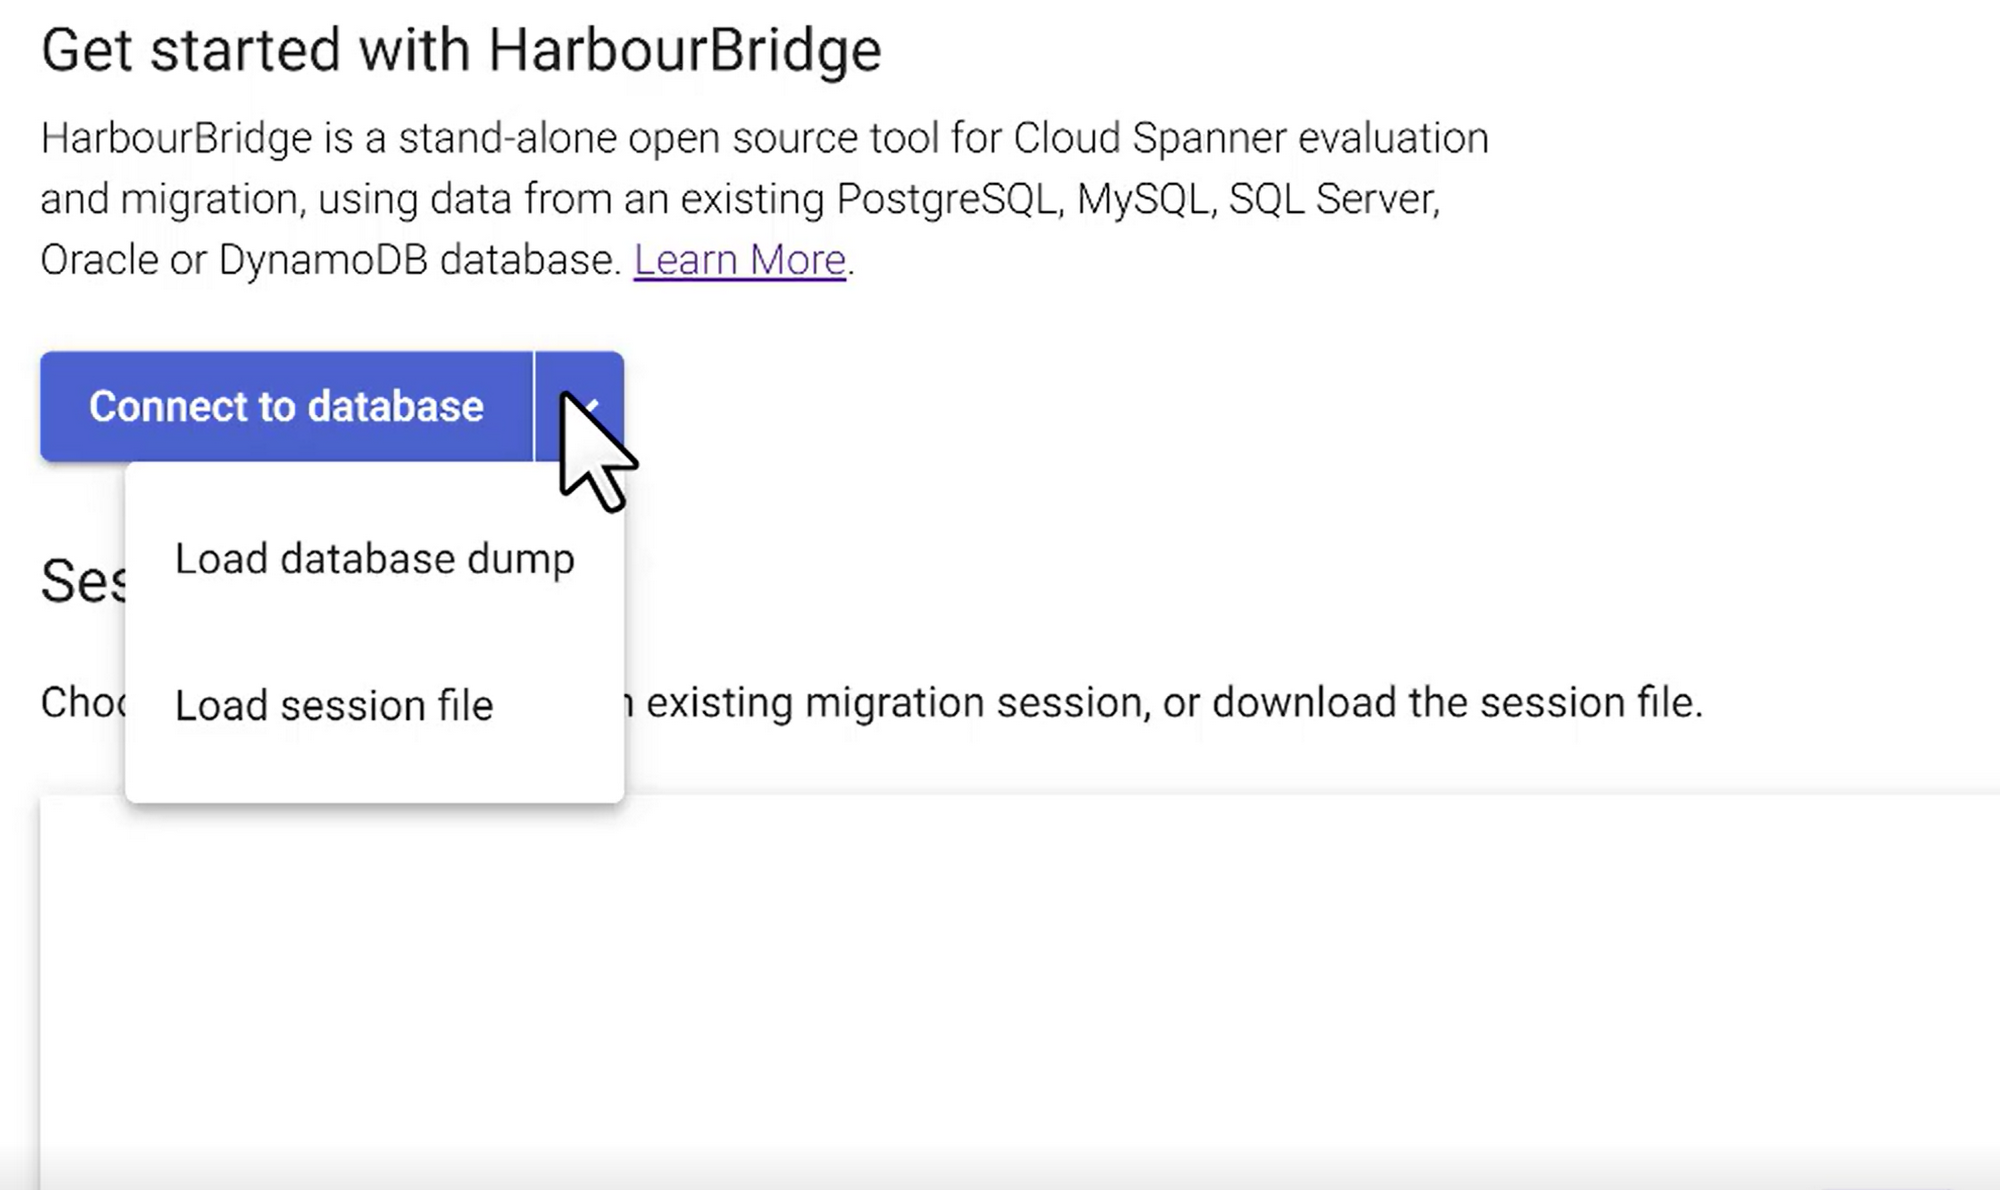
Of the 3 modes of connecting to source, we will use the “Connect to database” method to get the connection established with source:

Provide the connection credentials and hit connect:
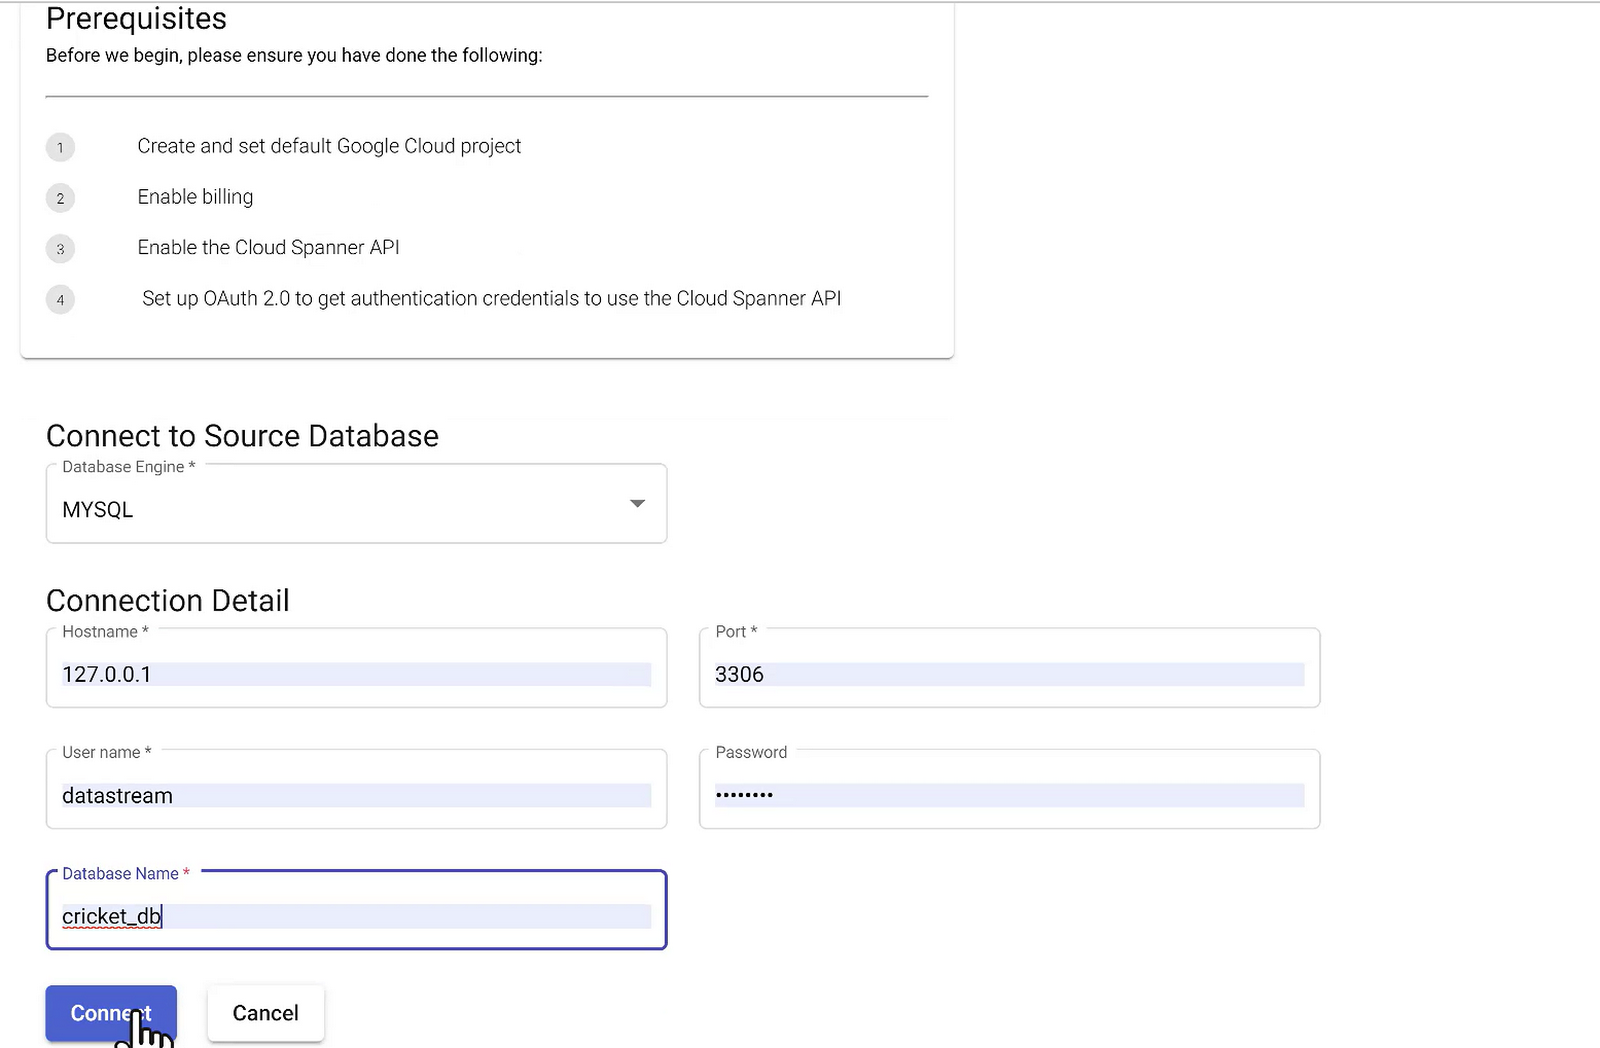

You are now connected to the source and HarbourBridge will land you on the next step of migration.
*** Use your database public IP Address for HOST
Schema Assessment and Configuration
At this point, you get to see both the source (MySQL) version of the schema and the target draft version of the “Configure Schema” page. The Target draft version is the workspace for all edits you can perform on the schema on your destination database, that is, Cloud Spanner.
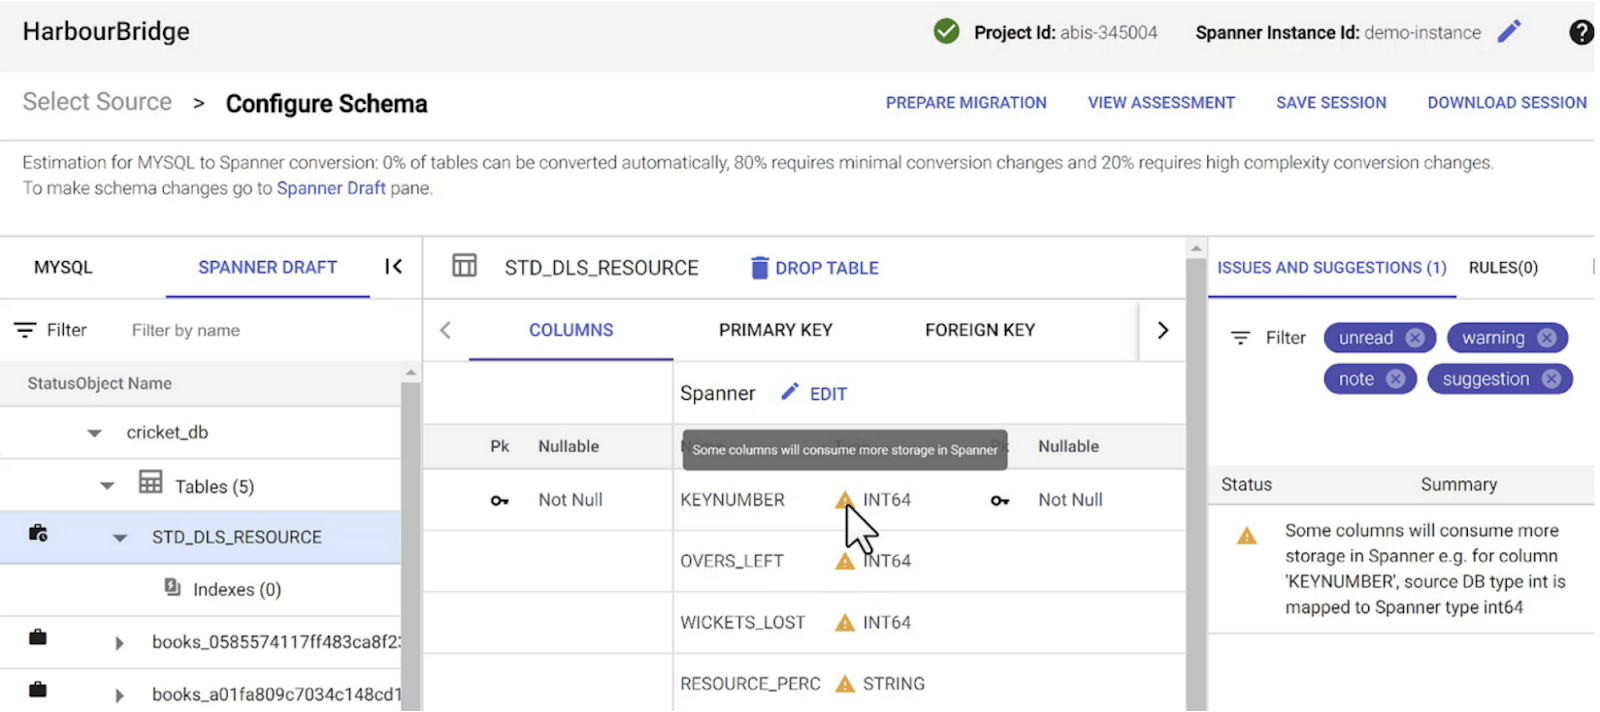

HarbourBridge provides you with comprehensive assessment results and recommendations for improving the schema structure and performance.
As you can see in this image above, the icons to the left of table represent the complexity of table conversion changes as part of the schema migration
In this case, the STD_DLS_RESOURCE table requires high complexity conversion changes whereas the other ones require minimal complexity changes
The recommendation on the right provides information about the storage requirement of specific columns and there other warnings indicated with the columns list as well
You have the ability to make changes to the column types at this point
Primary Key, Foreign Key, Interleaving tables, indexes and other dependencies related changes and suggestions are also available
Once changes are made to the schema, HarbourBridge gives you the ability to review the DDL and confirm changes
Once you confirm the schema changes are in effect before triggering the migration
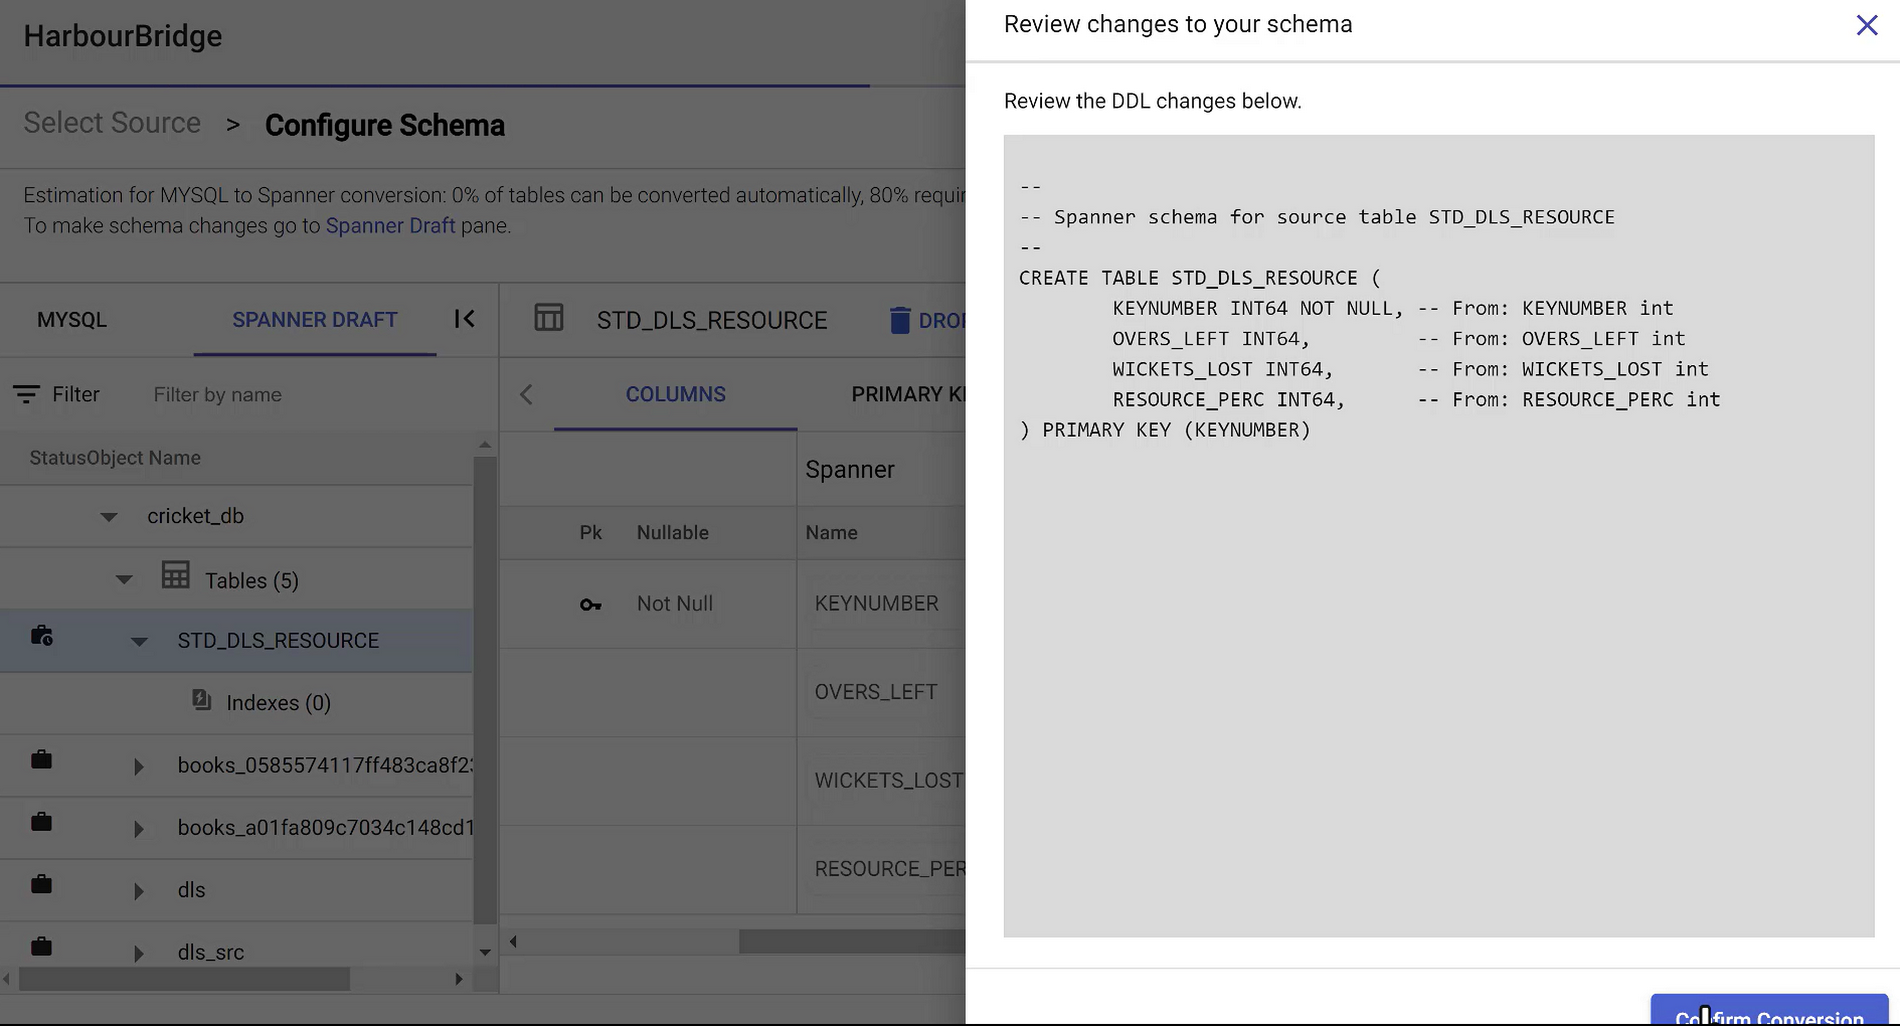

Schema changes are saved successfully.
Prepare Migration
Click the “Prepare Migration” button on the top right corner of the HarbourBridge page.
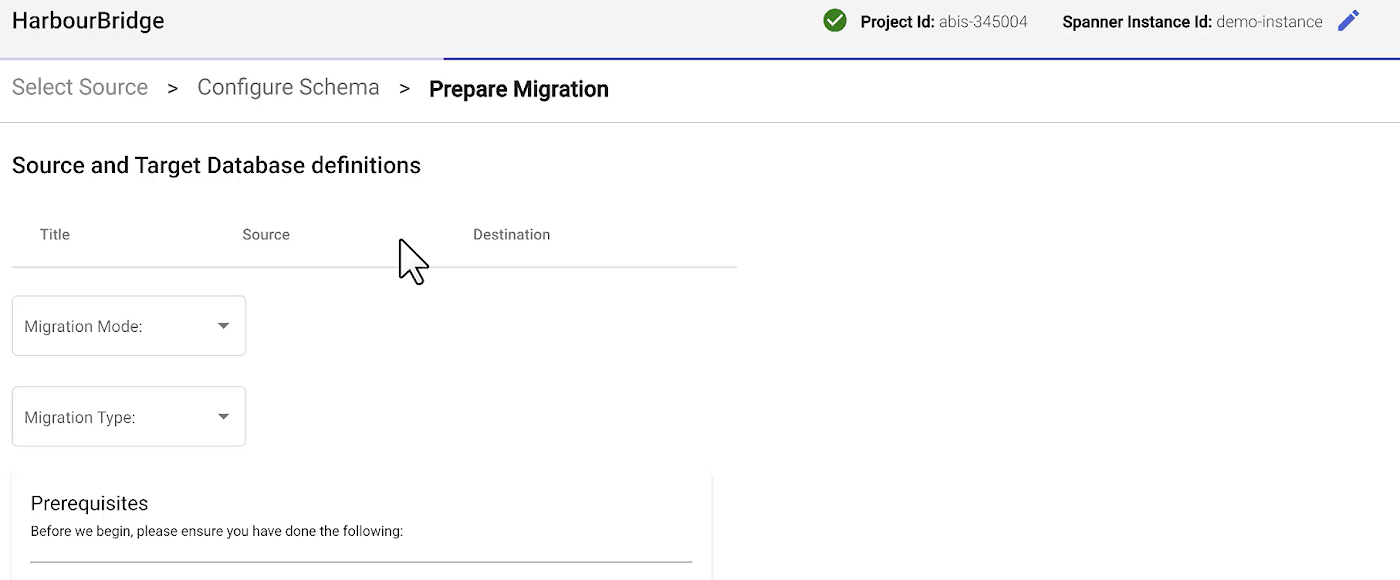

1. Select Migration Mode as “Schema and Data”
2. Migration Type as “Minimal Downtime Migration”
3. Set up Target Cloud Spanner Instance
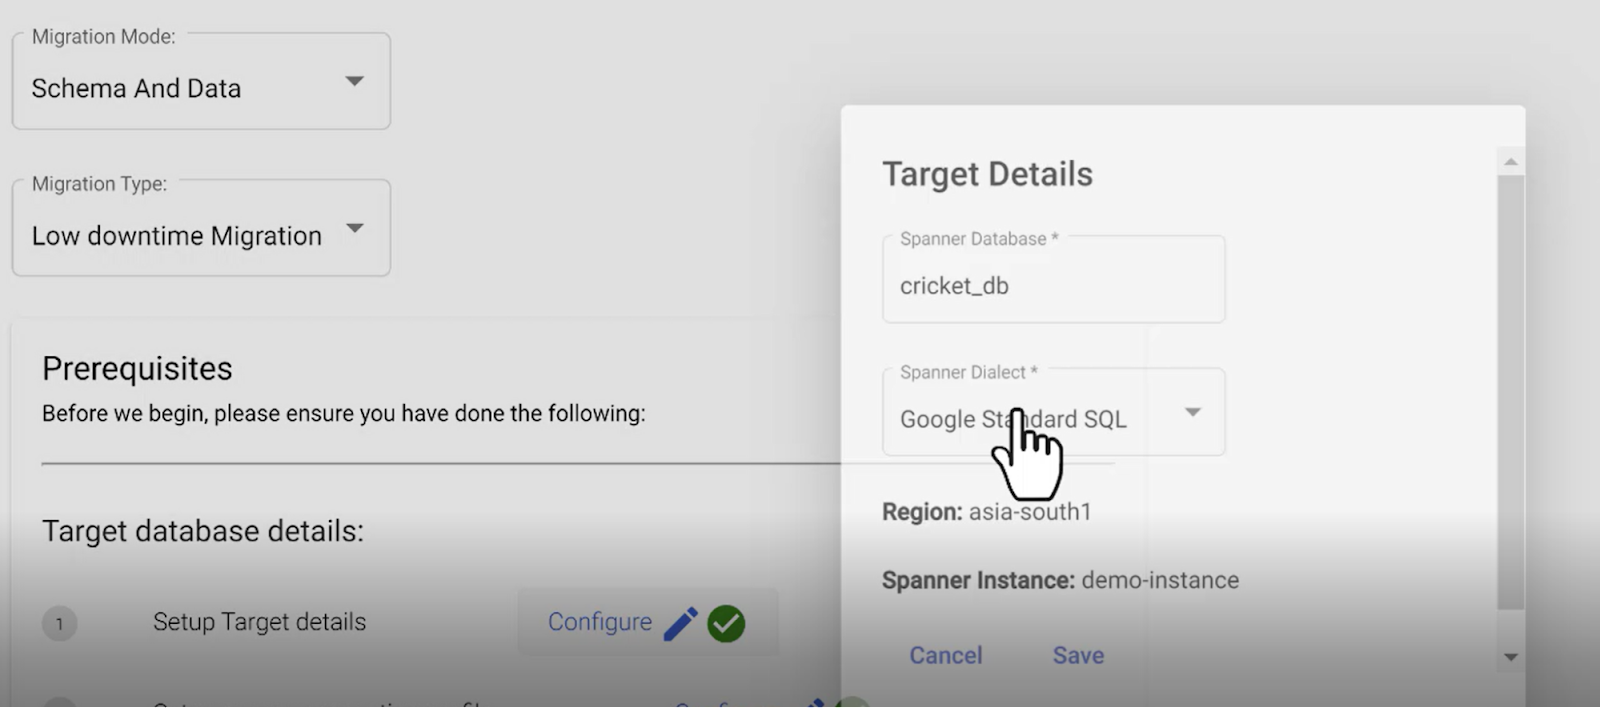

Note: HarbourBridge UI supports both Google SQL dialect and PostgreSQL dialect as destinations. Support for PostgreSQL dialect was added in March 2023.
4. Set up Source Connection profile
This is your connection to the MySQL data source. Ensure, you have the IP Addresses displayed on the screen allow-listed by your source.
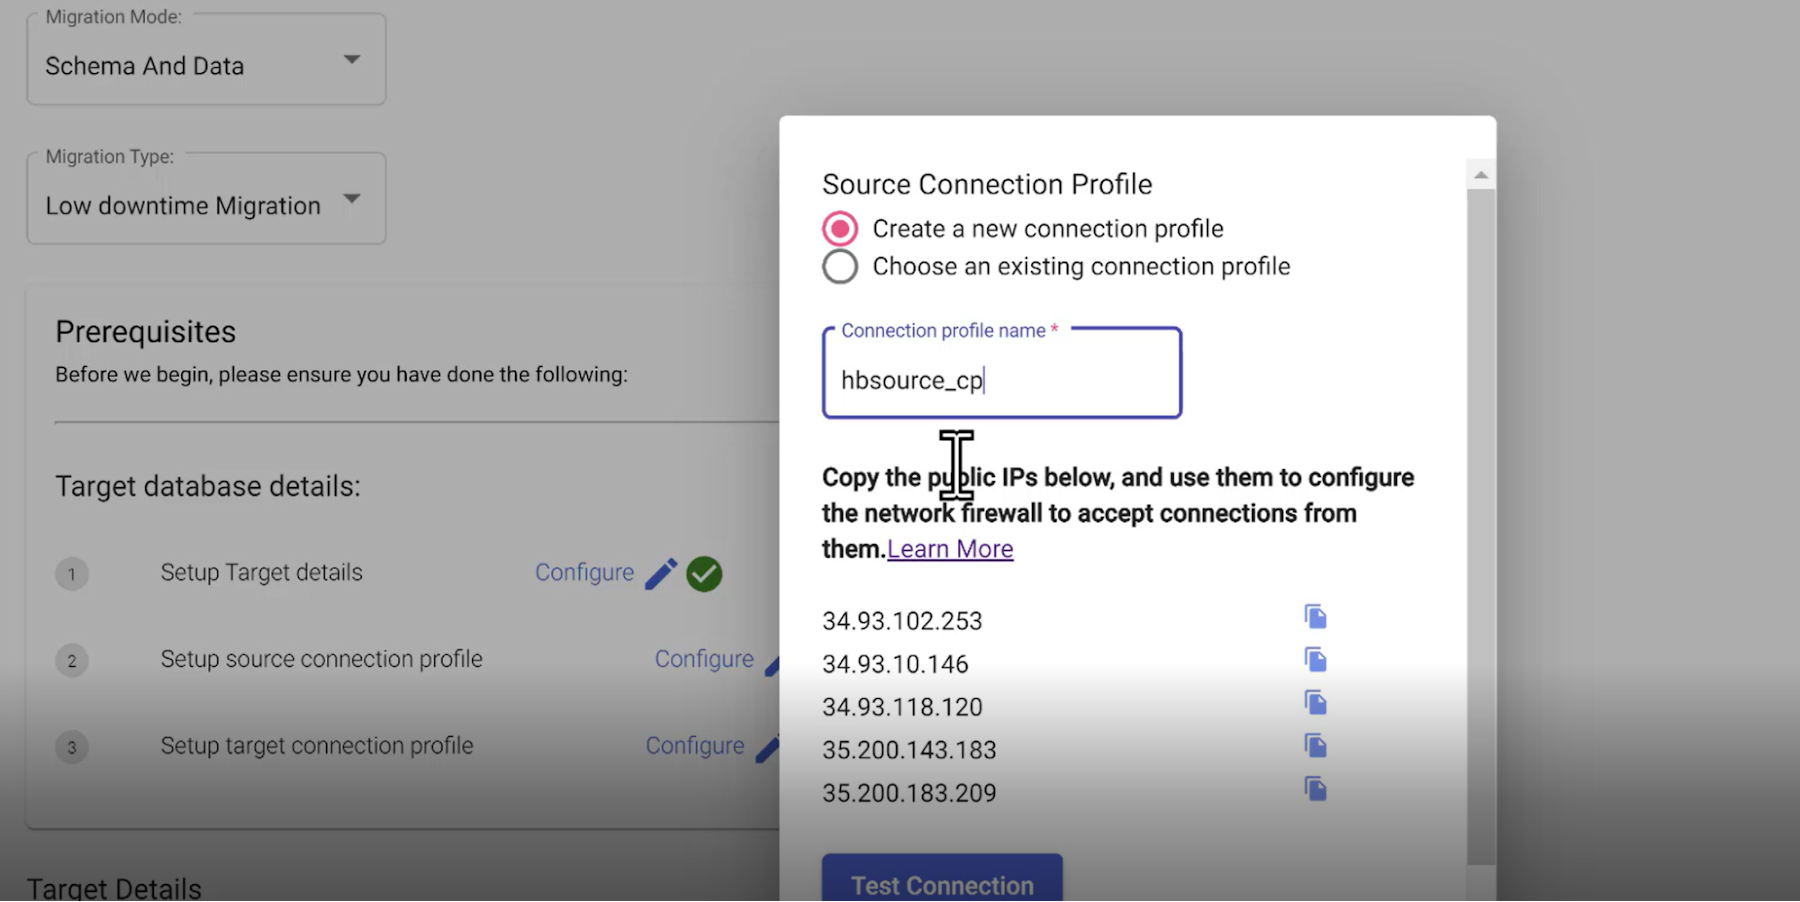

5. Set up Target Connection profile
This is the connection to your Datastream job destination which is the Cloud Storage. Please select the instance and make sure you have allow-listed the necessary access.
Once done, hit Migrate at the bottom of the page and wait for the migration to start. HarbourBridge takes care of everything else, including setting up the Datastream and Dataflow jobs and executing them under the hood. You have the option to set this up on your own. But that is not necessary now with the latest launch of HarbourBridge.
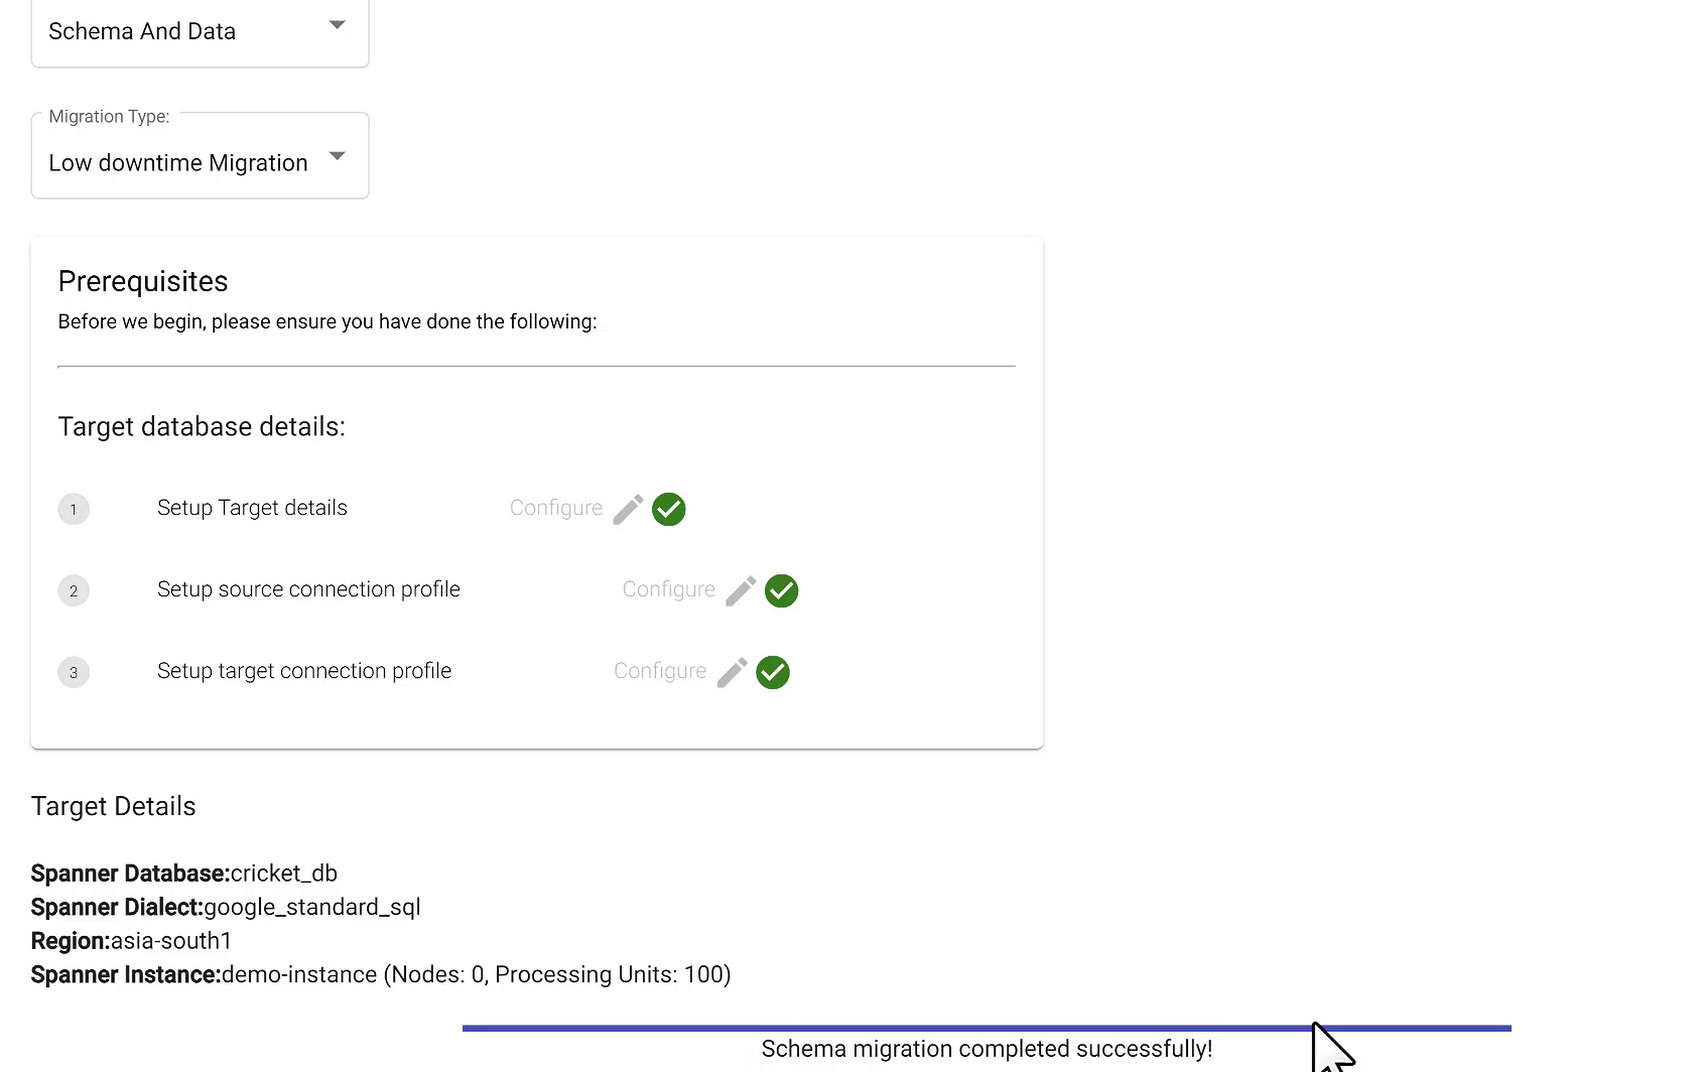

Wait until you see the message “Schema migration completed successfully” on the same page. Once you see that, head over to your Spanner database to validate the newly created (migrated) schema.
Validate Schema and Initial Data
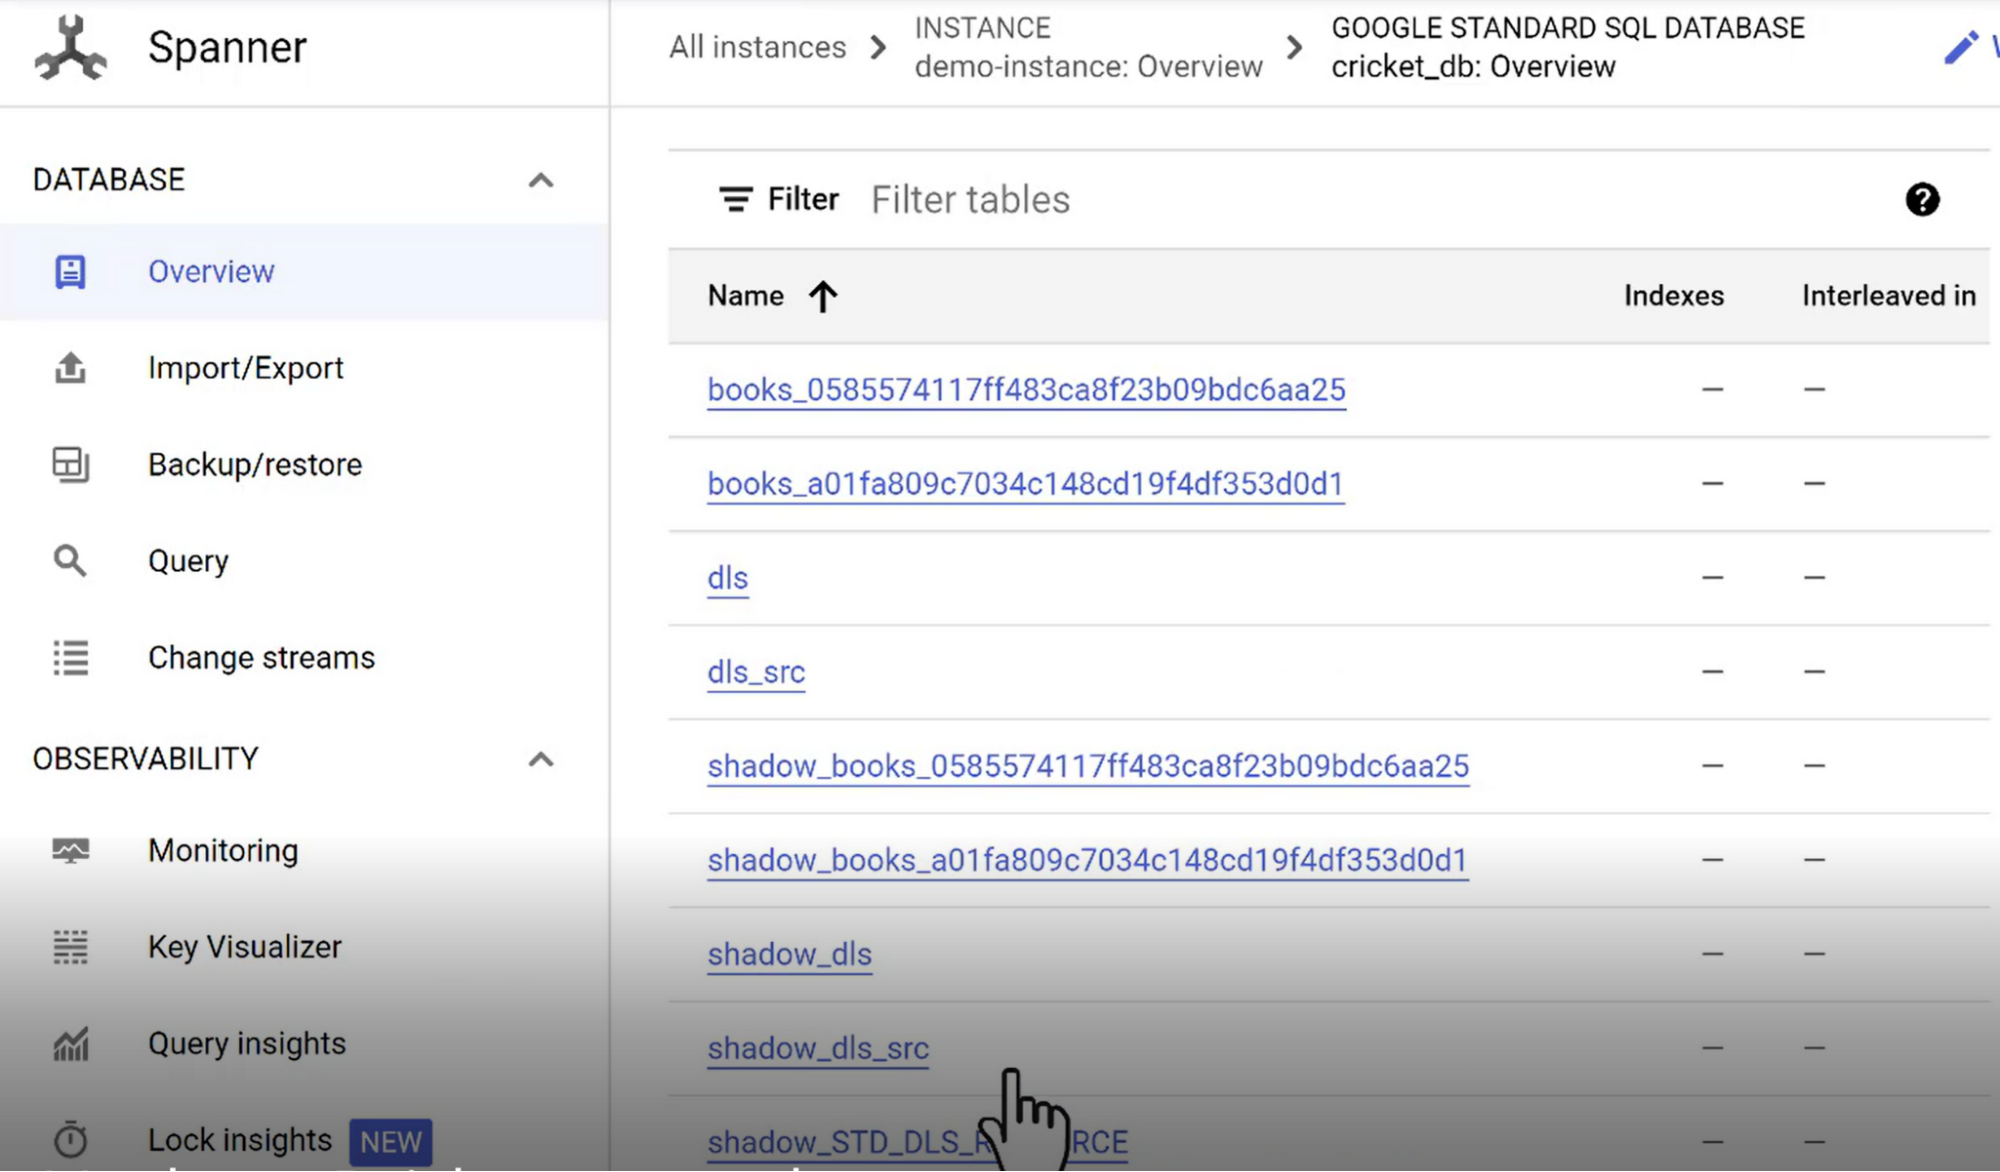
Connect to the Spanner instance, and head over to the database “cricket_db”. You should see the tables and rest of schema migrated over to the Spanner database:

Set up Streaming Data
As part of the setup, after the initial data is migrated, trigger the Cloud Functions job to kickstart data streaming into My SQL.
Validate Streaming Data
Check if the streaming data is eventually migrating into Spanner as the streaming happens.
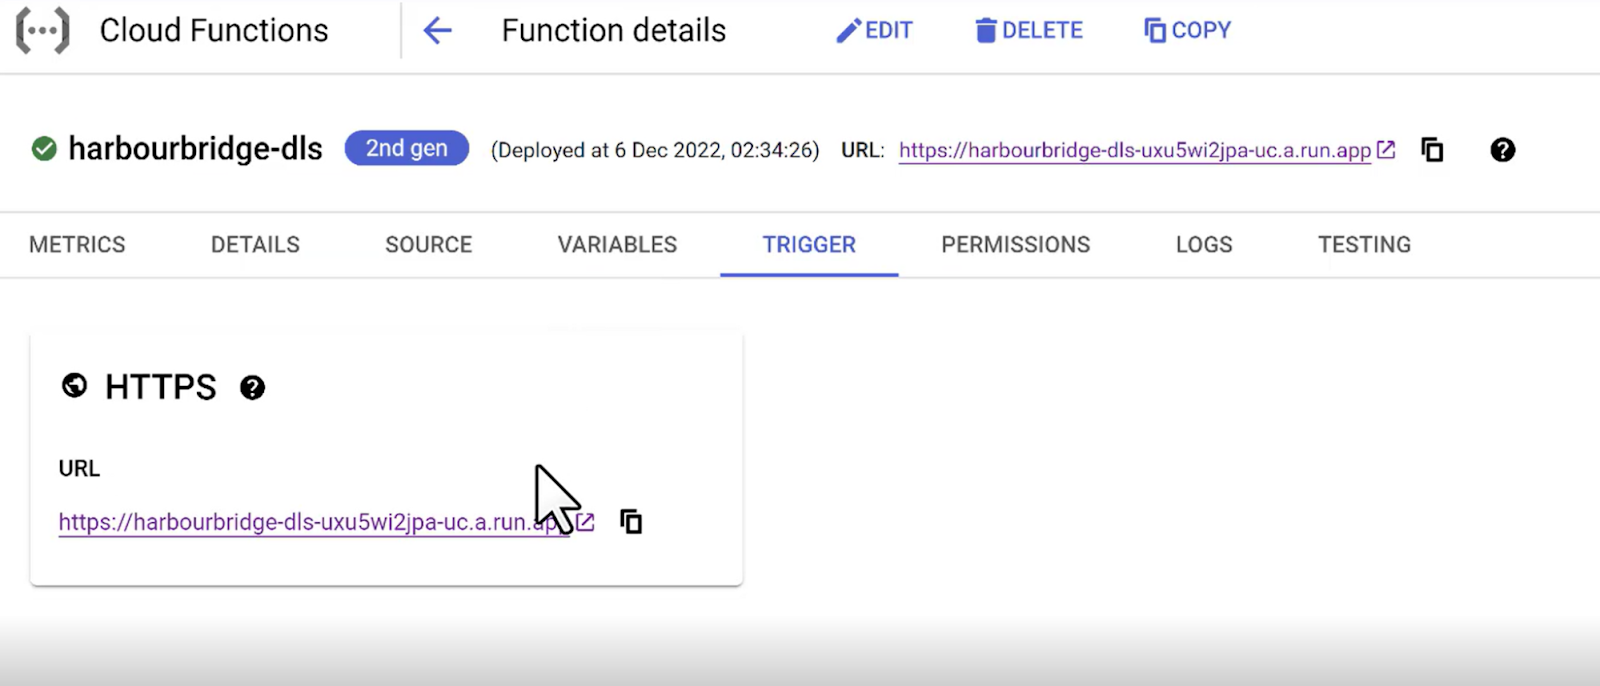

The Cloud Functions (Java Function) can be triggered by hitting the HTTPS URL in the Trigger section of the function’s detail page. Once the streaming starts, you should see data flowing into MySQL and the Target DLS score for Innings 2 getting updated in the DLS table.
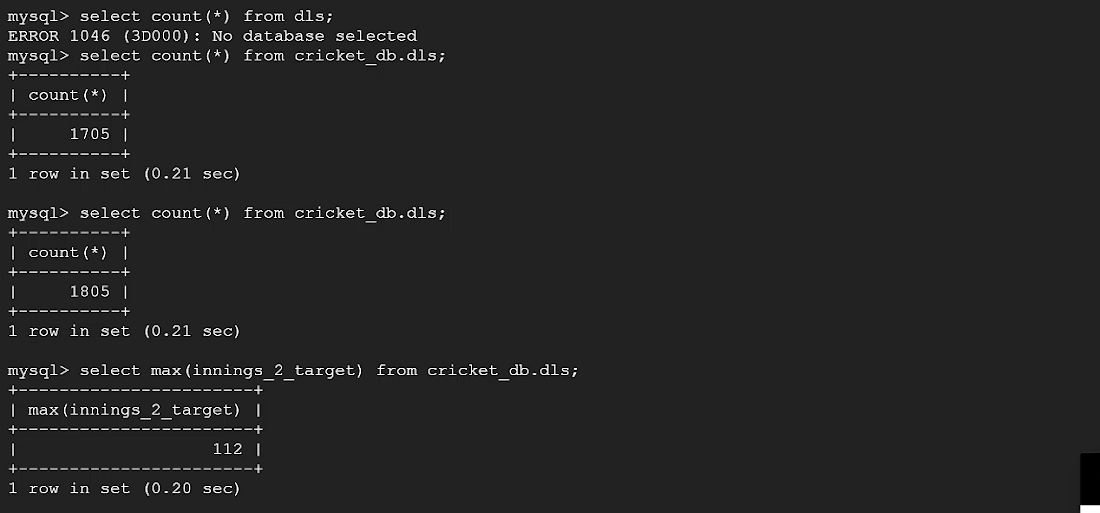

In the above image, you can see the record count go from 1705 to 1805 with the streaming. Also, the DLS Target field has a calculated value of 112 for the most recent ball.
Now let’s check if the Spanner database table got the updates in migration. Go to the Spanner table and query:
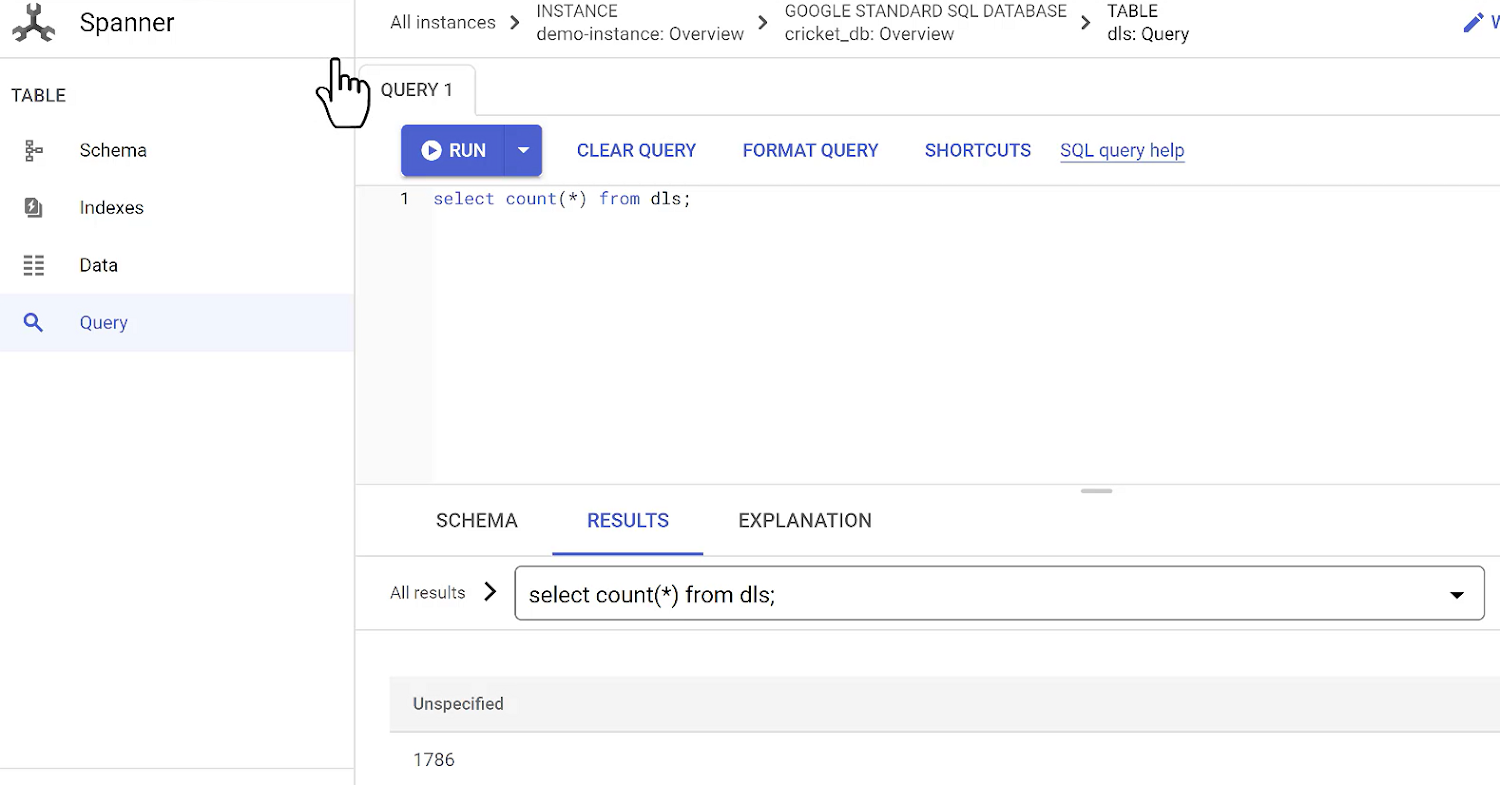

As you can see, Spanner has records increasing as part of migration as well.
Also note the change in Target score field value ball after ball:
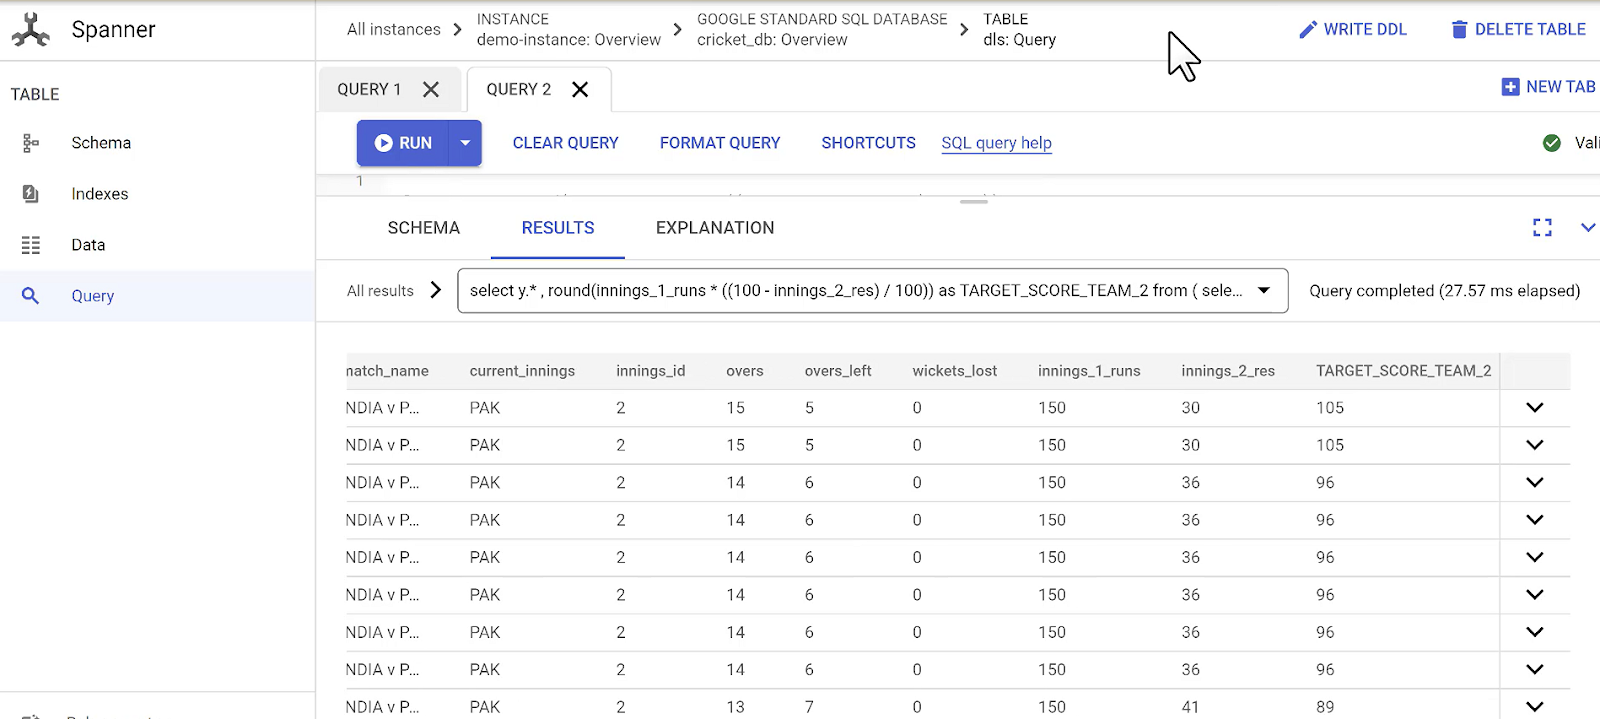

Wait until you see all the changes migrated over.
For data validation, you can use DVT (Data Validation Tool), which is a standardized data validation method built by Google, and can be incorporated into existing GCP tools and technologies. In our use case, I validated the migration of the initial set of records from MySQL source to Spanner table using Cloud Spanner queries.
End the Migration
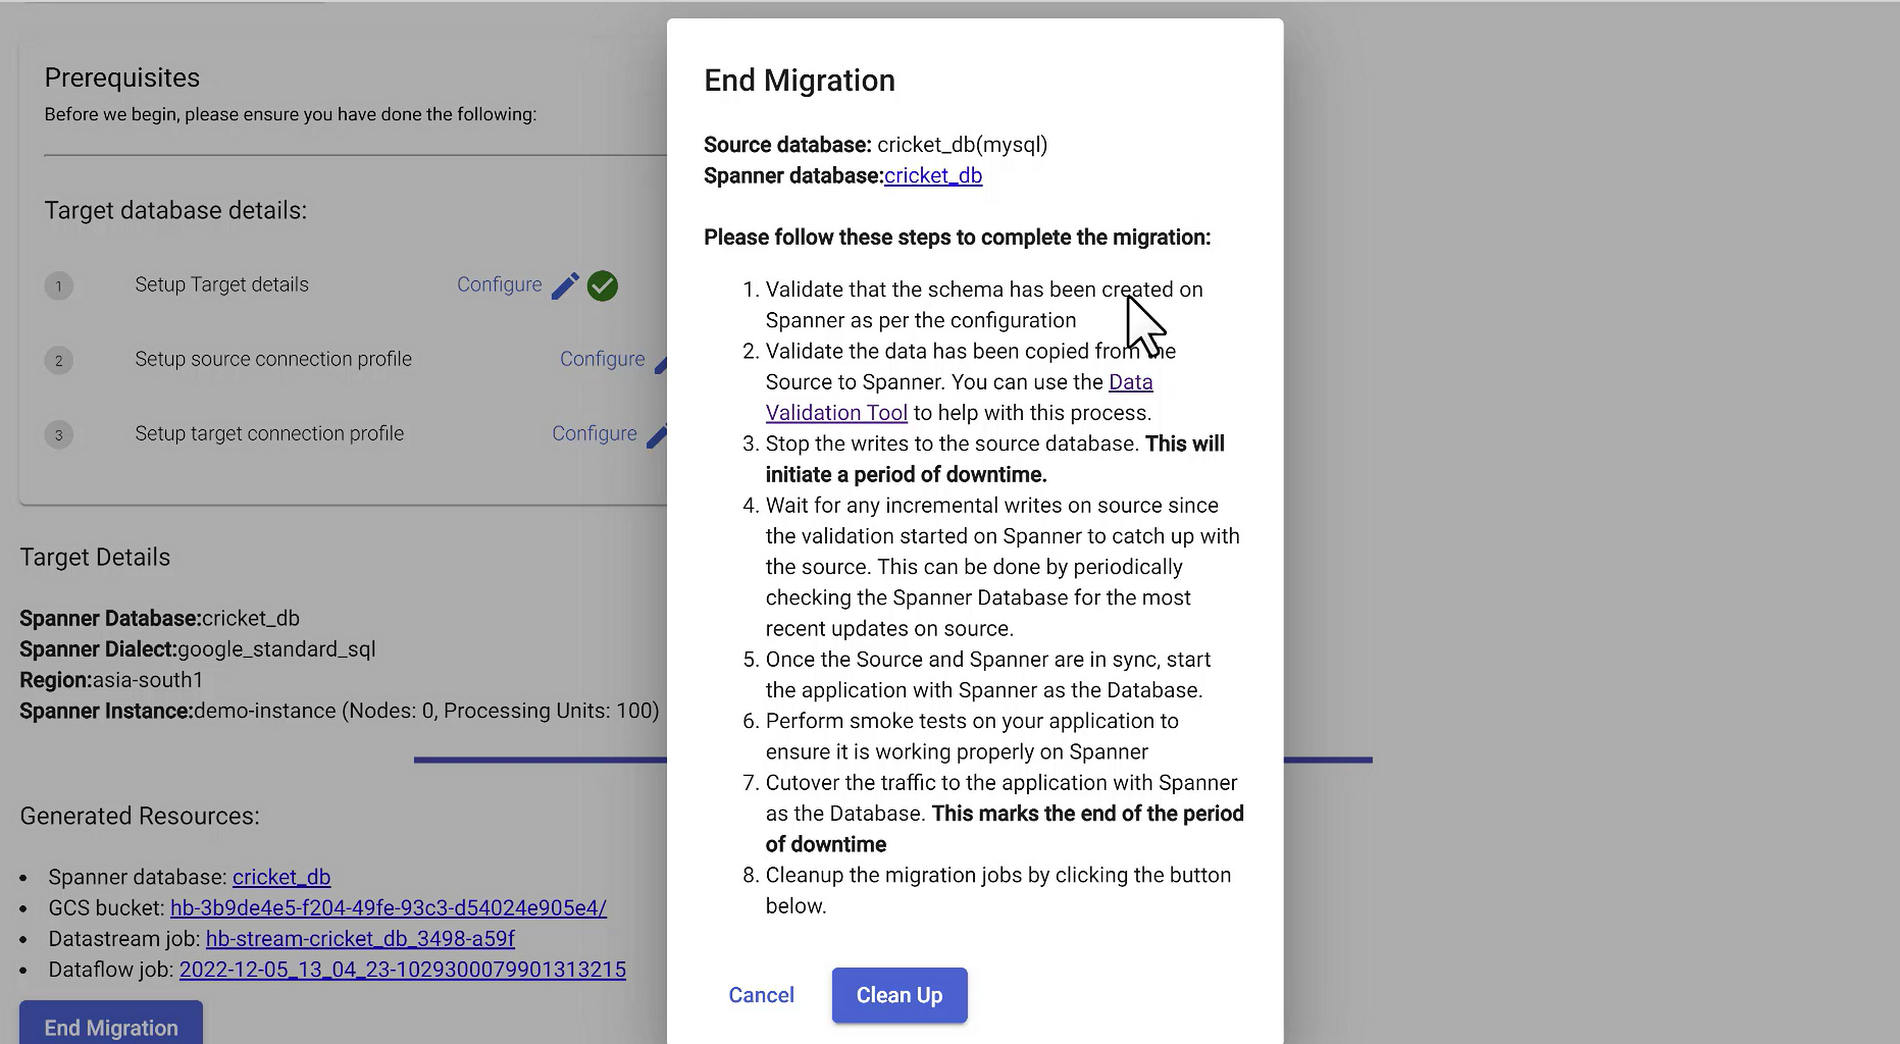
When you complete all these validation steps, click End Migration. Follow the below steps to update your application to point to Spanner database:
Stop writes to the source database - This will initiate a period of downtime
Wait for any other incremental writes to Spanner to catch up with the source
Once you are sure source and Spanner are in sync, update the application to point to Spanner
Start your application with Spanner as the database
Perform smoke tests to ensure all scenarios are working
Cutover the traffic to your application with Spanner as the database
This marks the end of the downtime period

Clean Up
Finally hit the “Clean Up” button on the End Migration popup screen. This will remove the migration jobs and dependencies that were created in the process.
Watch the migration in action

Next Steps
As you walked through this migration with us, you would have noticed how easy it is to point to your database, assess and modify your schema based on recommendations, and migrate your schema, your data, or both to Spanner with minimal downtime.
You can learn more about HarbourBridge on the README, and learn to install gCloud here.
Get started today
Spanner’s unique architecture allows it to scale horizontally without compromising on the consistency guarantees that developers rely on in modern relational databases. Try out Spanner today for free for 90 days or for as low as $65 USD per month.
