Dual deployments on Vertex AI
Chansung Park
ML Google Developer Expert
Sayak Paul
ML Google Developer Expert
In this post, we will cover an end-to-end workflow enabling dual model deployment scenarios using Kubeflow, TensorFlow Extended (TFX), and Vertex AI. We will start with the motivation behind the project and then we will move over to the approaches we realized as a part of this project. We will conclude the post by going over the cost breakdown for each of the approaches. While this post will not include exhaustive code snippets and reviews you can always find the entire code in this GitHub repository.
To fully follow through this post, we assume that you are already familiar with the basics of TFX, Vertex AI, and Kubeflow. It’d be also helpful if you have some familiarity with TensorFlow and Keras since we will be using them as our primary deep learning framework.
Motivation
Scenario #1 (Online / offline prediction)
Let's say you want to allow your users to run an application both in online and offline mode. Your mobile application would use a TensorFlow Lite (TFLite) model depending on the network bandwidth/battery etc., and if sufficient network coverage/internet bandwidth is available your application would instead use the online cloud one. This way your application stays resilient and can ensure high availability.
Scenario #2 (Layered predictions)
Sometimes we also do layered predictions where we first divide a problem into smaller tasks:
1) predict if it's a yes/no, 2) depending on the output of 1) we run the final model.
In these cases, 1) takes place on-device and 2) takes place on the cloud to ensure a smooth user experience. Furthermore, it's a good practice to use a mobile-friendly network architecture (such as MobileNetV3) when considering mobile deployments. A detailed analysis of this situation is discussed in the book ML Design Patterns.
The discussions above lead us to the following question:
Can we train two different models within the same deployment pipeline and manage them seamlessly?
This project is motivated by this question. The rest of this post will walk you over the different components that were pulled in to make such a pipeline operate in a self-contained and seamless manner.
Dataset and models
We use the Flowers dataset in this project which consists of 3670 examples of flowers categorized into five classes - daisy, dandelion, roses, sunflowers, and tulips. So, our task is to build flower classification models which are essentially multi-class classifiers in this case.
Recall that we will be using two different models. One, that will be deployed on the cloud and will be consumed via REST API calls. The other model will sit inside mobile phones and will be consumed by mobile applications. For the first model, we will use a DenseNet121 and for the mobile-friendly model, we will use a MobileNetV3. We will make use of transfer learning to speed up the model training process. You can study the entire training pipeline from this notebook.
On the other hand, we also make use of AutoML-based training pipelines for the same workflow where the tooling automatically discovers the best models for the given task within a preconfigured compute budget. Note that the dataset remains the same in this case. You can find the AutoML-based training pipeline in this notebook.
Approaches
Different organizations have people with varied technical backgrounds. We wanted to provide the easiest solution first and then move on to something that is more customizable.
AutoML
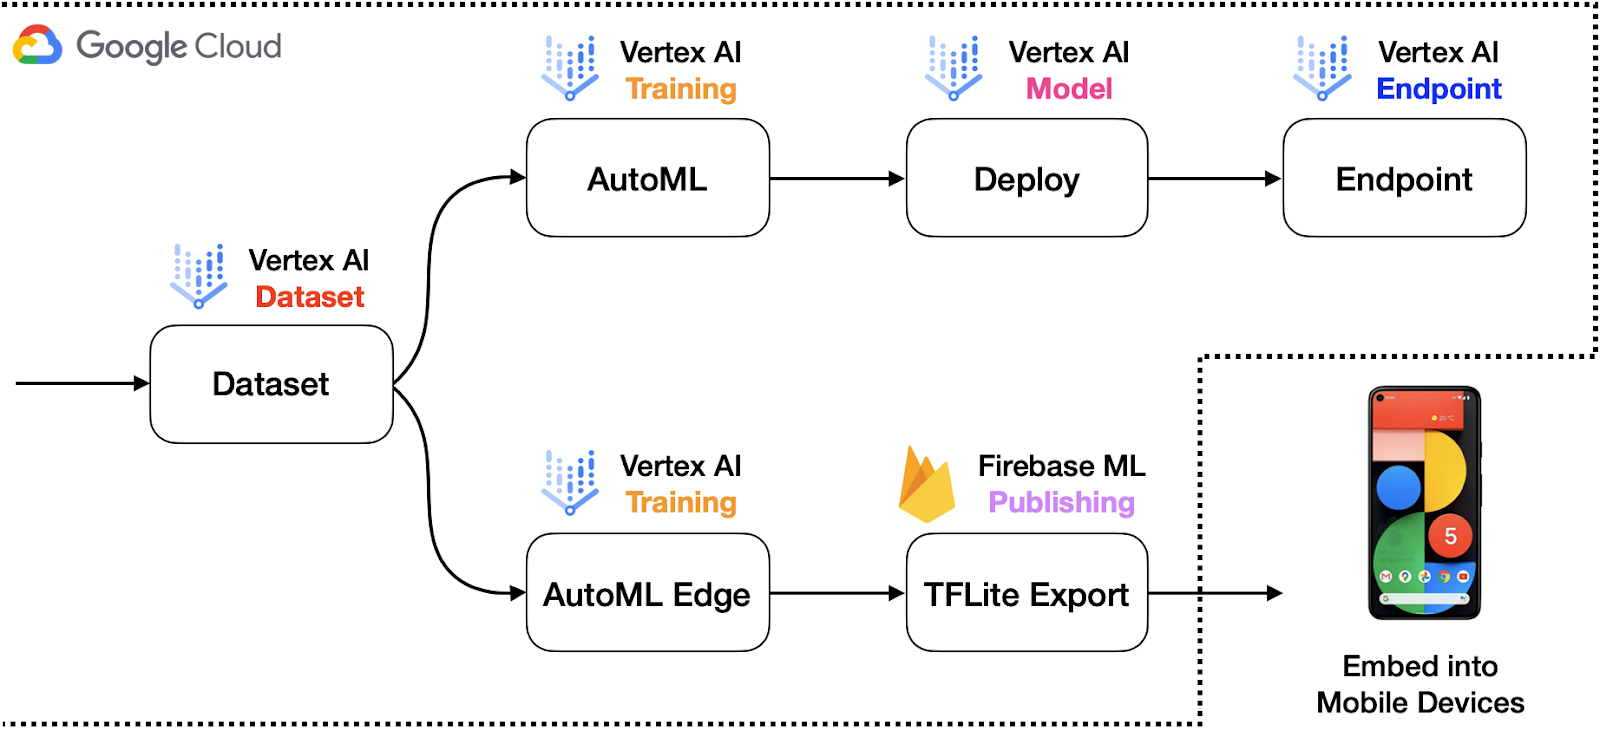

Figure 1: Schematic representation of the overall workflow with AutoML components (high-quality).
To this end, we leverage standard components from the Google Cloud Pipeline Components library to build, train, and deploy models with different production use-cases. With AutoML, the developers can delegate a large part of their workflows to the SDKs and the codebase also stays comparatively smaller. Figure 1 depicts a sample system architecture for this scenario.
For reference, there are a number of tasks supported ranging from image classification to object tracking in Vertex AI.
TFX
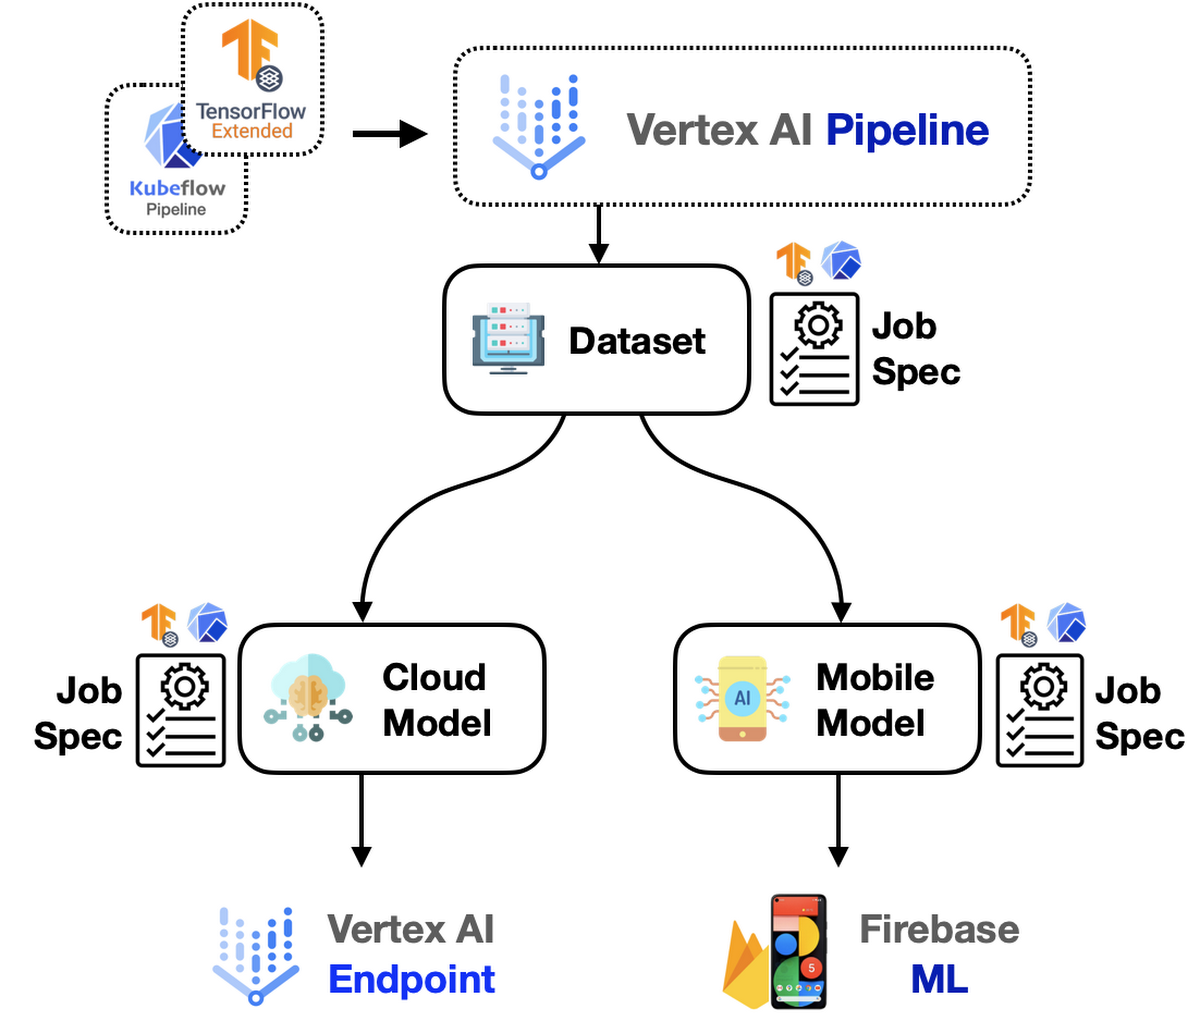
But the story does not end here. What if we wanted to have better control over the models to be built, trained, and deployed? Enter TFX! TFX provides the flexibility of writing custom components and including them inside a pipeline. This way Machine Learning Engineers can focus on building and training their favorite models and delegate a part of the heavy lifting to TFX and Vertex AI. On Vertex AI (acting as an orchestrator) this pipeline will look like so:
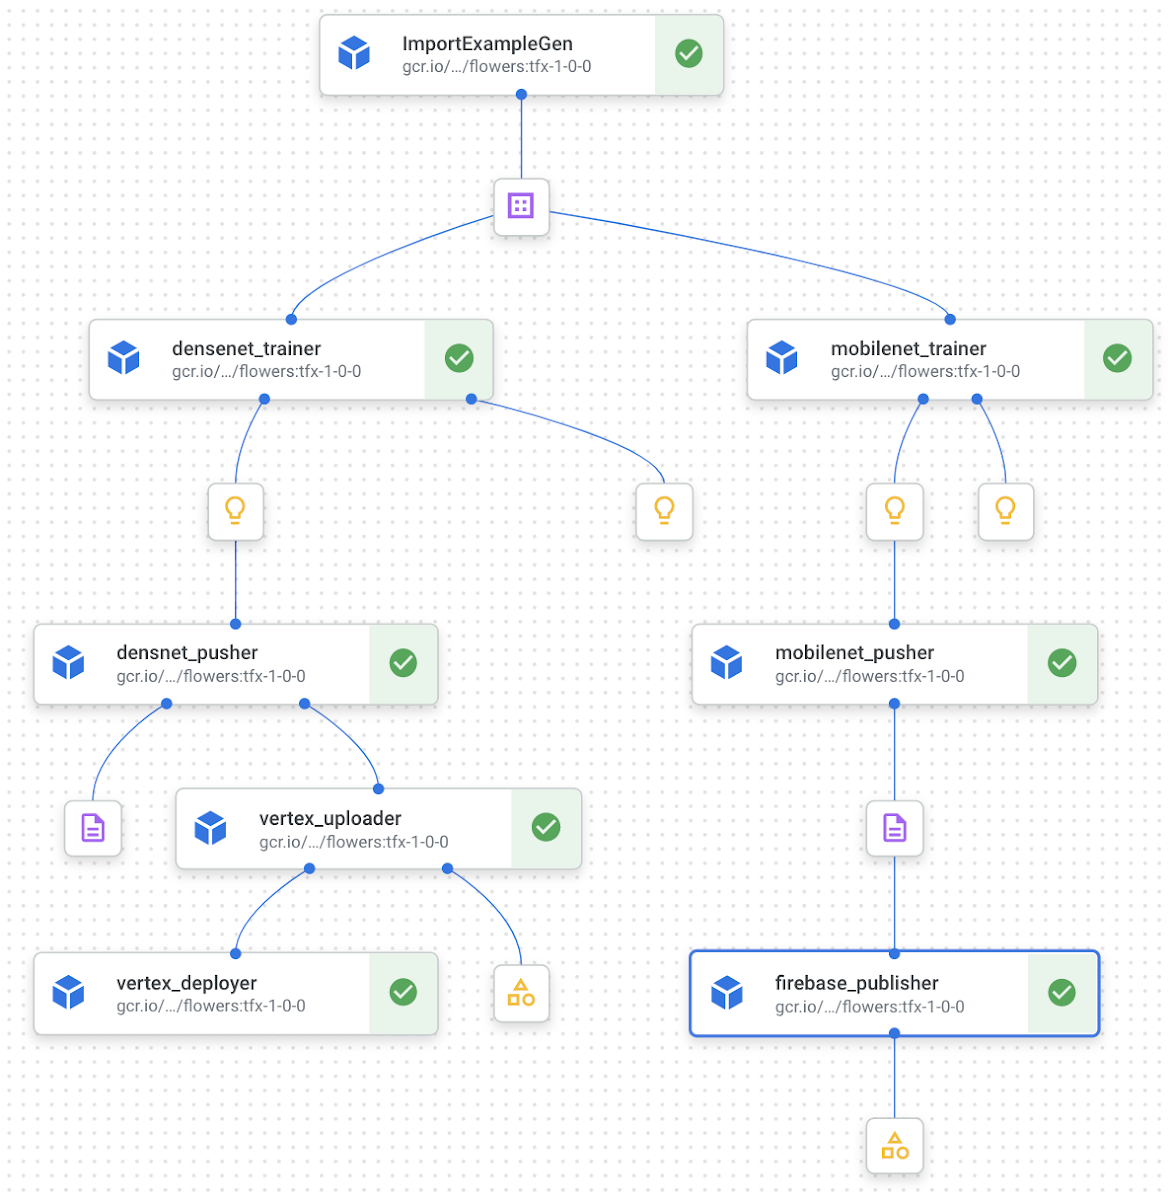

Figure 2: Computation graph of the TFX components required for our workflow (high-quality).
You are probably wondering why there is Firebase in both of the approaches we just discussed. For the model that would be used by mobile applications, that needs to be a TFLite model because of tremendous interoperability with mobile platforms. Firebase provides excellent tooling and integration for TFLite models such as canary rollouts, A/B testing, etc. You can learn more about how Firebase can enhance your TFLite deployments from this blog post.
So far we have developed a brief idea about the approaches followed in this project. In the next section, we will dive a bit more into the code and various nuts and bolts that had to be adjusted to make things work. You can find all the code shown in the coming section here.
Implementation details
Since this project uses two distinguished setups i.e. AutoML based minimal code and TFX-based custom code we will divide this section into two. First, we will introduce the AutoML side of things and then we will head over to TFX. Both these setups will provide similar outputs and will implement identical functionalities.
Vertex AI Pipelines with Kubeflow’s AutoML Components
The Google Cloud Pipeline Components library comes with a variety of predefined components supporting services built-in Vertex AI. For instance, you can directly import dataset from Vertex AI’s managed dataset feature into the pipeline, or you can create a model training job to be delegated to Vertex AI’s training feature. You can follow along with the rest of this section with the entire notebook. This project uses the following components:
We use ImageDatasetCreateOp to create a dataset to be injected to the next component, AutoMLImageTrainingJobRunOp. It supports all kinds of datasets from Vertex AI. The import_schema_uri argument determines the type of the target dataset. For instance, it is set to multi_label_classification for this project.
The AutoMLImageTrainingJobRunOp delegates model training jobs to Vertex AI training with specified configurations. Since the AutoML model can grow very large, we can set some constraints with budget_milli_node_hours and model_type arguments. The budget_milli_node_hours how many hours are allowed for training. The model_type tells the training job what the target environment is, and which format a trained model should have. We created two instances of AutoMLImageTrainingJobRunOp, and model_type is set to "CLOUD" and "MOBILE_TF_VERSATILE_1" respectively. As you can see, the string parameter itself describes what it is. There are more options, so please take a look at the official API document.
The ModelDeployOp does three jobs in one place. It uploads a trained model to Vertex AI model, creates an endpoint, and deploys the trained model to the endpoint. With ModelDeployOp, you can deploy your model in the cloud easily and fast. On the other hand, the ModelExportOp only exports a trained model to a designated location like GCS bucket. Because the mobile model is not going to be deployed in the cloud, we explicitly need to get the saved model so that we can directly embed it on a device or publish it to Firebase ML.
In order to make a trained model as an on-device model, export_format_id should be set appropriately in ModelExportOp. The possible values are "tflite", "edgetpu-tflite", "tf-saved-model", "tf-js", "core-ml", and "custom-trained", and it is set to "tflite" for this project.
With these four components, you can create a dataset, train cloud and mobile models with AutoML, deploy the trained model to cloud, and export the trained model to a file whose format is .tflite. The last step would be to embed the exported model into the mobile application project. However, it is not flexible since you have to compile the application and upload it to the marketplace every time.
Firebase
Instead, we can publish a trained model to Firebase ML. We are not going to explain what Firebase ML is in-depth, but it basically lets the application download and update the machine learning model on the fly. This ensures that the user experience becomes much smoother. In order to integrate publishing capability into the pipeline, we have created custom components, one for KFP native and the other one for TFX. Let’s explore what it looks like in KFP native now, then the one for TFX will be discussed in the next section. Please make sure you read the general instructions under the “Before you begin” section on the official Firebase document as a prerequisite.
In this project, we have written python function-based custom components for the KFP native environment. The first step is to mark a function with @component decorator by specifying which packages to be installed. When compiling the pipeline, KFP will wrap this function as a Docker image which means everything inside the function is completely isolated, so we have to say what dependencies this function needs via packages_to_install.
The beginning part is omitted, but what it does is to download the firebase credential file and the saved model from firebase_credential_uri and model_bucket respectively. You can assume that the downloaded files are named as credential.json and model.tflite. Also, we have found that the files can not be directly referenced if they are stored in GCS, so this is why we have downloaded them locally.
firebase_admin.initialize_app method initializes the authorization to the Firebase with the given credential and the GCS bucket which is used to store the model file temporarily. The GCS bucket is required by Firebase, and you can simply create one within the storage menu in the Firebase dashboard.
ml.list_models method returns a list of models deployed in the Firebase ML, and you can filter the items with display_name or tags. The purpose of this line is to check if the model with the same name has already been deployed because we have to update the model instead of creating one if the one exists.
The update and create routine has one thing in common. That is the loading process for the local model file to be uploaded into the temporary GCS bucket by calling ml.TFLiteGCSModelSource.from_tflite_model_file method. After the loading process, you can choose either of ml.create_model or ml.update_model method. Then you are good to publish the model with the ml.publish_model method.
Putting things together
We have explored five components including the custom one, push_to_firebase. It is time to jump into the pipeline to see how these components are connected together. First of all, we need two different sets of configurations for each deployment. We can hard-code them, but it would be much better to have a list of dictionaries like below.
You should be able to recognize each individual component and what it does. What you need to focus on this time is how the components are connected, how to make parallel jobs for each deployment, and how to make a conditional branch to handle each deployment-specific job.
As you can see, each component except for push_to_firebase has an argument to get input from the output of the previous component. For instance, the AutoMLImageTrainingJobRunOp launches a model training process based on the dataset parameter, and its value is injected from the output of ImageDatasetCreateOp.
You might wonder why there is no dependency between ModelExportOp and push_to_firebase components. That is because the GCS location for the exported model is defined manually with artifact_destination parameter in ModelExportOp. Because of this, the same GCS location can be passed down to the push_to_firebase component manually.
With the pipeline function defined with @kfp.dsl.pipeline decorator, we can compile the pipeline via the kfp.v2.compiler.compile method. The compiler converts all the details about how the pipeline is constructed into a JSON format file. You can safely store the JSON file in a GCS bucket if you want to control different versions. Why not version control the actual pipelining code? That is because the pipeline can be run by just referring to the JSON file with create_run_from_job_spec method under kfp.v2.google.client.AIPlatformClient.
Vertex AI Pipelines with TFX’s pre-built and custom components
TFX provides a number of useful pre-built components that are crucial to orchestrate a machine learning project end-to-end. Here you can find a list of the standard components offered by TFX. This project leverages the following stock TFX components:
We use ImportExampleGen to read TFRecords from a Google Cloud Storage (GCS) bucket. The Trainer component trains models and Pusher exports the trained model to a pre-specified location (which is a GCS bucket in this case). For the purpose of this project, the data preprocessing steps are performed within the training component but TFX provides first-class support for data preprocessing.
Note: Since we will be using Vertex AI to orchestrate the entire pipeline, the Trainer component here is tfx.extensions.google_cloud_ai_platform.Trainer which lets us take advantage of Vertex AI’s serverless infrastructure to train models.
Recall from Figures 1 and 2 that once the models have been trained they will need to go down two different paths - 1) Endpoint (more on this in a moment), 2) Firebase. So, after training and pushing the models we would need to:
1. Deploy one of the models to Vertex AI as an Endpoint so that it can be consumed via REST API calls.- To deploy your model using Vertex AI one first needs to import their model if it’s not already there.
- Once the right model is imported (or identified) it needs to be deployed to an Endpoint. Endpoints provide a flexible way to version control different models that one may deploy during the entire production life-cycle.
As per these requirements, we need to develop three custom components at the very least:
- One that would take input as a pre-trained model and import that in Vertex AI (
VertexUploader). - Another component will be responsible for deploying it to an Endpoint (if it’s not present it will be created automatically) (
VertexDeployer). - The final component will push the mobile-friendly model to Firebase (
FirebasePublisher).
Let’s now go through the main components of each of these one by one.
Model upload
We will be using Vertex AI’s Python SDK to import a model of choice in Vertex AI. The code to accomplish this is fairly straightforward:Learn more about the different arguments of vertex_ai.Model.upload() from here. Now, in order to turn this into a custom TFX component (so that it runs as a part of the pipeline), we need to put this code inside a Python function and decorate that with the component decorator:
And that is it! The full snippet is available here for reference. One important detail to note here is that serving_image_uri should be one of the pre-built containers as listed here.
Model deploy
Now that our model is imported in Vertex AI we can proceed with its deployment. First, we will create an Endpoint and then we will deploy the imported model to that Endpoint. With some utilities discarded the code for doing this looks like so (full snippet can be found here):
Explore the different arguments used inside endpoint.deploy() from here. You might actually enjoy them because they provide many production-friendly features like autoscaling, hardware configurations, traffic splitting, etc. right off the bat.
Thanks to this repository that was used as references for implementing these two components.
Firebase
This part shows how to create a custom python function based on the TFX component. However, the underlying logic is pretty much the same to the one introduced in the AutoML section. We omit the internal details on this post, but you can find the complete source code here.
We just want to point out the usage of the type checker, tfx.dsl.components.InputArtifact[tfx.types.standard_artifacts.PushedModel]. The tfx.dsl.components.InputArtifact means the parameter is a type of TFX artifact, and it is used as an input to the component. Likewise, there is tfx.dsl.components.OutputArtifact, and you can specify what kind of output the component should produce.
Then, we have to tell where the input artifact comes from within the square brackets. In this case, we want to publish the pushed model to the Firebase ML, so the tfx.types.standard_artifacts.PushedModel is used. You can hard code the URI, but it is not flexible, and it is recommended to refer to the information from the PushedModel component.
Custom Docker image
TFX provides pre-built Docker images where the pipelines can be run. But to execute a pipeline that contains custom components leveraging various external libraries we need to build a custom Docker image. Surprisingly, the changes are minor to accommodate this. Below is the Dockerfile configuration to build a custom Docker image that would support the above-discussed custom TFX components:
Here, custom_components contains the .py files of our custom components. Now, we just need to build the image and push it to Google Container Registry (one can use Docker Hub as well).
For building and pushing the image, we can either use docker build and docker push commands or we can use Cloud Build which is a serverless CI/CD platform from Google Cloud. To trigger the build using Cloud Build we can just use the following command:
Do note that TFX_IMAGE_URI which, as the name suggests, is the URI of our custom Docker image that will be used to execute the final pipeline. The builds are available in the form of a nice dashboard along with all the build logs.
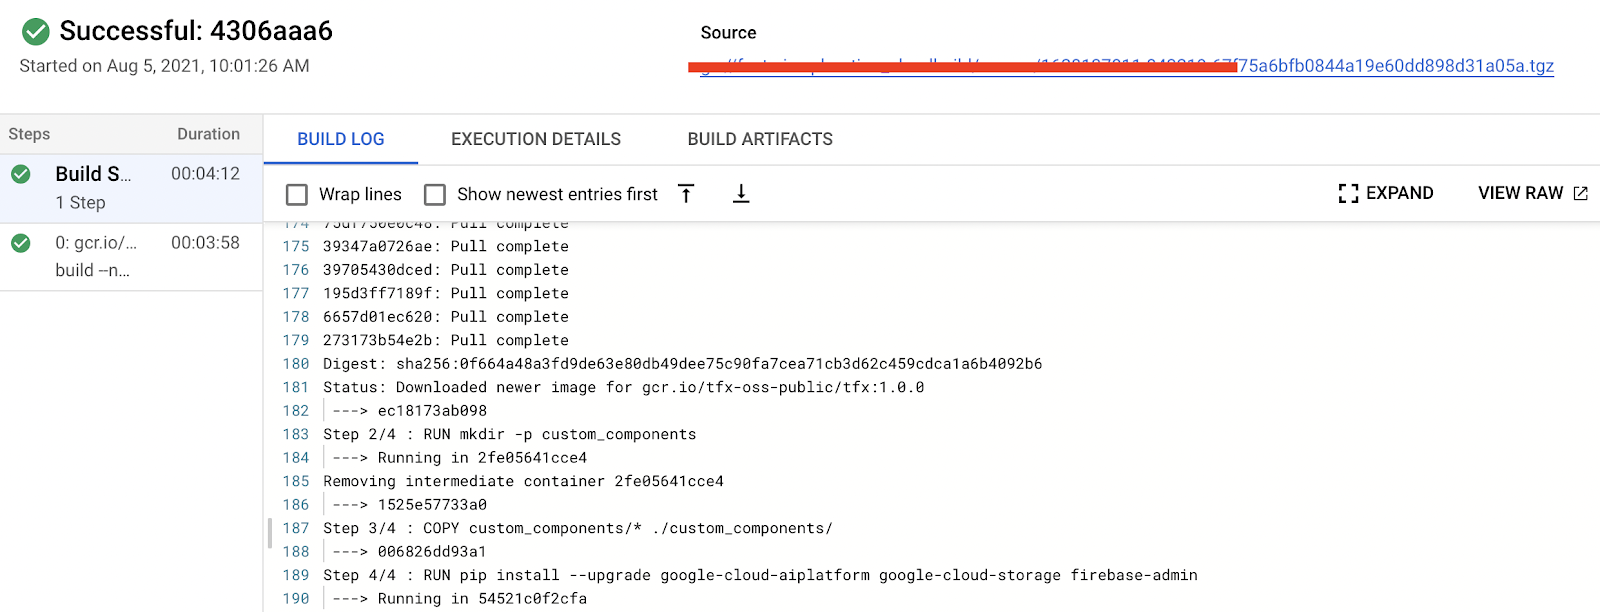

Figure 3: Docker image build output from Cloud Build (high-quality).
Putting things together
Now that we have all the important pieces together we need to make them a part of a TFX pipeline so that it can be executed end-to-end. The entire code can be found in this notebook.
Before putting things together into the pipeline, it is better to define some constant variables separately for readability. The name of model_display_name, pushed_model_location, and pushed_location_mobilenet variable itself explains pretty much what they are. On the other hand, the TRAINING_JOB_SPEC is somewhat verbose, so let’s go through it.
TRAINING_JOB_SPEC basically sets up the hardware and the software infrastructures for model training. The worker_pool_specs lets you have different types of clusters if you want to leverage distributed training features on Vertex AI. For instance, the first entry is reserved for the primary cluster, and the fourth entry is reserved for evaluators. In this project, we have set only the primary cluster.
For each worker_pool_specs, the machine_spec and the container_spec define hardware and software infrastructures respectively. As you can see, we have used only one NVIDIA_TESLA_K80 GPU within n1-standard-4 instance, and we have set the base Docker image to an official TFX image. You can learn more about these specifications here.
We will use these configurations in the pipeline below. Note that the model training infrastructure is completely different from the GKE cluster where the Vertex AI internally runs each component’s job. That is why we need to set base Docker images in multiple places rather than via a unified API.
The code below shows how everything is organized in the entire pipeline. Please follow the code by focusing on how components are connected and what special parameters are necessary to leverage Vertex AI.
As you can see, each standard component has at least one special parameter to get input from the output of different components. For instance, the Trainer has the examples parameter, and its value comes from the ImportExampleGen. Likewise, Pusher has the model parameter, and its value comes from the Trainer. On the other hand, if a component doesn’t define a special parameter, you can set the dependencies explicitly via add_upstream_node method. You can find the example usages of add_upstream_node with VertexUploader and VertexDeployer.
After defining and connecting TFX components, the next step is to put those components in a list. A pipeline function should return tfx.dsl.Pipeline type of object, and it can be instantiated with that list. With tfx.dsl.Pipeline, we can finally create a pipeline specification with KubeflowV2DagRunner under the tfx.orchestration.experimental module. When you call the run method of the KubeflowV2DagRunner with the tfx.dsl.Pipeline object, it will create a pipeline specification file in JSON format.
The JSON file can be passed to the kfp.v2.google.AIPlatformClient’s create_run_from_job_spec method, then it will create a pipeline run on Vertex AI Pipeline. All of these in code looks like so:
Once the above steps are executed you should be able to see a pipeline on the Vertex AI Pipelines dashboard. One very important detail to note here is that the pipeline needs to be compiled such that it runs on the custom TFX Docker image we built in one of the earlier steps.
Cost
Vertex AI Training is a separate service from Pipeline. We need to pay for the Vertex AI Pipeline individually, and it costs about $0.03 per pipeline run. The type of compute instance for each component was e2-standard-4, and it costs about $0.134 per hour. Since the whole pipeline took less than an hour to be finished, we can estimate that the total cost was about $0.164 for a Vertex AI Pipeline run.
The cost for the AutoML training depends on the type of task and the target environment. For instance, the AutoML training job for the cloud model costs about $3.15 per hour whereas the AutoML training job for the on-device mobile model costs about $4.95 per hour. The training jobs were done in less than an hour for this project, so it cost about $10 for the two models fully trained.
On the other hand, the cost of custom model training depends on the type of machine and the number of hours. Also, you have to consider that you pay for the server and the accelerator separately. For this project, we chose n1-standard-4 machine type whose price is $0.19 per hour and NVIDIA_TESLA_K80 accelerator type whose price is $0.45 per hour. The training for each model was done in less than an hour, so it cost about $1.28 in total.
The cost of the model prediction is defined separately for AutoML and custom-trained models. The online and batch predictions for AutoML model cost about $1.25 and $2.02 per hour respectively. On the other hand, the prediction cost of a custom-trained model is roughly determined by the machine type. In this project, we specified it as n1-standard-4 whose price is $0.1901 per hour without an accelerator in the us-central-1 region. If we sum up the cost spent on this project, it is about $12.13 for the two pipeline runs to be completed. Please refer to the official document for further information.
Firebase ML doesn’t cost anything. You can use it for free for Custom Model Deployment. Please find out more information about the price for Firebase service here.
Conclusion
In this post, we covered why having two different types of models may be necessary to serve users. We realized a simple but scalable automated pipeline for the same using two different approaches using Vertex AI on GCP. One, where we used Kubeflow’s AutoML SDK delegating much of the heavy lifting to the frameworks. In the other approach, we leveraged TFX’s custom components to customize various parts of the pipeline as per our requirements. Hopefully, this post provided you with a few important recipes that are important to have in your Machine Learning Engineering toolbox. Feel free to try out our code here and let us know what you think.
Acknowledgements
We are grateful to the ML-GDE program that provided GCP credits for supporting our experiments. We sincerely thank Karl Weinmeister and Robert Crowe of Google for their help with the review.
