Serving real-time scikit-learn and XGBoost predictions
Noah Negrey
Cloud Developer Programs Engineer
Torry Yang
Cloud Developer Programs Engineer
We’re excited to bring support for scikit-learn and XGBoost, machine learning libraries, to Google Cloud Platform and partner with a growing community of data scientists and ML users.
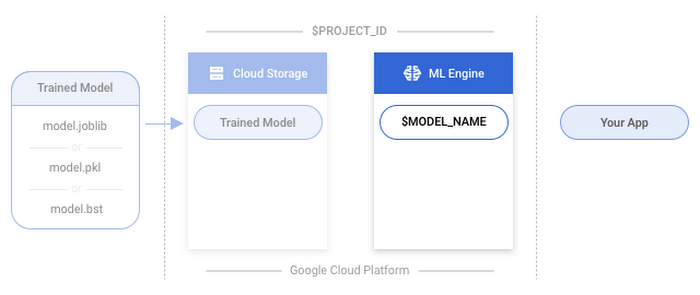
If you’ve built machine learning models with scikit-learn or XGBoost, and you want to serve your models in real time for an application, perhaps managing the resulting infrastructure sounds like a nightmare. Fortunately, now there’s an alternative. Serving your trained scikit-learn and XGBoost models on Cloud Machine Learning Engine (ML Engine) is now in beta.
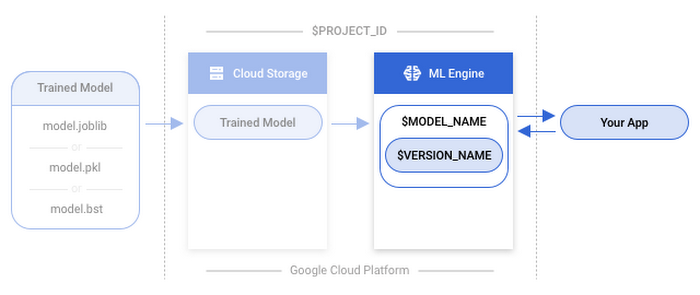
You can now upload a model you’ve already trained onto Google Cloud Storage and use ML Engine’s online prediction service to support scalable prediction requests against your trained model.
In this post we’ll cover how to use a trained scikit-learn or XGBoost model on ML Engine to make online predictions. You can find the complete guides in our documentation with a sample model and dataset. If this is your first time using Google Cloud Platform (GCP), or you need help training a scikit-learn or XGBoost model, we suggest you follow one of the complete guides for scikit-learn or XGBoost.
How to bring your model to ML Engine
Getting your model ready for predictions can be done in 5 steps:- Save your model to a file
- Upload the saved model to Google Cloud Storage
- Create a model resource on ML Engine
- Create a model version (linking your scikit-learn/XGBoost model)
- Make an online prediction
Setup
These environment variables will be needed for the following steps:PROJECT_ID: Use the unique identifier that matches your GCP projectMODEL_PATH: The path to your model on Google Cloud StorageMODEL_NAME: Use your own model name, such as ‘census’VERSION_NAME: Use your own version, such as ‘v1’REGION: Select a region here or use the default ‘us-central1’. The region is where the model will be deployed.INPUT_DATA_FILE: Include a JSON file that contains the data used as input to your model’s predict method.
(For more info see the complete guide.)
1. Save your model
First, you’ll need to save your model and put it in a format that is usable by Cloud ML Engine.If you're using scikit-learn, you can save the model by adding the following code to the end of your file after your model is trained. This uses scikit-learn's built-in version of joblib.
If you're using XGBoost, there is also the option of saving the model using the native save_model method of the Booster object as explained here. Add this code to the end of your file to save your model:
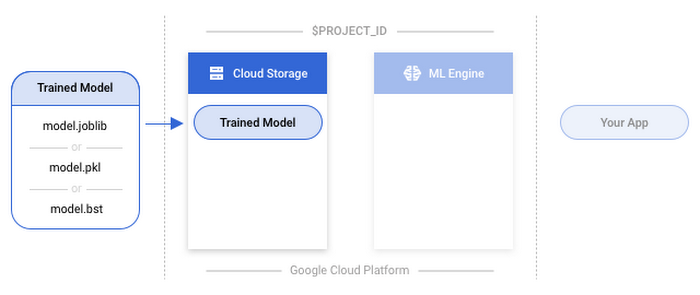
2. Upload the saved model
To use your model with ML Engine, you’ll need to upload it to Google Cloud Storage. This step takes your localmodel.joblib or model.bst file and uploads it to Cloud Storage via the Cloud SDK using gsutil.scikit-learn
XGBoost
3. Create a model resource
Cloud ML Engine organizes your trained models using model and version resources. A Cloud ML Engine model is a container for the versions of your machine learning model. More information on model resources and model versions can be found in our documentation.In this step you’ll create a container that can hold several different versions of your actual model.
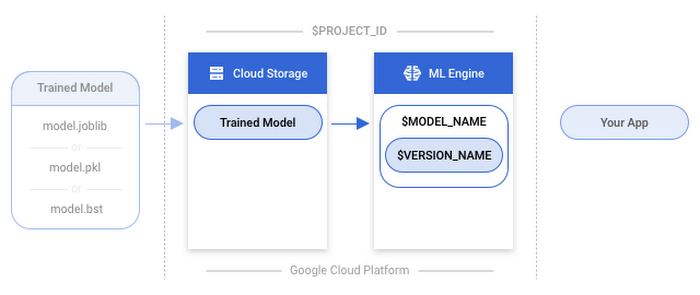
4. Create a model version
Now it’s time to get a version of your model uploaded to your container that was created in the previous step. This will allow you to make online predictions. The model version requires a few components as specified here.name: The name specified for the version when it was created. This will be theVERSION_NAMEvariable you declared above.deploymentUri: The Google Cloud Storage location of the trained model used to create the version. This is the bucket where you uploaded the model with yourMODEL_PATH.runtimeVersion: The Cloud ML Engine runtime version to use for this deployment. This is set to 1.4.framework: This specifies whether you’re usingSCIKIT_LEARNorXGBOOST. This is set toSCIKIT_LEARN.pythonVersion- This specifies whether you’re using Python 2.7 or Python 3.5. The default value is set to “2.7”, if you are using Python 3.5, set the value to “3.5”
Note: It can take several minutes before your model becomes available.
You can check the status of your model’s deployment with:
5. Make an online prediction
It’s time to use gcloud to make an online prediction with your newly deployed model. (Note: For a python example, check out one of the tutorials.)Before you begin, you’ll need data you can send to your model in order to generate a prediction. Prepare a JSON file with the input data you want to use to make a prediction based on your model’s expected input. This file’s name should match the one you used above for the INPUT_DATA_FILE variable. (If you’re not sure what this looks like, check out the complete guide for more info.)
gcloud