How to transfer BigQuery tables between locations with Cloud Composer
David Sabater Dinter
Product Manager, Data Analytics Google Cloud
Update 03/30/20: Copying BigQuery datasets from one region to another is much easier now. You can just use the BigQuery Transfer Service rather than exporting to GCS, do a cross-region-copy, and import back to BigQuery.
This tutorial is still relevant if the transfer process is part of a much bigger orchestrated pipeline, in which case the cost of running the Composer cluster and network egress need to be considered, it also introduces some Airflow concepts applicable to your own pipelines.
BigQuery is a fast, highly scalable, cost-effective, and fully-managed enterprise data warehouse for analytics at any scale. As BigQuery has grown in popularity, one question that often arises is how to copy tables across locations in an efficient and scalable manner. BigQuery has some limitations for data management, one being that the destination dataset must reside in the same location as the source dataset that contains the table being copied. For example, you cannot copy a table from an US-based dataset and write it to a EU-based dataset. Luckily you can use Cloud Composer to implement a data pipeline to transfer a list of tables in an efficient and scalable way.
Cloud Composer is a fully managed workflow orchestration service that empowers you to author, schedule, and monitor pipelines that span across clouds and on-premises data centers. Built on the open source Apache Airflow and operated using the Python programming language, Cloud Composer is free from lock-in and easy to use. Plus, it’s deeply integrated within Google Cloud Platform, giving users the ability to orchestrate their full pipeline. Cloud Composer has robust, built-in integration with many products, including Google BigQuery, Cloud Dataflow, Cloud Dataproc, Cloud Datastore, Cloud Storage, Cloud Pub/Sub, and Cloud ML Engine.
Overview
In this blog you will learn how to create and run an Apache Airflow workflow in Cloud Composer that completes the following tasks:
Reads from a configuration file the list of tables to copy
Exports the list of tables from a BigQuery dataset located in a US region to Cloud Storage
Copies the exported tables from US to EU Cloud Storage buckets
Imports the list of tables into the target BigQuery Dataset in an EU region
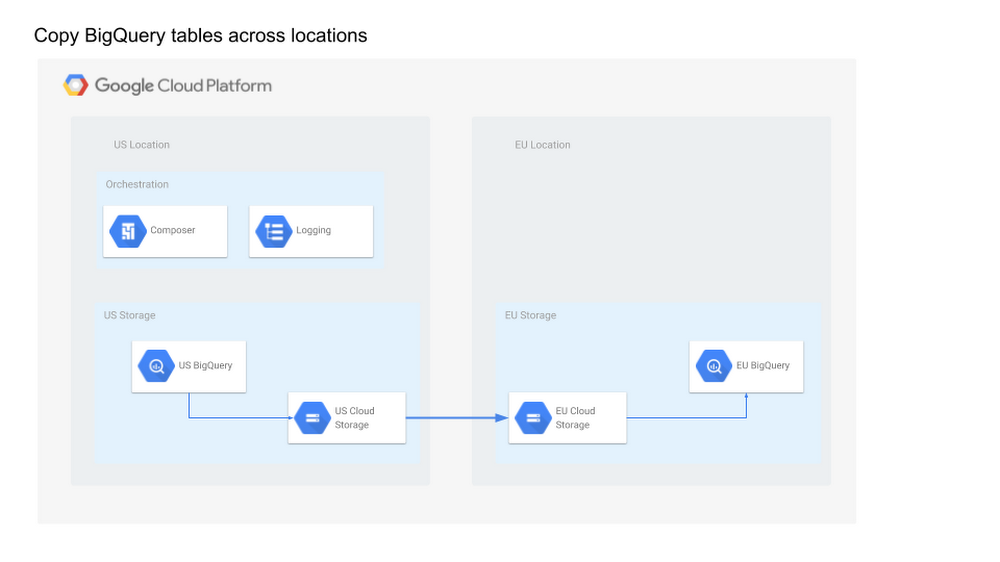

In this post you will learn:
How to access your Cloud Composer environment through the Google Cloud Platform Console, Cloud SDK, and Airflow web interface.
How to install a Plugin to implement a Cloud Storage to Cloud Storage operator as this operator is required but not present in Composer current Airflow version (1.9)
How to use Cloud Stackdriver Logging Client python library for logging
How to dynamically generate DAGs (directed acyclic graphs) based on a config file
Create Cloud Composer environment
Create a Cloud Composer environment and wait until the environment creation step completes. Enable the Composer API if asked to do so, then click Create. Then set the following parameters for your environment:
Name: composer-advanced-lab
Location: us-central1
Zone: us-central1-a
Leave all other settings as default.
The environment creation process is completed when the green checkmark displays to the left of the environment name on the Environments page in the GCP Console.
It can take up to 20 minutes for the environment to complete the setup process. Move on to the next sections to create your Cloud Storage buckets and a new BigQuery dataset.
Create Cloud Storage buckets
Create two Cloud Storage multi-regional buckets in your project, one located in the US as source and the other in EU as destination. These buckets will be used to copy the exported tables across locations, i.e., US to EU.
Note: One can select regional buckets from the same location to minimize cost and unnecessary replication, for simplicity this post uses multi-regional buckets to keep referring to locations (US and EU).
Go to Navigation menu > Storage > Browser and then click Create bucket.
Give your two buckets a universally unique name including the location as a suffix (e.g., 6552634-us, 6552634-eu).
BigQuery destination dataset
Create the destination BigQuery Dataset in EU from the BigQuery new web UI:
Navigation menu > Big Data > Big Query
Then select your project ID.
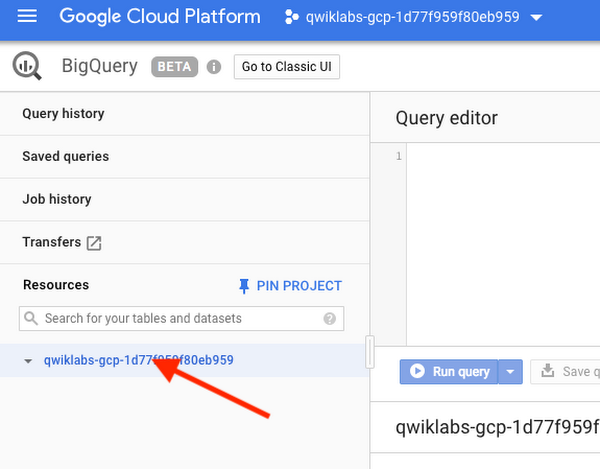

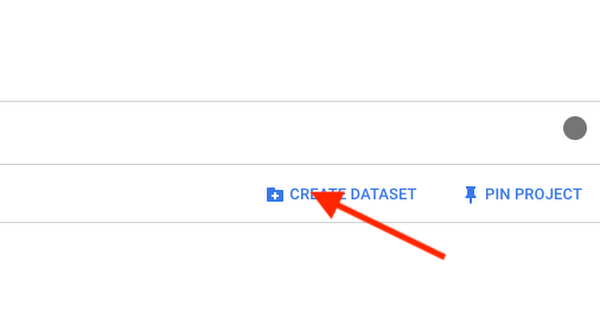
Finally click Create Data Set, use the name “nyc_tlc_EU” and Data location EU.

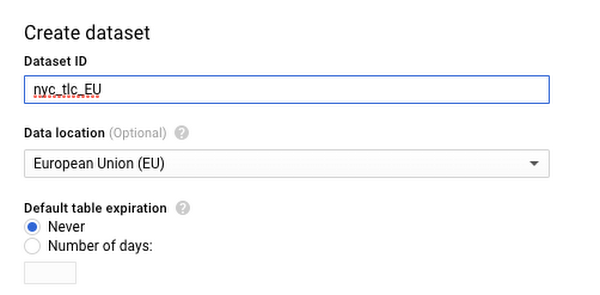

Confirm the dataset has been created and is empty.
Defining the workflow
Cloud Composer workflows are comprised of DAGs (Directed Acyclic Graphs). The code shown in bq_copy_across_locations.py is the workflow code, also referred to as the DAG. You can find sample code here.
To orchestrate all the workflow tasks, the DAG imports the following operators:
DummyOperator: Creates Start and End dummy tasks for better visual representation of the DAG.BigQueryToCloudStorageOperator: Exports BigQuery tables to Cloud Storage buckets using the Avro format. Note: You can export the table in Avro compressed format to reduce overall costs, either using Snappy or DeflateGoogleCloudStorageToGoogleCloudStorageOperator: Copies files across Cloud Storage buckets.GoogleCloudStorageToBigQueryOperator: Imports tables from Avro files in Cloud Storage bucket.
read_table_list() to read the config file and build the list of tables to copy .You can find the above code on GitHub.
The name of the DAG is bq_copy_us_to_eu_01, and the DAG is not scheduled by default so needs to be triggered manually.
To define the Cloud Storage plugin we define a class GCSPlugin(AirflowPLugin), mapping the hook and operator downloaded from the Airflow 1.10-stable branch.
Note: Airflow 1.10 is already supported in Composer, you no longer need to define this operator as a plugin in the latest Composer versions, but it is still relevant if you need to define your own plugin
Viewing environment information
Go back to Composer to check on the status of your environment.
Once your environment has been created, click the name of the environment to see its details.
The Environment details page provides information, such as the Airflow web UI URL, Kubernetes Engine cluster ID, name of the Cloud Storage bucket connected to the/dags folder.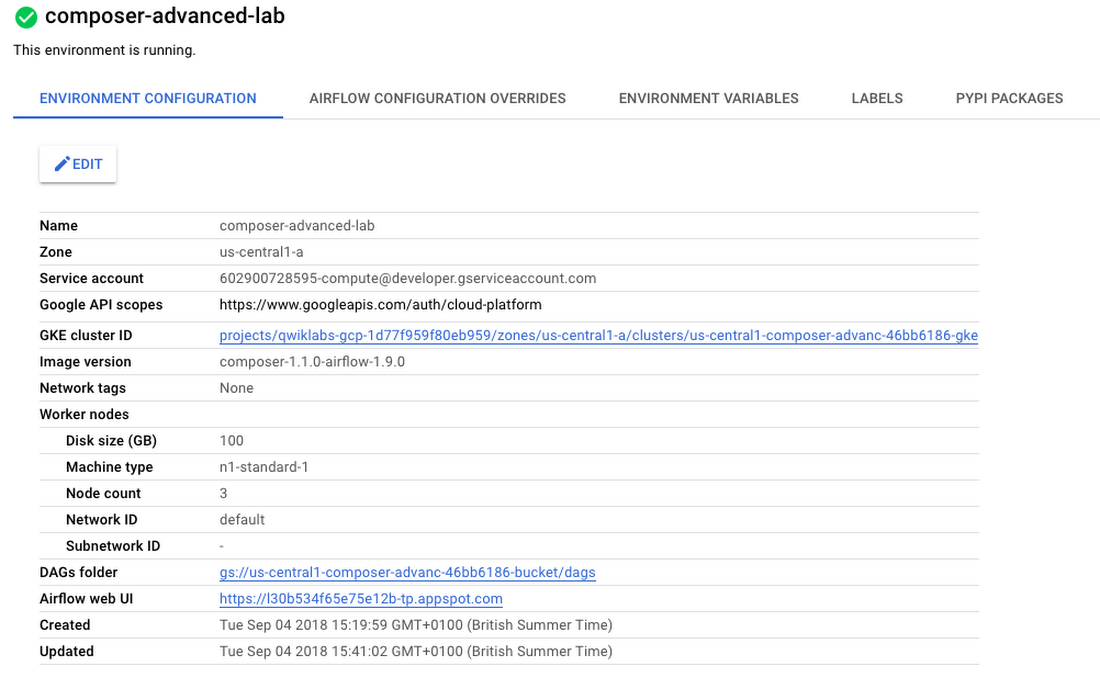

Note: Cloud Composer uses Cloud Storage to store Apache Airflow DAGs, also known as workflows. Each environment has an associated Cloud Storage bucket. Cloud Composer schedules only the DAGs in the Cloud Storage bucket.
Setting your DAGs’ Cloud Storage bucket
Set a variable in your Cloud shell to refer to the DAGs Cloud Storage bucket, we will be using this variable few times during the post, e.g., using the above DAGs folder:
Airflow variables are an Airflow-specific concept that is distinct from environment variables. In this step, you'll set the following three Airflow variables used by the DAG we will deploy: table_list_file_path, gcs_source_bucket, and gcs_dest_bucket.
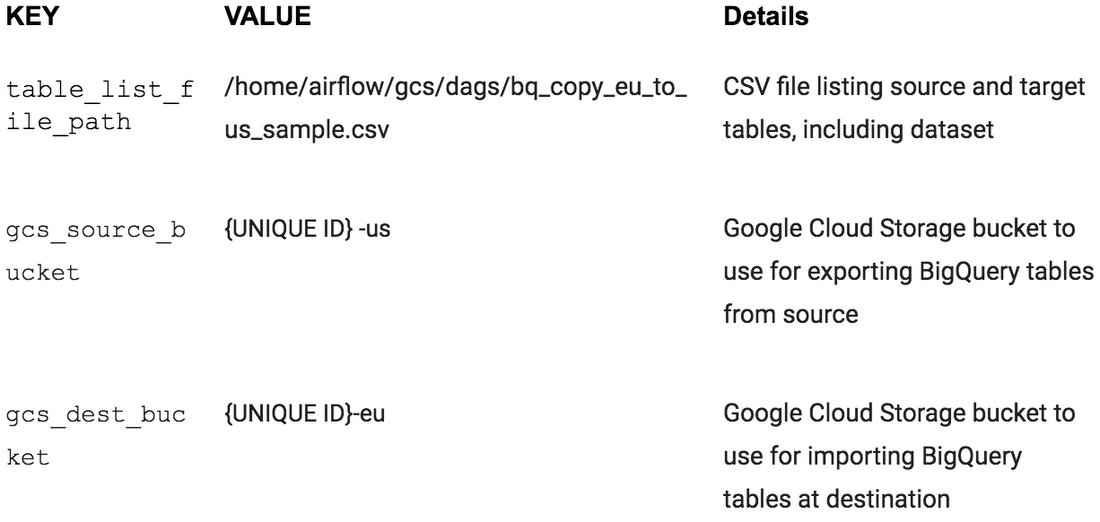

Set Airflow variables using gcloud commands in Cloud Shell, alternatively these can be set using the Airflow UI. To set the three variables, run the gcloud composer command once for each row from the above table. This gcloud composer command executes the Airflow CLI sub-command variables. The sub-command passes the arguments to the gcloud command line tool.
For example, the gcs_source_bucket variable would be set like this:
ENVIRONMENT_NAMEis the name of the environment.LOCATIONis the Compute Engine region where the environment is located. Thegcloud composercommand requires including the--locationflag or setting the default location before running the gcloud command.KEYandVALUEspecify the variable and its value to set. Include a space two dashes space (--) between the left-sidegcloudcommand with gcloud-related arguments and the right-side Airflow sub-command-related arguments. Also include a space between theKEYandVALUEarguments. using thegcloud composer environments runcommand with the variables sub-command in
To see the value of a variable, run the Airflow CLI sub-command variables with the get argument or use the Airflow UI.
For example, run the following:
Uploading the DAG and dependencies to Cloud Storage
To upload the DAG and its dependencies:
Clone the GCP Python docs samples repository on your Cloud shell.
2. Upload a copy of the third party hook and operator to the plugins folder of your Composer DAGs Cloud Storage bucket, e.g.:
3. Next upload the DAG and config file to the DAGs Cloud Storage bucket of your environment, e.g.:
Cloud Composer registers the DAG in your Airflow environment automatically, DAG changes occur within 3-5 minutes. You can see task status in the Airflow web interface and confirm the DAG is not scheduled as per the settings.
Using the Airflow UI
To access the Airflow web interface using the GCP Console:
Go back to the Environments page.
In the Airflow webserver column for the environment, click the new window icon. The Airflow web UI opens in a new browser window.
Use your GCP credentials.
You’ll now be in the Airflow UI.
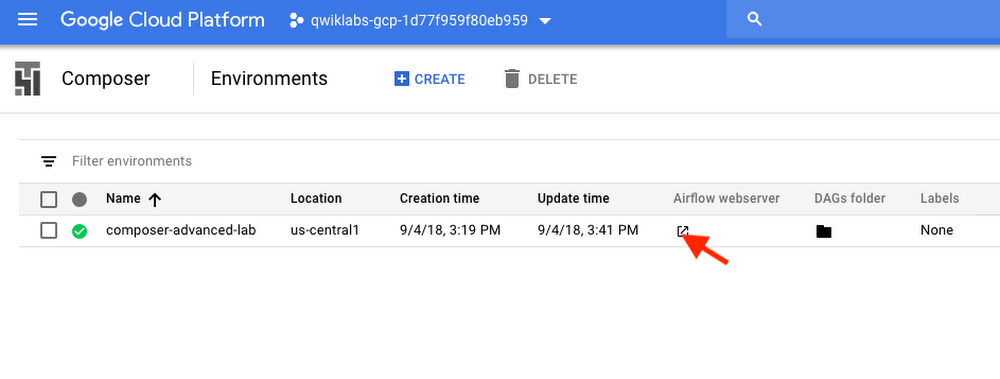

For information about the Airflow UI, see Accessing the web interface
Viewing variables
The variables you set earlier persist in your environment. You can view the variables by selecting Admin > Variables from the Airflow menu bar.
Exploring DAG runs
When you upload your DAG file to the dags folder in Cloud Storage, Cloud Composer parses the file. If no errors are found, the name of the workflow appears in the DAG listing, and the workflow is queued to run immediately if the schedule conditions are met, in our case indicates None as seen above in the settings.

Trigger the DAG run manually
To trigger the DAG manually click the play button:


Click bq_copy_us_to_eu_01 to open the DAG details page. This page includes a graphical representation of workflow tasks and dependencies.
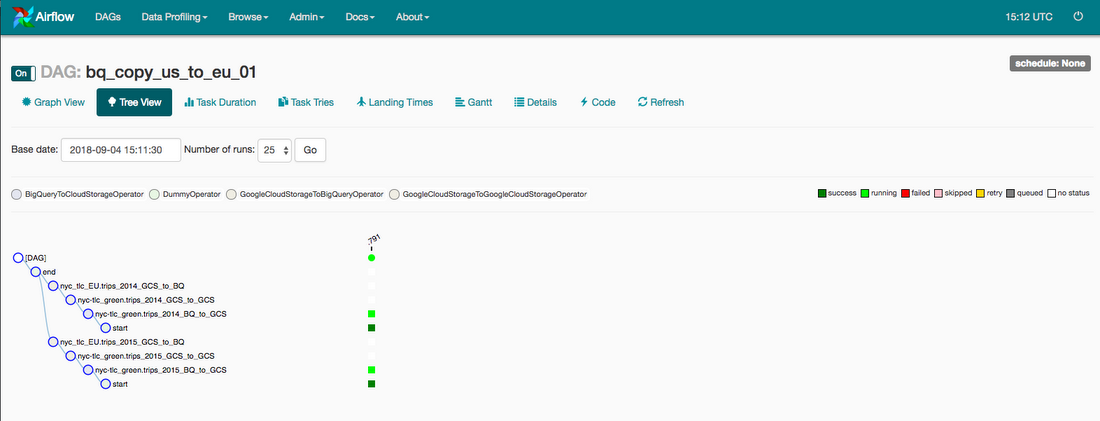

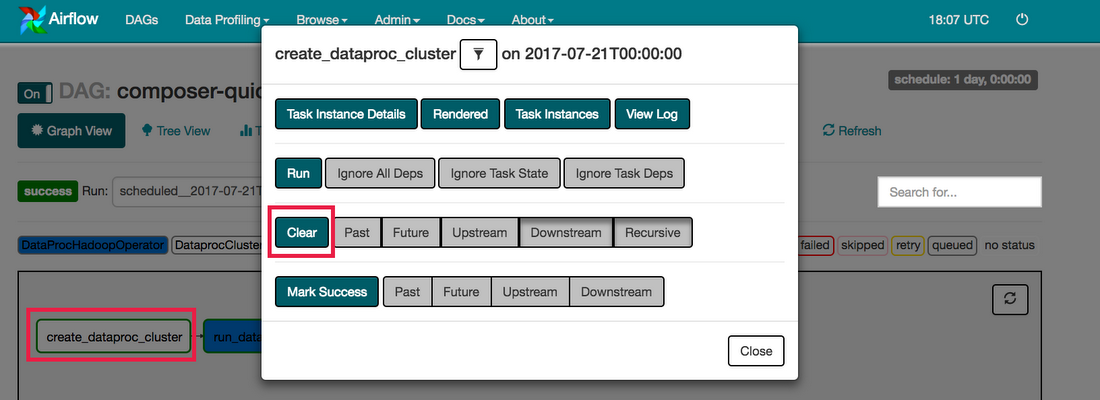
To run the workflow again from the Graph View:
In the Airflow UI Graph View, click the start graphic.

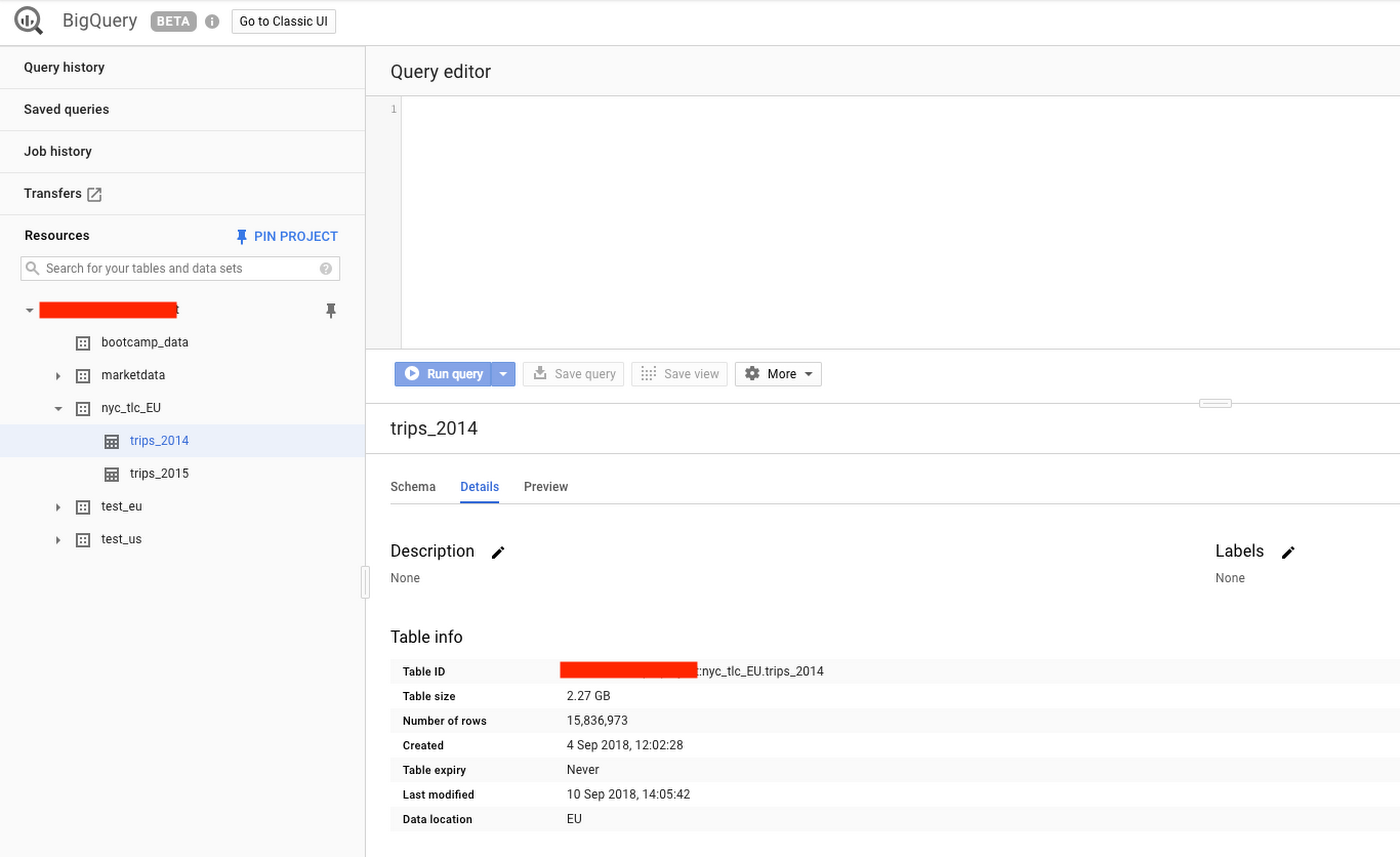
Finally, check the status and results of the bq_copy_us_to_eu_01 workflow by going to the following Console pages:
- BigQuery web UI to validate the tables are accessible from the dataset created in EU.

Cloud Storage Browser to see the intermediate Avro files in the source and destination buckets.
You’ve have successfully copied two tables programmatically from the US region to the EU region!
Feel free to reuse this DAG to copy as many tables as you require across your locations.
Next steps
You can learn more about using Airflow at the Airflow website or the Airflow Github project. There are lots of other resources available for Airflow, including a discussion group.
Sign up for the Apache dev and commits mailing lists (send emails to dev-subscribe@airflow.incubator.apache.org and commits-subscribe@airflow.incubator.apache.org to subscribe to each)
Sign up for an Apache JIRA account and re-open any issues that you care about in the Apache Airflow JIRA project


