Automating BigQuery exports to an email
Neha Nene
Strategic Cloud Engineer
Ishita Shah
Cloud Technical Resident
Data accessibility and analysis is a crucial part of getting value from your data. While there are many methods to view data when it comes to BigQuery, one common way is to export query results as an email on a scheduled basis. This lets end users get an email with a link to the most recent query results, and is a good solution for anyone looking for daily statistics on business processes, monthly summaries of website metrics, or weekly business reviews. Whatever the query may be, stakeholders who need the information can access data easily via email for relevant insights.
In this post, we’ll describe a way to easily automate exporting results from BigQuery to email.
Design considerations for results emails
An important design consideration is the size and complexity of the data. Keep in mind the size constraints for email attachments and for exporting large queries from within BigQuery. In the case that the query results are over 1 GB, BigQuery will output the results into multiple tables. As a result, you would need to send multiple CSV attachments in the email.
If you have G Suite access, you can do this using scheduled Apps Script, which uses the BigQuery API to run the query and export the results to a Google Sheet. A time-based trigger on the script will refresh the data at scheduled intervals. With this, you could easily send an email with a link to the Sheet using the Gmail Service.
This method depends on G Suite. For a more general solution, we recommend using Google Cloud as the primary solution to automate BigQuery exports to an email. It involves a couple of Google Cloud products and the SendGrid API for sending the emails. Here’s how to do that.
Automating BigQuery results to an email
We’ll walk you through how to build an automated process to export BigQuery results into email, starting with the steps and a look at the architecture diagram.
Create a Pub/Sub topic that will trigger your Cloud Functions code to run.
Set up a BigQuery dataset and Cloud Storage bucket for your exports.
Build a Cloud Function with the code that runs the query, exports results, and sends an email.
Create a Cloud Scheduler job tied to the Pub/Sub topic to automatically run the function on a scheduled basis.
Here’s a look at the architecture of this process:
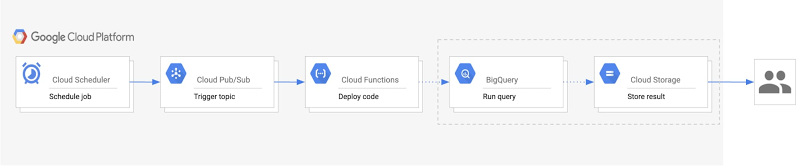
Within this architecture, you’ll see:
Cloud Scheduler: A Cloud Scheduler job invokes the Pub/Sub topic to schedule the email export periodically.
Pub/Sub: A Pub/Sub topic triggers the Cloud Function.
Cloud Function: A Cloud Function subscribes to the Pub/Sub topic and runs the code calling the BigQuery and Cloud Storage APIs.
BigQuery: The BigQuery API generates the query results, stores them in a table, and then exports the results as a CSV into Cloud Storage.
Cloud Storage: A Cloud Storage bucket stores the CSV file. The Cloud Storage API generates a signed URL for the CSV that is sent out as an email to users.
Last, the SendGrid API sends an email with the link to the signed URL to the specified recipients.
Getting started with email exports
There are a few one-time setup steps related to storing data and sending emails when you begin this process. First, create a BigQuery dataset that will host the tables created for each export. For example, if you want to receive an email every day, this dataset would have a table for each daily export with a naming convention such as “daily_export_${TIMESTAMP}.” Since this dataset can quickly increase in size, we recommend setting a default table expiration time. This way, the tables holding outdated data can be deleted.
Next, create a Cloud Storage bucket to host the exported CSV files from BigQuery. Similar to the dataset expiration time, the bucket lifecycle management configuration can automatically delete the CSV or move the file to a different storage class after the time frame defined in the “Age” condition.
The final setup step involves configuring access to the SendGrid API. To do this, create an account and generate a SendGrid API key, which will allow the Cloud Function to authenticate with the Email API and send an email. The free tier pricing for SendGrid applies for 40,000 messages per day for the first 30 days, and then 100 per day forever. (We’ll get to the implementation of the API in the next section.)
Implementation details
Creating a service account
You will need to create a service account to authenticate SendGrid API. The service account must have the Service Account Token Creator role to generate signed credentials for Cloud Functions. It will also need access to perform the BigQuery and Storage actions, for which the BigQuery Admin and Storage Object Admin roles should be added. The following sample code creates a service account with the previously mentioned roles:
Writing the Cloud Functions code
In order to build this solution, use the Python Client Library to call Google BigQuery and Cloud Storage APIs. Instantiate the client library with the proper service account credentials for the correct authentication to perform the necessary tasks. If the main script will run in Cloud Functions, the credentials default to the Application Default Credentials. In the case that it will run locally, the credentials will use the service account key file provided by the environment variable GOOGLE_APPLICATION_CREDENTIALS. The following sample code demonstrates creating the credentials:
Now, to instantiate the client libraries in your main function:
Using the BigQuery and Cloud Storage client libraries, you can create a table, output your query results to that table, and export the table data as a CSV to Cloud Storage.
Next, generate the signed URL for the CSV file stored in the bucket. This process includes setting an expiration time indicating the duration for which the link can be accessed. The expiration time should be set to the delta in time between emails to prevent recipients from accessing old data. For authentication, Function Identity fetches the function’s current identity (the service account executing the function). iam.Signer() sends a request to that service account to generate OAuth credentials for authenticating the generate_signed_url() function.
To send the email using SendGrid API, follow the SendGrid implementation guide for the web API using the token you generated. The following sample shows what that looks like:
As shown above, the SendGrid API key can be accessed as an environment variable on Cloud Functions. In order to store the API key more securely, you can also encrypt and store the key with Cloud Key Management Service.
Deploying the pipeline
To build the pipeline, create a Pub/Sub topic, deploy the Cloud Function with the code from the previous section, and configure Cloud Scheduler to trigger the pipeline. This sample code shows how to deploy the pipeline locally, assuming that “main.py” holds the Cloud Function code:
Now you have an automated pipeline that sends your BigQuery exports straight to a set of emails, allowing for easy data accessibility and analysis.
Learn more about the Google Cloud tools used here:
Get started with the BigQuery Client Libraries
Schedule queries in BigQuery
Use signed URLs in Cloud Storage
How to create a Cloud Scheduler job