Google Cloud SQL で Active Directory と統合した SQL Server インスタンスの作成
Google Cloud Japan Team
※この投稿は米国時間 2021 年 4 月 10 日に、Google Cloud blog に投稿されたものの抄訳です。
Google Cloud SQL の SQL Server インスタンスは、Microsoft Active Directory(AD)と統合され、pre-GA 機能としてすぐにお試しいただけます。この投稿記事では、この新機能を使用して SQL Server インスタンスを作成するために必要な基本手順を説明します。詳細については、公式ドキュメントを参照してください。
Managed Service for Microsoft Active Directory でドメインを作成する
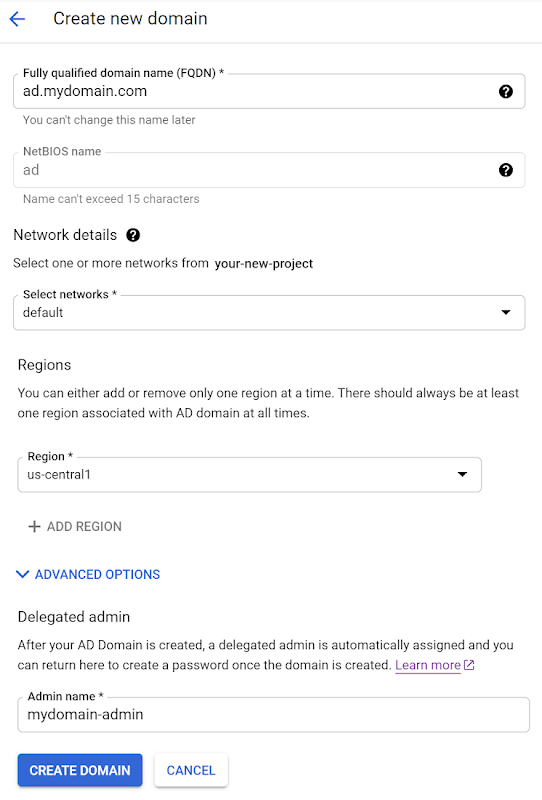
まず、Managed Service for Microsoft AD を使用してドメインを作成します。Google Cloud Console の [マネージド Microsoft AD] セクションを利用すると簡単に作成できます。[新しい AD ドメインを作成] ボタンをクリックして以下の情報を入力します。
完全修飾ドメイン名を指定します。
例: ad.mydomain.com
VPC ネットワークを選択します。
例: デフォルト
AD ドメインに対して適切な CIDR 範囲を指定します。
例: 10.1.0.0/24
AD ドメインを配置するリージョンを選択します。
例: us-central1
AD ドメインの代理管理者に対して管理者名を指定します。
例: mydomain-admin
すべての情報が指定されると、以下のように表示されます。
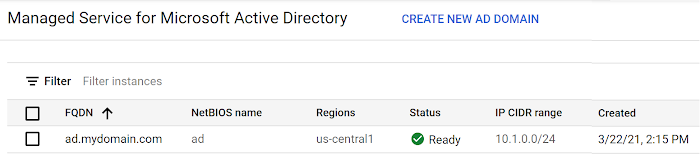
[ドメインを作成] をクリックすると、AD ドメインの作成処理が完了します。ドメインが利用可能となるまで最大で 60 分かかる場合があるため、しばらくお待ちください。利用可能となったドメインは、ドメイン一覧で以下のように表示されます。
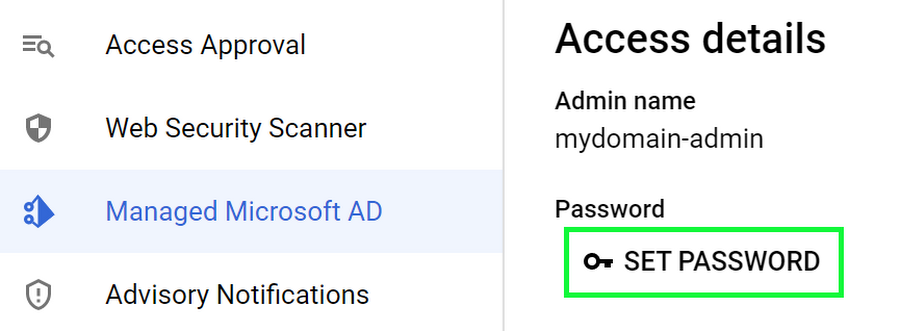
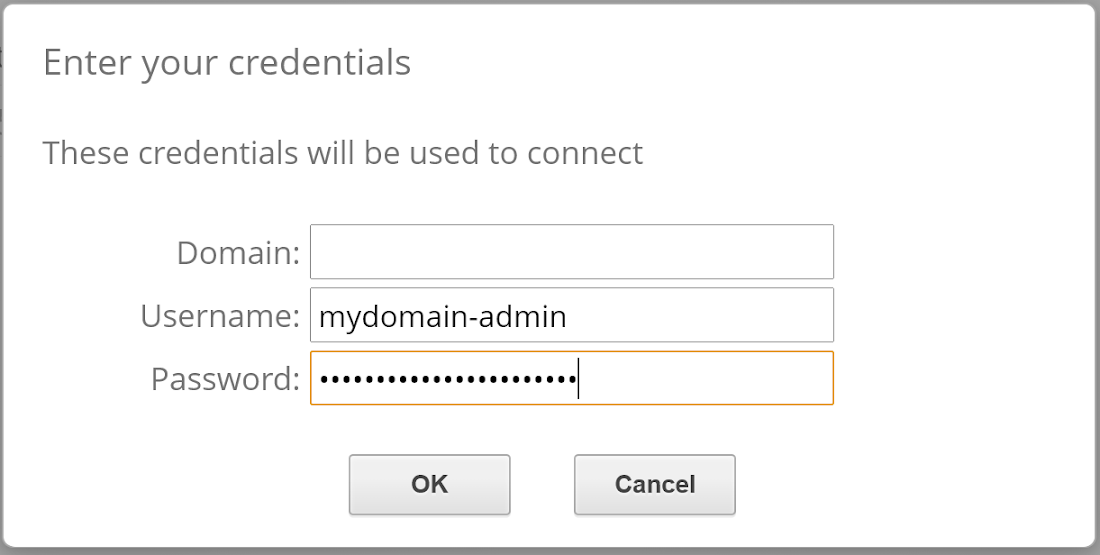
AD ドメインの構成を完了するには、最後に [代理管理者] パスワードを設定します。ドメイン一覧からドメイン名をクリックして詳細ページに移動します。このページで [パスワードを設定] リンクをクリックして、パスワードをメモします。パスワードはこのブログ投稿で後述のステップで使用します。
Windows 認証を使用して SQL Server インスタンスを作成する
AD ドメインが使用可能になったら、AD ドメインを利用する SQL Server インスタンスの作成を開始して、AD ベースの ID による Windows 認証を有効化できます。Google Cloud Console の Cloud SQL セクションにアクセスして、新しい SQL Server インスタンスを作成してみてください。[インスタンスを作成] ボタンをクリックします。[SQL Server を選択] をクリックして以下の情報を入力します。
インスタンス ID を指定します。
例: sql-server-with-ad
「sqlserver」ユーザー用のパスワードを入力して、以降のステップで使用するためにメモしておきます。
データベースのバージョンを選択します。すべてのバージョンが Active Directory で動作します。今回は「SQL Server 2017 Standard」を選択します。
インスタンスを配置するリージョンを選択します。ネットワーク レイテンシを最小限に抑えて最高のパフォーマンスを得るためには、SQL Server インスタンスを AD ドメインと同じリージョンに配置することをおすすめします。
例: us-central1
インスタンスを「シングルゾーン」と「複数のゾーン」のどちらに配置するかを選択します。本番環境のインスタンスでは、選択リージョン内の別のゾーンに自動的にフェイルオーバーする高可用性を実現するために、「複数のゾーン」をおすすめします。
[設定オプションを表示] を選択します。
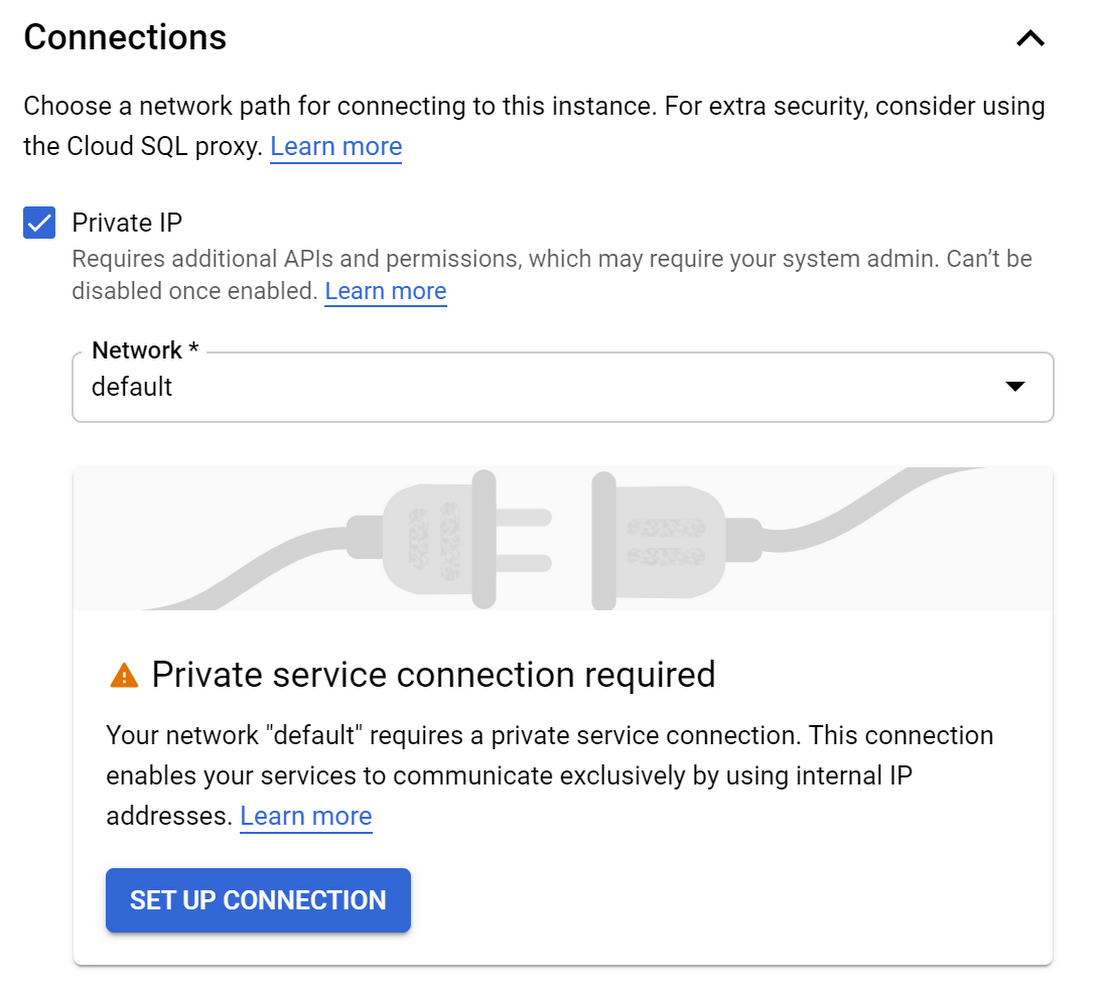
[接続] セクションをクリックして展開し、[プライベート IP] および [パブリック IP] オプションを両方とも選択します。
なお、選択した「ネットワーク」に初めてプライベート IP を作成する場合は、「プライベート サービス接続は必須です」というメッセージが表示されます。
- [接続を設定] をクリックして、表示された [Service Networking API の有効化] ダイアログで [自動的に割り当てられた IP 範囲を使用する] を選択します。
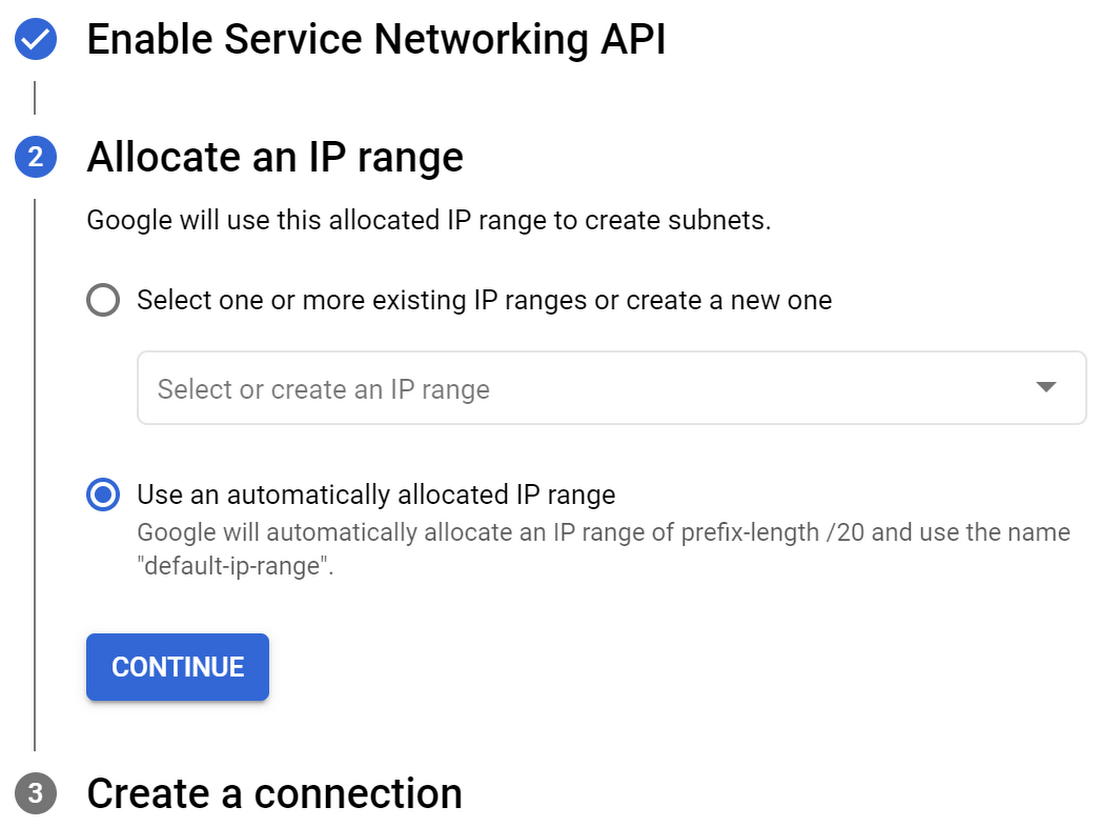
その後、[続行] ボタンをクリックして処理を完了します。
インスタンスの [設定オプション] に戻り、[認証] セクションをクリックして展開します。
Managed Active Directory ドメインに参加するためのプルダウン メニューから、このブログ投稿の最初のステップで作成したドメインを選択します。
Cloud SQL は、インスタンス認証に使用するプロダクトごと、プロジェクトごとのサービス アカウントを自動的に作成します。サービス アカウントに「managedidentities.sqlintegrator」という IAM ロールを付与するよう求められます。
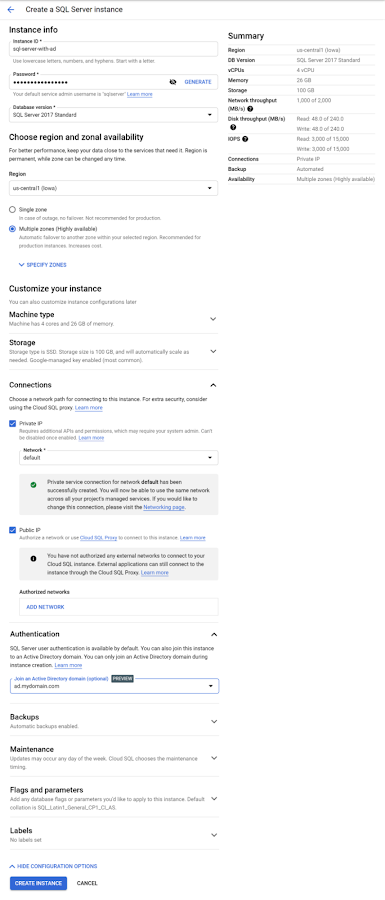
すべての情報が指定されると、インスタンス作成フォームは以下のように表示されます。
[インスタンスを作成] をクリックすることで、インスタンスの作成処理が完了します。インスタンスが作成されると、新規インスタンスの概要ページが以下のように表示されます。
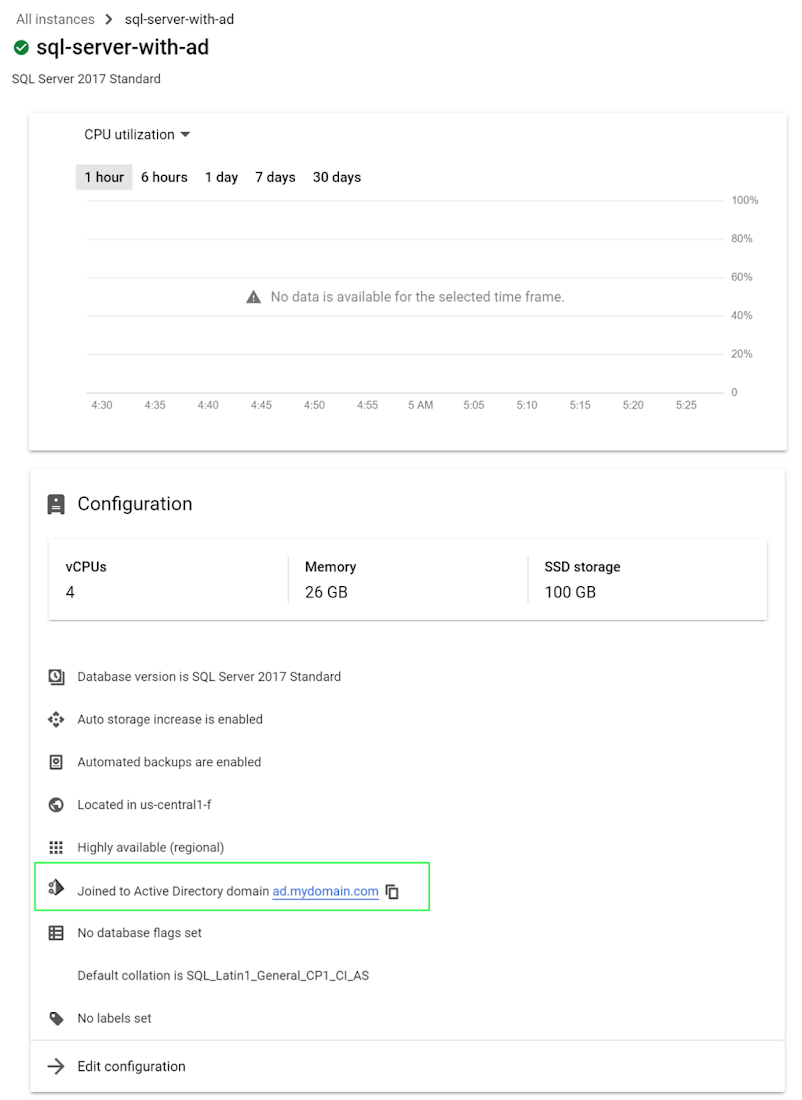
お疲れさまでした。これで、Google Cloud 上に SQL Server インスタンスが作成され、AD ベースの ID で Windows 認証を使用してログインできるようになりました。
Windows 認証を使用して SQL Server インスタンスを接続する
以下の手順で、すべてが想定どおりに動作することを確認します。今回は、Google Compute Engine を使用して Windows Server 2019 VM を作成します。これを使用することで、Managed Active Directory に新しいユーザーを追加する、そのユーザーに Cloud SQL の SQL Server インスタンスに対するアクセス権を与える、そのユーザーとして Windows 認証を使用して SQL Server インスタンスに接続することができるようになります。
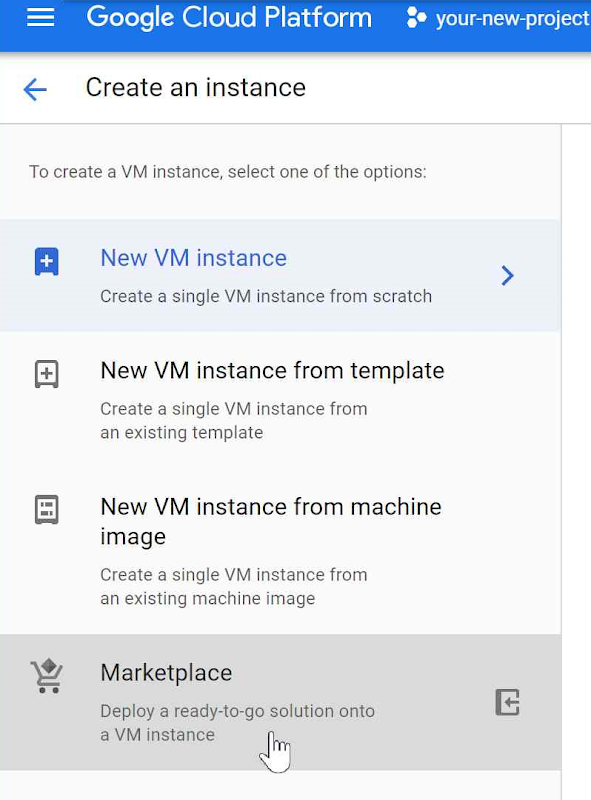
Windows Server VM は、Google Compute Engine のマーケットプレイスを使用することで簡単に作成できます。
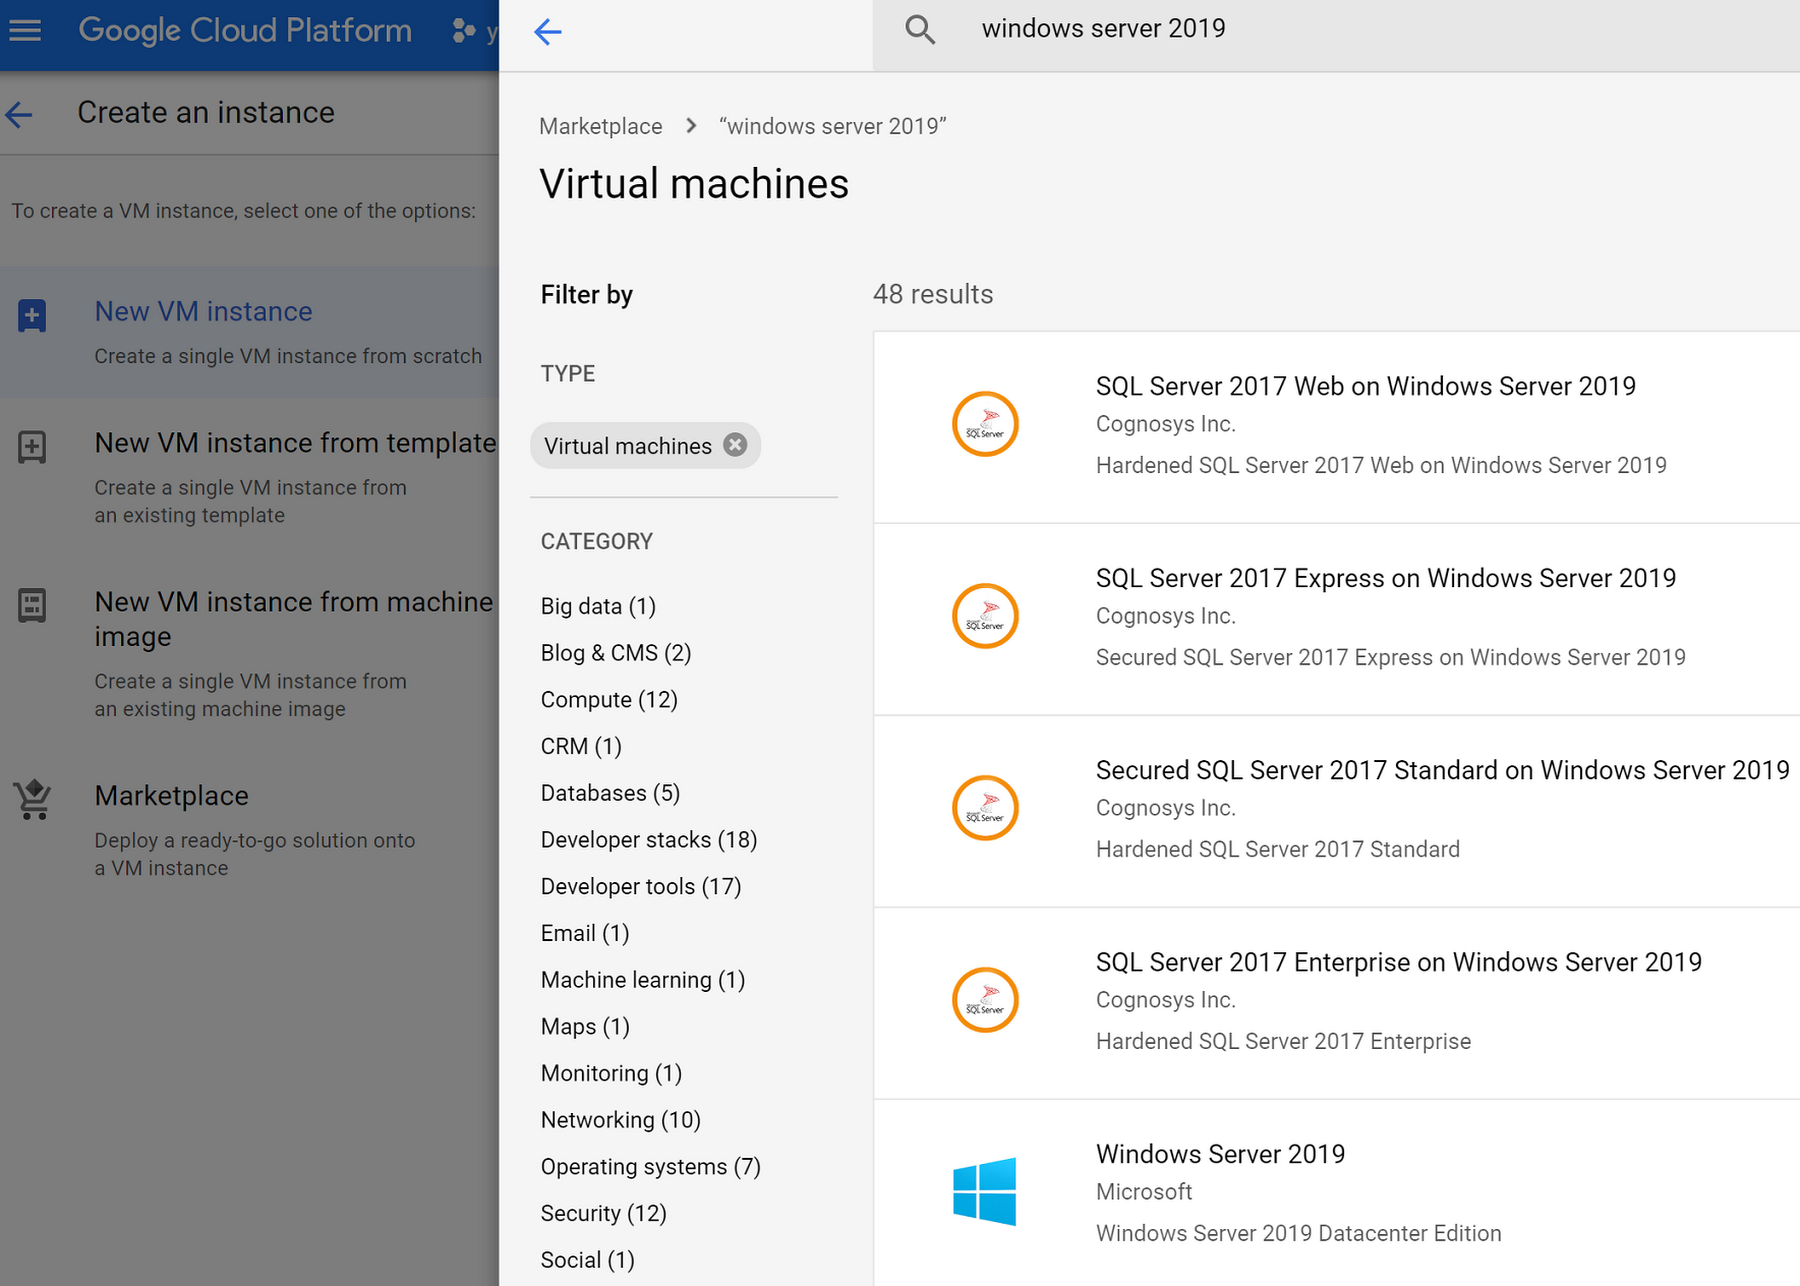
マーケットプレイス内で「Windows Server 2019」を検索すると、いくつものオプションを返します。
[Secured SQL Server 2017 Standard on Windows Server 2019] オプションを使用して VM を作成します。
VM オプションの選択後、[開始] ボタンをクリックしてインスタンスの作成ページに移動します。作成する VM インスタンスの設定(特に [ネットワーキング] セクションにおける「ネットワーク」の選択内容)を見直し、選択した「ネットワーク」が Active Directory ドメインに含まれるネットワークであることを確認します。その後、インスタンス作成ページの下部までスクロールし、[作成] ボタンをクリックします。
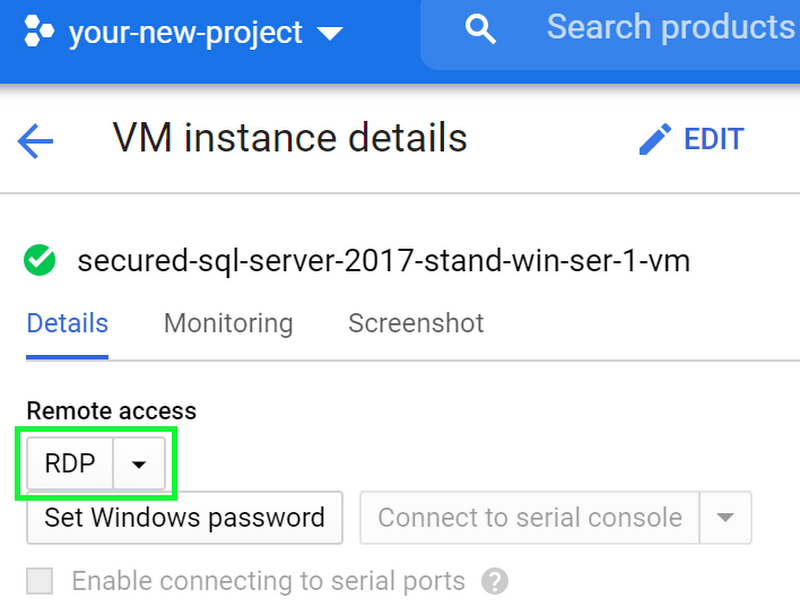
VM 作成処理が完了すると、インスタンスの詳細ページに移動します。[Windows パスワードを設定] ボタンをクリックして、VM にログインするために使用するパスワードを設定します。続けて、[リモート デスクトップ プロトコル](RDP)ボタンを使用して VM にログインします。
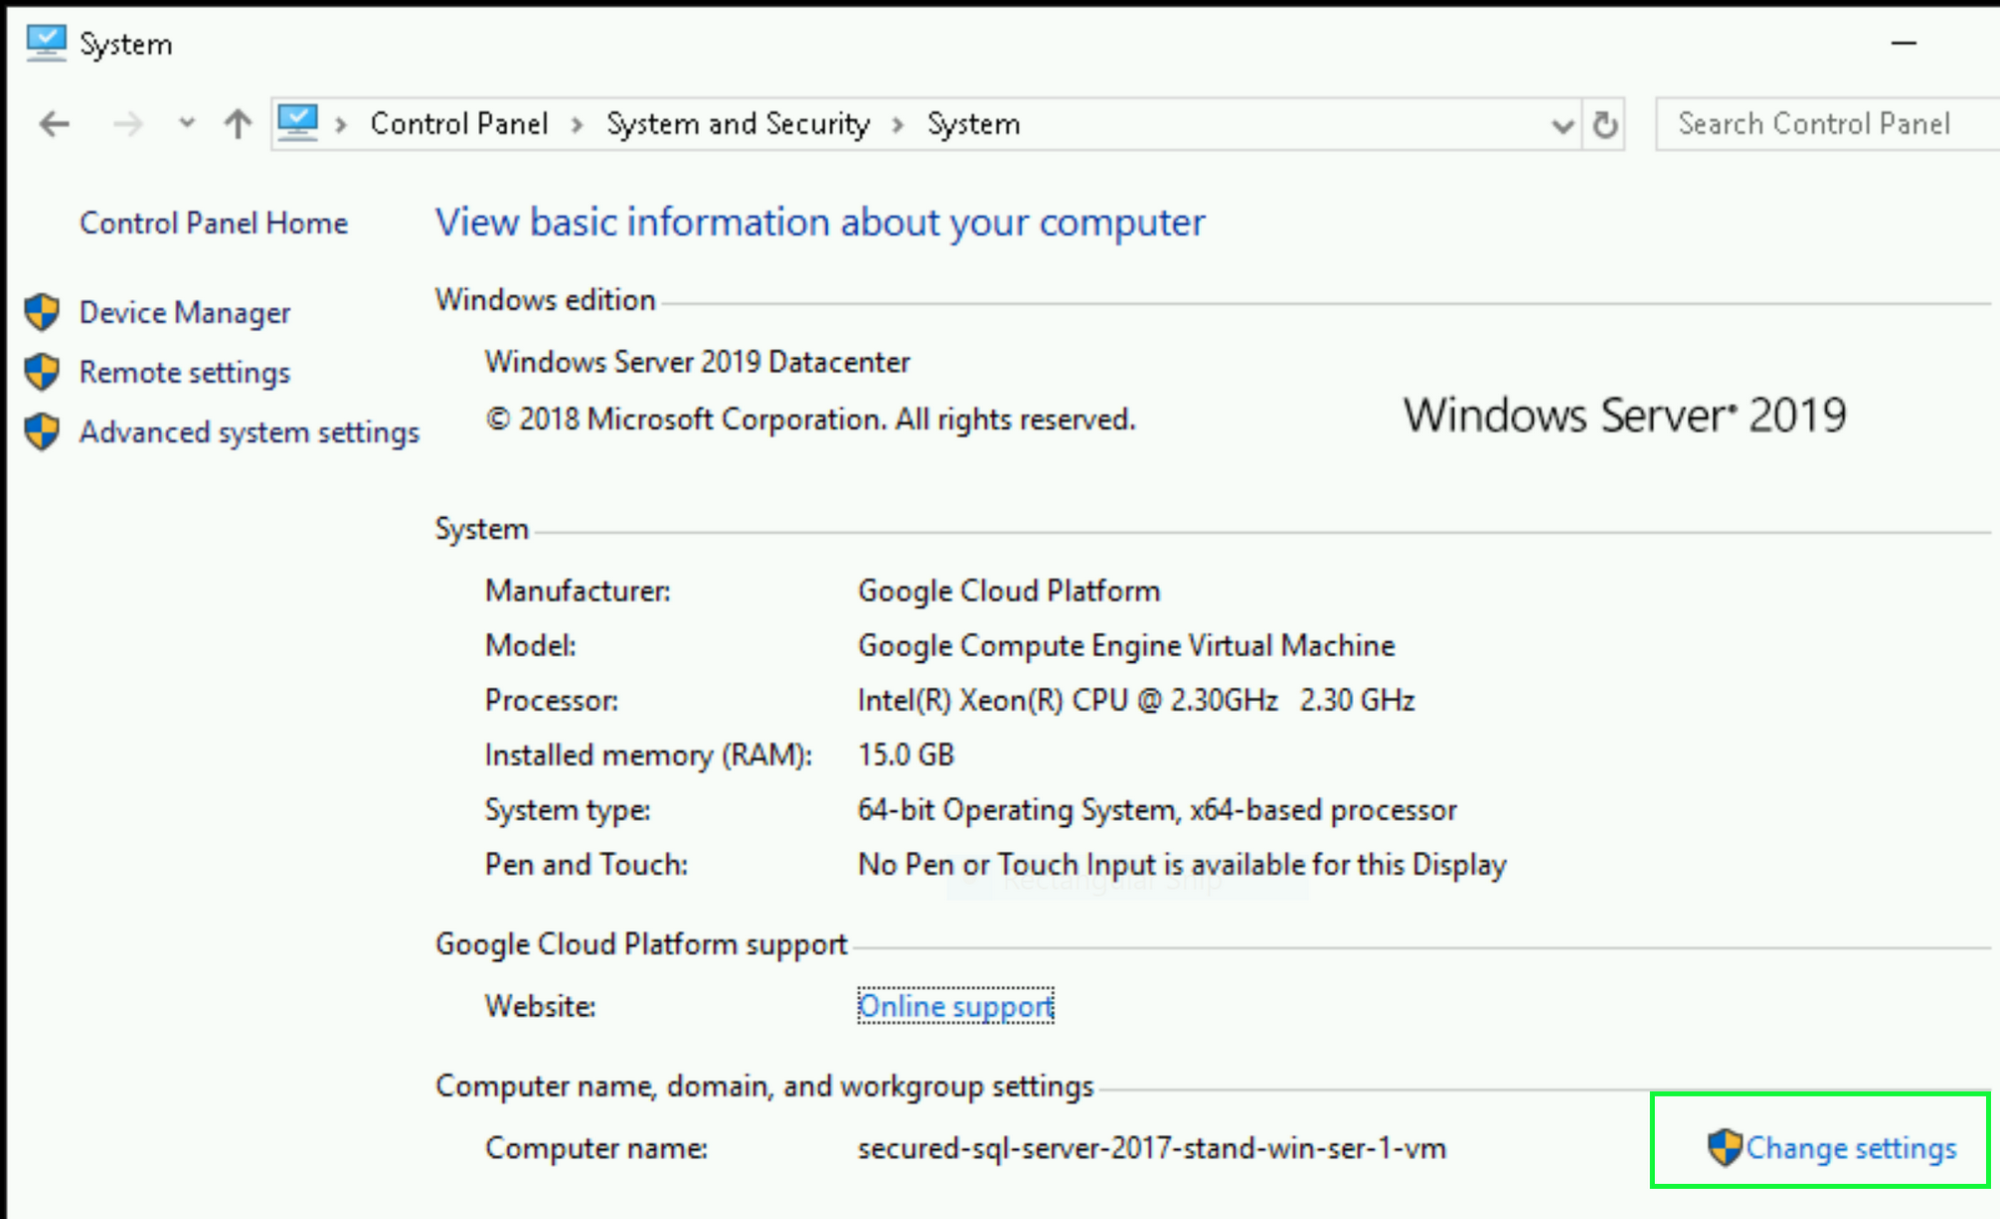
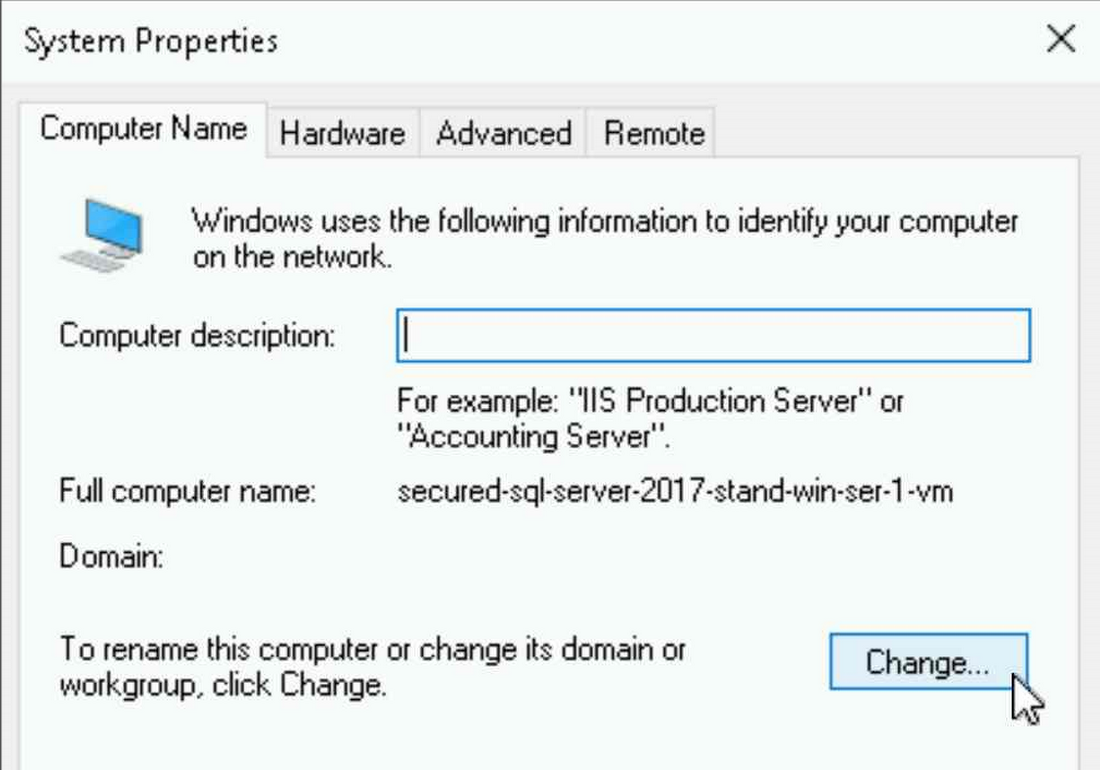
VM インスタンスにログインすると、Managed Active Directory ドメインに VM を参加させることができます。画面左下の Windows アイコンをクリックして「コントロール パネル」と入力し、Enter キーを押します。[システムとセキュリティ] に移動し、[システム] をクリックします。[コンピューター名、ドメインおよびワークグループの設定] の [設定の変更] をクリックします。
[システムのプロパティ] ダイアログ ボックスで [変更] ボタンをクリックします。
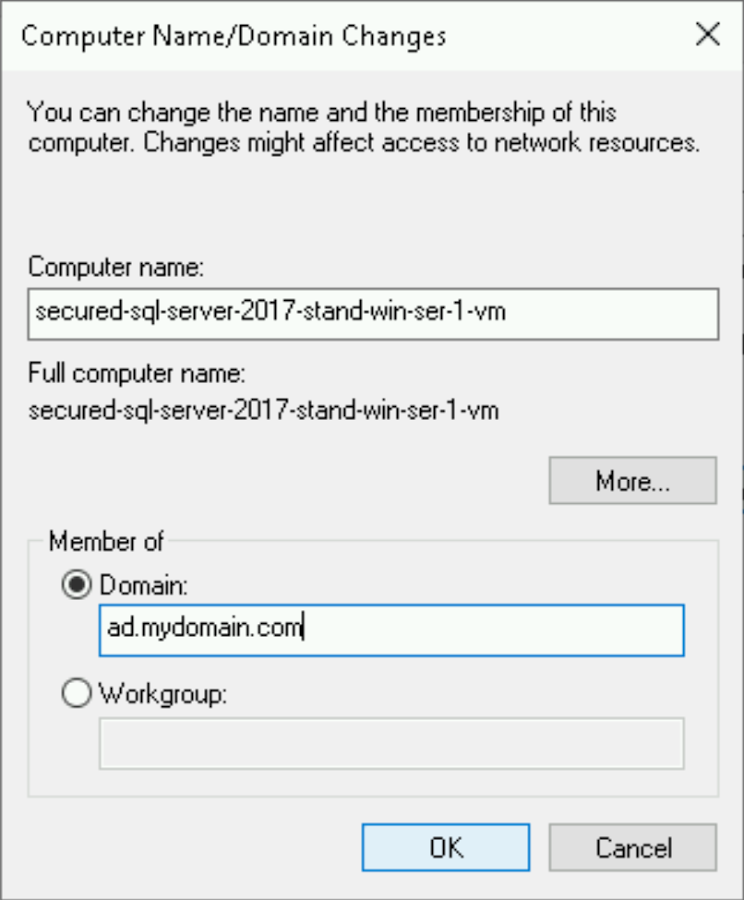
[ドメイン] の入力テキスト ボックスに Managed Active Directory の名前を入力して、[OK] ボタンをクリックします。
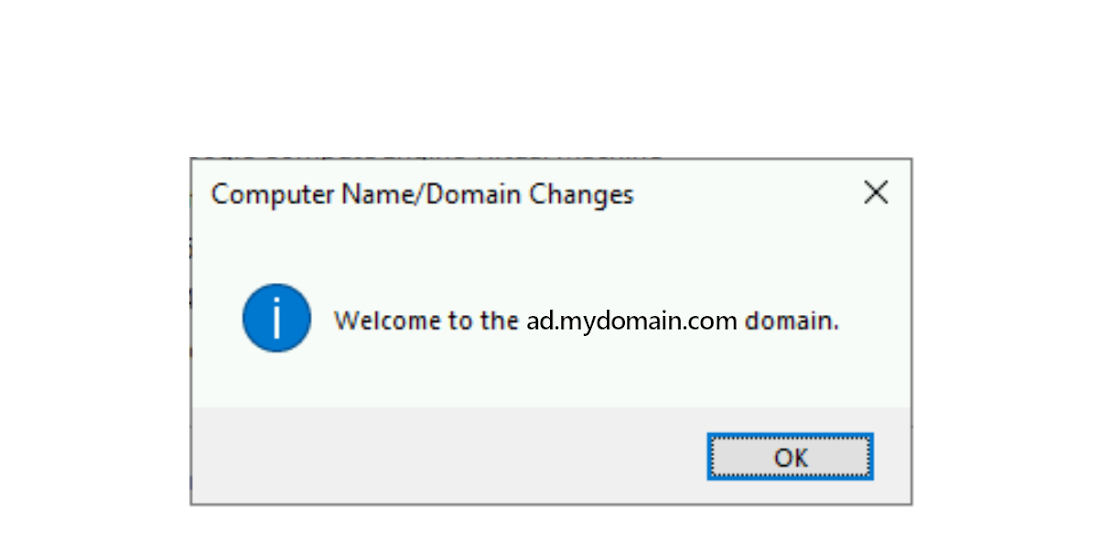
ドメインへのウェルカム メッセージは以下のように表示されます。
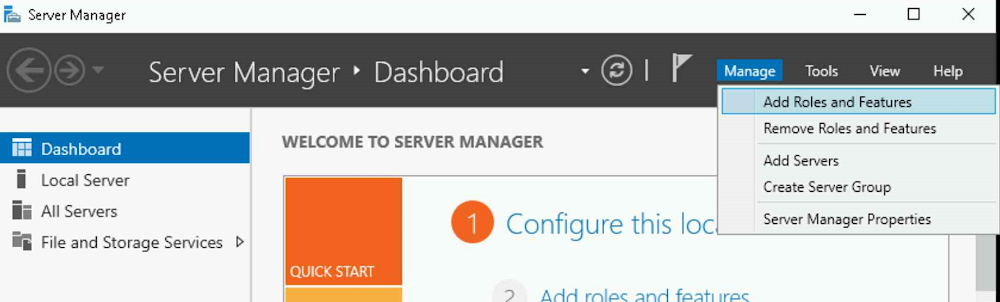
Managed Active Directory の Windows Server VM が利用可能となり、ユーザーを追加できるようになりました。追加するためには、必要なリモート サーバー管理ツール(RSAT)をインストールする必要があります。[サーバーマネージャー] を開き、[管理] メニュー項目をクリックして [役割と機能の追加] ウィザードを選択します。
ウィザードで [機能の選択] ページに進みます。サイドバーから [機能] を選択するか、ページまで [次へ] を選択します。
[機能の選択] ページの [機能] リストで [リモート サーバー管理ツール] を展開し、[役割管理ツール] を展開します。
[役割管理ツール] で [AD DS および AD LDS ツール] を選択します。これによって以下の機能が有効になります。
Active Directory module for Windows PowerShell
AD LDS スナップインおよびコマンドライン ツール
Active Directory 管理センター
AD DS スナップインおよびコマンドライン ツール
省略可: 以下の機能を有効にすることもできます。
グループ ポリシーの管理
DNS サーバーツール([役割管理ツール] の下)
ウィザードを終了します。
お疲れさまでした。ツールによって Windows Server VM が有効化され、ユーザーを Managed AD ドメインに追加できるようになりました。このブログ投稿の初めに AD ドメインを作成した際に指定した [代理管理者] を覚えていますか。この設定をここで使用します。Windows Server VM をログアウトして [代理管理者] としてログインし直します。VM インスタンス画面左下にある Windows アイコン" をクリックし、[電源] アイコンをクリックしてから [切断] を選択します。

Google Compute Engine インスタンスのページに戻って [RDP] ボタンをクリックし、AD ドメインの「代理管理者」ユーザー名およびパスワードを使用して Window Server VM にログインし直します。
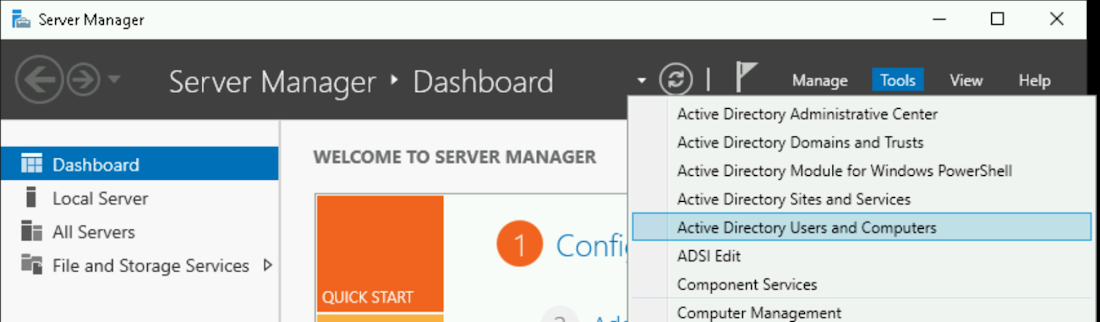
ログイン後、[サーバー マネージャー] を開いて [ツール] メニューをクリックし、[Active Directory ユーザーとコンピューター] を選択します。
[Active Directory ユーザーとコンピューター] ダイアログ ウィンドウが表示されるので、ad.mydomain.com の項目を展開して [Cloud] のサブ項目をクリックします。その後、[現在のコンテナに新しいユーザーを作成] アイコンをクリックして新しいユーザーを作成します。
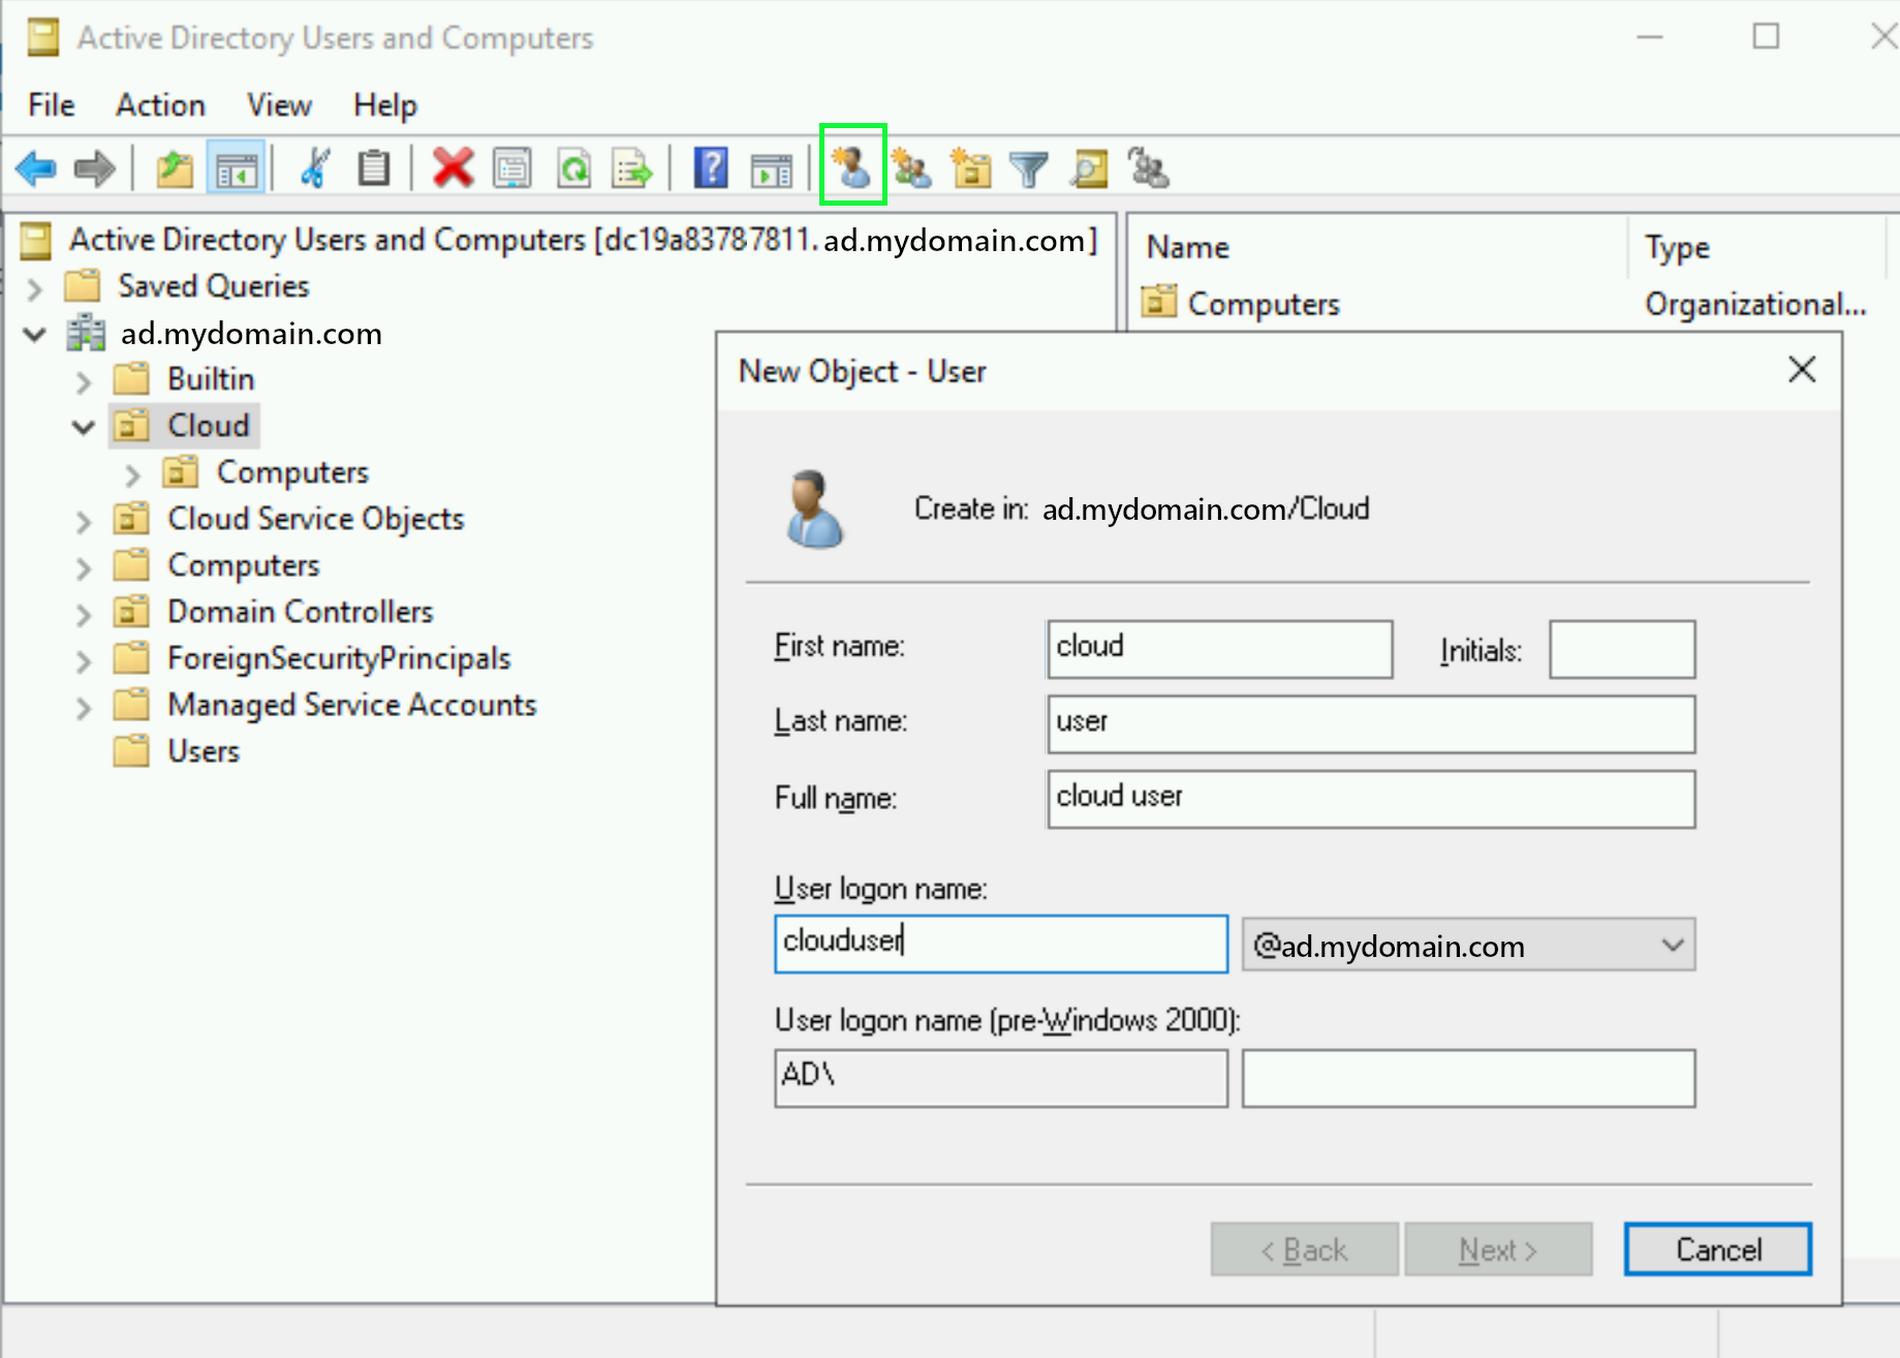
ユーザーのログオン名とあわせて姓名を入力し、[次へ] ボタンをクリックします。
ユーザーのパスワードを入力して確定し、再度 [次へ] ボタンをクリックします。最後に、確認のダイアログ ボックスで [完了] ボタンをクリックしてユーザーを作成します。
お疲れさまでした。新しい AD ドメイン ユーザーが完成しました。これらのユーザーにはさらに Cloud SQL 上の SQL Server インスタンスに対するアクセス権を付与する必要があります。アクセス権は Azure Data Studio を使用して付与できます。Windows Server VM 上でブラウザを開き、Azure Data Studio のダウンロード ページに移動します。
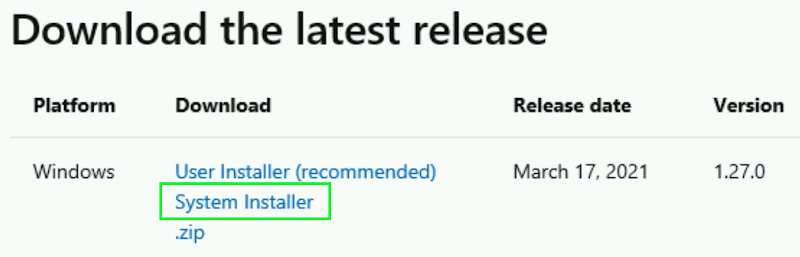
「システム インストーラー」リンクをクリックしてダウンロードを開始し、表示されたダウンロード ダイアログ ウィンドウで [実行] をクリックします。

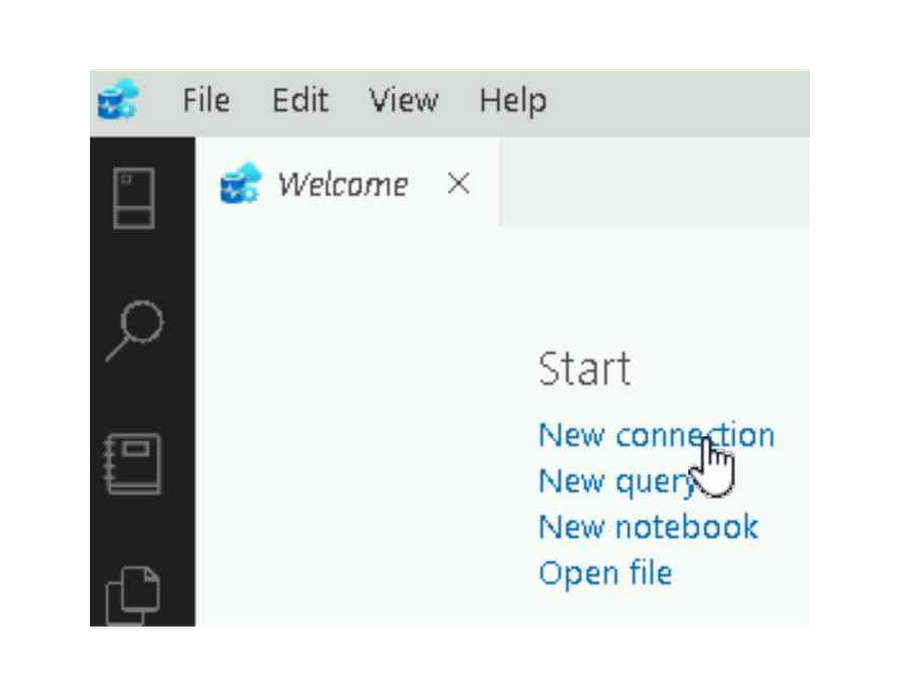
Azure Data Studio インストール ウィザードの完了後、[Azure Data Studio を実行する] チェックボックスを選択した状態で [完了] ボタンをクリックしてプログラムを起動します。Azure Data Studio のスタート画面で、[New connection] リンクをクリックします。
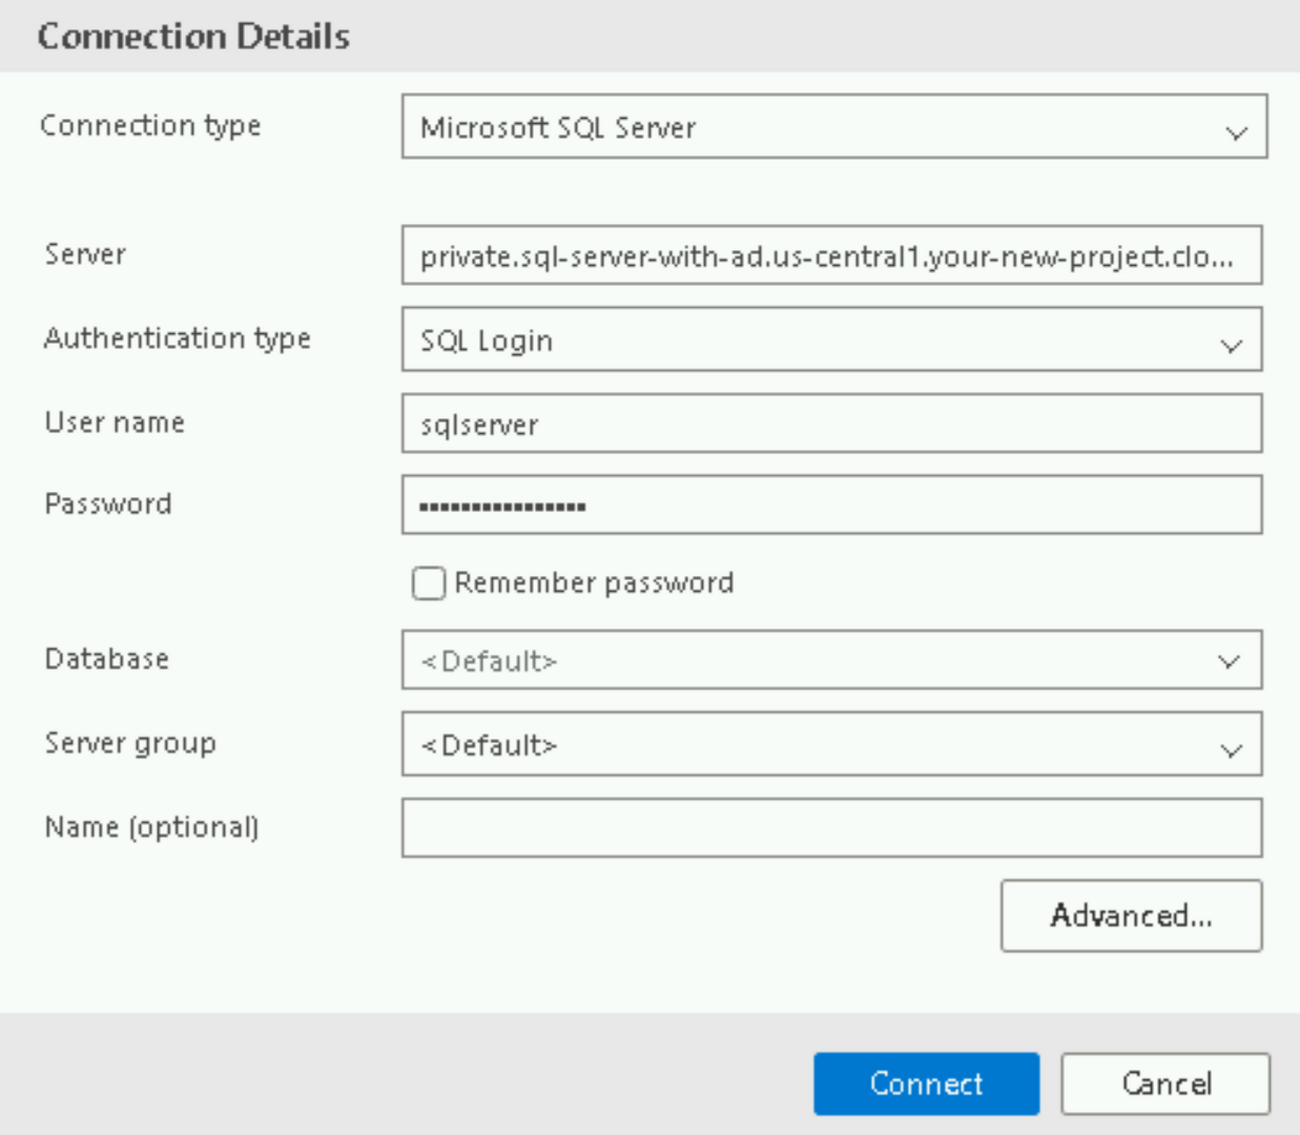
[Server] に関して、Cloud SQL の SQL Server インスタンス詳細ページから [Active Directory FQDN(プライベート)] 値を入力します。
例: private.sql-server-with-ad.us-central1.your-new-project.cloudsql.ad.mydomain.com
認証の種類に関して [SQL Login] を選択します。
[User name] に関して「sqlserver」を入力し、[Password] に関して、SQL Server インスタンス作成時に指定した「sqlserver」ユーザーを入力します。
すべての情報が指定されると、[接続の詳細] は以下のように表示されます。
[接続] ボタンをクリックして SQL Server インスタンスに接続します。接続が確立したら、[New query] リンクをクリックして以下のクエリを入力します。
Windows からログイン [ad.mydomain.com\clouduser] を作成し、
[Run] ボタンをクリックします。
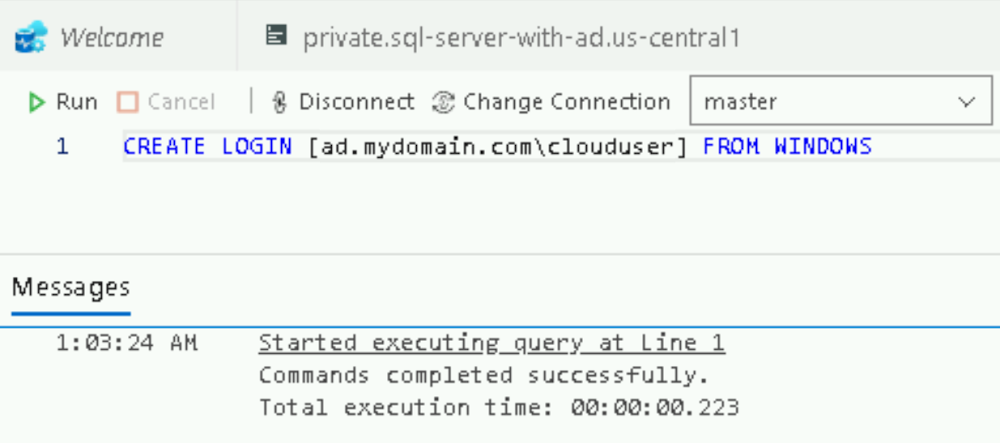
これで設定が完了し、利用できる状態になりました。
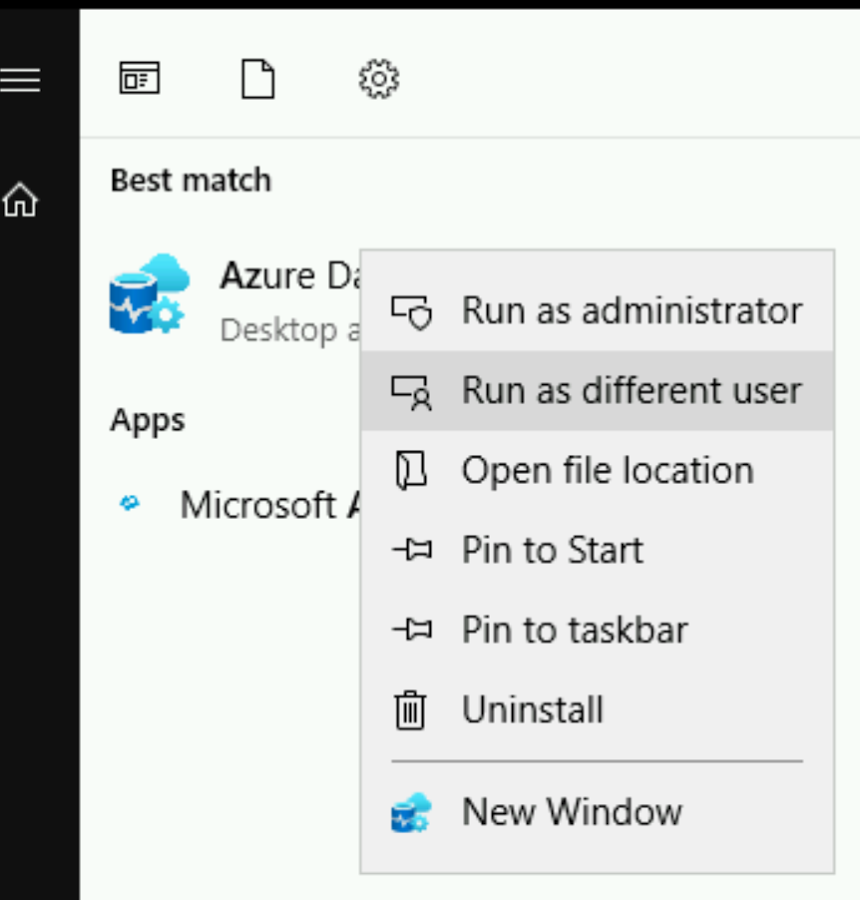
Windows 認証を使用し、新しい AD ドメイン ユーザーとして SQL Server インスタンスに接続してみましょう。Azure Data Studio を一旦終了し、新しい AD ドメイン ユーザーとして Azure Data Studio を再起動します。VM インスタンス画面左下の Windows アイコンをクリックして「Azure Data Studio」と入力します。Azure Data Studio アイコンを右クリックして [別のユーザーとして実行] を選択します。
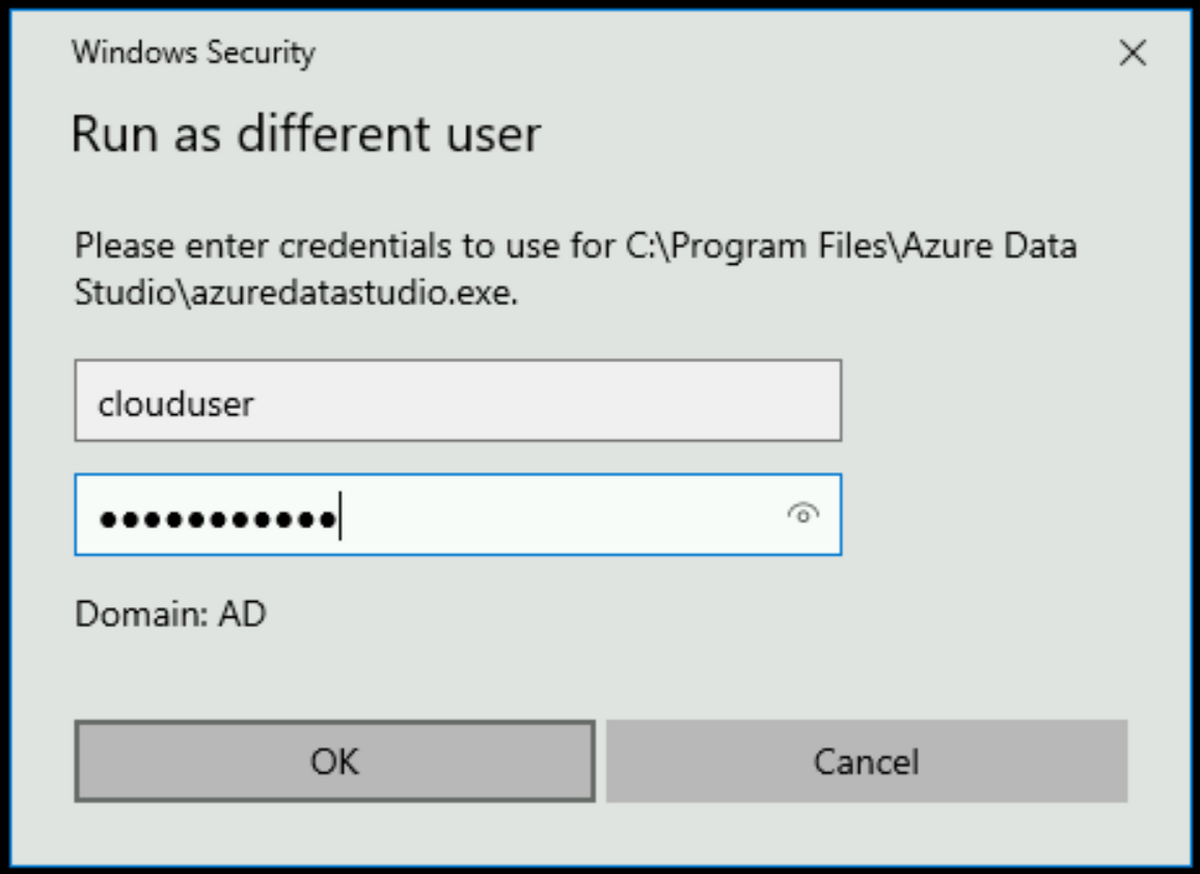
表示されたダイアログ ボックスで AD ドメイン ユーザーの [ユーザー名] および [パスワード] を入力します。
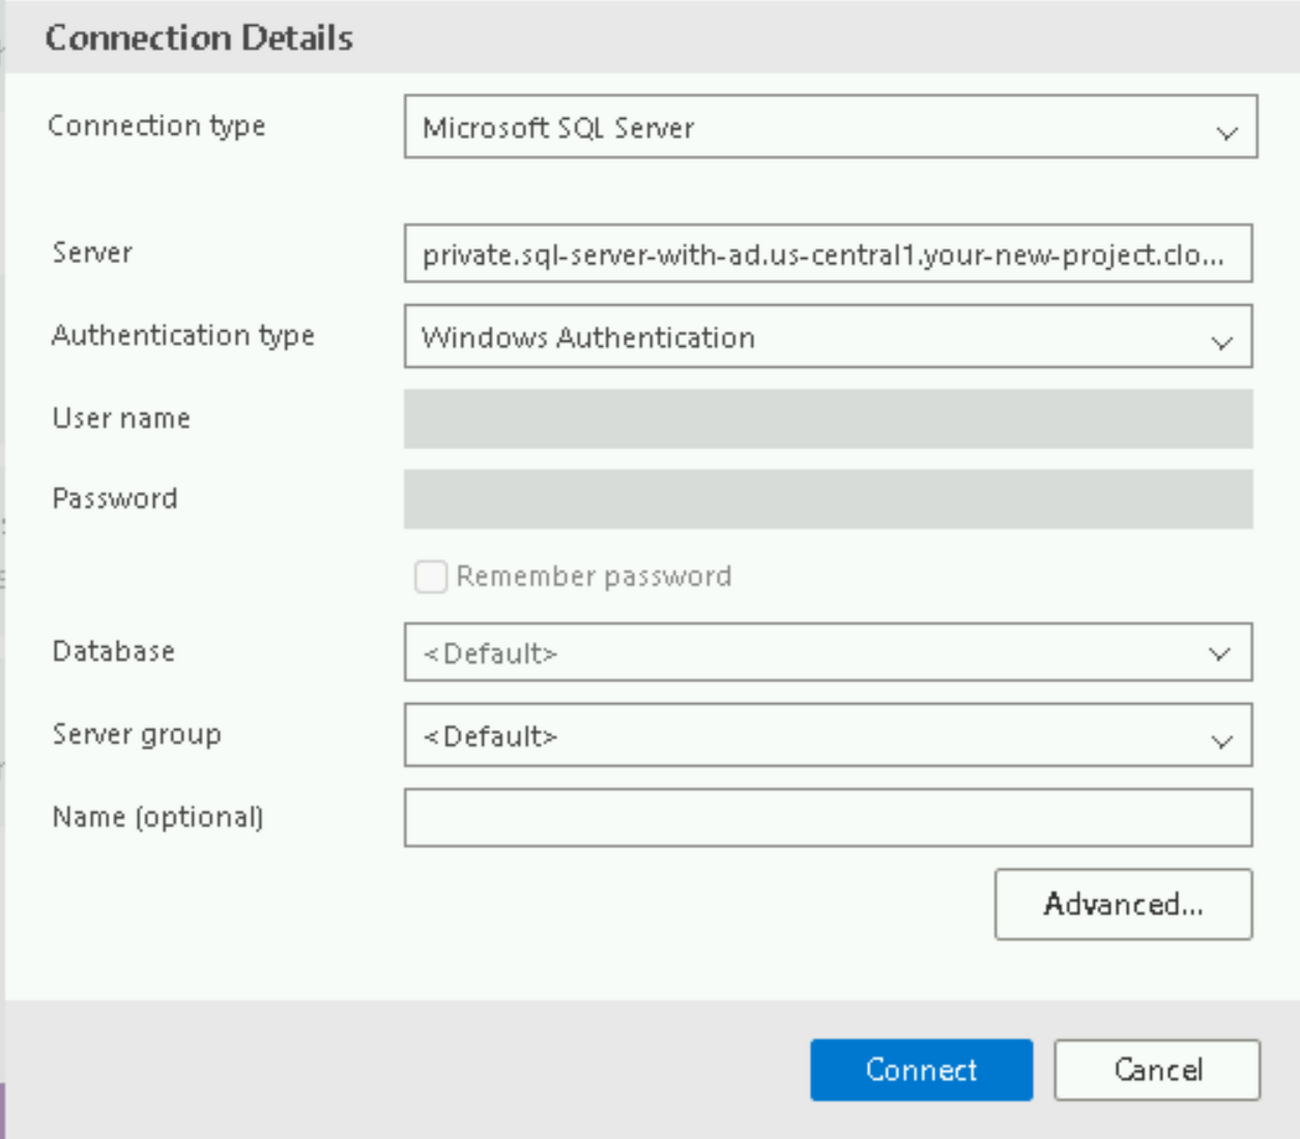
Azure Data Studio のスタートページで、[New connection] リンクをクリックします。
[Server] に関して、Cloud SQL の SQL Server インスタンス詳細ページから [Active Directory FQDN(プライベート)] 値を入力します。
例: private.sql-server-with-ad.us-central1.your-new-project.cloudsql.ad.mydomain.com
認証の種類に関して [Windows Authentication] を選択します。
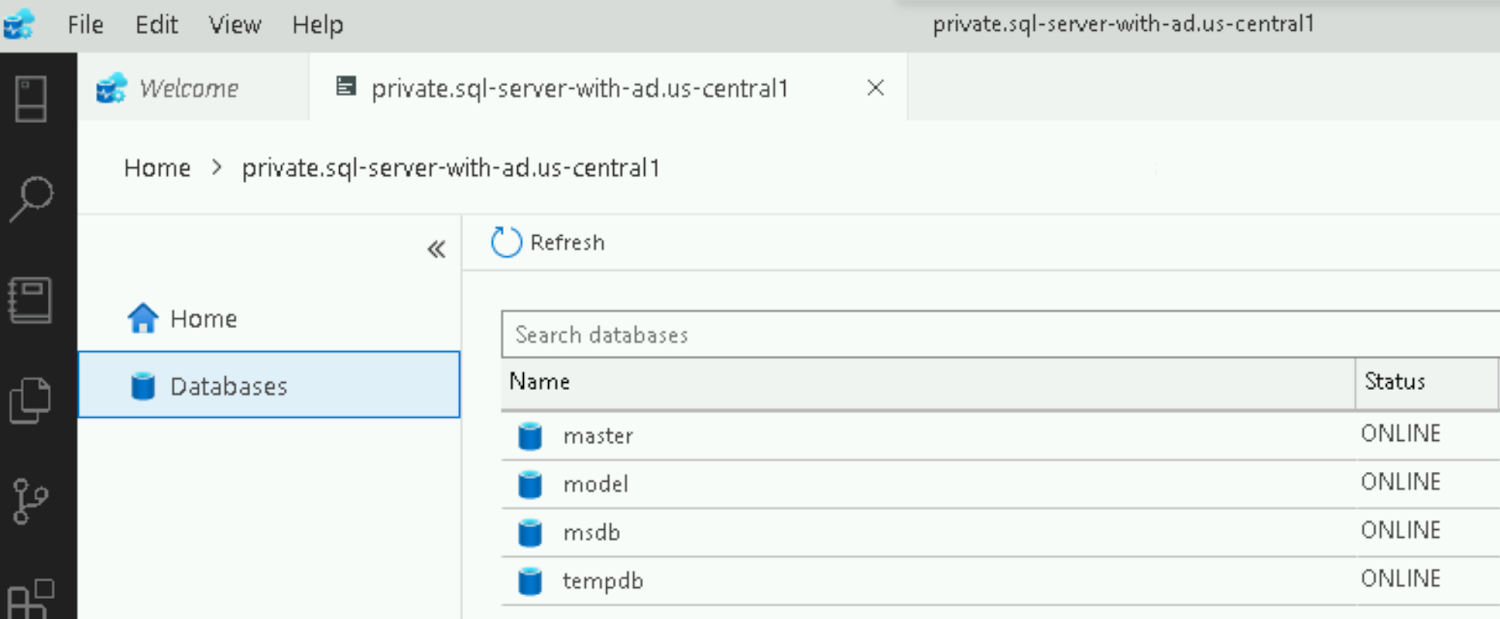
[接続] ボタンをクリックします。これで、Cloud SQL 上の SQL Server が Managed Active Directory と統合されました。
開始方法
Cloud SQL for SQL Server の Windows 認証がすべてのお客様にプレビューでご利用いただけるようになりました。詳細をご確認のうえご利用ください。
-Google Cloud 担当デベロッパー プログラム エンジニア Jonathan Simon