These best practices reflect recommendations shared by a cross-functional team of seasoned Lookers. These insights come from years of experience working with Looker customers from implementation to long-term success. The practices are written to work for most users and situations, but as always use best judgment when implementing.
This page provides administrators of Looker instances with a guided example of setting up content access controls. We will walk through the implementation process, starting with a new project and continuing over models, model sets, permission sets, groups, roles, and user attributes.
First, an analogy to understand the primary Looker features in this context:
A project is like a home.A model is a room in the home that is filled with specific content.
A model set is a group of rooms or a single room (bedrooms, kitchen).
A permission set is an activity checklist, specifying what people can do in a room (eat, play, sleep).
A group is a way to combine people with shared characteristics (adults, kids, guests).
A role is how to give groups of people their activity checklists in different sets of rooms.
A user attribute is a key that opens up special items in the house (teapot, power tools).
Scenario
The following is an example of a startup with finance, sales, and product teams. The CEO is our only admin, and she wants each team to see only the content that is relevant to them, with the exception that each team's VP should have access to all teams' content. She wants different feature access for standard employees, managers, and VPs.
- Standard employees should be able to view and explore data in their own models.
- Managers should have standard access and also be able to download and schedule content.
- VPs should have almost all privileges, except for a few reserved for just the CEO.
The CEO wants salespeople to be able to view the data for their their own activities, but not be able to view another salesperson's individual sales numbers. However, sales managers should be able to view every salesperson's numbers. And finally, there are some finance fields with sensitive information that she wants masked for the standard employees using that model.
The organizational chart is below:
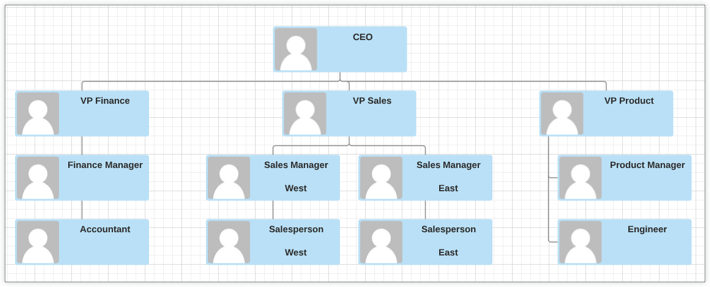
The chart above reveals the following organizational structure for our example startup:
- CEO
- VP of Finance
- Finance Manager
- Accountant
- VP of Sales
- Sales Manager West
- Salesperson West
- Sales Manager East
- Salesperson East
- VP of Product
- Product Manager
- Engineer
Implementing the desired access controls will involve the following steps:
- Create a project: A project is the structural link between a database connection and data models.
- Add models: Decide what data will be revealed to which users.
- Create model sets: Group relevant models together.
- Create permission sets: Explicitly define the actions users can take within a model set.
- Create groups: Bucket similar users together.
- Create roles: Create the connections between model sets, permission sets, and groups.
- Edit content access: Manage which dashboards and Looks users can view via folders.
- Add data filters: Further filter the data that specific users can access within a model.
1. Create a project
The first thing we need is a project, which is a container for one or more models. If you already have a project set up, you can skip this step. Otherwise, you can navigate to the LookML Projects page by selecting Projects in the Develop section of Looker and selecting New LookML Project to create a new project. For more detailed instructions on creating a new project, see the Creating a new LookML project documentation page.
On the New Project page, we'll create a project with the following settings:

- In the Name section, we give the project a name.
- In the Starting Point section, we select Generate Model from Database Schema.
- In the Connection drop-down menu, we select the name of our database connection.
- In the Build Views From section, for this example, we select the All Tables option so that the LookML generator creates a view file for each table in your database.
Once the desired settings for the new project have been configured, we select Create Project.
Upon creating a project, you'll be brought to the project's auto-generated LookML model. At this point, you'll need to use the Configure Git button to set up version control for the project. Detailed instructions on setting up version control are on the Setting up and testing a Git connection documentation page.
2. Add models
A data model is like a customizable portal into the database. Each model may expose different data to users. In our example, our salespeople need different data than our engineers do, so we'll add separate models to expose the appropriate information from the database to each kind of user.
In our LookML project, we'll add new LookML model files with the names of each of our desired models (finance, sales, and product). Make sure to define at least one Explore in each model file; this will allow us to select the model when creating model sets (otherwise, they won't show up in the selection). For additional reference on how to use the explore parameter in your model file, see the Understanding model and view files documentation page.
Once we have successfully added the models, we will still need to configure them. To configure the models, we'll go back to the Projects page in the Develop section, which should now show red text reading "Configuration required for use" inline with each model name.

Next to each model, select Configure. We will make sure our project name is correct, along with the connections we will allow this model to use, then save.
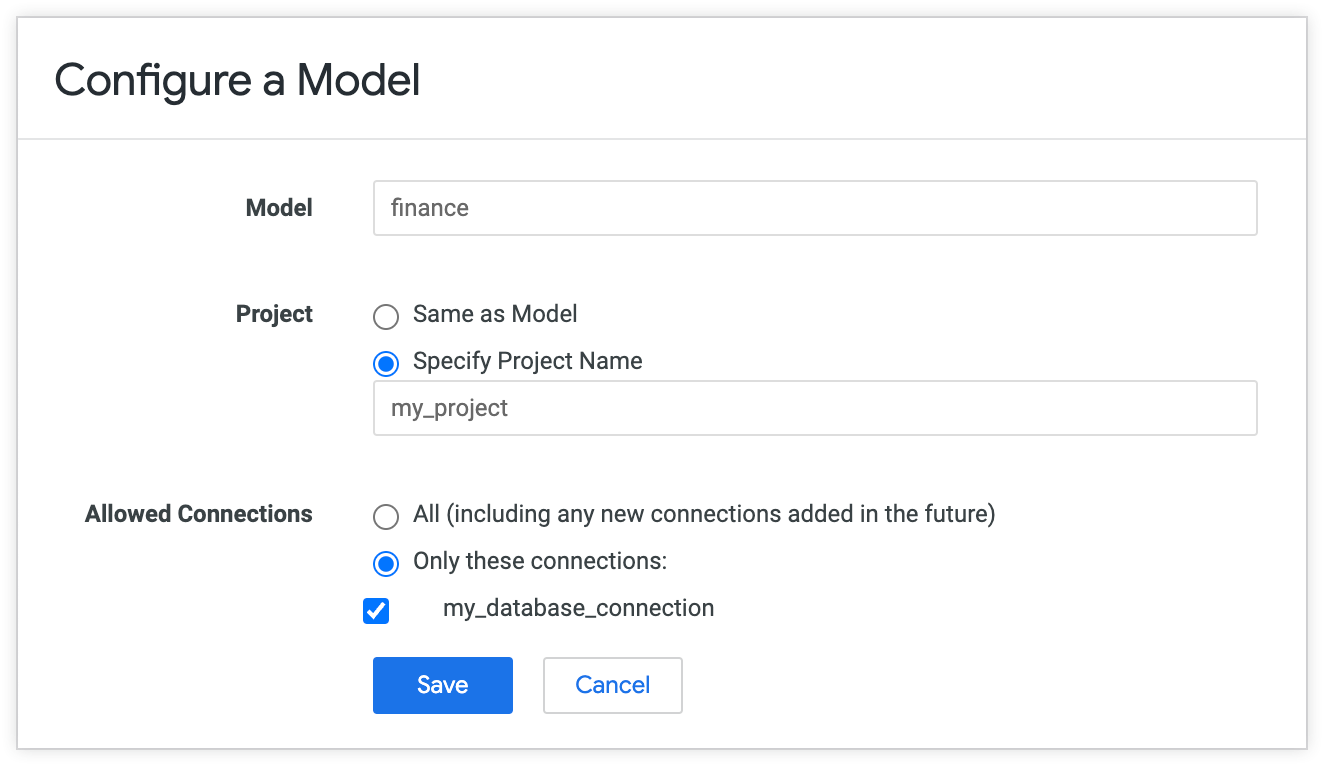
After all the models are configured correctly, the red configuration issue messages we encountered previously will no longer appear.

Remember that in Looker, granting a user the see_lookml or develop permission on one model grants them that permission for all models in that project. Therefore, you should make separate projects if you want to partition permission to view or develop LookML. Otherwise, you should just create a new model. Model permissions are sufficient to ensure that only certain people can query certain data.
For more on permissions, check out our documentation on roles.
3. Create model sets
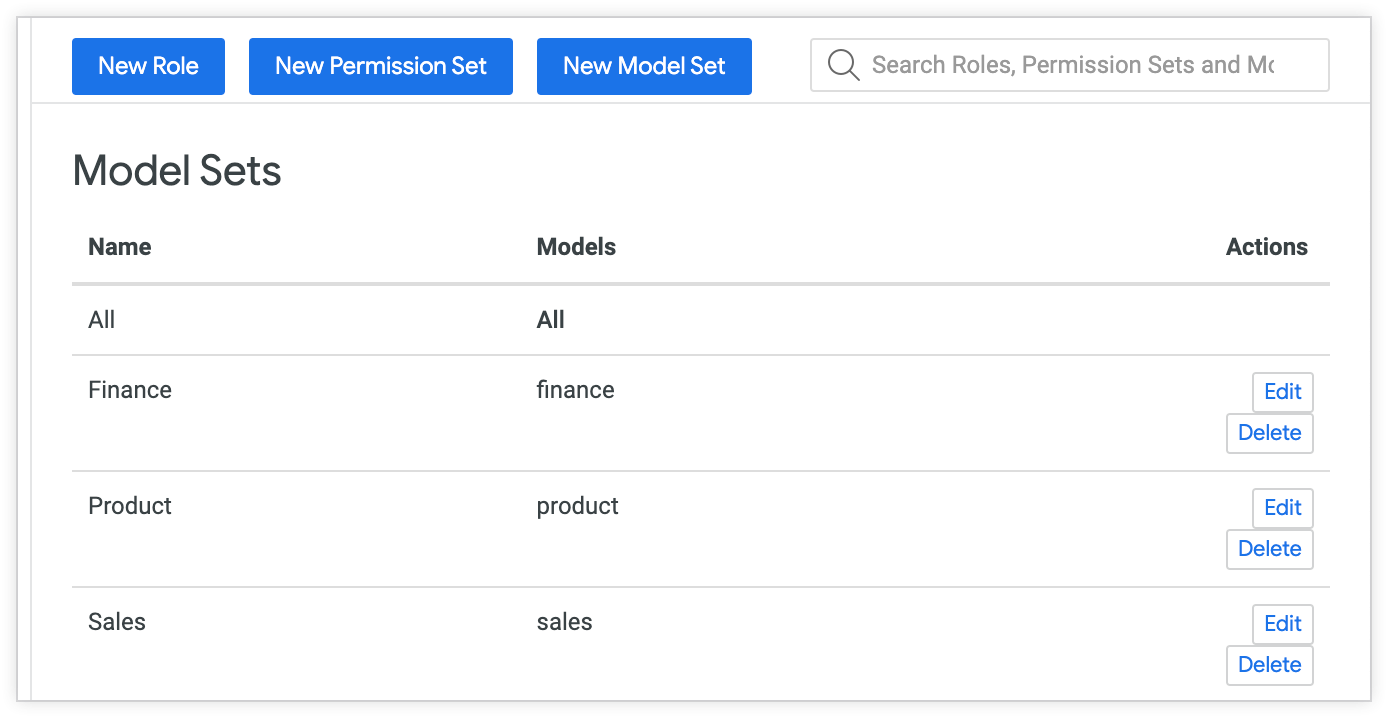
Now that the data models for each department have been configured, we'll add the corresponding model for each department into the model sets we build. To create new model sets, we'll navigate to the Roles page in the Admin panel and select New Model Set. For further instructions on creating new model sets, see the Roles documentation page.
Once the new model sets have been created, they will be displayed in the Model Sets section of the Roles page, as in the following example screenshot:
4. Create permission sets
Next, we will create permission sets using the model sets we have just made. As mentioned when we set up the scenario, we want four tiers of permissions corresponding with the four hierarchical levels in the organization chart, and higher tiers should include the permissions for the tiers below. In our scenario we'll identify the permission sets as follows:
- The CEO has the Admin permission set.
- VPs have the Limited Admin permission set.
- Managers have the Download and Share permission set.
- Standard employees have the View and Explore permission set.
To create new permission sets, we'll navigate to the Roles page in the Admin panel and select New Permission Set. For each permission tier, we'll select the appropriate permissions. In general, permission sets should overlap as little as possible, with each set adding only the specific permissions we want the users with this permission set to have. This is because we will be giving some users multiple permission sets, and we want to know exactly what each permission set allows. However, because of the tree structure, some overlap is often necessary.
In our example, we want the View and Explore permission set to allow users to view content, ask questions, and save useful tiles. So, we'll give them permissions associated with seeing content (such as see_looks and see_user_dashboards), the explore permission, and the save_content permission. The notable exceptions here are see_lookml which we may only want for developers, and see_sql, which we reserve for those who both understand SQL and are trusted to view the database structure. All of these permissions are strictly under the access_data branch. We are not giving any of the see permissions at the bottom of the tree, because they are administrative permissions.

For the Download and Share permission set, we'll add the permissions associated with downloading, scheduling, sharing, creating public Looks (which allows sharing of Looks to non-Looker users), and see_schedules (because they can create schedules, it's logical that they can also view them in the Admin panel).

The only fields that have been selected when configuring both the View and Explore and the Download and Share permission sets are the parent permissions required to select the added child permissions under the access_data branch. Therefore, since users with the Download and Share permission set will also have the View and Explore permission set, it is not necessary to include permissions like see_lookml_dashboards, see_user_dashboards, and explore in the Download and Share permission set, since these permissions do not contain any child permissions that are needed for the Download and Share permission set.
Finally, for our Limited Admin permission set, we'll add most of the administrative permissions at the bottom of the tree, excluding the manage_models and sudo privileges that the CEO wants only for herself. That looks like this:

When it's all done, the permission sets will include the following permissions:
- Admin: The Admin permission set, which is reserved for the CEO of our example company, includes all permissions.
- Limited Admin: The Limited Admin permission set includes the
create_prefetches,login_special_email,manage_homepage,manage_spaces,see_alerts,see_datagroups,see_logs,see_pdts,see_queries,see_users, andupdate_datagroupspermissions. - Download and Share: The Download and Share permission set includes the
access_data,create_public_looks,download_with_limit,download_without_limit,save_content,schedule_external_look_emails,schedule_look_emails,see_looks,see_schedules,send_outgoing_webhook,send_to_s3, andsend_to_sftppermissions. - View and Explore: The View and Explore permission set includes the
access_data,create_table_calculations,explore,save_content,see_drill_overlay,see_lookml_dashboards,see_looks, andsee_user_dashboardspermissions.
You can view the permissions that belong to an existing permission set by navigating to the Permission Sets section of the Roles admin page.
5. Create groups
The next step is to create the groups and bucket our users. We will create groups for both standard employees and managers in each department, because these will eventually match the different roles we later create. VPs will be in their own group and the CEO doesn't need a group. When completed, the Groups page should list the following groups and their corresponding group IDs, which are automatically generated by Looker. For example:
| ID | Name |
|---|---|
| 1 | All Users |
| 3 | Finance |
| 4 | Sales |
| 5 | Product |
| 7 | Sales Manager |
| 8 | Product Manager |
| 9 | Finance Manager |
| 10 | VPs |
With the groups created, we'll need to add users into those groups. For instructions on adding users to groups, see the Groups documentation page.
When adding users to the groups we have created, remember that because of the way we have structured permissions, the higher-tier groups may be included in the lower-tier groups. For example, we want the VPs in the Finance group, but we do not want the Sales Managers in the Product group. An efficient way to approach this is to start by adding users to the higher-tier groups (like VPs), so we can add them as a group to the lower tiers.
6. Create roles
Now that we have our model sets, permission sets, and groups in place, we can put them all together using roles. Every role will have a single permission set and a single model set, and may include one or more groups. Because roles must include a model set, we'll again create roles both for standard employees and for managers for each department.
- Standard roles: Standard roles will include the View and Explore permission set, along with the corresponding model set. Assign standard roles to the standard and manager groups for that department, and to the VP. For example, assign the Standard Finance role to the Finance and Finance Manager groups, and to the VP of Finance.
- Manager roles:Manager roles will have the Download and Share permission set, along with the corresponding model set. These roles should be assigned to the manager group for the corresponding department, and to the department's VP.
- Manager roles:Manager roles will have the Download and Share permission set, along with the corresponding model set. These roles should be assigned to the manager group for the corresponding department, and to the department's VP.
- VP role: The VP role will have the Limited Admin permission set and the All model set. This role will be assigned to the VPs group.
7. Edit content access
The next step is to organize our folder access permissions so that each group has access to their own (and only their own) content. Here is the layout of folders in our example instance, which can be viewed by navigating to the Content Access page in the Admin panel:
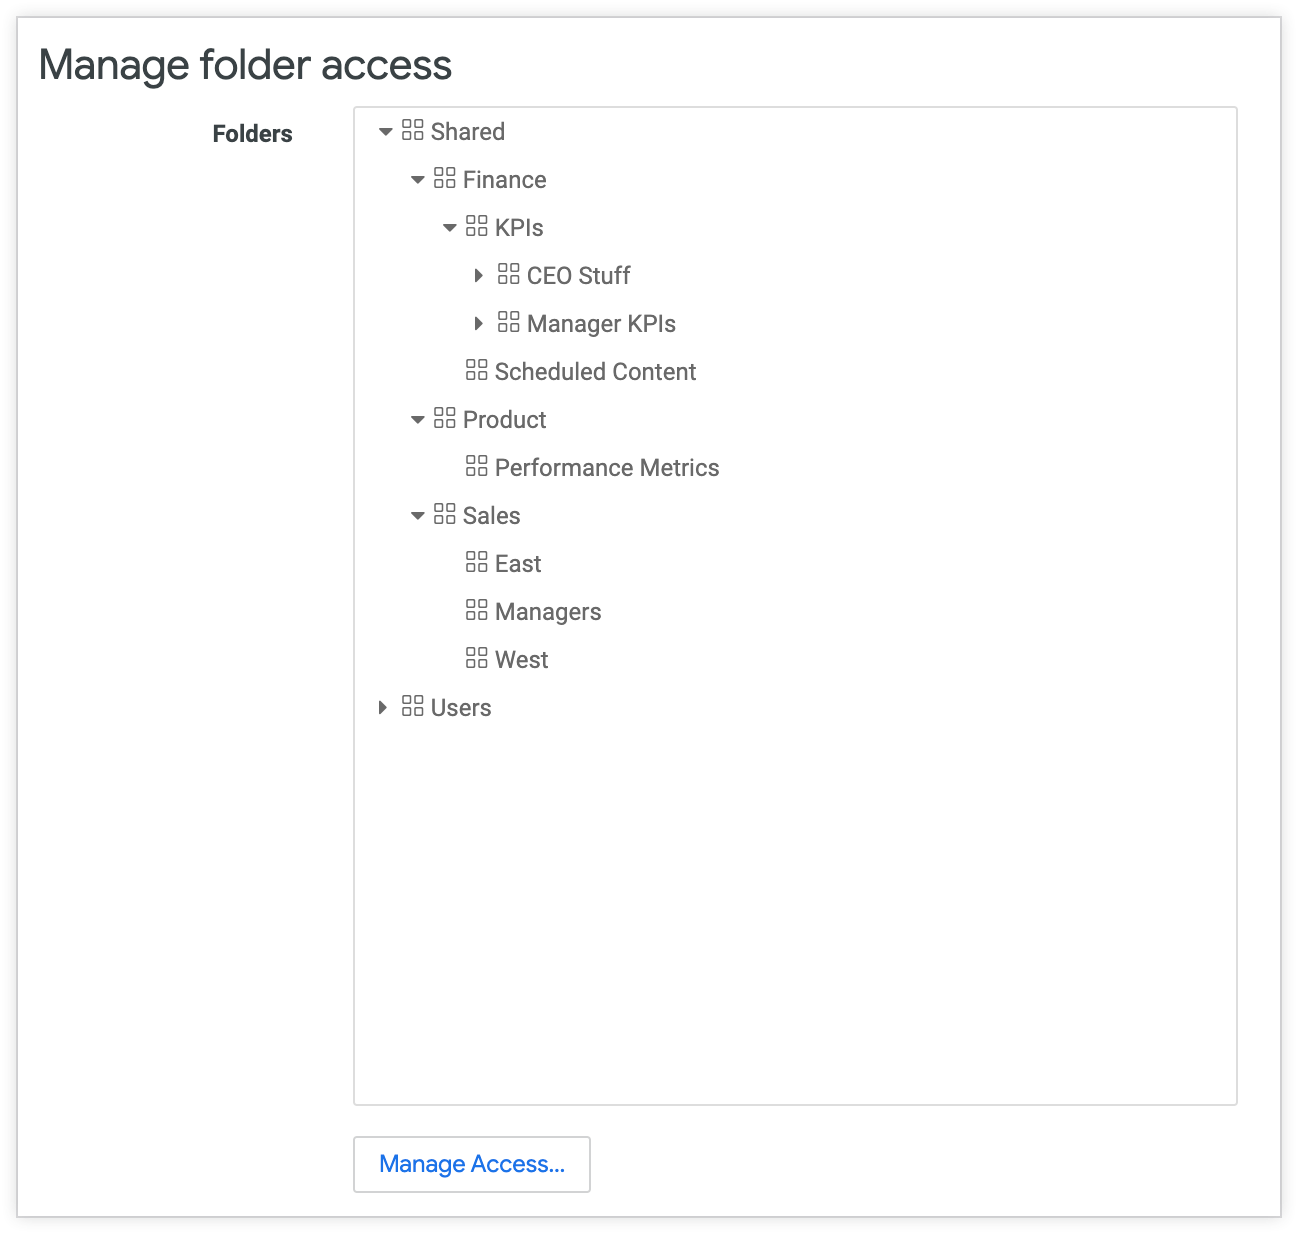
Access to folders follows the rules of hierarchical inheritance. For more information on how this works, check out our documentation on access levels and on access control and permission management.
Following the rules for folder access, we want to give View access to all users in the Shared folder. We'll give each group View access to the parent folders in the tree above the folders that the group will have access to. This way, as we traverse down the tree, if we don't want a group to see a folder, we won't include that group when giving access.
We can give the Manage Access, Edit access level to groups in a folder where we want to control who sees that folder. In our example, we only want the CEO and VPs to have those permissions; everyone else will only have View access to the folders they need.
8. Add data access restrictions with user attributes
This section shows methods for preventing specific users from accessing particular rows or columns of data from a model they have access to. Remember, our CEO wants salespeople to be able to view the data for their own individual activities, but not others' activities. Sales managers, however, should be able to view every salesperson's numbers. To do this, we'll leverage user attributes and the sql_always_where parameter.
Create user attributes
First, we will create a new user attribute called access_level that is hidden from users. This will allow us to define access tiers for the different groups we have. We will set the following values when creating our user attribute:
- Name:
access_level - Label: Access Level
- Data Type: String
- User Access: Edit
- Hide Values: No
In our example, we'll leave the Set a default value box unchecked.
While creating the field, we'll configure three levels of access: Basic, Premium, and Full. We'll assign those levels to the standard, manager, and VP groups, respectively. This is done under the Group Values tab in the same section. See the Assigning values to user groups section of the User attributes documentation for more details.
Because the order of these rules matters, we want to place the highest access values at the top of the list, to override the lower access values toward the bottom. This behavior is further explained on our User attributes documentation page.
Filtering row data with user attributes
We will imagine that there is already an Explore being built with all the sales information in it. We will check the access level of the user querying the Explore; if the access level is Basic (which we've given to all our standard salespeople) then we'll always filter the Explore on the user's name, so only each salesperson's own rows are accessible to them. If the access level is Premium or Full, then the query will not get filtered. By default, we have a user attribute called Name which is the name of the Looker user. The LookML for the Explore will look like this:
explore: sales_info {
  sql_always_where: {% if {{_user_attributes['access_level']}} == "Basic" %}
    ${sales_info.name} = "{{_user_attributes['name']}}"
    % endif %
  ;;
}
Filtering column data with user attributes
Lastly, there are some PII (personally identifiable information) columns in the finance model that we want to hide from some of our users as well. To do this, we can use the user attributes we've created, along with the instructions for applying database-level permissions in Looker on the User attributes documentation page, to give only users with the Full access level the ability to see the PII fields.
And we are done! We have finished setting up our content and data access controls and all of our users are free to explore Looker. By doing this we can be assured that they'll only see the content that we've allowed them to see.