Mit der Funktion zur Erkennung von Sehenswürdigkeiten können Sie bekannte natürliche oder von Menschen erschaffene Strukturen in einem Bild erkennen.
Anfragen zur Erkennung von Sehenswürdigkeiten
Google Cloud Projekt und Authentifizierung einrichten
Wenn Sie noch kein Google Cloud Projekt erstellt haben, tun Sie dies jetzt. Maximieren Sie diesen Abschnitt, um die Anleitung einzublenden.
-
In the Google Cloud console, on the project selector page, select or create a Google Cloud project.
Roles required to select or create a project
- Select a project: Selecting a project doesn't require a specific IAM role—you can select any project that you've been granted a role on.
-
Create a project: To create a project, you need the Project Creator
(
roles/resourcemanager.projectCreator), which contains theresourcemanager.projects.createpermission. Learn how to grant roles.
-
Verify that billing is enabled for your Google Cloud project.
-
Enable the Vision API.
Roles required to enable APIs
To enable APIs, you need the Service Usage Admin IAM role (
roles/serviceusage.serviceUsageAdmin), which contains theserviceusage.services.enablepermission. Learn how to grant roles. -
Install the Google Cloud CLI.
-
Konfigurieren Sie die gcloud CLI für die Verwendung Ihrer föderierten Identität.
Weitere Informationen finden Sie unter Mit Ihrer föderierten Identität in der gcloud CLI anmelden.
-
Führen Sie folgenden Befehl aus, um die gcloud CLI zu initialisieren:
gcloud initSehenswürdigkeiten in einem lokalen Bild erkennen
Sie können die Vision API für die Erkennung von Features in einer lokalen Bilddatei verwenden.
Senden Sie bei REST-Anfragen den Inhalt der Bilddatei als base64-codierten String im Text Ihrer Anfrage.
Geben Sie für Anfragen mit
gcloudund Clientbibliotheken den Pfad zu einem lokalen Bild in Ihrer Anfrage an.REST
Ersetzen Sie folgende Werte in den Anfragedaten:
- BASE64_ENCODED_IMAGE: die Base64-Darstellung (ASCII-String) der Binärbilddaten. Dieser String sollte in etwa so aussehen:
/9j/4QAYRXhpZgAA...9tAVx/zDQDlGxn//2Q==
- RESULTS_INT: (optional) ein ganzzahliger Wert der Ergebnisse, die zurückgegeben werden sollen. Wenn Sie das Feld
"maxResults"und seinen Wert weglassen, gibt die API den Standardwert von 10 Ergebnissen zurück. Dieses Feld gilt nicht für die folgenden Featuretypen:TEXT_DETECTION,DOCUMENT_TEXT_DETECTIONoderCROP_HINTS. - PROJECT_ID: Ihre Google Cloud Projekt-ID
HTTP-Methode und URL:
POST https://vision.googleapis.com/v1/images:annotate
JSON-Text der Anfrage:
{
  "requests": [
    {
      "image": {
        "content": "BASE64_ENCODED_IMAGE"
      },
      "features": [
        {
          "maxResults": RESULTS_INT,
          "type": "LANDMARK_DETECTION"
        },
      ]
    }
  ]
}
Wenn Sie die Anfrage senden möchten, wählen Sie eine der folgenden Optionen aus:
curl
Speichern Sie den Anfragetext in einer Datei mit dem Namen
request.jsonund führen Sie den folgenden Befehl aus:curl -X POST \
-H "Authorization: Bearer $(gcloud auth print-access-token)" \
-H "x-goog-user-project: PROJECT_ID" \
-H "Content-Type: application/json; charset=utf-8" \
-d @request.json \
"https://vision.googleapis.com/v1/images:annotate"PowerShell
Speichern Sie den Anfragetext in einer Datei mit dem Namen
request.jsonund führen Sie den folgenden Befehl aus:$cred = gcloud auth print-access-token
$headers = @{ "Authorization" = "Bearer $cred"; "x-goog-user-project" = "PROJECT_ID" }
Invoke-WebRequest `
-Method POST `
-Headers $headers `
-ContentType: "application/json; charset=utf-8" `
-InFile request.json `
-Uri "https://vision.googleapis.com/v1/images:annotate" | Select-Object -Expand ContentWenn die Anfrage erfolgreich ist, gibt der Server den HTTP-Statuscode
200 OKund die Antwort im JSON-Format zurück.Antwort:
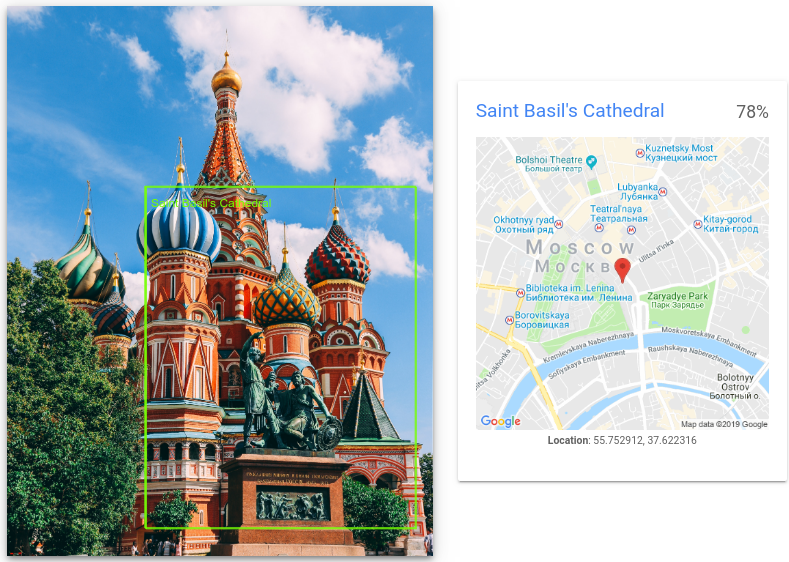
{
  "responses": [
    {
      "landmarkAnnotations": [
        {
          "mid": "/m/014lft",
          "description": "Saint Basil's Cathedral",
          "score": 0.7840959,
          "boundingPoly": {
            "vertices": [
              {
                "x": 812,
                "y": 1058
              },
              {
                "x": 2389,
                "y": 1058
              },
              {
                "x": 2389,
                "y": 3052
              },
              {
                "x": 812,
                "y": 3052
              }
            ]
          },
          "locations": [
            {
              "latLng": {
                "latitude": 55.752912,
                "longitude": 37.622315883636475
              }
            }
          ]
        }
      ]
    }
  ]
}
Go
Bevor Sie dieses Beispiel ausprobieren, folgen Sie der Einrichtungsanleitung für Go in der Vision-Kurzanleitung zur Verwendung von Clientbibliotheken. Weitere Informationen finden Sie in der Go-Referenzdokumentation zur Vision API.
Richten Sie zur Authentifizierung bei Vision die Standardanmeldedaten für Anwendungen (ADC) ein. Weitere Informationen finden Sie unter ADC für eine lokale Entwicklungsumgebung einrichten.
Java
Bevor Sie dieses Beispiel ausprobieren, folgen Sie der Einrichtungsanleitung für Java in der Vision API-Kurzanleitung zur Verwendung von Clientbibliotheken. Weitere Informationen finden Sie in der Java-Referenzdokumentation zur Vision API.
Node.js
Bevor Sie dieses Beispiel ausprobieren, folgen Sie der Einrichtungsanleitung für Node.js in der Vision-Kurzanleitung zur Verwendung von Clientbibliotheken. Weitere Informationen finden Sie in der Node.js-Referenzdokumentation zur Vision API.
Richten Sie zur Authentifizierung bei Vision die Standardanmeldedaten für Anwendungen (ADC) ein. Weitere Informationen finden Sie unter ADC für eine lokale Entwicklungsumgebung einrichten.
Python
Bevor Sie dieses Beispiel ausprobieren, folgen Sie der Einrichtungsanleitung für Python in der Vision-Kurzanleitung zur Verwendung von Clientbibliotheken. Weitere Informationen finden Sie in der Python-Referenzdokumentation zur Vision API.
Richten Sie zur Authentifizierung bei Vision die Standardanmeldedaten für Anwendungen (ADC) ein. Weitere Informationen finden Sie unter ADC für eine lokale Entwicklungsumgebung einrichten.
Weitere Sprachen
C#: Folgen Sie der Einrichtungsanleitung für C# auf der Seite der Clientbibliotheken und rufen Sie dann die Vision-Referenzdokumentation für .NET auf.
PHP: Folgen Sie der Einrichtungsanleitung für PHP auf der Seite der Clientbibliotheken und rufen Sie dann die Vision-Referenzdokumentation für PHP auf.
Ruby: Folgen Sie der Einrichtungsanleitung für Ruby auf der Seite der Clientbibliotheken und rufen Sie dann die Vision-Referenzdokumentation für Ruby auf.
Sehenswürdigkeiten in einem Remote-Bild erkennen
Sie können die Vision API für die Erkennung von Features in einer Remote-Bilddatei verwenden, die sich in Cloud Storage oder im Web befindet. Zum Senden einer Remote-Dateianfrage geben Sie die URL oder den Cloud Storage-URI der Datei im Anfragetext an.
REST
Ersetzen Sie folgende Werte in den Anfragedaten:
- CLOUD_STORAGE_IMAGE_URI: der Pfad zu einer gültigen Bilddatei in einem Cloud Storage-Bucket. Sie müssen zumindest Leseberechtigungen für die Datei haben.
Beispiel:
gs://cloud-samples-data/vision/landmark/st_basils.jpeg
- RESULTS_INT: (optional) ein ganzzahliger Wert der Ergebnisse, die zurückgegeben werden sollen. Wenn Sie das Feld
"maxResults"und seinen Wert weglassen, gibt die API den Standardwert von 10 Ergebnissen zurück. Dieses Feld gilt nicht für die folgenden Featuretypen:TEXT_DETECTION,DOCUMENT_TEXT_DETECTIONoderCROP_HINTS. - PROJECT_ID: Ihre Google Cloud Projekt-ID
HTTP-Methode und URL:
POST https://vision.googleapis.com/v1/images:annotate
JSON-Text der Anfrage:
{
  "requests": [
    {
      "image": {
        "source": {
          "gcsImageUri": "CLOUD_STORAGE_IMAGE_URI"
        }
      },
      "features": [
        {
          "maxResults": RESULTS_INT,
          "type": "LANDMARK_DETECTION"
        },
      ]
    }
  ]
}
Wenn Sie die Anfrage senden möchten, wählen Sie eine der folgenden Optionen aus:
curl
Speichern Sie den Anfragetext in einer Datei mit dem Namen
request.jsonund führen Sie den folgenden Befehl aus:curl -X POST \
-H "Authorization: Bearer $(gcloud auth print-access-token)" \
-H "x-goog-user-project: PROJECT_ID" \
-H "Content-Type: application/json; charset=utf-8" \
-d @request.json \
"https://vision.googleapis.com/v1/images:annotate"PowerShell
Speichern Sie den Anfragetext in einer Datei mit dem Namen
request.jsonund führen Sie den folgenden Befehl aus:$cred = gcloud auth print-access-token
$headers = @{ "Authorization" = "Bearer $cred"; "x-goog-user-project" = "PROJECT_ID" }
Invoke-WebRequest `
-Method POST `
-Headers $headers `
-ContentType: "application/json; charset=utf-8" `
-InFile request.json `
-Uri "https://vision.googleapis.com/v1/images:annotate" | Select-Object -Expand ContentWenn die Anfrage erfolgreich ist, gibt der Server den HTTP-Statuscode
200 OKund die Antwort im JSON-Format zurück.Antwort:
{
  "responses": [
    {
      "landmarkAnnotations": [
        {
          "mid": "/m/014lft",
          "description": "Saint Basil's Cathedral",
          "score": 0.7840959,
          "boundingPoly": {
            "vertices": [
              {
                "x": 812,
                "y": 1058
              },
              {
                "x": 2389,
                "y": 1058
              },
              {
                "x": 2389,
                "y": 3052
              },
              {
                "x": 812,
                "y": 3052
              }
            ]
          },
          "locations": [
            {
              "latLng": {
                "latitude": 55.752912,
                "longitude": 37.622315883636475
              }
            }
          ]
        }
      ]
    }
  ]
}
Go
Bevor Sie dieses Beispiel ausprobieren, folgen Sie der Einrichtungsanleitung für Go in der Vision-Kurzanleitung zur Verwendung von Clientbibliotheken. Weitere Informationen finden Sie in der Go-Referenzdokumentation zur Vision API.
Richten Sie zur Authentifizierung bei Vision die Standardanmeldedaten für Anwendungen (ADC) ein. Weitere Informationen finden Sie unter ADC für eine lokale Entwicklungsumgebung einrichten.
Java
Bevor Sie dieses Beispiel ausprobieren, folgen Sie der Einrichtungsanleitung für Java in der Vision-Kurzanleitung zur Verwendung von Clientbibliotheken. Weitere Informationen finden Sie in der Java-Referenzdokumentation zur Vision API.
Richten Sie zur Authentifizierung bei Vision die Standardanmeldedaten für Anwendungen (ADC) ein. Weitere Informationen finden Sie unter ADC für eine lokale Entwicklungsumgebung einrichten.
Node.js
Bevor Sie dieses Beispiel ausprobieren, folgen Sie der Einrichtungsanleitung für Node.js in der Vision-Kurzanleitung zur Verwendung von Clientbibliotheken. Weitere Informationen finden Sie in der Node.js-Referenzdokumentation zur Vision API.
Richten Sie zur Authentifizierung bei Vision die Standardanmeldedaten für Anwendungen (ADC) ein. Weitere Informationen finden Sie unter ADC für eine lokale Entwicklungsumgebung einrichten.
Python
Bevor Sie dieses Beispiel ausprobieren, folgen Sie der Einrichtungsanleitung für Python in der Vision-Kurzanleitung zur Verwendung von Clientbibliotheken. Weitere Informationen finden Sie in der Python-Referenzdokumentation zur Vision API.
Richten Sie zur Authentifizierung bei Vision die Standardanmeldedaten für Anwendungen (ADC) ein. Weitere Informationen finden Sie unter ADC für eine lokale Entwicklungsumgebung einrichten.
gcloud
Verwenden Sie für die Erkennung von Sehenswürdigkeiten den Befehl
gcloud ml vision detect-landmarks, wie im folgenden Beispiel gezeigt:gcloud ml vision detect-landmarks gs://cloud-samples-data/vision/landmark/st_basils.jpeg
Weitere Sprachen
C#: Folgen Sie der Einrichtungsanleitung für C# auf der Seite der Clientbibliotheken und rufen Sie dann die Vision-Referenzdokumentation für .NET auf.
PHP: Folgen Sie der Einrichtungsanleitung für PHP auf der Seite der Clientbibliotheken und rufen Sie dann die Vision-Referenzdokumentation für PHP auf.
Ruby: Folgen Sie der Einrichtungsanleitung für Ruby auf der Seite der Clientbibliotheken und rufen Sie dann die Vision-Referenzdokumentation für Ruby auf.
Jetzt ausprobieren
Probieren Sie die Erkennung von Sehenswürdigkeiten jetzt aus. Sie können das bereits angegebene Bild verwenden (
gs://cloud-samples-data/vision/landmark/st_basils.jpeg) oder stattdessen ein eigenes Bild angeben. Wählen Sie zum Senden der Anfrage Ausführen aus.
Bildnachweis: Nikolay Vorobyev auf Unsplash. Anfragetext:
{ "requests": [ { "features": [ { "maxResults": 10, "type": "LANDMARK_DETECTION" } ], "image": { "source": { "imageUri": "gs://cloud-samples-data/vision/landmark/st_basils.jpeg" } } } ] } - BASE64_ENCODED_IMAGE: die Base64-Darstellung (ASCII-String) der Binärbilddaten. Dieser String sollte in etwa so aussehen: