Recommendations AI data ingestion
Eric Larson
Technical Solutions Consultant
In our previous post, we presented a high-level picture of Recommendations AI, showing how the product is typically used. In this post, we’ll take a deep dive into the first step of getting started, which is data ingestion. This post will answer all your questions on getting your data into Recommendations AI so you can train models and get recommendations.
Recommendations AI uses your product catalog and user events to create machine learning models and deliver personalized product recommendations to your customers. Essentially, Recommendations AI uses a list of items available to be recommended (product catalog) and user's interactions with those products (events), allowing you to create various types of models (algorithms specifically designed for your data) to generate predictions based on business objectives (conversion rate, click through rate, revenue).
Recommendations AI is now part of the Retail API which uses the same product catalog and event data for several Google Retail AI products, like Retail Search.
Catalog data
To get started with Recommendations AI, you will first need to upload your data, starting with your complete product catalog. The Retail API catalog is made up of product entries. Take a look at the full Retail Product schema to see what can be included in a product. The schema is shared between all Retail Product Discovery products, so once you upload a catalog it can be used for Recommendations AI and Retail Search. While there are a lot of fields available in the schema, you can start with a small amount of data per product - the minimal required fields are: id, title, categories. We recommend submitting description and price as well as any custom attributes as well.
Catalog levels
Before uploading any products you may also need to determine which product level to use. By default, all products are "primary", but if you have variants in your catalog you may need to change the default ingestion behavior. If your catalog has multiple levels (variants), you need to determine if you want to get recommendations back at the primary (group) level or at the variant (sku) level, and also if the events are sent using the primary id or the variant ids. If you’re using Google Merchant Center, you can easily import your catalog directly (see below). In Merchant Center, the item grouping is done using item_group_id. If you have variants, and you're not ingesting the catalog from Merchant Center, you just need to make sure your primaryProductId is set appropriately and you set ingestionProductType as needed before doing your initial catalog import.
1. Catalog import
There are several ways to import catalog data into Retail API:
a. Merchant Center sync
Many retailers use Google Merchant Center to upload their product catalogs in the form of product feeds. These products can then be used for various types of Google Ads and for other services like Google Shopping and Buy on Google. But another nice feature of Merchant Center is the ability to export your products for use with other services - BigQuery for example.
The Merchant Center product schema is similar to the Retail product schema, so the minimum requirements are met if you do want to use Merchant Center to feed your Retail API product catalog.
The easiest way to import your catalog from Merchant Center is to set up a Merchant Center Sync in the Retail Admin Console:

Simply go to the Data tab and select Import at the top of the screen. Then as the Source of data select Merchant Center Sync. Add your Merchant Center account # and select a branch to sync to.
While this method is easy, there are some limitations. For example, if your Merchant Center catalog is not complete, you won't be able to add more products directly to the Recommendations catalog - you would need to add them to the merchant center feed and they would then get synced to your Recommendations catalog. This may be easier than maintaining a separate feed for Recommendations however, as you can easily add products to your Merchant Center feed and simply leave them out of your Ads destinations if you don't want to use them for Ads & Shopping.
Another limitation of using Merchant Center data is that you may not have all of the attributes that you need for Recommendations AI. Size, Brand, Color are often submitted to Merchant Center, but you may have other data you want to use for Recommendations model data.
Also, you are only able to enable a sync to a catalog branch that has no items. So if you have existing items in the catalog, you would need to delete them all first.
b. Merchant Center import via BigQuery
Another option that provides a bit more flexibility is to export your Merchant Center catalog to BigQuery using the BigQuery Data Transfer Service. You can then bulk import that data from BigQuery directly into the Retail API catalog. You are still somewhat limited by the merchant center schema, but it is possible to add additional products from other sources to your catalog (unlike MC Sync which doesn't allow updating the branch outside of the sync).
The direct Merchant Center sync in a) is usually the simplest option, but if you already have a BigQuery DTS job or want to control exactly when items are imported, then this method may be a good option. You also have the flexibility to use a BigQuery view, so you could limit the import to a subset of the Merchant Center data if necessary – a single language or variant to avoid duplicate items for example. Likewise, you could also use unions or multiple tables to import from different sources as necessary.
c. Google Cloud Storage import
If your catalog resides in a database or if you need to pull product details from multiple sources, doing an import from GCS may be your easiest option. For this option, you simply need to create a text file with one product per line (typically referred to as NDJSON format) in the Retail AI JSON Product Schema. There are a lot of fields in the schema, but you can usually just start with the basics. So a very basic sample to import 2 items from a GCS file might look like this:
d. BigQuery import
Just as you can import products from BQ in the merchant center schema, you can also create a BigQuery table using the Retail product schema. The product schema definition for BigQuery is available here. The Merchant Center Big Query schema can be used whether or not you transfer the data from Merchant Center, but it is not the full schema for retail. It doesn’t include custom attributes for example. So using the Retail Schema allows you to import all possible fields.
Importing from BigQuery is useful if your product catalog is already in BigQuery. You can also create a view that matches the Retail schema, and import from the view, pulling data from existing tables as necessary.
For Merchant Center, Cloud Storage and BigQuery imports, the import itself can be triggered through the Admin Console UI, or via the import API call. When using the API, the schema needs to be specified with the dataSchema attribute as product or product_merchant_center accordingly.
e. API import & product management
You can also import and modify catalog items directly via API. This is useful to make changes to products in realtime for example, or if you want to integrate with an existing catalog management system.
The inline import method is very similar to GCS import: you simply construct a list of products in the Retail Schema format, and call the products.import method API to submit the products. Like with GCS, existing products are overwritten and new products are created. Currently the import method can import up to 100 products per call.
There is also the option to manage products individually with the API, using get, create, patch, and delete methods.
All of the API calls can be done using HTTP/REST or gRPC, but using the retail client libraries for the language of your choice may be the easiest option. The documentation currently has many examples using curl with the REST API, but the client libraries are usually preferred for production use.
2. Live user events
Once your catalog is imported you'll need to start sending user events to the Retail API. Since recommendations are personalized in real-time based on recent activity, user events should be sent in real-time as they are occurring. Typically, you’ll want to start sending live, real-time events and then optionally backfill historical events before training any models.
There are currently 4 event types used by the Recommendations AI models:
Not all models require all of these events, but it is recommended to send all of these if possible.
Note the “minimum required” fields for each event. As with the product schema, the user event schema also has many fields, but only a few are required. A typical event might looks like this:
There are 3 ways you can send live events to Recommendations:
a. Google Tag Manager
If you are already using Google Tag Manager and are integrated with Google Analytics with Enhanced Ecommerce, then this will usually be the easiest way to get real-time events into the Retail API.
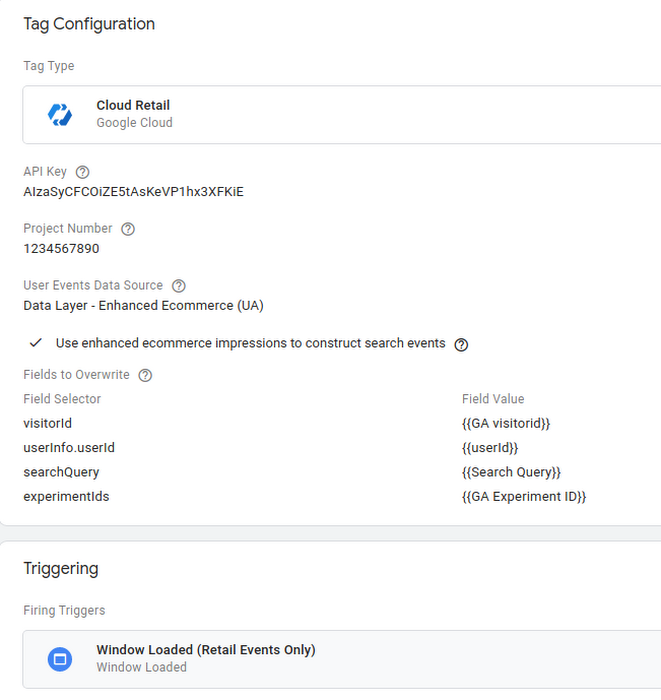
We have provided a Cloud Retail tag in Google Tag Manager that can easily be configured to use the Enhanced Ecommerce data layer, but you can also populate the cloud retail data layer, and use your own variables in GTM to populate the necessary fields. Detailed instructions for setting up the cloud retail tag can be found here. Set up is slightly different depending on if you are using GA360 or regular Google Analytics, but essentially you just need to provide your Retail API key, project number, and then set up a few variable overrides to get visitorId, userId and any other fields that aren’t provided via Enhanced Ecommerce.
The Cloud Retail Tag doesn’t require Google Analytics with Enhanced Ecommerce, but you will need to populate a data layer with the required fields or be able to get the required data fields GTM variables or existing data layer variables. A typical Cloud Retail tag configuration in GTM might look something like this:

b. JavaScript pixel
If you're not currently using Google Tag Manager, an easy alternative is to add our JavaScript pixel to the relevant pages on your site. Usually this would be the home page, product details pages and cart pages.
Configuring this will usually require adding the javascript code along with the correct data to a page template. It may also require some server-side code changes depending on your environment.
c. API write method
As an alternative to GTM or the tracking pixel which sends events directly from the user's browser to the Retail API, you can also opt to send events server-side using the userEvents.write API method. This is usually done by service providers that want to have an existing event handling infrastructure in their platform.
3. Historical events
AI models tend to work best with large amounts of data. There are minimum event requirements for training Recommendations models, but it is usually advised to submit a year's worth of historical data if available. This is especially useful for retailers with high seasonality. For a high-traffic site, you may gather enough live events in a few days to start training a model, even so it's usually a good idea to submit more historical data. You'll get higher quality results without having to wait for events to stream in over weeks or months.
Just like the catalog data, there are several ways to import historical event data:
a. GA360 import
If you are using GA360 with Enhanced Ecommerce tracking you can easily export historical data into BigQuery and then import directly into the Retail API.
Regular Google Analytics does not have an export functionality, but GA360 does. Using this export feature you can easily import historical events from GA360 into Retail API.
b. Google Cloud Storage import
If you have historical events in a database or logs you can also write them out to files in NDJSON format and import those files from Cloud Storage. This is usually the easiest method of importing large number of events, since you simply have to write JSON to text files and then they can be imported directly from Google Cloud Storage.
Just as with catalog import, the lines in each file simply need to be in the correct JSON format, in this case the JSON event format.
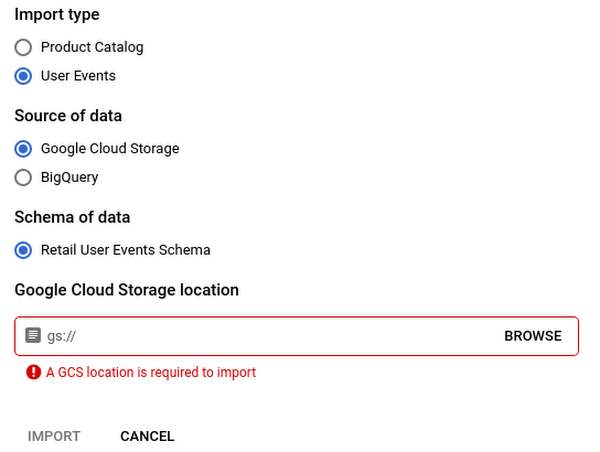
The import can be done with the API, or in the cloud console UI, simply enter the GCS bucket path for your file:

c. BigQuery import
Events can be read directly from BigQuery in the Retail Event Schema or in GA360 Event Schema. This method is useful if you already have events in BigQuery, or prefer to use BigQuery instead of GCS for storage.
Since each event type is slightly different, it may be easiest to create a separate table for each event type.
As with the GCS import, the BigQuery import can also be done using the API or in the cloud console UI by entering the BigQuery table name.

d. API import & write
The userEvents.write method used to do realtime event ingestion via API can also be used to write historical events. But for importing large batches of events the userEvents.import method is usually a better choice since it requires less API calls. The import method should not be used for real-time event ingestion since it may add additional processing latency.
Keep in mind that you should only have to import historical events once, so the events in BigQuery or Cloud Storage can usually be deleted after importing. The Retail API will de-duplicate events that are exactly the same if you do accidentally import the same events.
4. Catalog & event data quality
All of the methods above will return errors if there are issues with the products or events in the request. For the inline and write methods errors will be returned immediately in the API response. For the BigQuery, Merchant Center & Cloud Storage imports error logs can be written to a GCS bucket, and there will be some details in the Admin Console UI. If you look at the Data section in the Retail Admin Console UI there are a number of places to see details about the Catalog data:
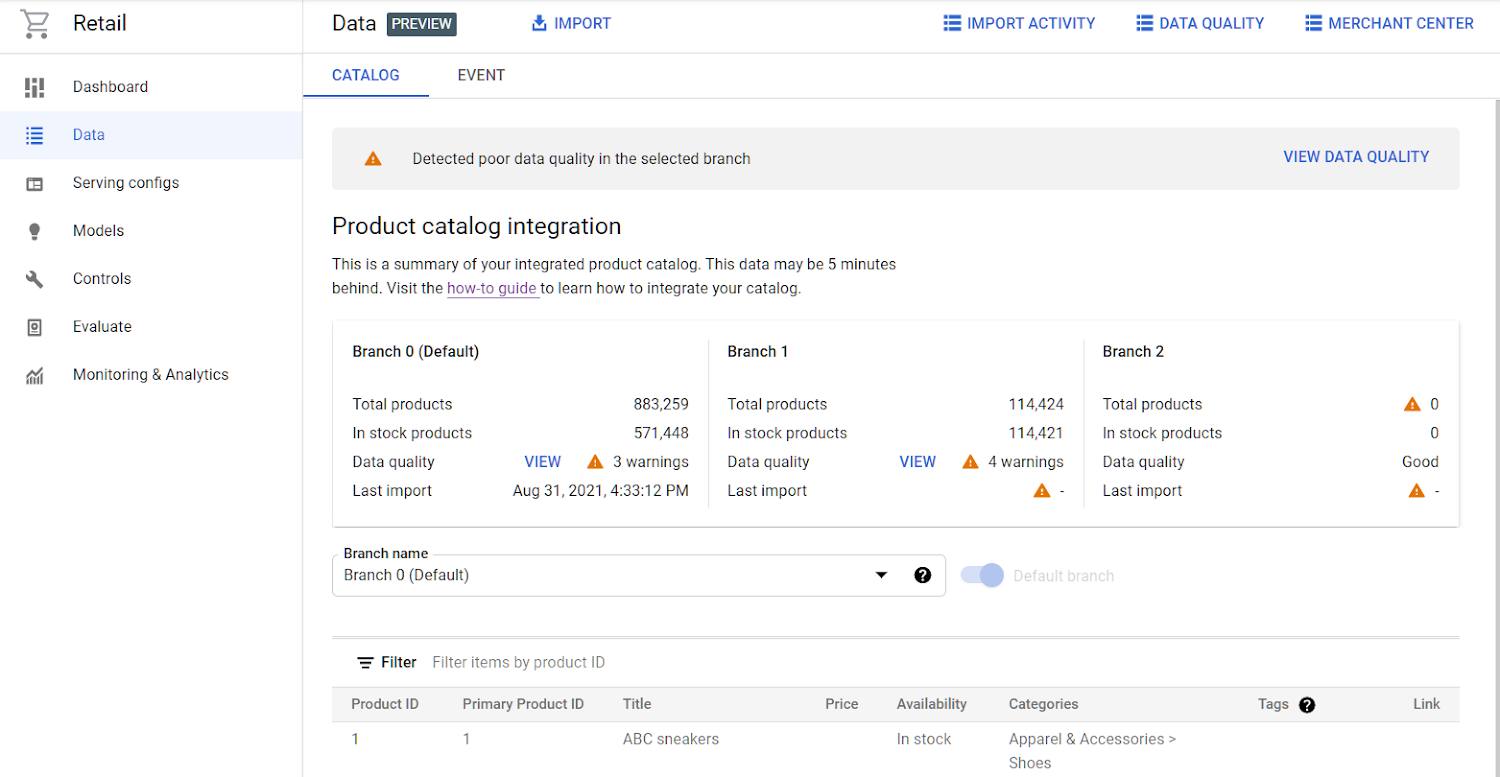

The main Catalog tab shows the overall catalog status. If you click the VIEW link for Data quality you will see some more detailed metrics around key catalog fields:
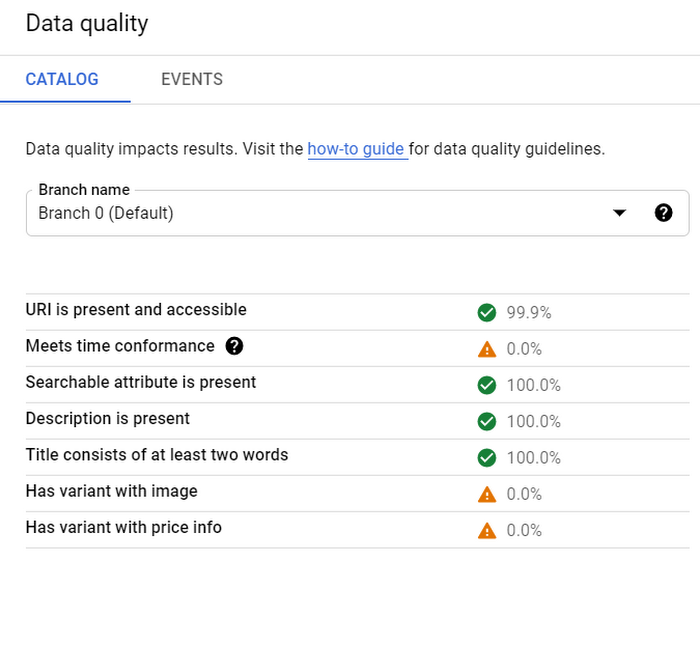

You can also click the Import Activity or Merchant Center links on the top of the page to view the status of the past imports or change your Merchant Center linking (if necessary).
Commonly seen errors
By far the most important metric is "Unjoined Rate". An "unjoined" event is one in which we received an item id that was not in the catalog. This can be caused by numerous factors: outdated catalog, errors in event ingestion implementation, perhaps the events are for variant id's but the catalog only has primary id's, etc. To view the event metrics click on the Data > Event tab:
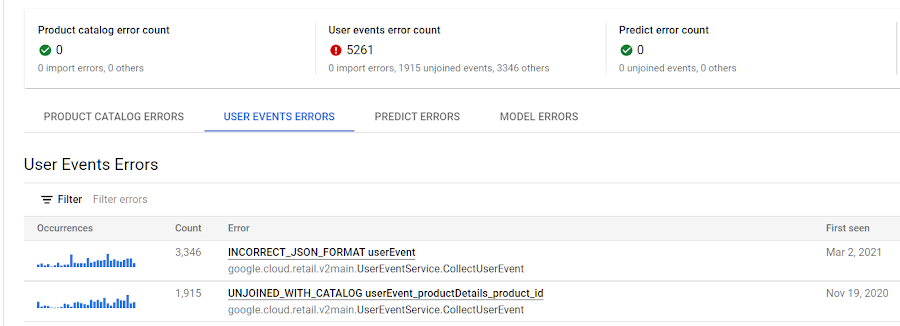

Here you can see various errors over time. Clicking on the error will take you into cloud logging where you can see the full error response and determine exactly why a specific error occurred.
Training models
Once your catalog & events are imported you should be ready to train your first model. Check the Data > Catalog & Data > Event tabs as shown above. If your catalog item count has the correct number of in-stock items for your inventory, the total number of events ingested, unjoined rate, and days with joined events are sufficient, you should be ready to train a model.
Check out post on Recommendations AI modeling for more details!

