Creating custom notifications with Cloud Monitoring and Cloud Run
Dong Wang
Software Engineer
The uniqueness of each organization in the enterprise IT space creates interesting challenges in how they need to handle alerts. With many commercial tools in the IT Service Management (ITSM) market, and lots of custom internal tools, we equip teams with tools that are both flexible and powerful.
This post is for Google Cloud customers who want to deliver Cloud Monitoring alert notifications to third-party services that don’t have supported notification channels.
It provides a working implementation of integrating Cloud Pub/Sub notification channels with the Google Chat service to forward the alert notifications to Google Chat rooms and demonstrates how this is deployed on Google Cloud. Moreover, it outlines steps for continuous integration using Cloud Build, Terraform, and GitHub. All the source code for this project can be found in this GitHub repository.
It is worth noting that the tutorial provides a generic framework that can be adapted by Google Cloud customers to deliver alert notifications to any 3rd-party services that provide Webhook/Http API interfaces.
Instructions for how to modify the sample code to integrate with other 3rd-party services is explained in the section “Extending to other 3rd-party services“.
Objectives
Write a service to forward Google Cloud Monitoring alert notifications from Cloud Monitoring Pub/Sub notification channels to a third-party service.
Build and deploy the service to Cloud Run using Cloud Build, Terraform, and GitHub.
Costs
This tutorial uses billable components of Google Cloud:
Cloud Build
Cloud Compute Engine (GCE)
Cloud Container Registry
Cloud Pub/Sub
Cloud Run
Cloud Storage
Use the pricing calculator to generate a cost estimate based on your projected usage.
Before you begin
For this tutorial, you need a GCP project. You can create a new project or select a project that you've already created:
Select or create a Google Cloud project.
Go to the project selector pageEnable billing for your project.
Enable billing
When you finish this tutorial, you can avoid continued billing by deleting the resources you created. For details, see the "Cleaning up" section at the end of this tutorial.
Integration with Google Chat
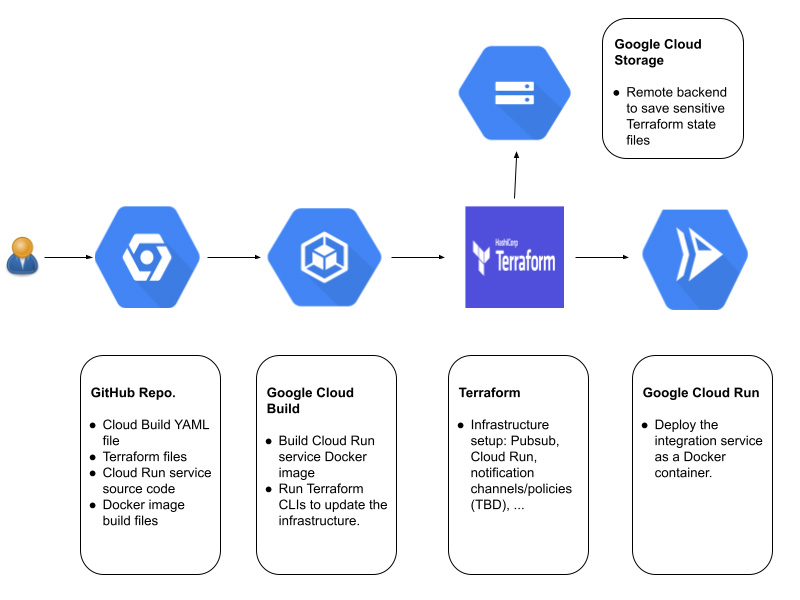
This tutorial provides a sample integration to enable Google Cloud customers to forward alert notifications to their Google Chat rooms. The system architecture is as follows:
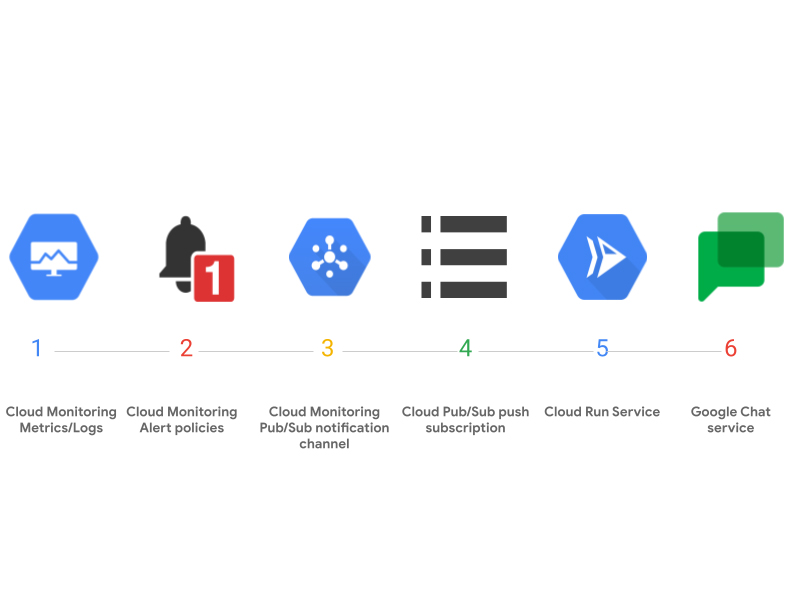
In the example, two monitoring alerting policies are created using Terraform: one is based on the GCE instance CPU usage_time metric and the other is based on the GCE instance disk read_bytes_count metric. Both alert policies use Cloud Monitoring Pub/Sub notification channels to send alert notifications. A Cloud Pub/Sub push subscription is configured for each Cloud Pub/Sub notification channel. The push endpoints of the Cloud Pub/Sub push subscriptions are pointed to the Cloud Run service we implement so that all the alert notifications sent to the Cloud Pub/Sub notification channels are forwarded to the Cloud Run service. The Cloud Run service is a simple Http server that transforms the incoming Cloud Pub/Sub messages into Google Chat messages and sends them to the configured Google Chat rooms via their incoming Webhook URLs.
All the infrastructure components are automatically created and configured using Terraform, which include:
Cloud Pub/Sub topics, push subscriptions, and service account setup.
Cloud Pub/Sub notification channels
Cloud Monitoring Alerting policies
Cloud Run service and service account setup.
The Terraform code can be found at ./tf-modules and ./environments.
Looking at the Cloud Run code
The Cloud Run service is responsible for delivering the Cloud Pub/Sub alert notifications to the configured Google Chat rooms. The integration code is located in the ./notification_integrationfolder.
In this example, a basic Flask HTTP server is set up in main.py to handle incoming Cloud Monitoring alert notifications from Cloud Monitoring Pub/Sub channels. We use Cloud Pub/Sub push subscriptions to forward the Pub/Sub notification messages to the Flask server in real time. More information on Cloud Pub/Sub subscription can be found in the Subscriber overview.
Below is a handler that processes the Pub/Sub message:
The handler calls the ExtractNotificationFromPubSubMsg() function in utilities/pubsub.py to parse the relevant notification data from the Pub/Sub message, and then loads the notification data into a dictionary. The output is a json object with the schema defined here.
This notification dictionary is then passed to SendNotification() which sends the notification along with config_params to the _SendHttpRequest(), in utilities/service_handler.py, which appropriately notifies the third-party service about the alert with an API client. There is a URL parameter “config_id”, which is the configuration ID used by the Cloud Run service to retrieve the configuration data “config_params”. “Config_params” includes all the needed parameters (e.g. HTTP URL and user credentials) for the Cloud Run service to forward the incoming notification to the third-party service. In this example, “config_id” corresponds to the Pub/Sub topics defined here.
You can modify this dispatch function to forward alerts to any third-party service.
Remember to acknowledge the Pub/Sub message on success by returning a success HTTP status code (200 or 204). See Receiving push messages.
All the logs written in the Cloud Run service can be easily accessed either from the Cloud Logging Logs Explorer or the Cloud Run UI. The logs are very useful for debugging the Cloud Run service. Moreover, users can create an extra pull subscription of the Pub/Sub topic used by the Cloud Pub/Sub notification channel to simplify the triage of notification delivery issues. For example, if some alert notifications were not delivered to users’ Google Chat room, users could first check if the pull subscription received the Cloud Pub/Sub messages of the missing alert notifications. If the pull subscription correctly received the missing alert notifications, then it means the alert notifications got lost in the Cloud Run service. Otherwise, it was the Cloud Pub/Sub notification channel issue.
Finally, there is a Dockerfile containing instructions to build an image that hosts the Flask server when deployed to Cloud Run:
Deploying the app
This section describes how to deploy and set up continuous integration using Cloud Build, Terraform, and GitHub, following the GitOps methodology. The instructions are based on Managing infrastructure as code with Terraform, Cloud Build, and GitOps, which also explains the GitOps methodology and architecture. Sections from the guide are also referenced in the steps below. An important difference is that this document assumes that separate Google Cloud projects are used for the dev and prod environments, whereas the referenced guide configures the environments as virtual private clouds (VPCs). As a result, the following deployment steps (with the exception of “Setting up your GitHub repository”) need to be executed for each of the dev and prod projects.
Set up your GitHub repository
To get all the code and understand the repository structure needed to deploy your app, follow the steps in Setting up your GitHub repository.
Deploy the Google Chat integration
Setting up webhook urls
Hardcoded Webhook URLs
We provided within main.py a config_map variable to store your webhook urls. You’ll first need to locate your Google Chat webhook url and replace the value for the key ‘webhook_url’ within the config_map dictionary.
Manual GCS Bucket Webhook URLs
Alternatively if you’d like to have a more secure option to store your webhook urls, you can create a GCS bucket to store your webhook urls.
Locate and store your Google Chat webhook url for your gchat rooms in a json file named
config_params.jsonin the format of:{“topic”: “webhook url”, “topic”: “webhook url”}
Create a Cloud Storage bucket to store the json file with the name
gcs_config_bucket_{PROJECT_ID}.You can also run this command in the cloud console:
gsutil mb gs://gcs_config_bucket_{PROJECT_ID}- Grant the read permissions (Storage Legacy Bucket Reader and Storage Legacy Object Reader) to the default Cloud Run service account
<PROJECT_NUMBER>-compute@developer.gserviceaccount.com
To deploy the notification channel integration sample for the first time automatically, we’ve provided a script deploy.py that will handle a majority of the required actions for deployment. After completing the webhook url step above run the following command:
Python3 deploy.py -p <PROJECT_ID>
Manual Deployment
To deploy the notification channel integration manually, you’ll have to complete the following steps:
1. Set the Cloud Platform Project in Cloud Shell. Replace <PROJECT_ID> with your Cloud Platform project id:gcloud config set project <PROJECT_ID>
2. Enable the Cloud Build Service:gcloud services enable cloudbuild.googleapis.com
3. Enable the Cloud Resource Manager Service:gcloud services enable cloudresourcemanager.googleapis.com
4. Enable the Cloud Service Usage Service:gcloud services enable serviceusage.googleapis.com
5. Grant the required permissions to your Cloud Build service account:CLOUDBUILD_SA="$(gcloud projects describe $PROJECT_ID --format 'value(projectNumber)')@cloudbuild.gserviceaccount.com"gcloud projects add-iam-policy-binding $PROJECT_ID --member serviceAccount:$CLOUDBUILD_SA --role roles/iam.securityAdmingcloud projects add-iam-policy-binding $PROJECT_ID --member serviceAccount:$CLOUDBUILD_SA --role roles/run.admingcloud projects add-iam-policy-binding $PROJECT_ID --member serviceAccount:$CLOUDBUILD_SA --role roles/editor
6. Create Cloud Storage bucket to store Terraform states remotely:PROJECT_ID=$(gcloud config get-value project)gsutil mb gs://${PROJECT_ID}-tfstate
7. (Optional) You may enable Object Versioning to keep the history of your deployments:gsutil versioning set on gs://${PROJECT_ID}-tfstate
8. Trigger a build and deploy to Cloud Run:
If you used the in-memory config server, run (replace <BRANCH> with the current environment branch)gcloud builds submit . --config cloudbuild.yaml --substitutions BRANCH_NAME=<BRANCH>,_CONFIG_SERVER_TYPE=in-memory
If you use the GCS based config server, run:gcloud builds submit . --config cloudbuild.yaml --substitutions BRANCH_NAME=<BRANCH>,_CONFIG_SERVER_TYPE=gcs
Continuous Deployment setup
This is an optional flow and this section describes how to set up continuous deployment using Cloud Build through the use of triggers. The flow is demonstrated in the following diagram: every time users push a new version to their Git repository, it will trigger the Cloud Build trigger; the Cloud Build will run the YAML file to rebuild the Cloud Run docker image, update the infrastructure setup, and redeploy the Cloud Run service.
The instructions are based on Automating builds with Cloud Build.
Set up a code repository, this could be GitHub, Google Cloud Source repository or any private repository.
Clone the repository from our GitHub.
Switch to the new project and push the cloned repository to the remote repository.
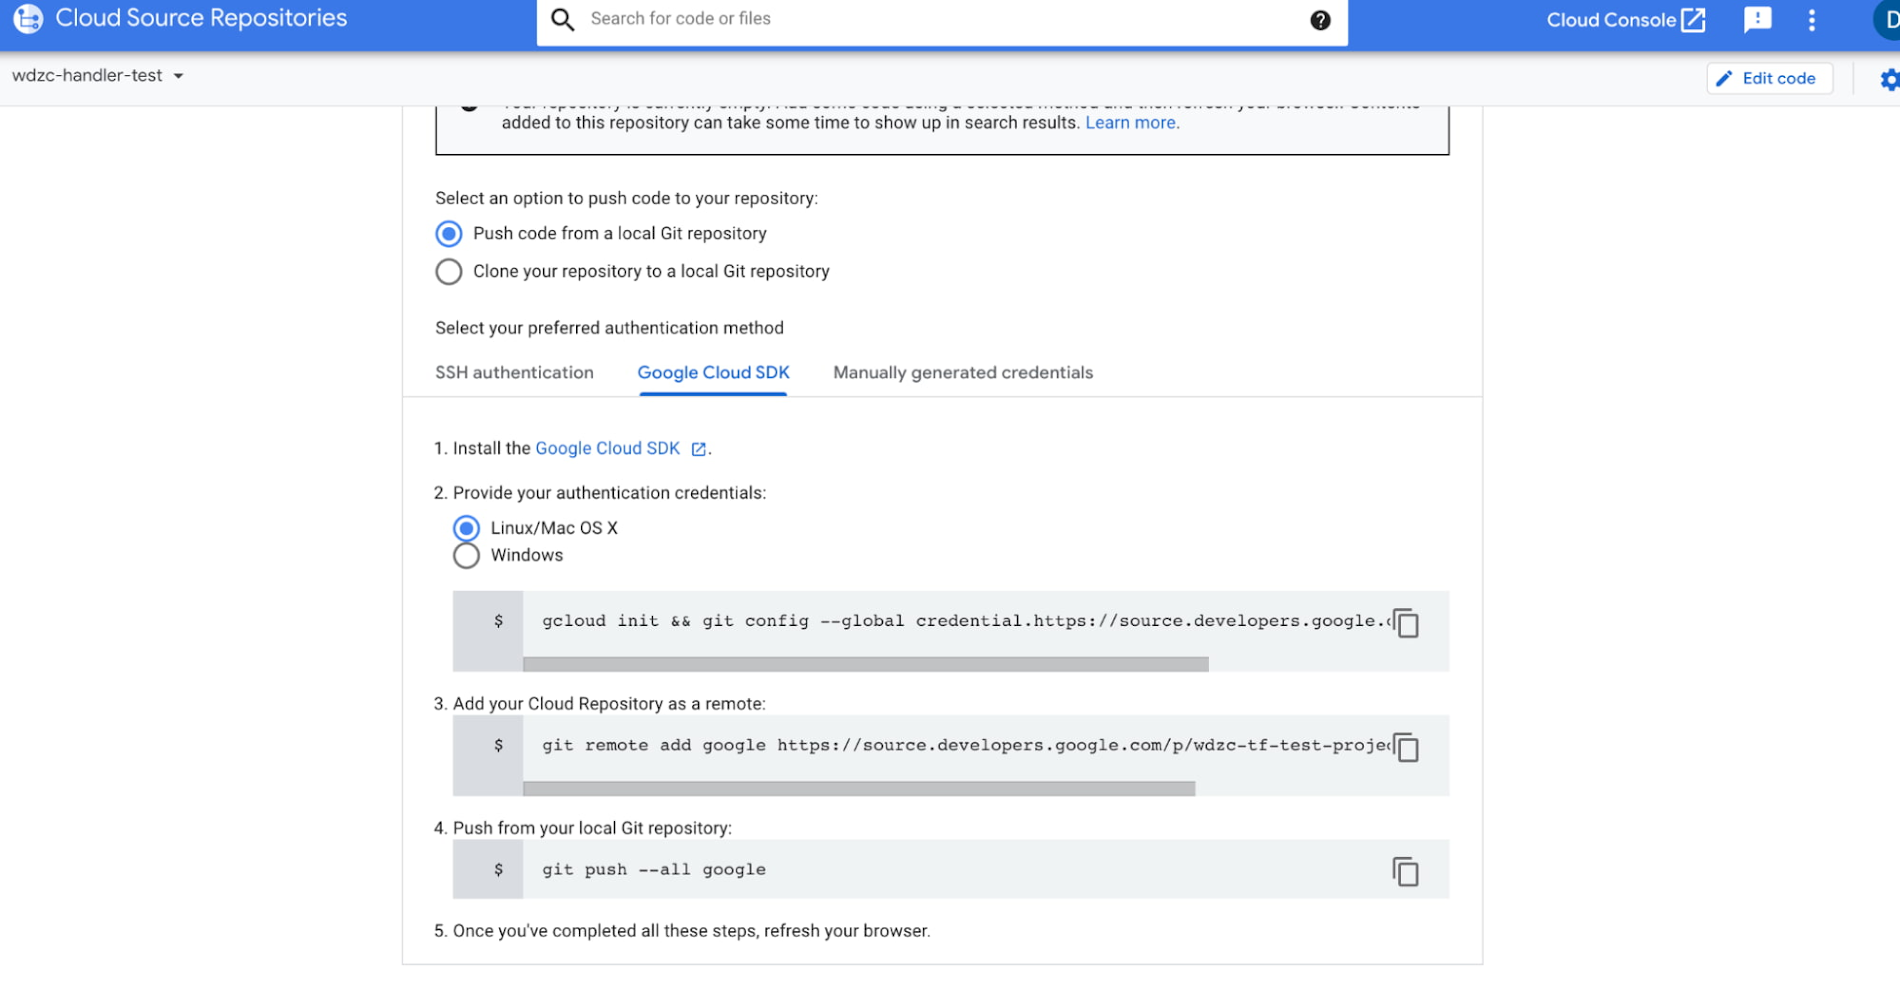
Next we create a new trigger in Cloud Build.
Step 2: Click “Create Trigger”
Cleaning up
If you created a new project for this tutorial, delete the project. If you used an existing project and wish to keep it without the changes added in this tutorial, delete resources created for the tutorial.
Delete the project
The easiest way to eliminate billing is to delete the project you created for the tutorial.
Deleting a project has the following effects:
Everything in the project is deleted. If you used an existing project for this tutorial, when you delete it, you also delete any other work you've done in the project.
Custom project IDs are lost. When you created this project, you might have created a custom project ID that you want to use in the future. To preserve the URLs that use the project ID, such as an appspot.com URL, delete selected resources inside the project instead of deleting the whole project.
If you plan to explore multiple tutorials and quickstarts, reusing projects can help you avoid exceeding project quota limits.
To delete a project, do the following:
In the Cloud Console, go to the Manage resources page.
Go to the Manage resources pageIn the project list, select the project that you want to delete and then click Delete.
In the dialog, type the project ID and then click Shut down to delete the project.
Delete tutorial resources
Delete the Cloud resources provisioned by Terraform:
terraform destroyDelete the Cloud Storage bucket called {PROJECT_ID}-tfstate.
Delete permissions that were granted to the Cloud Build service account:
gcloud projects remove-iam-policy-binding $PROJECT_ID --member serviceAccount:$CLOUDBUILD_SA --role roles/iam.securityAdmin
gcloud projects remove-iam-policy-binding $PROJECT_ID --member serviceAccount:$CLOUDBUILD_SA --role roles/run.admin
gcloud projects remove-iam-policy-binding $PROJECT_ID --member serviceAccount:$CLOUDBUILD_SA --role roles/storage.admin
Delete permission for the service account to publish to tf-topic:
gcloud pubsub topics remove-iam-policy-binding \ projects/[PROJECT_NUMBER]/topics/tf-topic --role=roles/pubsub.publisher \ --member=serviceAccount:service-[PROJECT_NUMBER]@gcp-sa-monitoring-notification.iam.gserviceaccount.com
Delete the notification channel that uses tf-topic.
Delete your forked GitHub repository notification_integration.
Disconnect the GitHub repository from Cloud Build by deleting the Cloud Build triggers.
Expanding to other 3rd-party services
The sample code in the tutorial provides a generic framework and can be easily customized for Google Cloud customers to deliver alert notifications to any 3rd-party services that provide Webhook/Http API interfaces.
To integrate with a new 3rd-party service, we can create a new derived class of the abstract class HttpRequestBasedHandler defined in ./notification_channel/service_handler.py and updated the following member functions:
CheckConfigParams(): A function that checks if a given integration configuration is valid, e.g. a required API key is given._GetHttpUrl(): A function to get the Http url (where to send Http requests) from the configuration data_BuildHttpRequestHeaders(): A function that constructs the Http request header._BuildHttpRequestBody(): A function that constructs the Http request message body based on the incoming Cloud Pub/Sub message.SendNotification(): You can reuse the one defined in the GchatHandler class.
There is no need to update the Terraform code, except you need to customize your alert policies. If you have additional suggestions, community feedback is always welcome. Please submit pull requests to continue to build the GitHub repository together.