Training an object detector using Cloud Machine Learning Engine
Derek Chow
Software Engineer
Today we announced the release of the Tensorflow Object Detection API, a new open source framework for object detection that makes model development and research easier. A key feature of our Tensorflow Object Detection API is that users can train it on Cloud Machine Learning Engine, the fully-managed Google Cloud Platform (GCP) service for easily building and running machine learning models using any type of data at virtually any scale.
In this tutorial, you’ll learn the process of training a new object detection model on the Oxford-IIIT Pet dataset, which will be able to detect the location of cats and dogs and identify the breed of each animal.
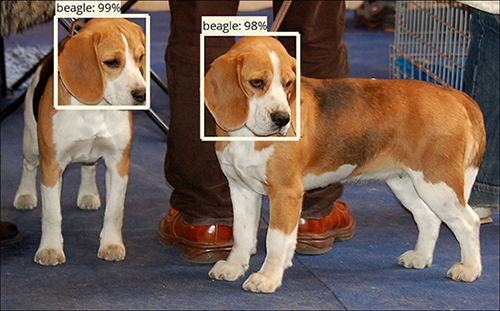
Example detections from our final trained model. Image source.
This document assumes you’re running on Ubuntu 16.04. Before following along, we need to set up the environment:
- Set up a Google Cloud Project, configure billing, and enable the necessary Cloud APIs by completing the “Before you begin” section on this page. Skip the “Set up your environment” section as this is covered in steps 2 and 3 below and tailored for Ubuntu.
- Set up the Google Cloud SDK.
- Install TensorFlow.
Define Environment Variables
After setting up your GCP project, define the following environment variables to make following this walkthrough a bit easier.Installing the Tensorflow Object Detection API
Assuming that you've already installed Tensorflow, the Object Detection API and other dependencies can then be installed using the following commands:You can test your installation by running the following command:
Download the Oxford-IIIT Pet Dataset, convert to TFRecords and upload to GCS
The Tensorflow Object Detection API uses the TFRecord format for training and validation datasets. Use the following to download the Oxford-IIIT Pet dataset and convert to TFRecords.You should see two new generated files: pet_train.record and pet_val.record. To use the dataset on GCP, we’ll need to upload it to our Cloud Storage bucket using the following commands. Note that we similarly upload a “label map” (included in the git repository), which corresponds numerical indices predicted by our model to category names (e.g., 4 -> “basset hound”, 5 -> “beagle”).
Upload our pretrained COCO Model for Transfer Learning
Training an object detector from scratch can take days! To speed up training, we’ll initialize the pet model using parameters from our provided model that has been pre-trained on the COCO dataset. The weights from this ResNet101-based Faster R-CNN model will be the starting point in our new model (which we'll call a fine-tune checkpoint) and will cut down the training time from days to just a few hours. To initialize from this model, we’ll need to download it and put it in Cloud Storage.Configuring the pipeline
Jobs are configured using protocol buffers in the TensorFlow Object Detection API. Sample configuration files can be found in object_detection/samples/configs/. These configuration files can be used to tune model and training parameters (such as learning rates, dropout and regularization parameters). The sample configuration files that we've provided need to be modified to know where you've uploaded your dataset and fine-tune checkpoints. The PATH_TO_BE_CONFIGURED strings need to be changed so they point to the dataset files and fine-tune checkpoint you’ve uploaded to your Cloud Storage bucket. Afterwards, we’ll also need to upload the configuration file itself to Cloud Storage.Running training and evaluation jobs
Before you can run on GCP, you must first package the TensorFlow Object Detection API and TF Slim.It’s also a good idea to double check that you’ve uploaded the dataset and configuration correctly to your Cloud Storage bucket. You can inspect your bucket using the Cloud Storage browser. The directory structure should look like the following:
After the code has been packaged, we’re ready to start our training and evaluation jobs:
You should see your jobs on the Machine Learning Engine dashboard and check the logs to ensure that the jobs are progressing. Note that this training job uses distributed asynchronous gradient descent with five worker GPUs and three parameter servers.
Monitoring progress with Tensorboard
You can also monitor the progress of your training and evaluation jobs using Tensorboard. For a new user, you’ll likely have to authenticate your local machine with the Google Cloud SDK.You can then launch Tensorboard:
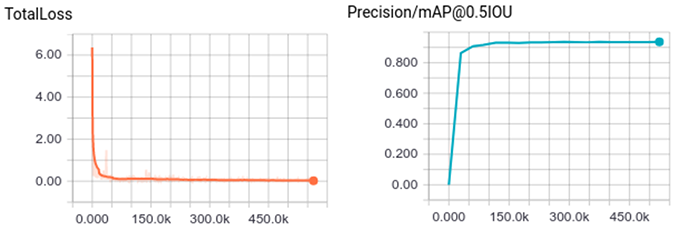
Navigate to the link showed in the terminal (typically localhost:6006). After several hours of training, you should see the following training curves. Typically we reach ~92% mean average precision on the validation set within the first couple of hours of training.
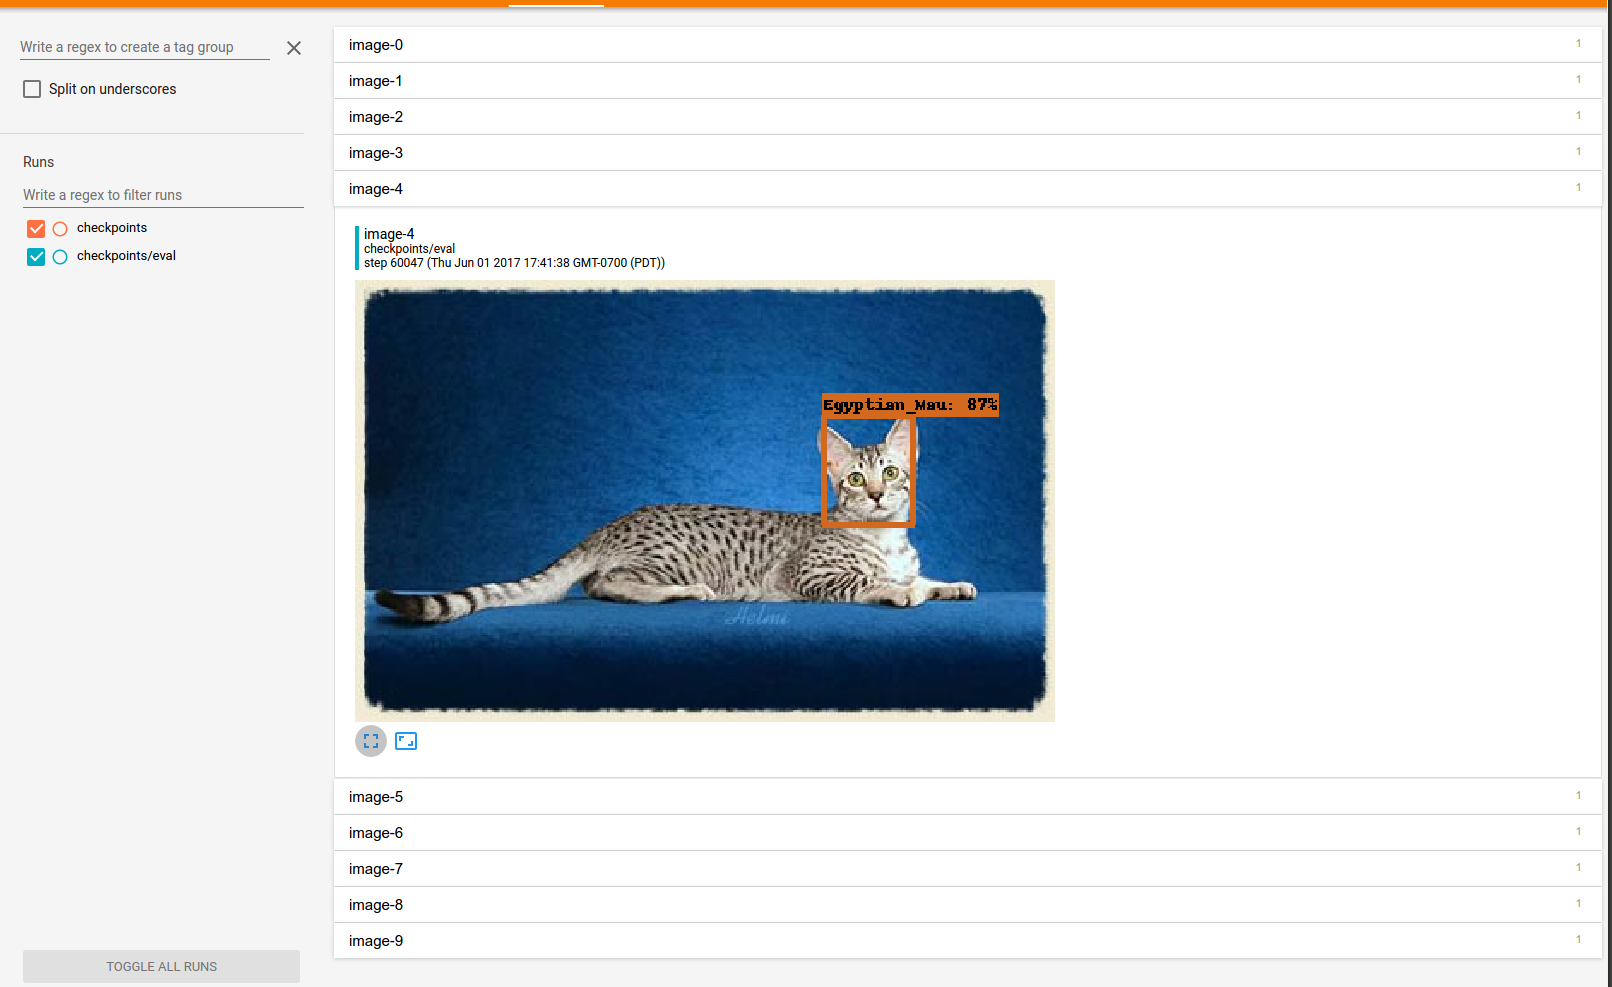
You can also click on the images link to visualize the outputs of the model:
Exporting the Tensorflow graph
Now that you’ve trained an amazing pet detector, you're probably going to want to run your detector on images of your family pet or those of your friends! In order to run detection on a few example images after training, we recommend trying out the Jupyter notebook demo. However, before doing so, you'll have to export your trained model to a TensorFlow graph proto with learned weights baked in as constants. First, you need to identify a candidate checkpoint to export. You can search your bucket using the Google Cloud Storage Browser. The checkpoint should be stored under ${YOUR_GCS_BUCKET}/train. The checkpoint will typically consist of three files:- model.ckpt-${CHECKPOINT_NUMBER}.data-00000-of-00001,
- model.ckpt-${CHECKPOINT_NUMBER}.index
- model.ckpt-${CHECKPOINT_NUMBER}.meta
If all has gone well, you should see your exported graph, which will will be stored in a file named output_inference_graph.pb.
Next steps
Congratulations, you've now trained an object detector for various cats and dogs! There are a few things you can do now:- Test your exported model using the provided Jupyter notebook.
- Experiment with different model configurations.