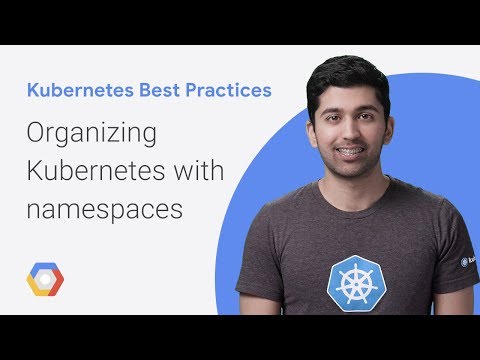
Kubernetes best practices: Organizing with Namespaces
Sandeep Dinesh
Developer Advocate
Editor’s note: Today is the second installment in a seven-part video and blog series from Google Developer Advocate Sandeep Dinesh on how to get the most out of your Kubernetes environment.
As you start to build more and more services on top of Kubernetes, simple tasks start to get more complicated. For example, teams can’t create Kubernetes Services or Deployments with the same name. If you have thousands of pods, just listing them all would take some time, let alone actually administering them! And these are just the tip of the iceberg.
In this episode of Kubernetes Best Practices, let’s take a look at how Kubernetes Namespaces can make managing your Kubernetes resources easier.
What is a Namespace?
You can think of a Namespace as a virtual cluster inside your Kubernetes cluster. You can have multiple namespaces inside a single Kubernetes cluster, and they are all logically isolated from each other. They can help you and your teams with organization, security, and even performance!The “default” Namespace
In most Kubernetes distributions, the cluster comes out of the box with a Namespace called “default.” In fact, there are actually three namespaces that Kubernetes ships with: default, kube-system (used for Kubernetes components), and kube-public (used for public resources). kube-public isn’t really used for much right now, and it’s usually a good idea to leave kube-system alone, especially in a managed system like Google Kubernetes Engine (GKE). This leaves the default Namespace as the place where your services and apps are created.There is absolutely nothing special about this Namespace, except that the Kubernetes tooling is set up out of the box to use this namespace and you can’t delete it. While it is great for getting started and for smaller production systems, I would recommend against using it in large production systems. This is because it is very easy for a team to accidentally overwrite or disrupt another service without even realizing it. Instead, create multiple namespaces and use them to segment your services into manageable chunks.
Creating Namespaces
Don’t be afraid to create namespaces. They don’t add a performance penalty, and in many cases can actually improve performance as the Kubernetes API will have a smaller set of objects to work with.Creating a Namespace can be done with a single command. If you wanted to create a Namespace called ‘test’ you would run:
Or you can create a YAML file and apply it just like any other Kubernetes resource.
test.yaml:
Viewing Namespaces
You can see all the Namespaces with the following command:kubectl get namespace
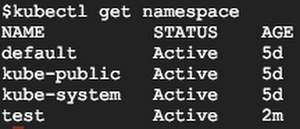
You can see the three built-in Namespaces, as well as the new Namespace called ‘test.’
Creating Resources in the Namespace
Let’s take a look at a simple YAML to create a Pod:You might notice that there is no mention of namespaces anywhere. If you run a `kubectl apply` on this file, it will create the Pod in the current active namespace. This will be the “default” namespace unless you change it.
There are two ways to explicitly tell Kubernetes in which Namespace you want to create your resources.
One way is to set the “namespace” flag when creating the resource:
You can also specify a Namespace in the YAML declaration.
If you specify a namespace in the YAML declaration, the resource will always be created in that namespace. If you try to use the “namespace” flag to set another namespace, the command will fail.
Viewing resources in the Namespace
If you try to find your Pod, you might notice you can’t!This is because all commands are run against the currently active Namespace. To find your Pod, you need to use the “namespace” flag.
This can get annoying quickly, especially if you are a developer working on a team that uses its own Namespace for everything and don’t want to use the “namespace” flag for every command. Let’s see how we can fix that.
Managing your active Namespace
Out of the box, your active namespace is the “default” namespace. Unless you specify a Namespace in the YAML, all Kubernetes commands will use the active Namespace.Unfortunately, trying to manage your active Namespace with kubectl can be a pain. Fortunately, there is a really good tool called kubens (created by the wonderful Ahmet Alp Balkan) that makes it a breeze!
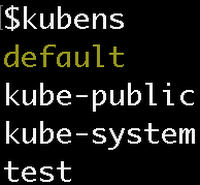
When you run the ‘kubens’ command, you should see all the namespaces, with the active namespace highlighted:
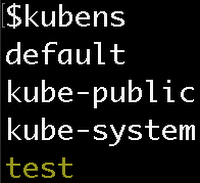
To switch your active namespace to the ‘test’ Namespace, run:
Now you can see that the ‘test’ Namespace is active:
Now, if you run kubectl commands, the Namespace will be ‘test’ instead of ‘default’! This means you don’t need the namespace flag to see the pod in the test namespace.
Cross Namespace communication
Namespaces are “hidden” from each other, but they are not fully isolated by default. A service in one Namespace can talk to a service in another Namespace. This can often be very useful, for example to have your team’s service in your Namespace communicate with another team’s service in another Namespace.When your app wants to access a Kubernetes sService, you can use the built-in DNS service discovery and just point your app at the Service’s name. However, you can create a service with the same name in multiple Namespaces! Thankfully, it’s easy to get around this by using the expanded form of the DNS address.
Services in Kubernetes expose their endpoint using a common DNS pattern. It looks like this:
Normally, you just need the Service’s name and DNS will automatically resolve to the full address. However, if you need to access a Service in another Namespace just use the Service name plus the Namespace name.
For example, if you want to connect to the “database” service in the “test” namespace, you can use the following address:
If you want to connect to the “database” service in the “production” namespace, you can use the following address:
Warning: If you create a Namespace that maps to a TLD like “com” or “org”, and then create a Service that has the same name as a website, like “google” or “reddit”, Kubernetes will intercept requests to “google.com” or “reddit.com” and send them to your Service. This can often be very useful for testing and proxying, but can also easily break things in your cluster!
Note: If you do want to isolate Namespaces, you should use Network Policies to accomplish this. Stay tuned for more on this in a future episode!
Namespace granularity
A common question I get is how many Namespaces to create and for what purpose. What exactly are manageable chunks? Create too many Namespaces and they get in your way, but make too few and you miss out on the benefits.I think the answer lies in what stage your project or company is in—from small team, to mature enterprise, each has its own organizational structure. Depending on your situation, you can adopt the relevant Namespace strategy.
The small team
In this scenario, you are part of a small team that is working on 5-10 microservices and can easily bring everyone into the same room. In this situation, it makes sense to launch all production services into the “default” Namespace. You might want to have a “production” and “development” namespace if you want to get fancy, but you are probably testing your development environment on your local machine using something like Minikube.Rapidly growing team(s)
In this scenario, you have a rapidly growing team that is working on 10+ microservices. You are starting to split the team into multiple sub-teams that each own their own microservices. While everyone might know how the complete system works, it is getting harder to coordinate every change with everyone else. Trying to spin up the full stack on your local machine is getting more complicated every day.It is necessary at this point to use multiple clusters or namespaces for production and development. Each team may choose to have their own namespace for easier manageability.
The large company
In a large company, not everyone knows everyone else. Teams are working on features that other teams might not know about. Teams are using services contracts to communicate with other microservices (e.g., gRPC) and service meshes to coordinate communication (e.g., istio). Trying to run the whole stack locally is impossible. Using a Kubernetes-aware Continuous Delivery system (e.g., Spinnaker) is highly recommended.At this point, each team definitely needs its own namespace. Each team might even opt for multiple namespaces to run its development and production environments. Setting up RBAC and ResourceQuotas is a good idea as well. Multiple clusters start to make a lot of sense, but might not be necessary.
Note: I’ll deep dive into gRPC, Istio, Spinnaker, RBAC, and resources in future episodes!
Enterprise
At this scale, there are groups that don’t even know about the existence of other groups. Groups might as well be external companies, and services are consumed through well-documented APIs. Each group has multiple teams that have multiple microservices. Using all the tools I mentioned above are necessary; people should not be deploying services by hand and should be locked out of Namespaces they don’t own.At this point, it probably makes sense to have multiple clusters to reduce the blast radius of poorly configured applications, and to make billing and resource management easier.