Introducing the new Google Cloud Load Balancing UI
Prajakta Joshi
Sr. Product Manager, Cloud Networking
Our user interface (UI) is everything that you see and interact with. While the technologies that power Google Cloud Platform are complex, the UI for using the resources on GCP should be simple and intuitive. We’re paying close attention to this in our Cloud Load Balancing service and are excited to introduce a new UI that aims to simplify Cloud Load Balancing configuration.
You’ll now be able to configure all Cloud Load Balancing flavors through a unified interface. This UI is also designed to seamlessly accommodate new load balancing features that are expected to land in 2016 and beyond, and deliver a simpler, more intuitive user experience.
Here’s an overview of the new UI, recapping Cloud Load Balancing config basics first. Cloud Load Balancing comes in multiple flavors — HTTP(S), TCP, SSL(TLS) and UDP, and distributes traffic among your configured backends. Your backend configuration consists of instance groups and instances that will service your user traffic. Your frontend configuration is comprised of the anycast IP address to which your users connect along with port, protocol and other related information.
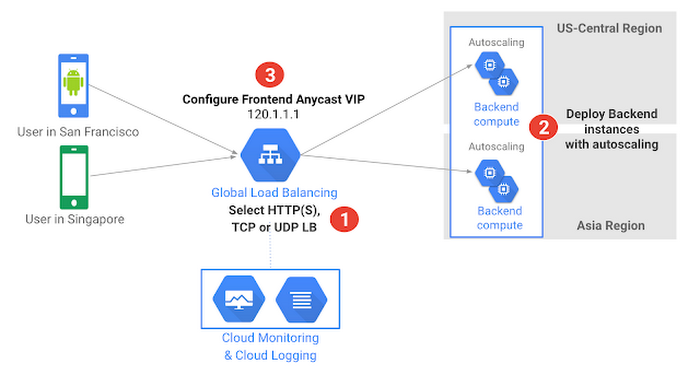

Of course, HTTP(S), TCP and UDP load balancers have flavor-specific configuration nuances, but we maintain a similar overall flow for configuring all of these flavors in the new UI.
You’ll begin your configuration by selecting the flavor of traffic you want to load balance: HTTP(S), TCP or UDP. Note that we’ll add support for SSL(TLS) in the new UI once this feature enters beta. To make your selection easier, we present you with a picker page as shown below:
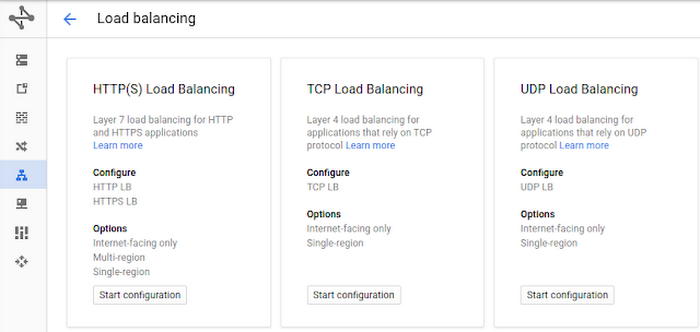

Let’s say you want to configure HTTP load balancer. Start by clicking the configure button below HTTP(S) Load Balancing. You’ll now be presented with the page to configure the load balancer name, backend configuration, host/path rules, which are relevant if you want to perform request routing based on the client request URL, and finally the frontend configuration.
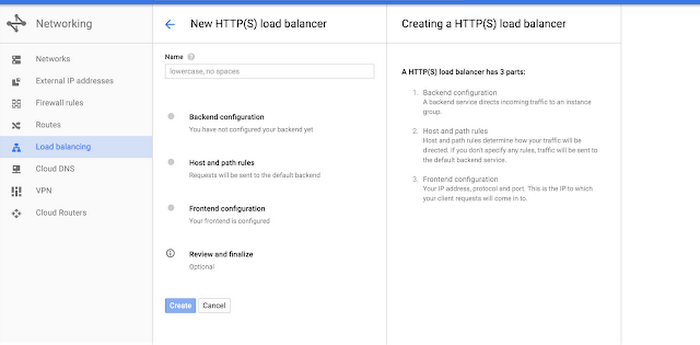

Once you’re done with the above steps, you can review and finalize your configuration. You can view all your configured load balancers as shown below:
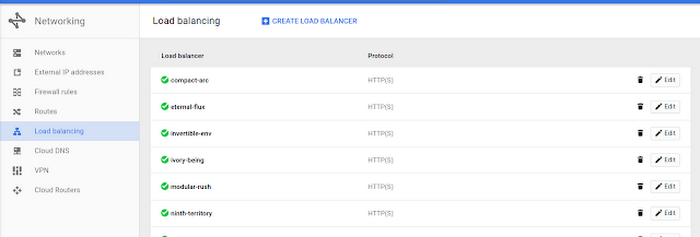

If you’d like additional information on any of your configured load balancers, you can simply use the drop-down card as shown below to view these details, including configuration as well as monitoring information.
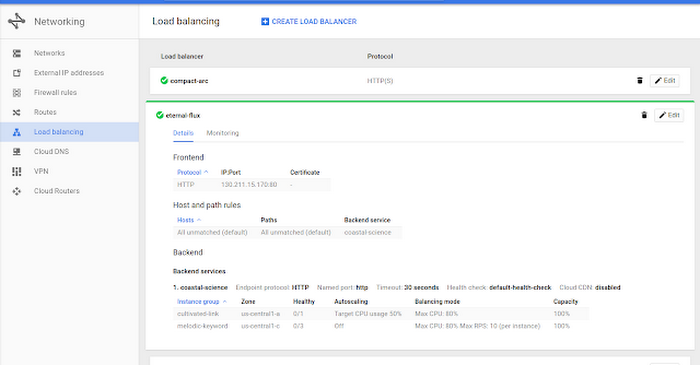

You can edit your configured load balancers any time by clicking the edit button shown above.
We’ve created this UI quickstart video to help you get started. After watching this video, we recommend that you play with the new UI and configure and edit HTTP(S), TCP and UDP load balancers to familiarize yourself with the UI flow and configuration options. You can also send in your feedback using the “Send feedback” button as shown below.


This is the first release of the new Google Cloud Load Balancing UI. We’ll continue to iterate, make improvements and most importantly incorporate your feedback into future UI releases. So take the new UI for a spin and let us know what works well and what you’d love to see next.
For those of you who attended GCP NEXT, we hope you enjoyed the opportunity to learn about Google’s global network and the software-defined and distributed systems technologies that power Google Cloud Load Balancing. If you missed it, here’s the Global Load Balancing talk and our TCP/UDP network load balancing talk at NSDI last month.
Happy load balancing and scale on!


