Bigtable Autoscaling: Deep dive and cost saving analysis
Billy Jacobson
Developer Advocate: Bigtable
Justin Uang
Software engineer: Cloud Bigtable
Cloud Bigtable is a fully managed service that can swiftly scale to meet performance and storage demands with the click of a button. If you're currently using Bigtable, you might configure your cluster sizes to perform for peak throughput or programmatically scale to match your workload. Bigtable now supports autoscaling for improved manageability, and in one of our experiments autoscaling reduced costs of a common diurnal workload by over 40%.
You only pay for what you need when autoscaling is enabled; Bigtable will automatically add or remove capacity in response to the changing demands of your workloads. Autoscaling enables you to spend more time on your business and less time managing your infrastructure due to the reduced overhead of capacity provisioning management. Autoscaling works on both HDD and SSD clusters, and is available in all Bigtable regions.
We'll look at when and how to use this feature, go through a performance analysis of autoscaling in action, and finally see how it can impact your database costs.
Enabling Autoscaling
Cloud Bigtable autoscaling is configured at the cluster level and can be enabled using the Cloud Console, the gcloud command-line tool, the Cloud Bigtable Admin API, and Bigtable client libraries.
With autoscaling enabled, Bigtable automatically scales the number of nodes in a cluster in response to changing capacity utilization. The business-critical risks associated with incorrect capacity estimates are significantly lowered: over-provisioning (unnecessary cost) and under-provisioning (missing business opportunities).
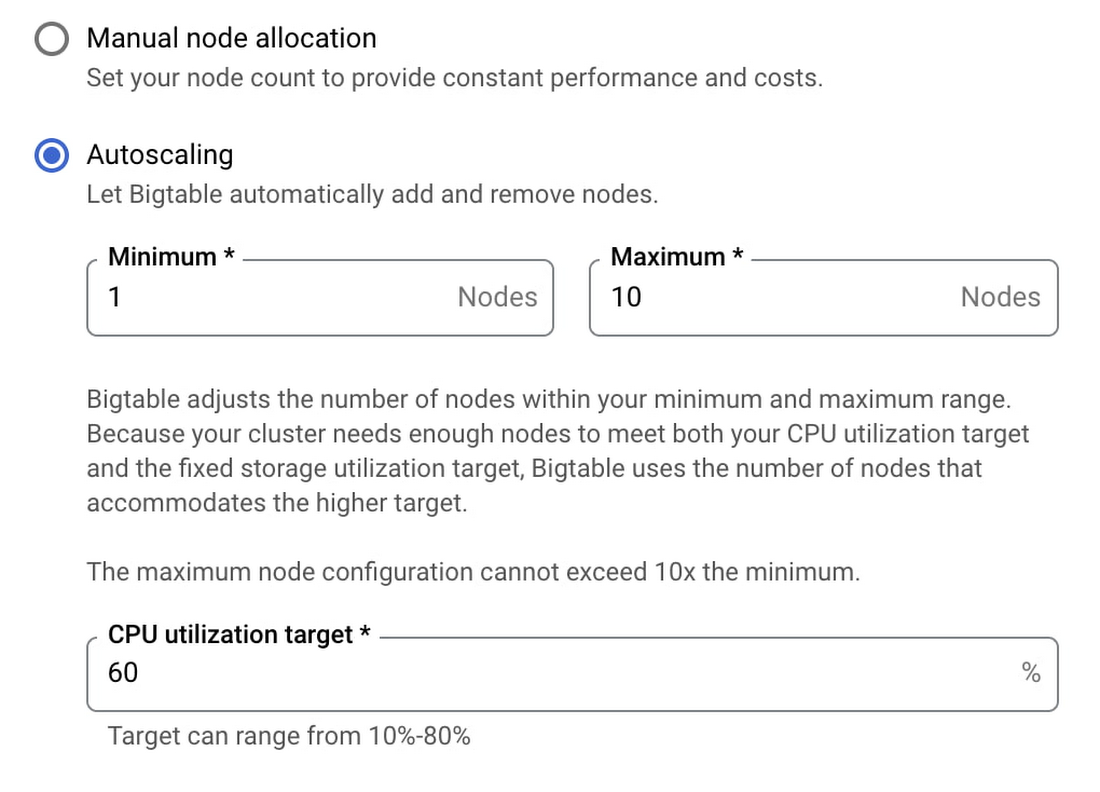
Autoscaling can be enabled for existing clusters or configured with new clusters. You'll need two pieces of information: a target CPU utilization and a range to keep your node count within. No complex calculations, programming, or maintenance are needed. One constraint to be aware of is the maximum node count in your range cannot be more than 10 times the minimum node count. Storage utilization is a factor in autoscaling, but the targets for storage utilization are set by Bigtable and not configurable.
Below are examples showing how to use the Cloud Console and gcloud to enable autoscaling. These are the fastest ways to get started.
Using Cloud Console
When creating or updating an instance via the Cloud Console you can choose between manual node allocation or autoscaling. When autoscaling is selected, you configure your node range and CPU utilization target.

Using command line
To configure autoscaling via the gcloud command-line tool, modify the autoscaling parameters when creating or updating your cluster as shown below.
Updating an existing cluster:
Creating a new cluster:
Transparency and trust
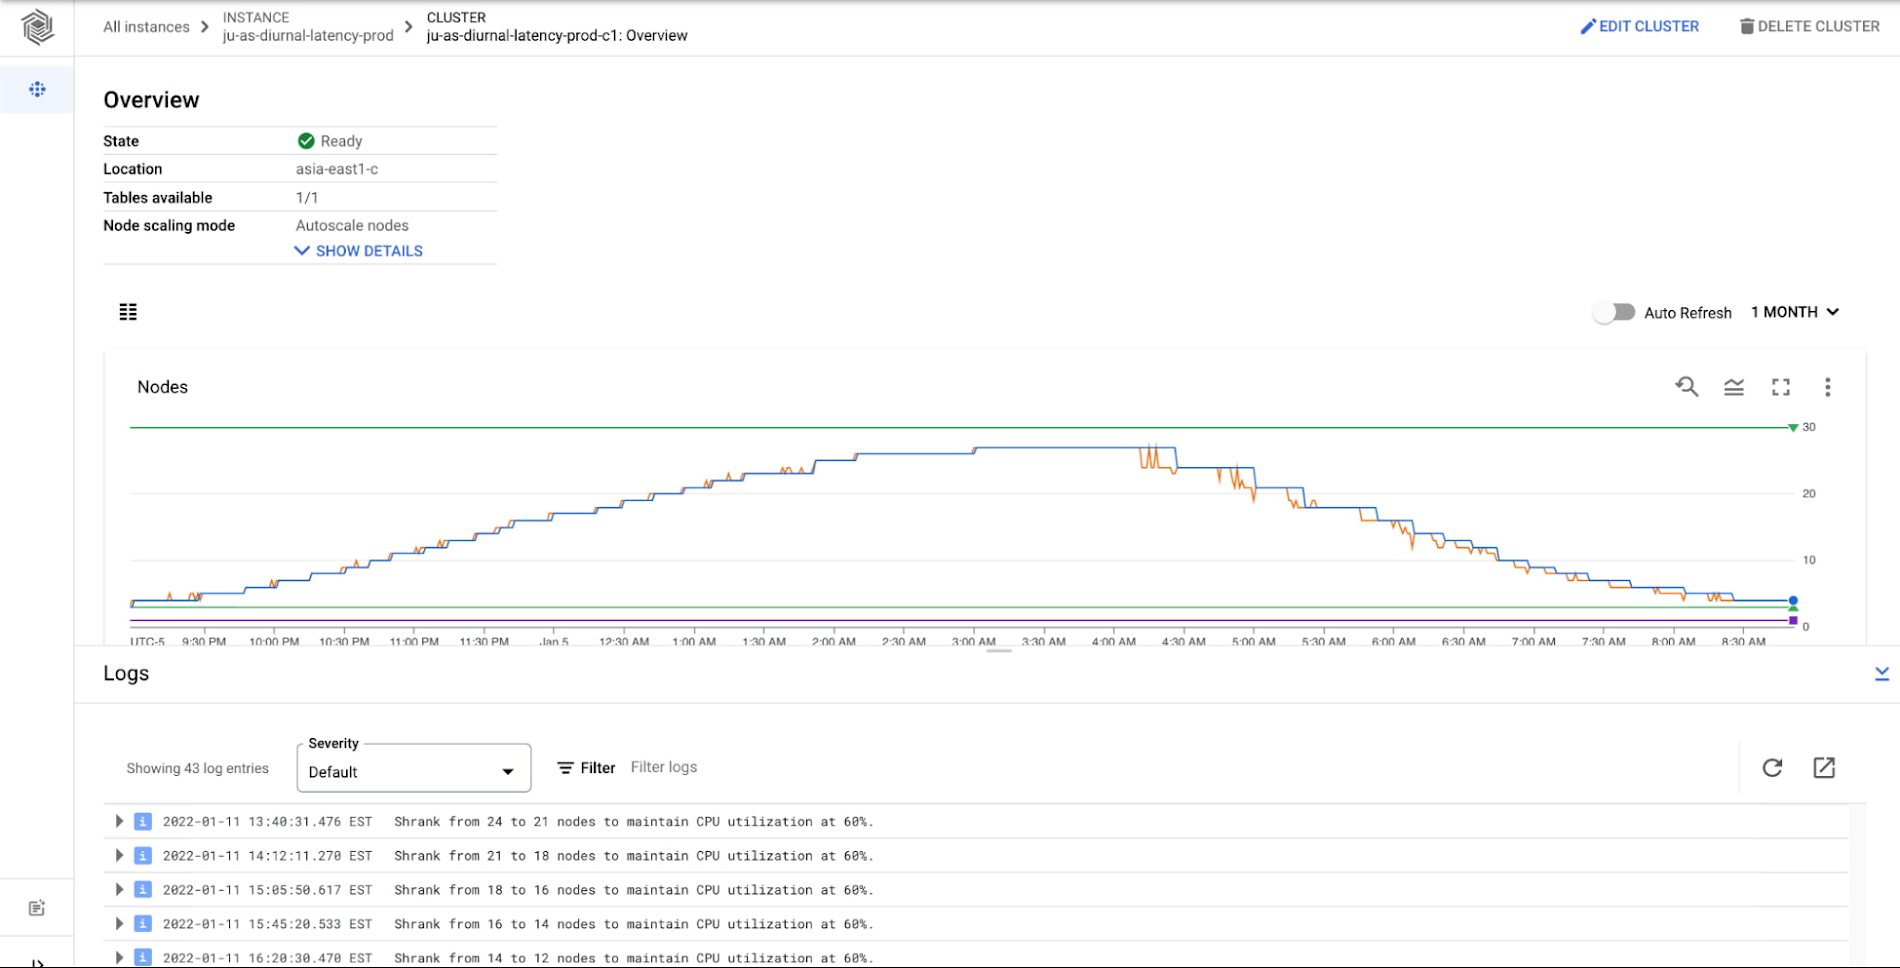
On the Bigtable team, we performed numerous experiments to ensure that autoscaling performs well with our customers' common workloads. It's important that you have insight into Cloud Bigtable's autoscaling performance, so you can monitor your clusters and understand why they are scaling. We provide comprehensive monitoring and audit logging to ensure you have a clear understanding of Bigtable's actions. You're able to connect Bigtable activity to your billing and performance expectations and fine tune the autoscaling configuration in order to ensure your performance expectations are maintained. Below is the Bigtable cluster monitoring page with graphs for metrics and logs for the cluster.

When is autoscaling right for your workload?
Bigtable is flexible for a variety of use cases with dynamic traffic profiles. Bigtable autoscaling may not always be the right configuration for your business, so here are some guidelines for when autoscaling is ideal.
When to use autoscaling
You're an existing Bigtable user who wants to optimize costs, while maintaining performance for your cluster. For example: diurnal traffic patterns that you might see with online retail.
You're a new Bigtable user or have a new workload. Provisioning enough capacity to meet unknown use cases is hard.
Your business is growing, and you're not sure the extent of future growth. You want to be prepared to scale for any opportunity.
What autoscaling won't solve
Certain batch workloads. Autoscaling will react to a sharp increase in traffic (a “step” or batch upload of data). However, Bigtable will still need to rebalance the data and traffic against a rapid increase in nodes, and this may cause a performance impact as Bigtable works to rebalance.
Autoscaling is likely not the correct solution to resolving hotspotting or ‘hot tablets’ in your Bigtable cluster. In these scenarios it is best to review data access patterns and row key / schema design considerations.
Autoscaling in Action
Cloud Bigtable's horizontal scalability is a core feature, derived from the separation of compute and storage. Updating the number of nodes for a Bigtable instance is fast whether or not you use autoscaling. When you add nodes to your cluster, Bigtable rebalances your data across the additional nodes, thus improving the overall performance of the cluster. When you scale down your cluster, Bigtable rebalances the load from the removed nodes to the remaining nodes.
With autoscaling enabled, Bigtable monitors the cluster's utilization target metrics and reacts in real time to scale for the workload as needed. Part of the efficiency of Bigtable’s native autoscaling solution is that it connects directly to the cluster's tablet servers to monitor metrics, so any necessary autoscaling actions can be done rapidly. Bigtable then adds or removes nodes based on the configured utilization targets. Bigtable's autoscaling logic scales up quickly to match increased load, but scales down slowly in order to avoid putting too much pressure on the remaining nodes.
Example workload
Let's look at one of the experiments we ran to ensure that autoscaling performance was optimal in a variety of scenarios. The scenario for our experiment is a typical diurnal traffic pattern: active users during peak times and a significant decrease during off-peak times. We simulated this by creating a Bigtable instance with 30 GB of data per node and performed point reads of 1 kb.
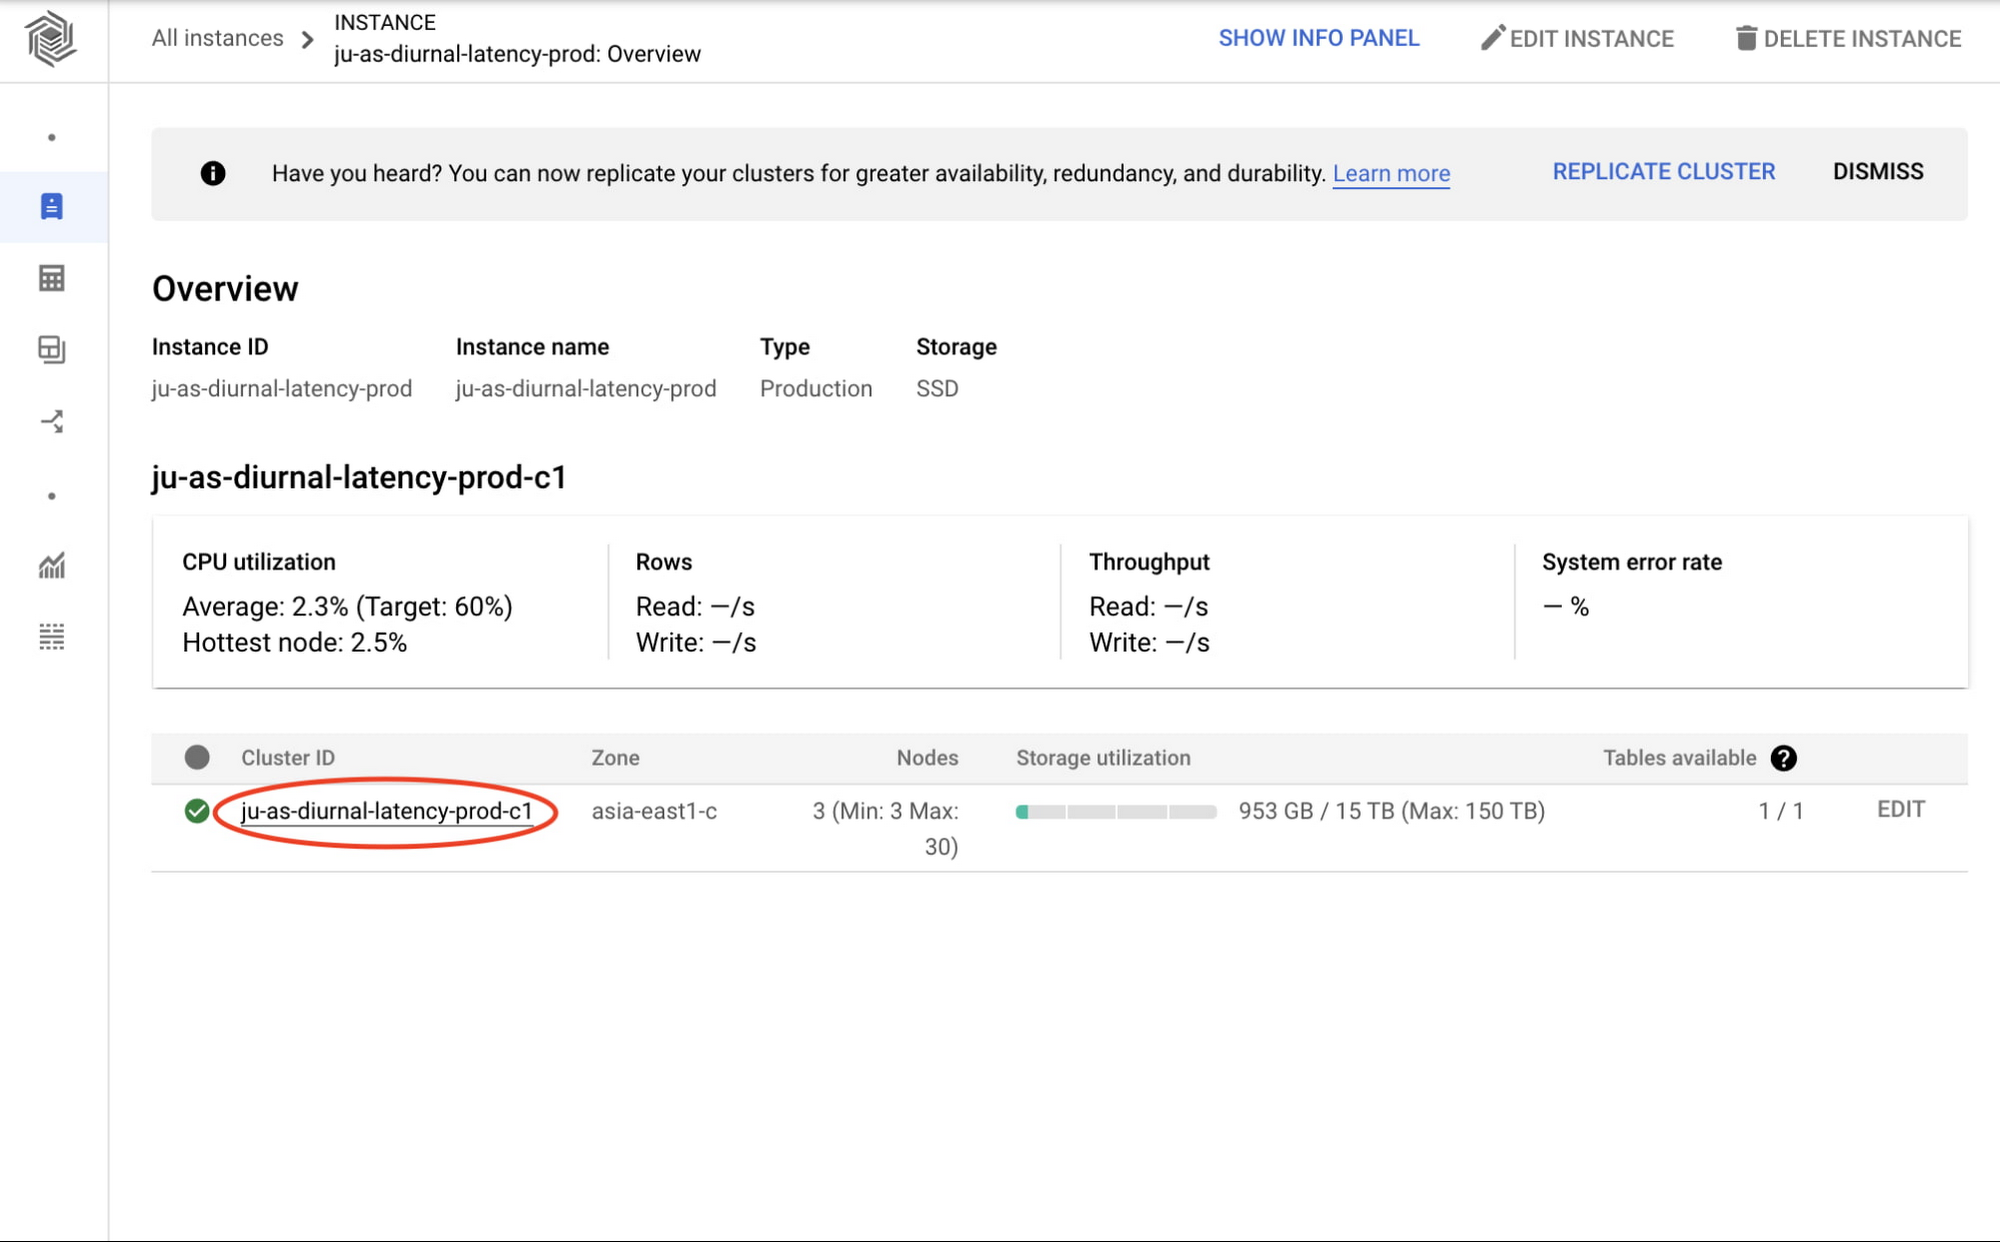
We'll get some insights from this experiment using Bigtable's monitoring graphs. You can access the cluster's monitoring graphs by clicking on the cluster ID from the Bigtable instance overview page in the Cloud Console.

Having clicked through to the cluster overview page, you can see the cluster's node and CPU utilization monitoring graphs as seen below.
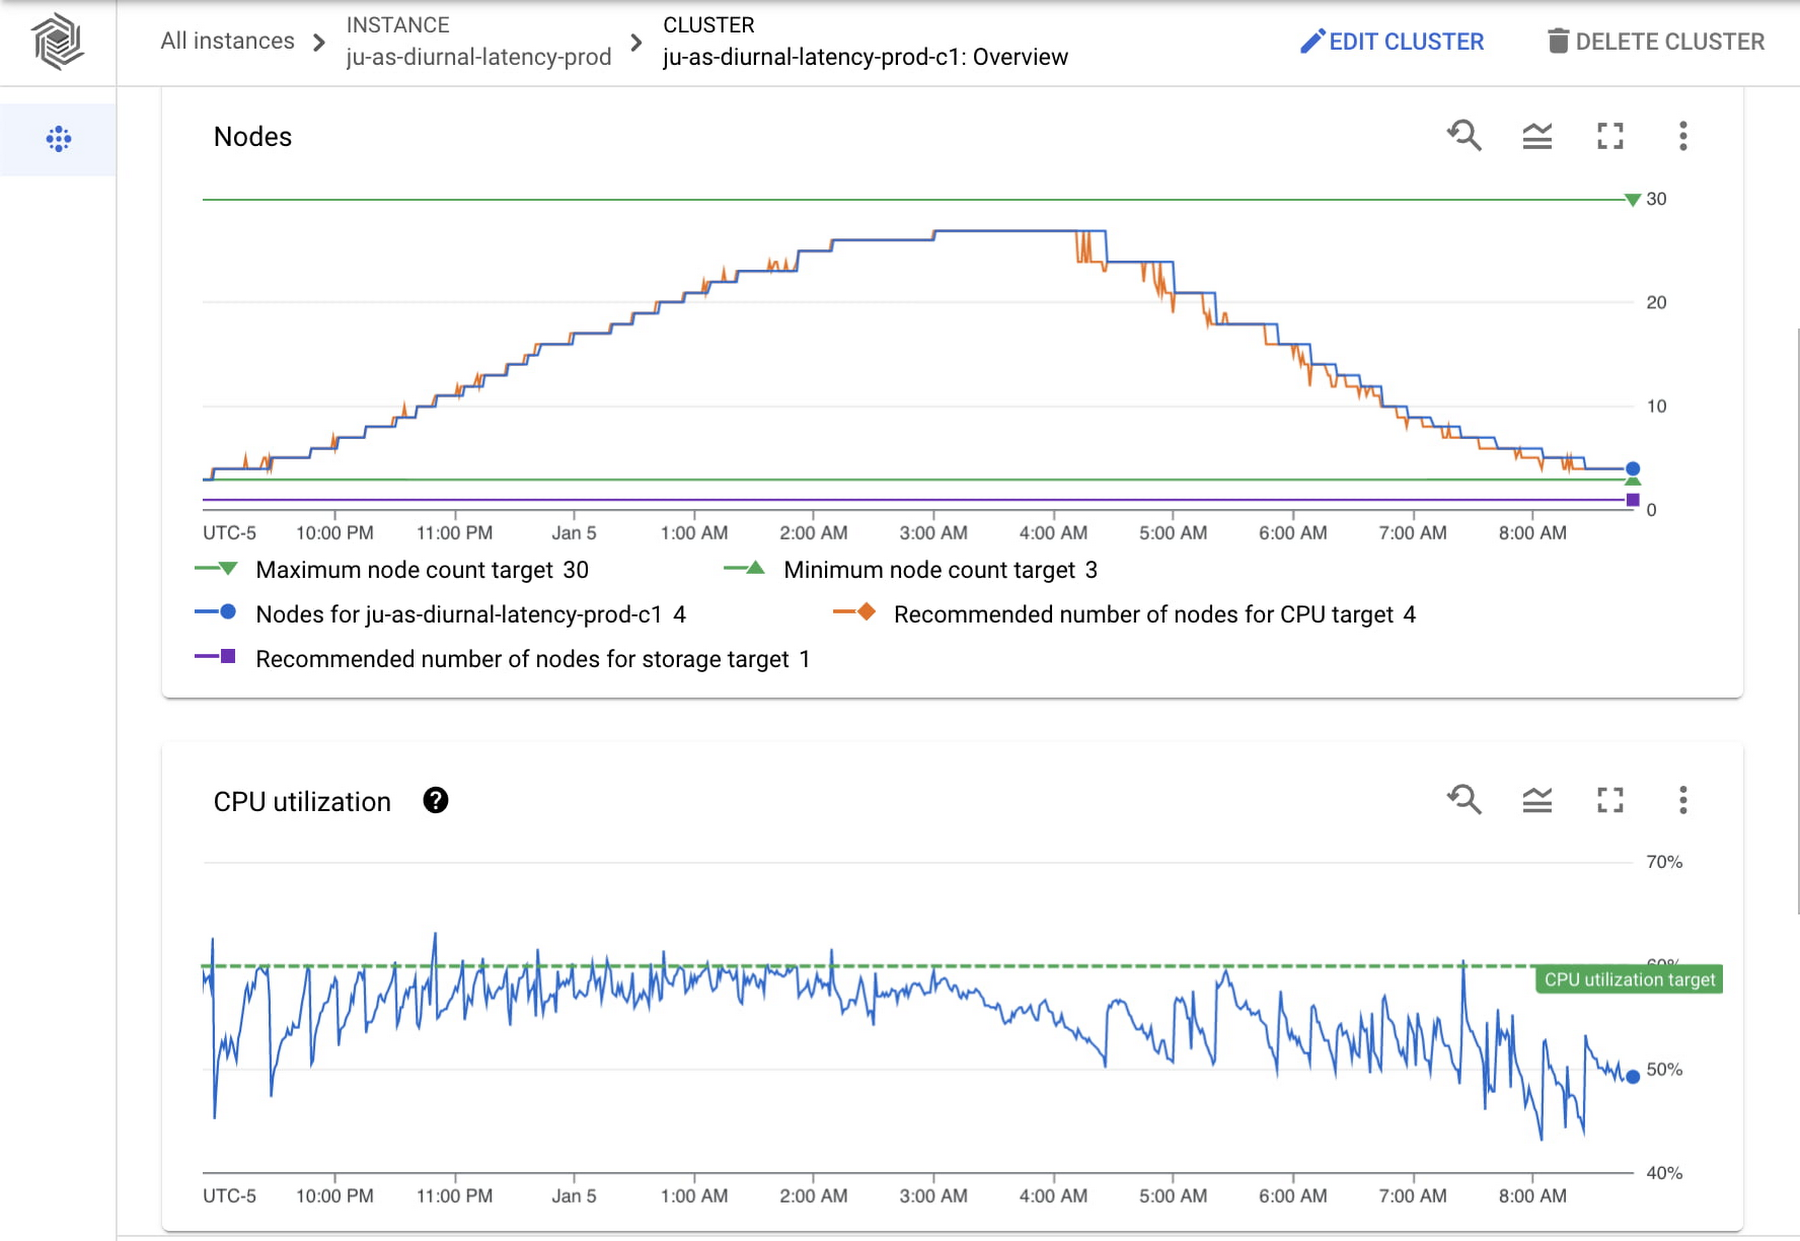

The node count graph shows a change from 3 nodes to 27 nodes and back down to 3 nodes over a period of 12 hours. The graph shows the minimum and maximum node counts configured as well as the recommended number of nodes for your current CPU load, so you can easily check that those are aligned. The recommended number of nodes for CPU target (orange line) is closely aligned with the actual number of nodes (blue line) as CPU utilization increases, since scaling up happens quickly to keep up with throughput. As CPU utilization decreases, the actual number of nodes lags behind the recommended number of nodes. This is in line with the Bigtable autoscaling policy to scale down more conservatively to avoid putting too much pressure on the remaining nodes.
In the CPU utilization graph we see a sawtooth pattern. As it reaches a peak, we can compare both graphs to see the number of nodes is adjusted to maintain the CPU utilization target. As expected, CPU utilization drops when Bigtable adds nodes and steeply increases when nodes are removed. In this example (a typical diurnal traffic pattern), the throughput is always increasing or decreasing. For a different workload, such as one where your throughput changes and then holds at a rate, you would see more consistent CPU utilization.
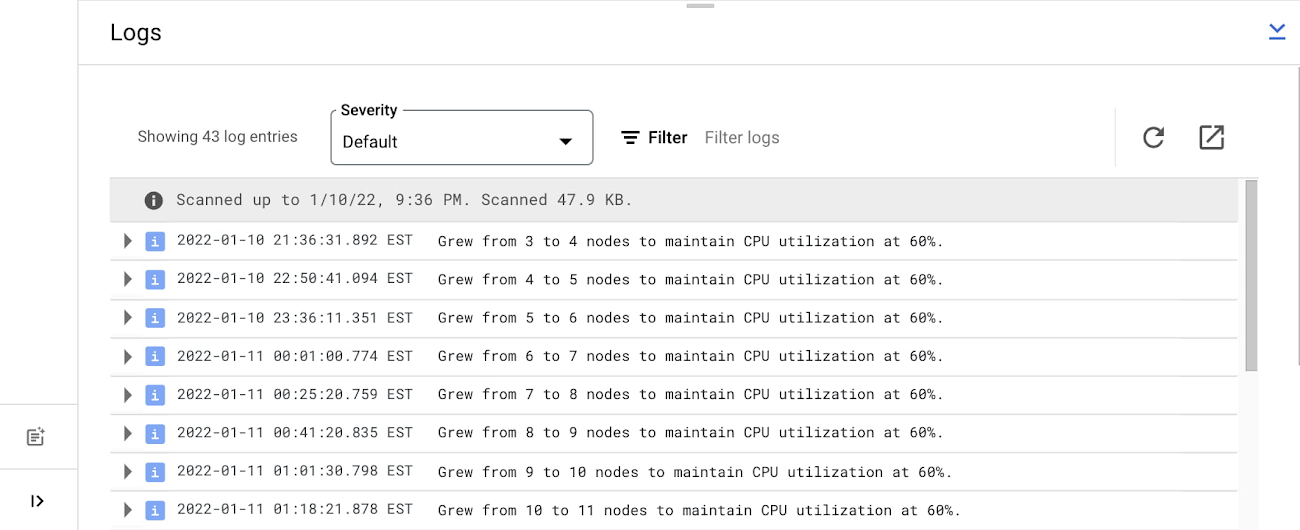
On the cluster overview page, we are also able to see the logs and understand when the nodes are changing and why.

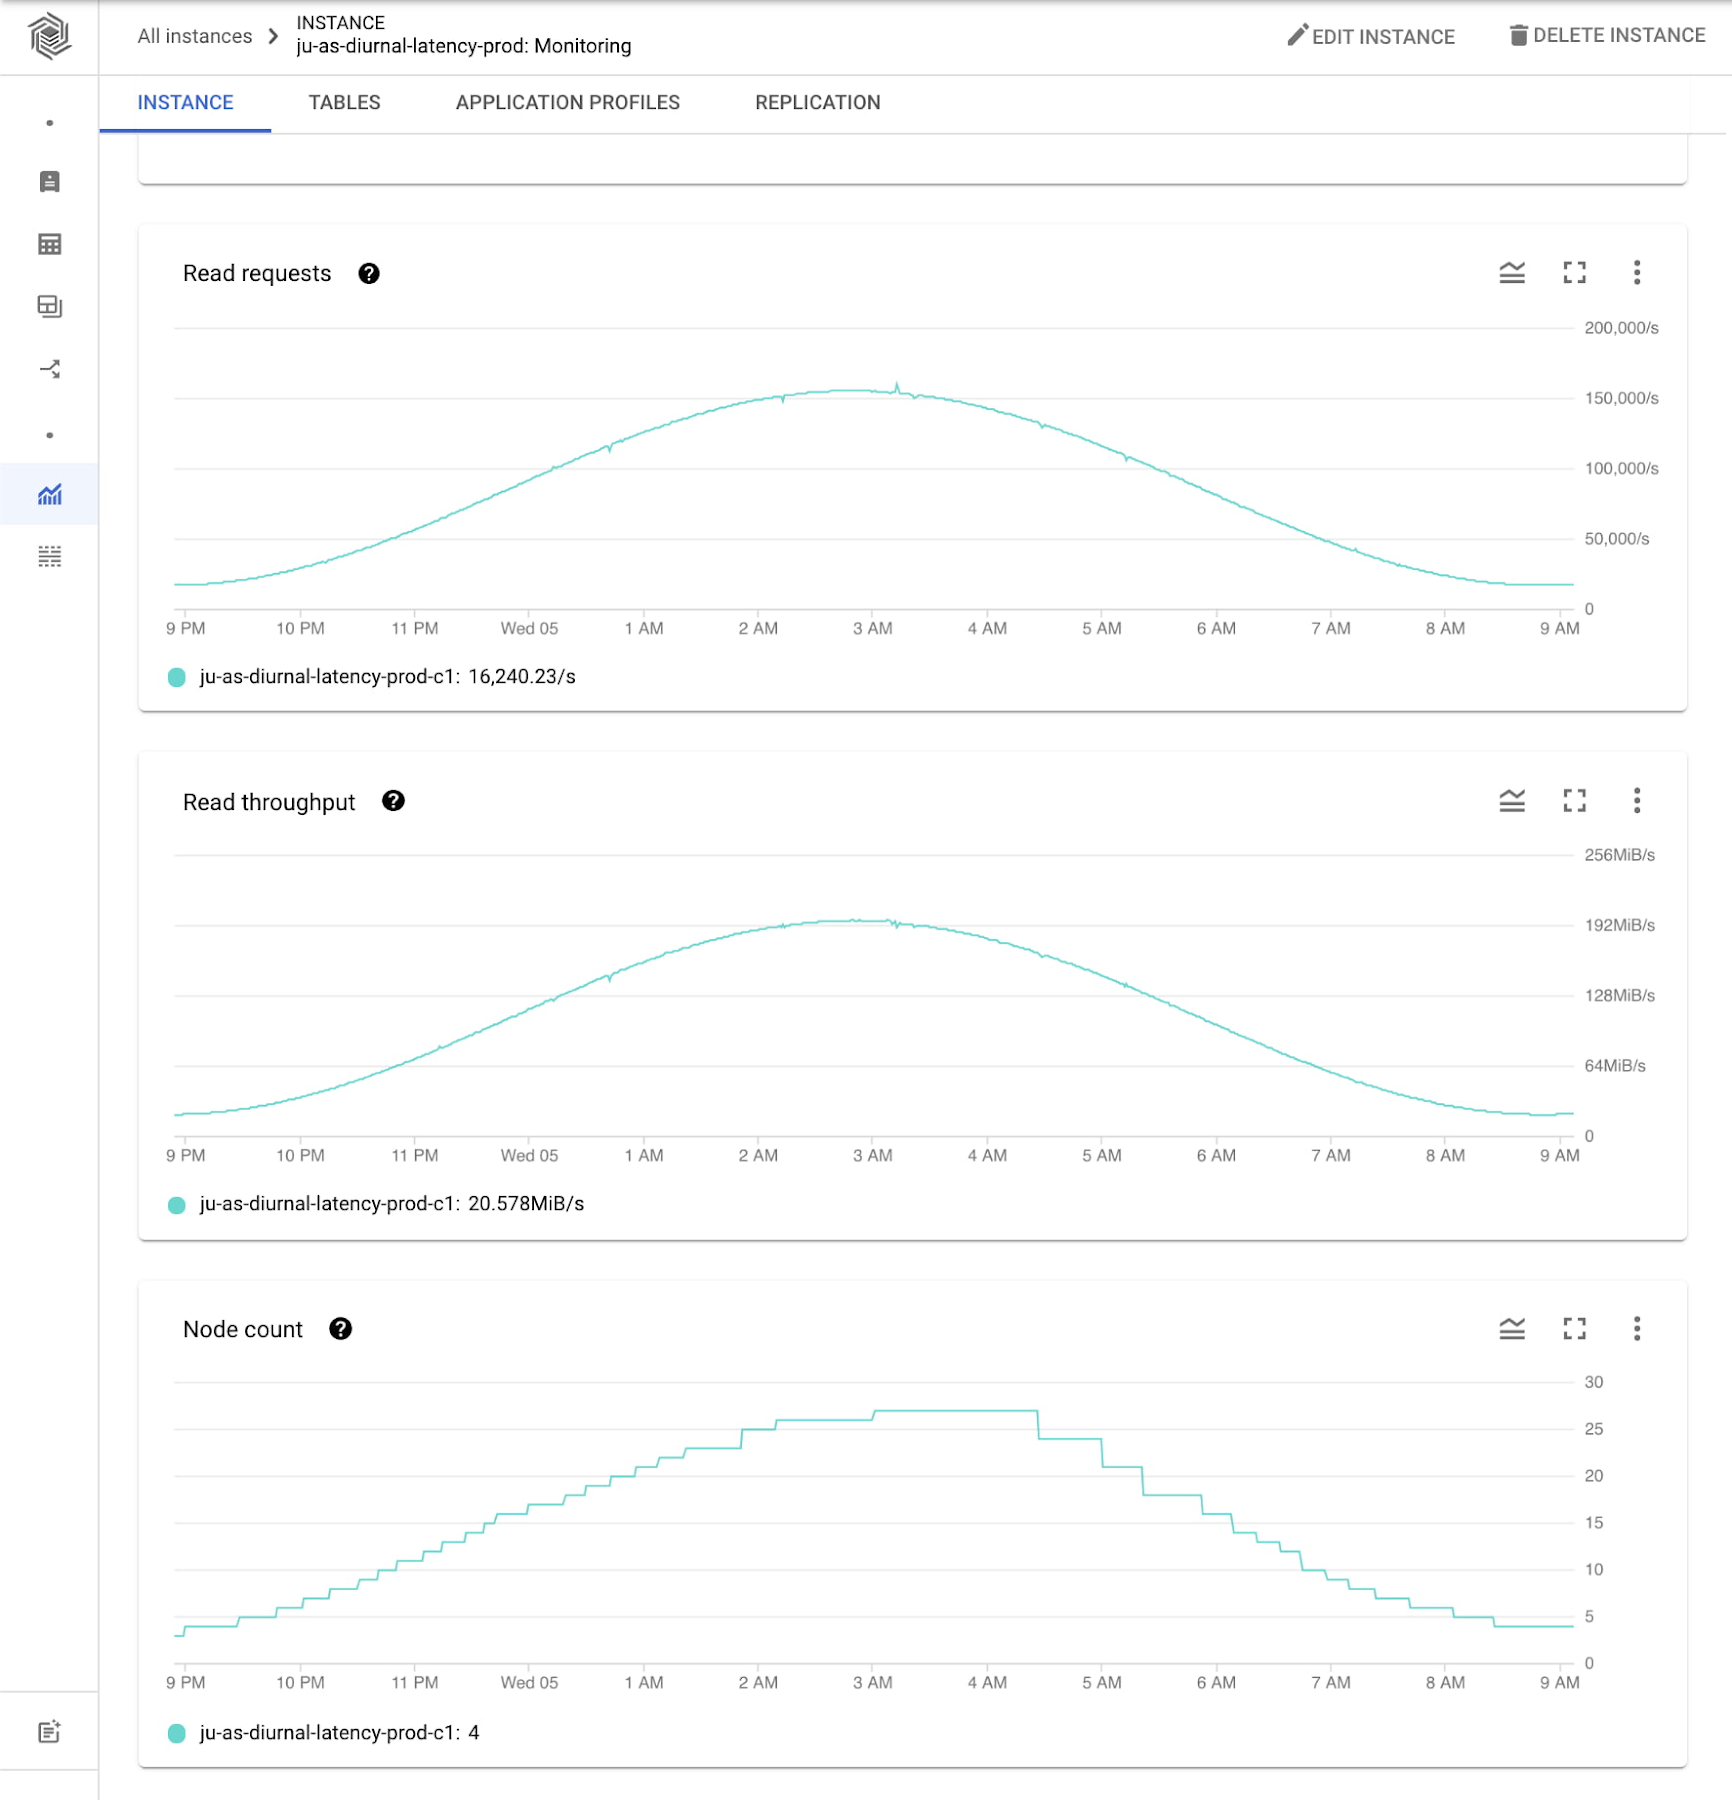
To get more insights, you can go to the instance monitoring view. Here we can see even more graphs showing the experiment workload activity. Note the diurnal traffic pattern mentioned above is in line with autoscaling behavior: as throughput increases, node count increases and as throughput decreases, node count decreases.

Cost evaluation
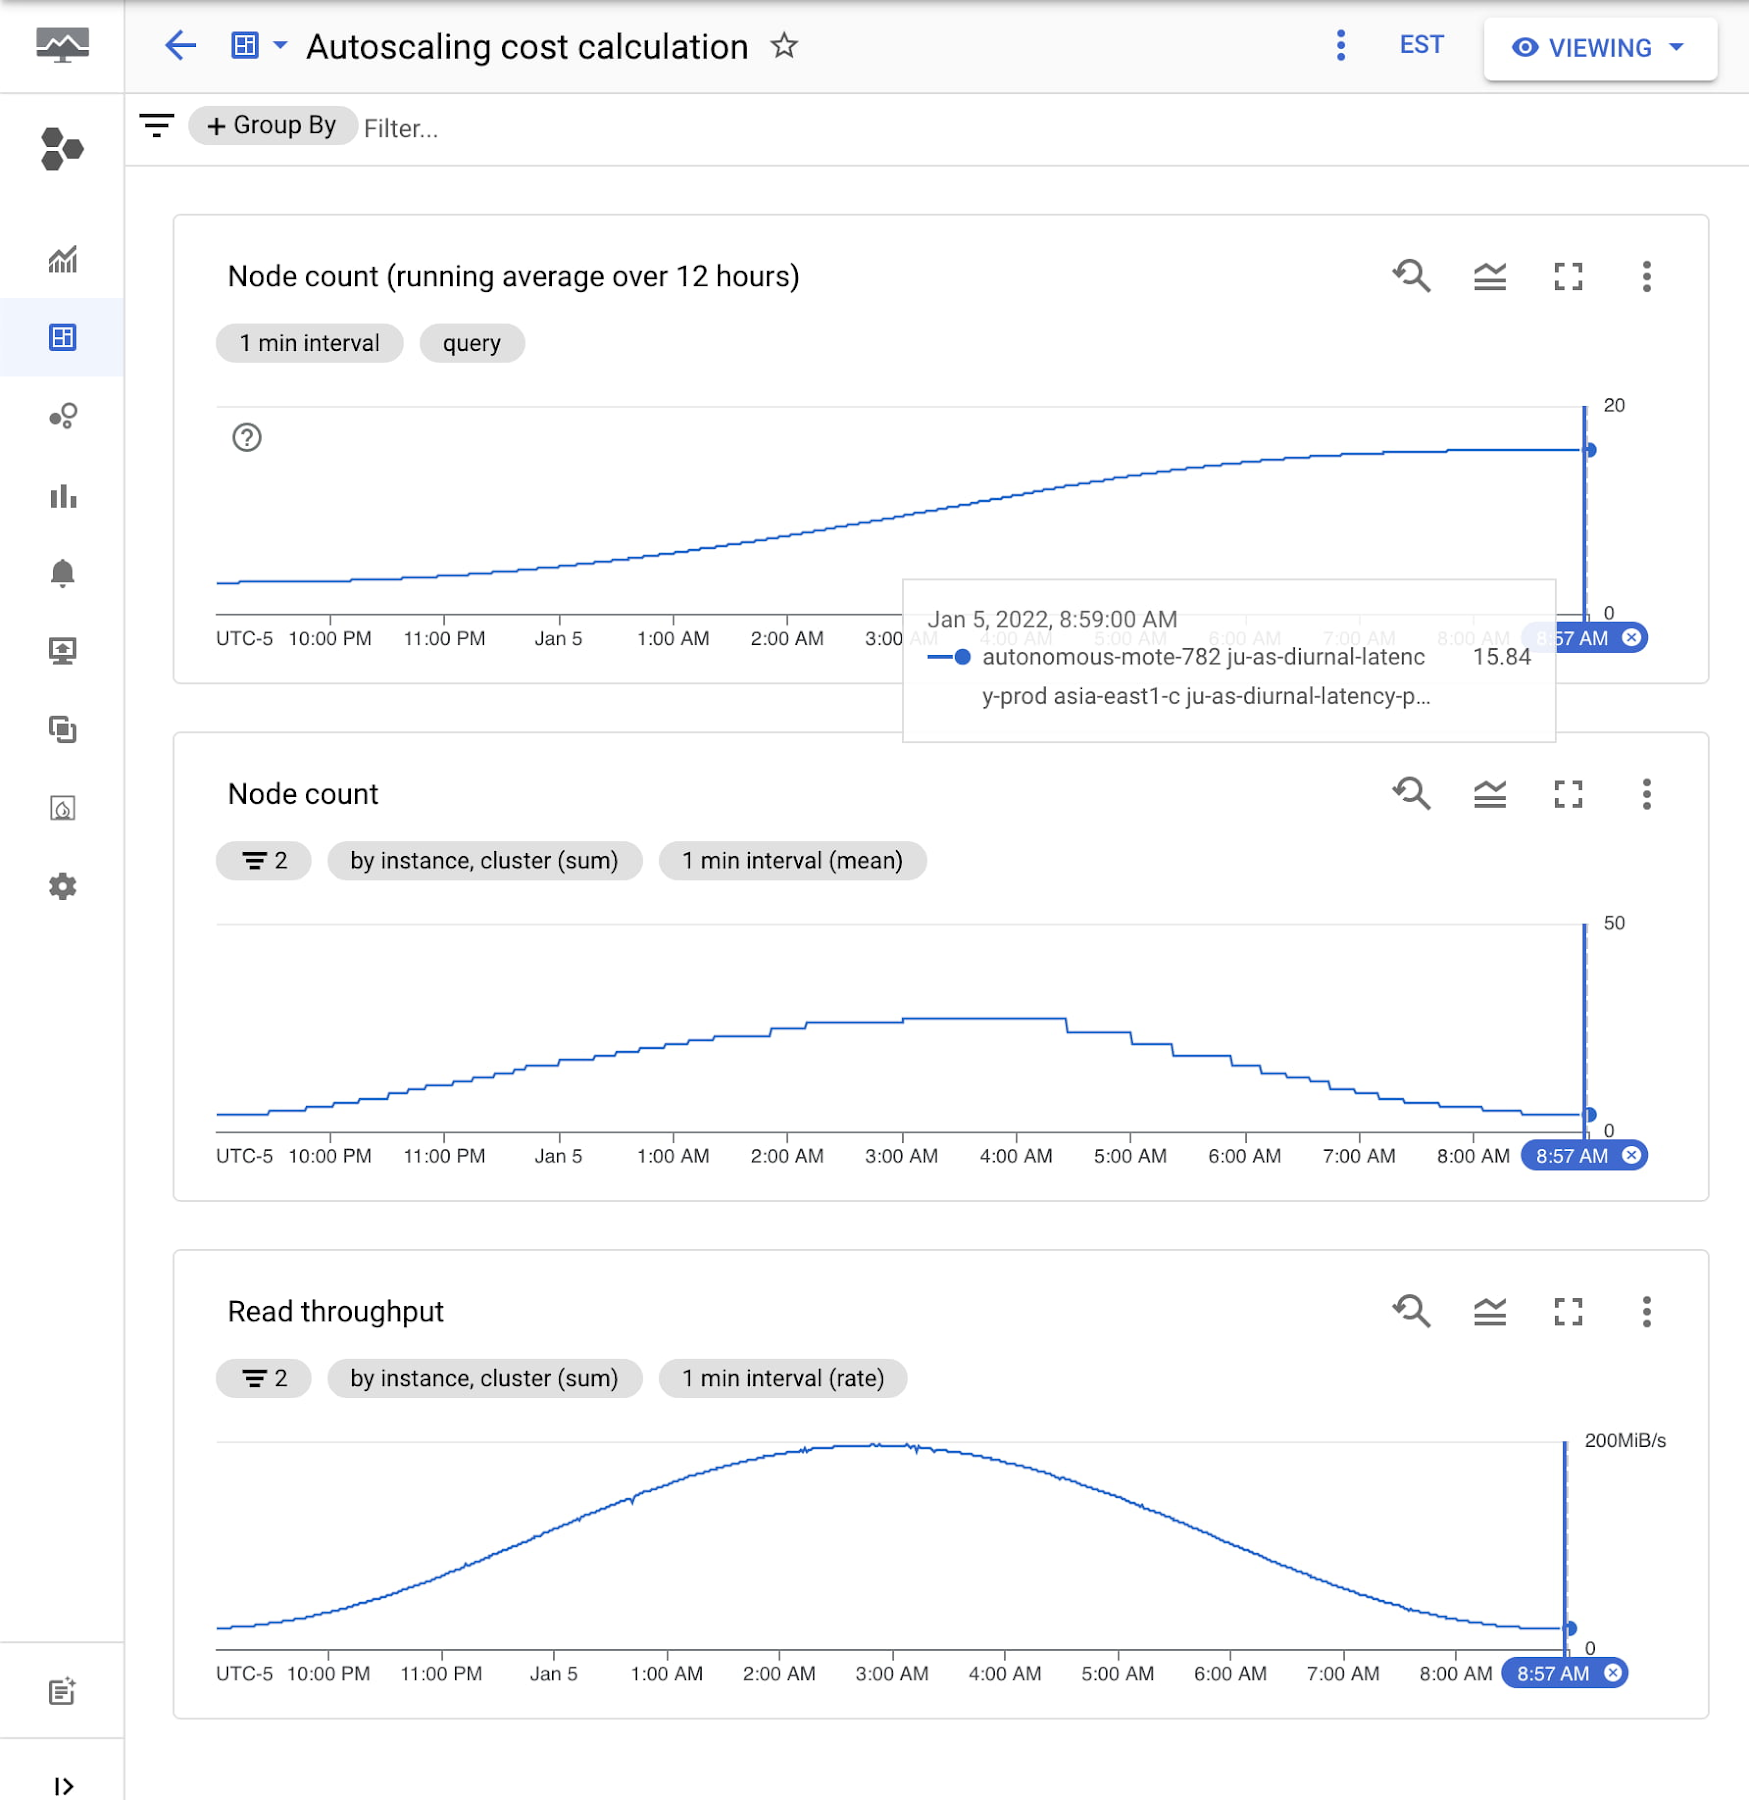

This experiment workload ran for 12 hours. Let's see how the costs would change for this scenario with and without autoscaling.
Assume a Bigtable node cost1 of $0.65/hr per node
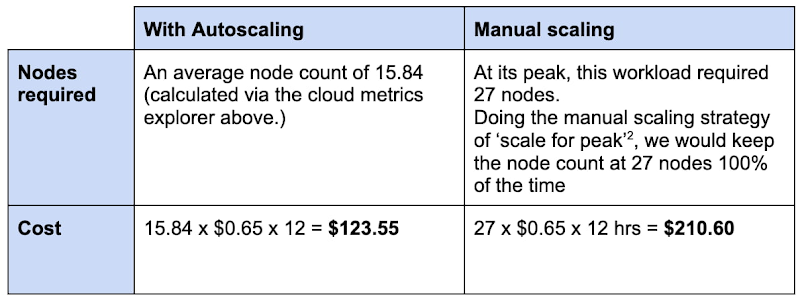

Comparing the number of nodes and cost when using autoscaling vs scaling for peak:
15.84 nodes on average for autoscaling / 27 nodes scaled for peak = .587
The number of nodes required is 58.7% of the peak when using autoscaling in this scenario. This is a potential approximate cost saving of 41.3% when using Bigtable native autoscaling in this example.
These savings can be significant when you're working with large amounts of data and queries per second.
Summary
Autoscaling with Bigtable provides a managed way to keep your node count and costs aligned with your throughput.
Get started: Enable autoscaling via the Cloud Console or command line.
Check performance: Keep an eye on your latency with the Bigtable monitoring tools and adjust your node range.
Reduce costs: While maintaining a 60% CPU utilization in our example scenario, the new cost on the diurnal workload was 58.7% of the total when compared to scaling for peak.
1. See Bigtable pricing: https://cloud.google.com/bigtable/pricing
2. ‘Scale for peak’ is the provisioning policy adopted by many DB operational managers to ensure the peak load is supported.
