How RealtimeCRM built a business card reader using machine learning
Ben Miles
RealtimeCRM
Lately, we at RealtimeCRM have attended a lot of networking events, and invariably we take home a small mound of business cards. Due to our own procrastination, the mound grows bigger and bigger until it consumes a sizeable chunk of desk space, at which point we finally take it on. The problem we face is that manually reading and entering the information on the cards is among the least interesting tasks imaginable, and it takes a really, really long time. Then we thought, what if we could just take a picture of a business card and then all the useful contact information we needed was automatically added into RealtimeCRM?
That’s how we came about creating our Card Reader. We thought it would be a great feature that our users would appreciate, too. In this post, we’ll take you through what we did in general terms, then for those of you who want to try this yourself, we’ll show you how we did it with an actual example script.
The problem
Up to this point, we needed a human to do the data entry. This is because a human can do two things that RealtimeCRM can’t:
- They can visually process the information.
- They can provide context for that information.
Therefore, they know where to enter the information to create a new contact record.
The solution
Google Cloud offers a range of tools to inject machine learning into your products to improve them. For us, there were two in particular that were of interest in solving the problem:So we’ve got the seeing part solved. We need to be able to “provide context” for the information we’ve pulled out. That’s where Cloud Natural Language comes into play. It can be used to recognise entities such as a person, location, or organisation—as well as the overall sentiment of a given block of text.
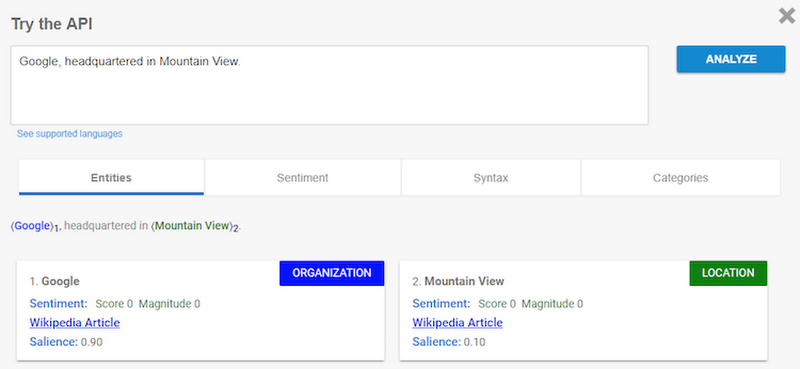
As you can see, Cloud Natural Language was able to recognise that “Google” is an organisation and that “Mountain View” is a location. So now we’re able to provide a context for the text we previously extracted using the Vision API, which is the missing piece in this puzzle.

What we need to do next is combine the Vision API and the Natural Language API so that we can do something useful: create new contact records in RealtimeCRM from business cards, just as the above flow chart demonstrates.
We know that Joe Example is a text string and that it is a name, so it should go into the name field in the contact record inside RealtimeCRM, and the other information on the business card naturally follows the same flow.
How we did it
RealtimeCRM is built in Javascript using NodeJS and React (via MeteorJS), so what we’ll provide here is a simple example of how this works that you can adapt into any NodeJS project.Preparation
First off, you’ll need a Google API key. If you don’t already have one, you can find instructions on how to create one here.
Step 1: Display an input
Let’s start with a simple image input. We want something that allows people to take images using their camera if they are on mobile, or select a file if they are on desktop. Thankfully, you can do this all with a simple HTML input.type="file" tells us that the input should be a file selector, accept="image/*" tells us it should be an image file and capture="environment" tells us that on mobiles that have two cameras (front and back) that it should use the back camera.
Step 2: Read the image file
There are many ways of reading a file from an input in JavaScript, depending on which libraries you are using, but we chose the standard JavaScript FileReader. We want to read the file and send it off for processing as soon as the user has selected an image/taken a picture so we do the following on the `onChange` event of the input. We also want the function to be asynchronous, so we use the async/await functionality.While developing, we realized that high quality images were taking a fair amount of time (up to 10/20 seconds) to process via Google Cloud APIs, so we decided we could reduce the quality of the images before we sent them to the API in order to reduce time and still get a good reading. For this we used the
npm package browser-image-compression. To install this, use the following command:Step 3: Interpreting the image
This is where the magic happens. Now we have our image as a compressed data, we can send its URL off to the Google API for processing. There are 3 steps to this: first, the Cloud Vision, which reads the text on the image, Cloud Natural Language to determine the context of the text, and our own special blend of regex and methods to pull out the information we need from the text given to us by the Vision API.Thankfully, Google have provided a handy `npm` package that wraps a lot of the boilerplate up for us. You’ll want to install both the Cloud Vision and the Cloud Natural Language client libraries.
Again, we need this to be an asynchronous function because we need to wait for the responses of the APIs before we try to do anything with the output responses.
Here are the regex functions we used to pull out information that has a good specified format (email, postcode, phone numbers and domain names). We remove anything we find from the string so that we can give a much clearer string to the Natural Language API:
Here is the function that does the actual parsing of the image: