ゲスト投稿 : Weave Cloud と Kubernetes Engine による継続的デリバリ、モニタリング、アラート機能を無料枠で活用する方法
Google Cloud Japan Team
編集部注 : 今回は、Google のパートナーである Weaveworks の投稿をお届けします。Weaveworks は先ごろ、同社のコンテナおよびマイクロサービス管理ツールの Weave Cloud と Google Kubernetes Engine との連携を実現しました。この投稿を読めば、Weave Cloud による Kubernetes Engine へのアプリケーションのデプロイとモニタリングが簡単なことをおわかりいただけるでしょう。
私たち Weaveworks は、Kubernetes ベースのアプリケーションを開発、運用する開発者の支援を目標にしています。Weave Cloud にサインアップすれば、開発者は誰でも Git リポジトリを接続して、継続的デリバリ、モニタリング、ダッシュボード、アラートといった機能をすぐに利用できます。
私たちは最近、Google Cloud Platform(GCP)のユーザー向けに Weave Cloud の無料利用枠の提供を開始しました。この無料枠と GCP の無料枠とを組み合わせれば、開発および運用の強力なスタックが得られます。Kubernetes を使い始めたばかりの方は、Kubernetes ベース アプリケーションの開発を始めるにあたって、そうしたスタックを利用できます。
Weave Cloud は、Kubernetes の強力な自動化と Weaveworks の継続的デプロイ サービスを提供します。開発チームと DevOps チームは、クラスタ内のすべてのサービスの継続的デプロイ、ビジュアルな管理、モニタリングを行うことができ、その恩恵を受けられます。すなわち、継続的デプロイによって開発をスピードアップし、自動化によって多くの時間を開発に振り分け、高度な監視によって問題解決を迅速化し、信頼性の向上につなげることができるのです。
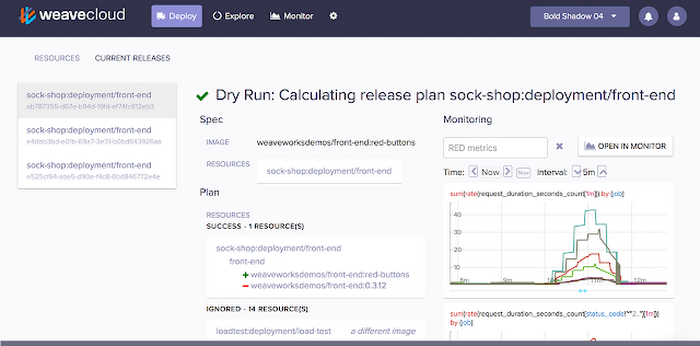
下のスクリーンショットは、ダッシュボードを使ってデプロイが行われることを示しています。このダッシュボードでは、新しいコードがパフォーマンス向上に貢献しているか、もしくはロール バックする必要があるかをチェックします。
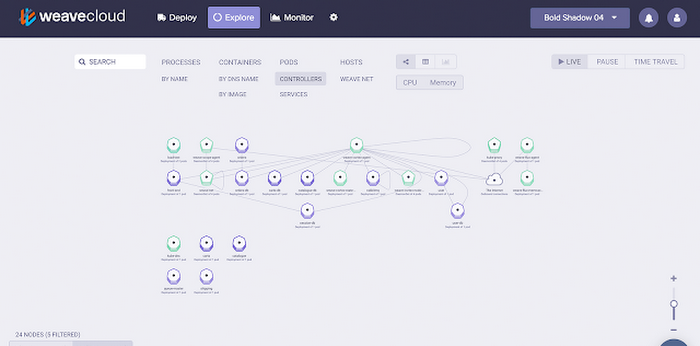
また、クラスタとその上で動くマイクロサービスを Weave Cloud で監視し、掘り下げて調べることも可能です。この機能は、アプリケーションの状態把握やトラブルシューティングに効果的です。
下のスクリーンショットは、Kubernetes クラスタとその上で動くアプリケーションのインタラクティブ マップを Weave Cloud Explore で表示しているところです。
Weave Cloud と Kubernetes Engine を使い始める
Weave Cloud に接続し、継続的デリバリ、モニタリング、アラートといった機能を Kubernetes Engine で利用するには、いくつかの簡単な手順を踏むだけです。Weave Cloud の利用を申し込む ― Weave Cloud は Google Cloud Launcher から導入できます。Cloud Launcher には、GCP 用にあらかじめ構成された開発スタック、ソリューション、サービスが多数登録されています。Cloud Launcher で Weave Cloud を検索し、利用を申し込みます。
Standard サブスクリプションでは毎月 1 ノードを無料で利用できます。
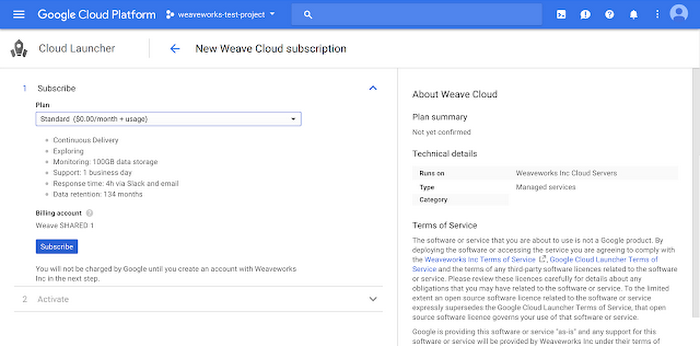
Weave Cloud の権限を設定する ― Weave Cloud の利用を申し込んだら、自分の Google アカウントでログインできるようにし、Google 経由で課金されるように自分のサブスクリプション データの閲覧を Weave Cloud に許可します。

Weave Cloud エージェントを Kubernetes Engine クラスタに追加する ― Weave Cloud は、Kubernetes Engine クラスタで動作するエージェントを介して機能します(まだクラスタを持っていない場合は、Kubernetes Engine クイックスタートに沿って作成してください)。次に、自分に固有のサービス トークンを含むコマンドをコピーし、クラスタ内で実行します。
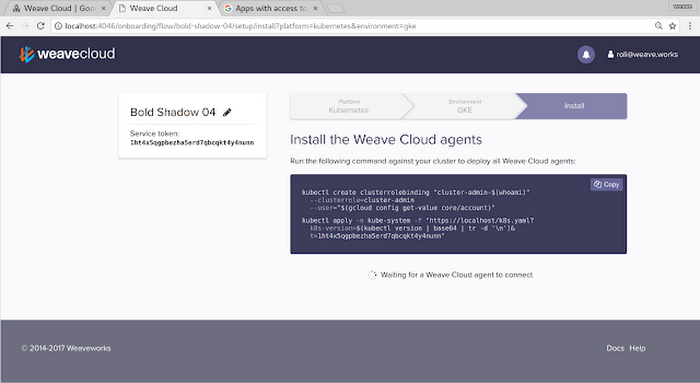
これで準備完了です。エージェントが接続されると、すぐに Weave Cloud 上で見えるようになり、Explore 機能を使って Kubernetes Engine クラスタの監視を開始できます。また、コミットされたコードを自動的にクラスタにデプロイする継続的デプロイメント パイプラインを作成できます(そのための手順は Weaveworks GCP ページをご覧ください)。
ここまでの説明がわかりやすく、スムーズに伝わり、お役に立つことを願っています。また、皆さんからのフィードバックを楽しみにしています。お困りの際はいつでもご連絡ください。Slack か Twitter でどうぞ。
* この投稿は米国時間 2 月 2 日、Weaveworks の COO である Steve George 氏によって投稿されたもの(投稿はこちら)の抄訳です。
- By Steve George, COO, Weaveworks